SEARCH FINESCALE.COM

Enter keywords or a search phrase below:

Weekend GB: See you in November!

15454 views
403 replies
1 rating 2 rating 3 rating 4 rating 5 rating
  • Member since
    March 2008
Posted by Caveman on Wednesday, December 12, 2018 8:57 PM

Holy crap!  I can finally log in again.  That was a pain.

Great builds guys.  Gutsy rigging a bi-plane.  Now that I know the forum is working again I will get one out this weekend and more to follow.


  • Member since
    July 2014
Posted by modelcrazy on Tuesday, December 11, 2018 1:15 AM

Great veriation on the wingd BD Yes Looks sharp.

Steve

Building a kit from your stash is like cutting a head off a Hydra, two more take it's place.


http://www.spamodeler.com/forum/

  • Member since
    January 2015
Posted by BrandonD on Monday, December 10, 2018 11:55 AM

As promised, here are some better pics of my Yak-1b. One day I will figure out how to do white balance and properly use my camera, but that day is not today. 

Yak1b 04

Yak1b 06

Yak1b 06_1

Yak1b 05

Yak1b 01_1

Thanks again for having me. And let's go with pic one for the front.

-BD-


  • Member since
    January 2015
Posted by BrandonD on Monday, December 10, 2018 11:52 AM

Lost - great job on the SPAD. I saw you doing a biplane for the weekend build and thought, "Yeah...this guy's crazy." But you nailed it, rigging and all. And not on a kit with good fit to begin with, so well done.

-BD-

  • Member since
    January 2006
  • From: California
Posted by SprueOne on Sunday, December 9, 2018 6:18 PM

lostagain

Nice work Greg, you got in just ahead of me!

Here is my offering...


BTW, good one, lostagain Beer

Anyone with a good car don't need to be justified - Hazel Motes


Iron Rails 2015 by Wayne Cassell Weekend Madness sprueone

  • Member since
    July 2014
Posted by modelcrazy on Sunday, December 9, 2018 5:34 PM

lostagain
and Steve is a great source of knowledge!

Pfft, I wouldn't go that far Propeller

Steve

Building a kit from your stash is like cutting a head off a Hydra, two more take it's place.


http://www.spamodeler.com/forum/

  • Member since
    April 2014
  • From: Australia
Posted by lostagain on Sunday, December 9, 2018 5:19 PM


Thanks Guys, thought I had a shed load of time until it came to putting on the top wing and rigging! There are times when an extra hand, good eyes and steady fingers would be a good thing…


BD, think I said it before, but it bears saying gain, super result on the YAK. The fine work on the white lines around the tail got you a great result. Only minutes waiting to mask lacquers? That’s amazing, I gave the acrylics at last a couple of hours. When I do gloss, I wait for at least five days… Great colour scheme too, the decals pop on the dark background.


Hey SD, too bad the T-80 didn’t come through in time, but there were a lot of issues for you to get through in the 48 hours. Look on the bright side – you have a great model to show for it and now you have to build another one!


BH – I had forgotten that tradition you just made up about celebrating the successful completion of a Weekend Madness build with a shot of your favourite libation. I had a glass of red wine, then another for your build, then one for BD, one for DB, one for BB and one for doobeedoobeedoo. That’s as much as I remember.


By the way, really like the Ha Go, the camo has come up beautifully. It is always great to pick up new techniques whilst we do the GBs, and Steve is a great source of knowledge!


BB – always impressed by anyone who can get a gloss paint job to dry in the 48 hours. The end result is fantastic. The Mustang is full of attitude and ready to go. And it’s great that you have a cat than can do headers…


DB The La 5 has come out really well considering your kit report on the way through. The finish is great and it looks the part. BTW, love the 4 things you learnt last weekend!


Once again Lew, thanks for running Weekend Madness, not sure I can fit another build in unless it is between Xmas and New Year. But I will be back next year and will start on the next Badge soon…


Piers


  • Member since
    December 2003
  • From: 37deg 40.13' N 95deg 29.10'W
Posted by scottrc on Sunday, December 9, 2018 11:26 AM

WOW, a rigged bipeplane in 48 hours.  I love how your Spad turned out Lost. 

  • Member since
    July 2014
Posted by modelcrazy on Sunday, December 9, 2018 10:35 AM

Oh wow Lost, that turned out excelent! 

Steve

Building a kit from your stash is like cutting a head off a Hydra, two more take it's place.


http://www.spamodeler.com/forum/

  • Member since
    April 2014
  • From: Australia
Posted by lostagain on Sunday, December 9, 2018 1:28 AM

In the closing stages, I remember how I don't like biplanes and rigging. This is not a Wingnut wings model, so there was a lot of slack in the struts and wings. My dryfit was cursory and I paid for it. To keep it all together a lot of tape and big lumps of glue were used. I am expecting to hear a big twang in the middle of the night as it all self destructs.


After a couple of points wishing for extra hands, the rigging was done and stable, prop and wheels were added and we are done! 47 hours to get this one done. Clock's a little fuzzy but you know you can trust me...

Lewbud, thanks again for another great Weekend GB, its always good to blow out the cobwebs for a fun result.

Thanks also to Brian who gave me the model as a present!

Now a chance to go back and enjoy the rest of the builds

Thanks

Piers

  • Member since
    April 2014
  • From: Australia
Posted by lostagain on Saturday, December 8, 2018 5:11 PM

Thanks Steve, I haven't done it much, happy with how it has come out

40 hours, decals on, even more colour:

  • Member since
    July 2014
Posted by modelcrazy on Saturday, December 8, 2018 10:31 AM

That looks fantastic Lost! I seem to have lost my nack for painting wood lately.

Steve

Building a kit from your stash is like cutting a head off a Hydra, two more take it's place.


http://www.spamodeler.com/forum/

  • Member since
    April 2014
  • From: Australia
Posted by lostagain on Saturday, December 8, 2018 7:08 AM

30 hours in, six colours done:

Got to go and pick up the better half from the work Xmas party now...

  • Member since
    April 2014
  • From: Australia
Posted by lostagain on Saturday, December 8, 2018 12:52 AM


Hey Steve, hope the Academy kit is better. This had flash, pin marks and short shots on the wings. Mold says Revell Inc, 1981.

24 hours down we have Colour No 3:

Wood work painted up:

Colour No. 4:

Colour No.5 and some rigging done:

Should have colour 6 and a gloss coat done tonight!

  • Member since
    November 2018
  • From: Saskatchewan, Canada
Posted by sickdude on Friday, December 7, 2018 9:45 AM
Wow, great cockpit! You said it GA!

William (Willy)

 
  • Member since
    July 2014
Posted by modelcrazy on Friday, December 7, 2018 9:43 AM

Cool subject Lost. I have the Academy kit and I'm sure it probably doesn't look much diffrent.....clearly an old mold.

Steve

Building a kit from your stash is like cutting a head off a Hydra, two more take it's place.


http://www.spamodeler.com/forum/

  • Member since
    April 2014
  • From: Australia
Posted by lostagain on Friday, December 7, 2018 6:55 AM

Yes Brandon, that cockpit is amazing, and you have managed to put together a plane around it to suit great job there.

I need to come back to all the builds - need to get on with what I have started at 6pm tonight (Friday):

Revell 1/72 Spad 13, and the moulding is pretty ordinary, loads of flash, the pilot looks like I don't know what. And it is a six colour camouflage scheme, out comes the blue tac!

Got five hours modelling in to get to here:

It's a start, just spent an hour trying to get Firefox and Finescale to talk, had to go onto Microsoft edge instead. Time for a sleep then a bike ridethen back to the next four colours...

  • Member since
    December 2003
  • From: 37deg 40.13' N 95deg 29.10'W
Posted by scottrc on Thursday, December 6, 2018 7:45 AM

Wow Brandon, really cool cockpit. 

  • Member since
    November 2003
  • From: Nashville, TN area
Posted by bobbaily on Thursday, December 6, 2018 6:37 AM

DasBeav-Thank you-cars take me back to my youth when I could put a kit together it a day-tube glue, brush painted body & all....not saying anything about the quality.  And thanks for the review on the La-5...I'm always looking for a good quality but less than difficult kit for future Weekend GB's

Brandon-outstanding job, especially in less than 48 hrs-I have the Accurate Miniatures version (w/skis) in the stash and was thinking about giving it a go later if time allows-now I'm looking for PE.....

Bob


  • Member since
    February 2016
  • From: Ice coated north 40 saskatchewan
Posted by German Armour on Wednesday, December 5, 2018 5:42 PM
WOW!! Nice markings! :)

 Never give up, never quit, never stop modelling.Idea


  • Member since
    January 2015
Posted by BrandonD on Wednesday, December 5, 2018 12:27 PM

Thnks, Lewbud.

Well, had a really minor surgery on Thursday last week, but it got me out of work on Friday, and I really couldn't do much other than sit around, so I decided to build my weekend kit.

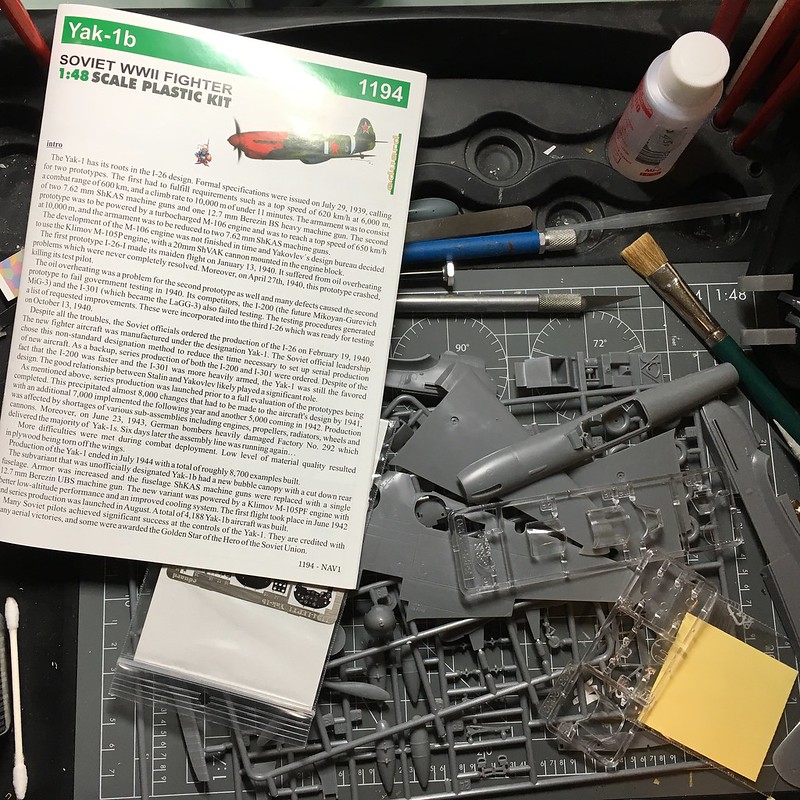
I went with the Eduard boxing of the 1/48 Accurate Miniatures Yak-1b. I chose this one because it (A) wasn't started and (B) has a beautiful bit of engineering where the spine of the aircraft is one piece like a turtleshell, so there is almost no fuselage seam to deal with, and that's what slows me down most on my builds.

Here's the starting pic. I kicked this off at 10 a.m. Friday.

Untitled

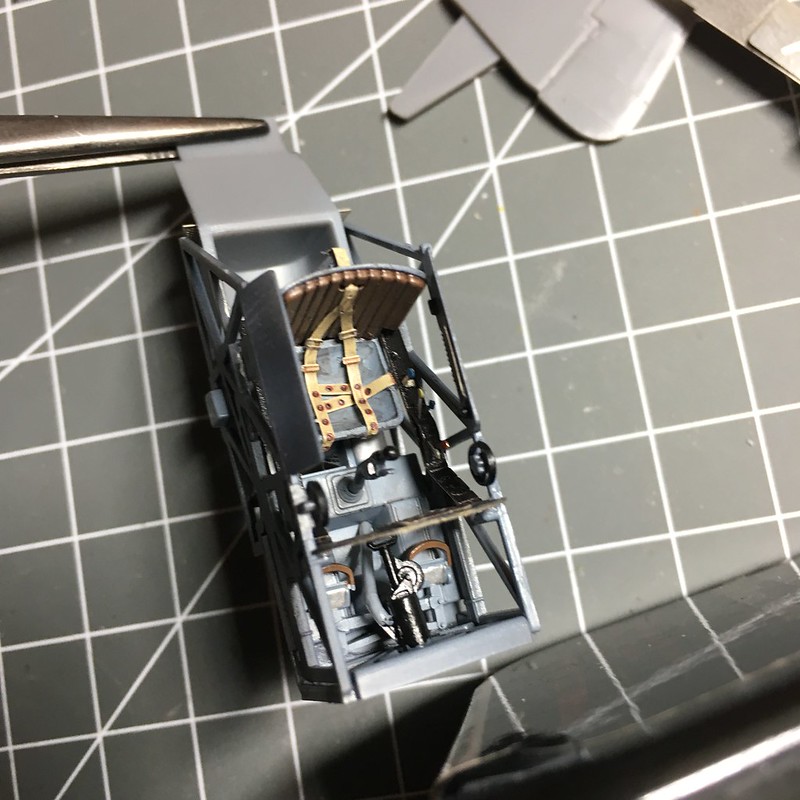
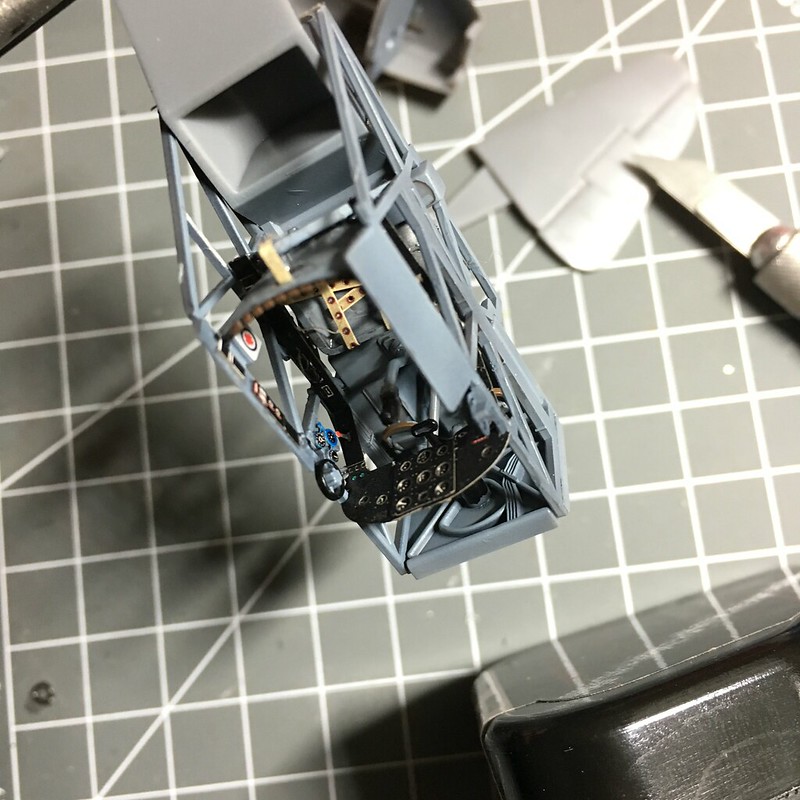
First order of business was to spray the innards, which are all one color. I used Mr. Paint USN Blue-Gray, then got to work with the photo etch that Eduard supplied with the kit. Between beautiful fit on the plastic parts and the PE, I had the cockpit and wheel wells done in a couple of hours.

Untitled

Untitled

Untitled

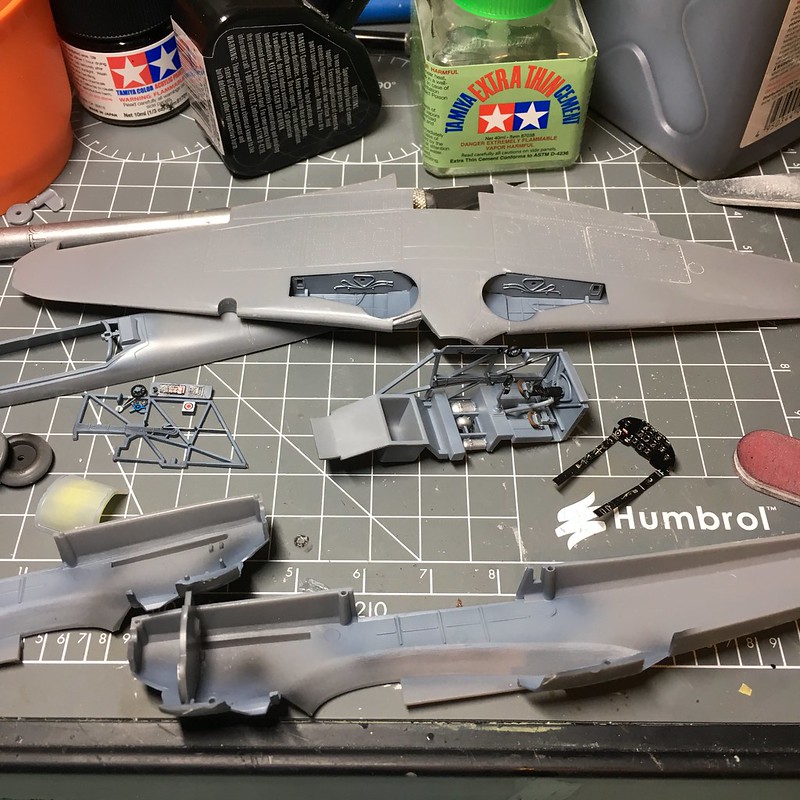
Then it was on to assembly. The wings took some coaxing to get the right dihedral, but that's aided by a spar that, though a little fiddly, was helpful in making sure I wouldn't run into a wing root seam later.

I had screwed up when I bought the kit and cut the turtleshell piece off the sprue - I removed a chunk of plastic. A little CA and accelerator, and I was able to sand it to an acceptable look.

My day one goal was to get the plane asembled and the tail feathers primed and painted white, because the scheme I decided to do required careful masking and I wanted the white paint more cured for that.

By the end of day one, I was there.

Untitled

One of the schemes offered was a plane with a striking tiger on the fuselage, and some cool striping. There is a lot of discussion on what colors this plane actually wore. Some say the tail is AMT-12 dark gray, while others say it's red. Also, there is debate on the spinner color, and the fuselage striping.

After reading up on it, I opted to go with a white stripe for the fuselage and a white spinner. That made the most sense, especially given the white leading edges of the horizontal stabilizers and spinner colors of other aircraft in this unit. Eduard provides a decal for the stripe in yellow, but given that ot's 0.9mm wide and is the demarcation between the tail color and the rest of the body, I was not about to try to use it. Plus, I wanted mine white.

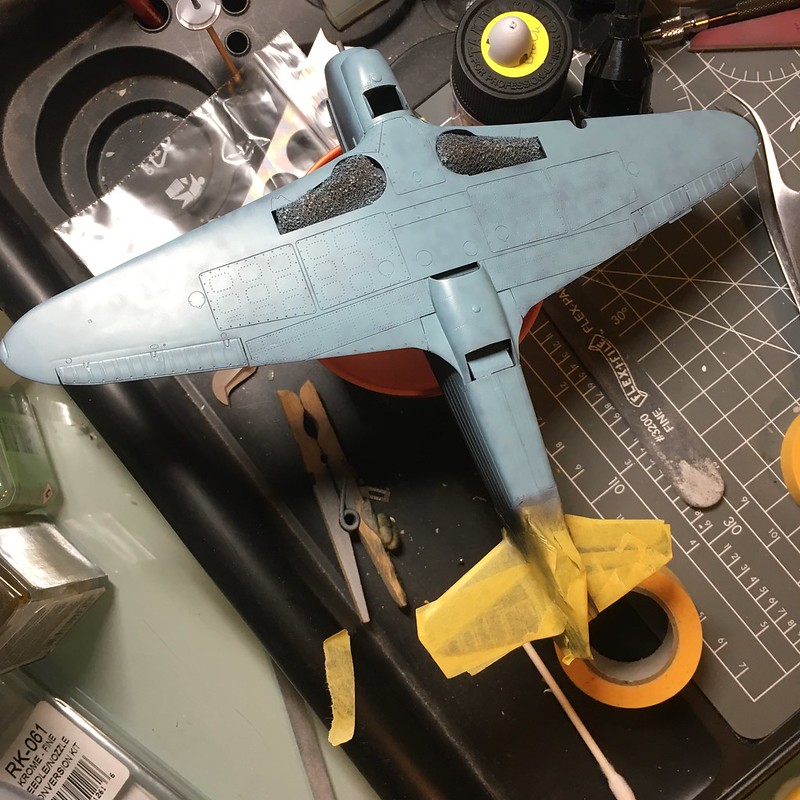
I used my Infini cutting mat to cut Tamiya tape to the perfect uniform thickness, and bent it around the fuselage in the pattern it needed to be in, then also masked the leading edges of the stabs.

Once done, I sprayed the tail AMT-12 dark gray.

Untitled

I love lacquers, because I was able to mask the tail about five minutes after spraying, with no paint lift worries.

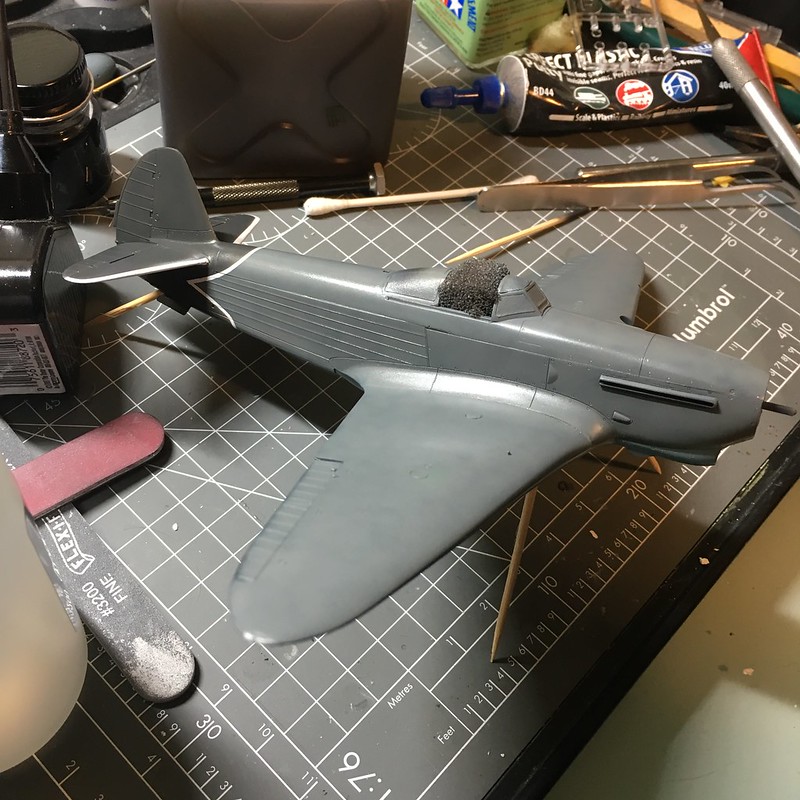
After that, it was on to AMT-7 gray blue for the underside.

Untitled

At this point, it was about 1 p.m. on Saturday, and I ate lunch, then masked the bottom and shot the AMT-11 blue gray topside color. Then, the moment of truth on the masking. After some very small touch-ups, it was a success.

Untitled

Amongst all this, I painted the wheels Tamiya rubber black and layed down primer, aluminum and clear on the prop, then hair spray, then Tamiya gloss black and chipped it.

Clear coats went down next. Even though Mr. Paint is smooth enough to decal without glossing underneath, I wanted to, given the complexity of the fuselage markings and knowing I'd need to play with them a bit.

Around 5 p.m., it was time for decals.

Untitled

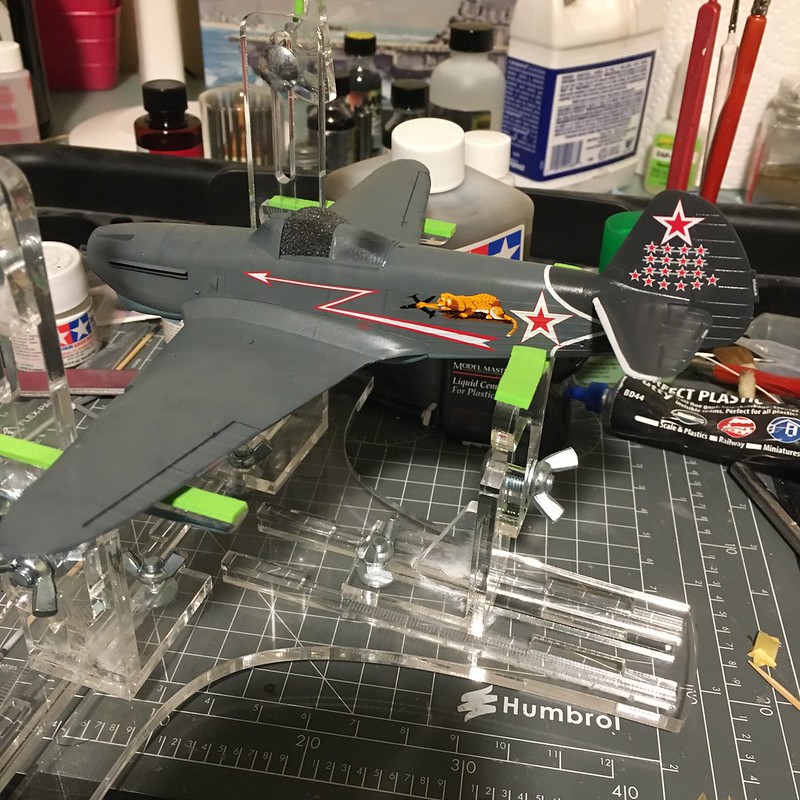
I broke the lightning bolt decal in the pic above, but thankfully it lined up perfectly when I coaxed it back together, and no one can tell. Gotta love Cartograf.

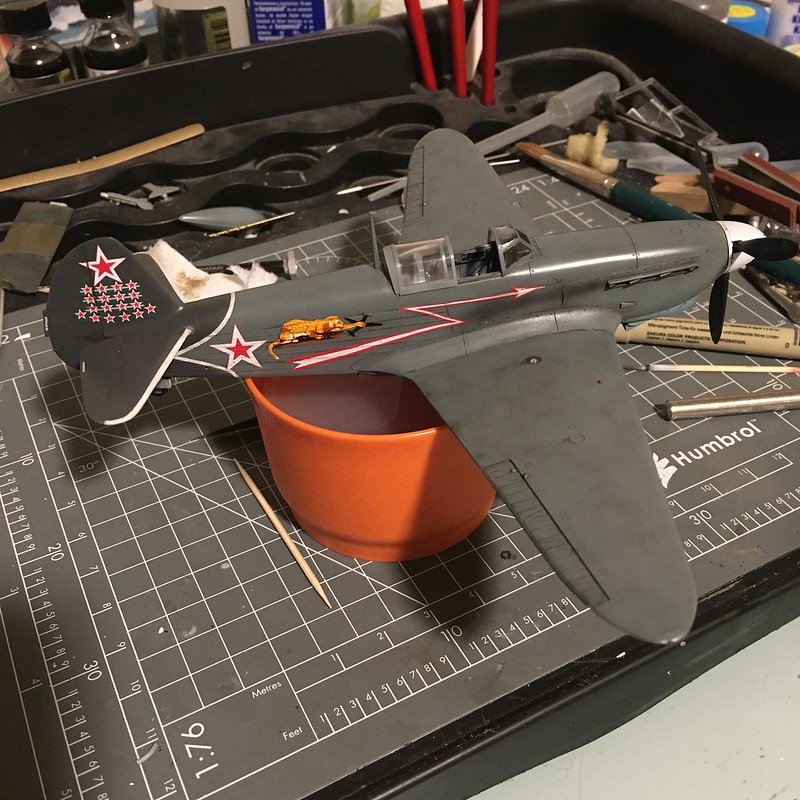
Once dry, I sprayed another gloss coat to seal them in, and then it was a flurry of weathering to get it grubbed up a bit. Flory Grime wash on the underside, Dark Dirt on the topside, and than I sealed those with a flat coat to knock down the shine. I attached the landing gear, and realized I'd put the legs on backwards. Yanked them, reattached them, and dropped CA onto them so it could stan don its own by the time it needed to be done.

Used an ink pen for some streaking, used Ammo engine oil for fuel leaks on the wings, spattered some Vallejo European splash mud on the underside, sprayed the exhaust stains with a mix of rubber black and red brown, used some dust pigments on the wheels, and beat up the wing root a bit with a silver pencil. I also stabbed at the cowling with a dark gray watercolor pencil for some discolored scratching effects and chipped it a bit with a sponge dipped in Testors silver.

Attached props, landing gear doors, radio mast, pitot tube, etc. Made a landing light by punching a piece of sheet styrene, installed it in wing leading edge, painted it silver, then added the glass. Removed masks, added cnaopy...and voila.

I finished at 9:58 p.m. Saturday, almost 36 hours to the minute after starting it.

Untitled

Thanks for having me, and sorry I didn't update as I went along. I was so focused on the build that I didn't drag out th ecomputer and make updates in the process.

I'll get better photos up when I can. Hopefully tonight, but I'm really having trouble getting the lighting right for decent shots with what I have lately.

This was obviously a bi tof a rush build, but it's one of my favorites that I've done, and after not finishing anything since September, it was a great feeling to roll one off the bench and toss the box.

-BD-

  • Member since
    October 2016
  • From: .O-H-I-O....
Posted by DasBeav on Tuesday, December 4, 2018 10:14 PM

Thanks everybody for the kind comments.

BobBailey, the HC La-5 is not he worst kit in the world. Has recessed panels and rivet lines. Average pit detail. Only one fit issue when you put the wings and the fuselage together. Only real beef was no guide pins or holes and the Prop pieces are kind of whack. Love the way the Mustang turned out. Makes me want to do a car!

BuffleHead, Like how the Ha-Go turned out. That was the first Tank model I ever AB. In the same scheme. They do not look alike, lol. I will be stealing that camo technique "youse guys" talked about.

 Sooner Born...Buckeye Bred.


  • Member since
    July 2014
Posted by modelcrazy on Tuesday, December 4, 2018 8:13 PM

Great looking tank SD. Be careful, Buddy will double dog dare ya.

Buddy, I'll be looking forward to that one.

Steve

Building a kit from your stash is like cutting a head off a Hydra, two more take it's place.


http://www.spamodeler.com/forum/

  • Member since
    September 2017
  • From: Netherlands
Posted by Sailing_Dutchman on Tuesday, December 4, 2018 8:10 PM

For my next build I will be tackling the Takom 1/32 Panther with interior.


  • Member since
    November 2003
  • From: Nashville, TN area
Posted by bobbaily on Tuesday, December 4, 2018 7:09 PM

Dutchman-I have to agree with everyone-great build!  Looking forward to seeing more of your work.

Bob


  • Member since
    June 2008
Posted by lewbud on Tuesday, December 4, 2018 5:58 PM

SD,

Great looking tank! I've added it to the front page. I look forward to your next build.

For my second attempt, I'm going to build the Platz 1/72 MQ-4B Global Hawk. Gunship gray with white wings. Don't know where I'm going to put her when she's done, the thing's a monster!

Buddy- Those who say there are no stupid questions have never worked in customer service.

  • Member since
    November 2004
  • From: Galloway,Ohio
Posted by Daddyman on Tuesday, December 4, 2018 11:20 AM

Sailing_Dutchman

I have finished a bit behind schedule, but it is finished:

I did not get this one done in time, so I will be re-joining this GB with another entry soon.


Dutchman, you may not have been on time but what a great build. I can't wait to see what you attempt next. 

Bill B 2.0

  • Member since
    November 2004
  • From: Galloway,Ohio
Posted by Daddyman on Tuesday, December 4, 2018 11:14 AM

scottrc
I had planned to build my SBD this weekend but a severe ear infection forced me to change that plan.  I hope to get on it next weekend.  I really, really, want to build this old Monogram kit in the worse way.

Hey, Scott.

Hope you're feeling better. Finding the perfect time to do this weekend build is part of the fun and frustration.

We've all started at different times and some, like yourself have run into issues getting started or with finding time once started due to things beyond our control. I'm wanting to start another kit on the weekend of 15/16 Dec but it looks like that may get rolled to the next weekend because of getting my daughter's senior pictures done and her college apps done and a ton of other family and personal stuff coming up.

Get well and get started. You can do it. Looking forward to seeing it done. My wife and daughter got me the same kit last Christmas.

Bill B 2.0

  • Member since
    September 2017
  • From: Netherlands
Posted by Sailing_Dutchman on Tuesday, December 4, 2018 9:58 AM

I have finished a bit behind schedule, but it is finished:

I did not get this one done in time, so I will be re-joining this GB with another entry soon.


  • Member since
    June 2008
Posted by lewbud on Monday, December 3, 2018 8:04 PM

Alright, alright, alright! NINE completed works of art. Way to go guys!

Scott,

Hope you get to feeling better soon. We'll be here.  


Buddy- Those who say there are no stupid questions have never worked in customer service.

JOIN OUR COMMUNITY!

Our community is FREE to join. To participate you must either login or register for an account.

SEARCH FORUMS
FREE NEWSLETTER
By signing up you may also receive reader surveys and occasional special offers. We do not sell, rent or trade our email lists. View our Privacy Policy.