SEARCH FINESCALE.COM

Enter keywords or a search phrase below:

Revell 1:83 Mayflower

50231 views
601 replies
1 rating 2 rating 3 rating 4 rating 5 rating
  • Member since
    May 2003
  • From: Greenville, NC
Posted by jtilley on Thursday, June 30, 2016 2:59 AM

Looks great, Steve. I see the reddish cast all right, but I think that's due to the camera.

Now, a bit of a wet blanket. As I understand it, the piece we're seeing is not the one you're going to incorporate into the model. When you do paint the quarterdeck "for real," watch out for those two little rectangular holes in the port side aft (just aft of the hole for the mizzen mast). If I remember right, they're locating holes for the ladder that leads up to the poop. There's likely to be a visible joint where the ladder stiles go through the hole.

Revell obviously was catering to the newcomer who might otherwise put the ladder in the wrong place. If I were you I'd snip the ends off the ladder stiles and fill the holes. If you do it carefully - before you paint the deck - it should be possible to make the holes disappear. I do believe you're capable of putting the ladder in the right place.

Looking great.

Youth, talent, hard work, and enthusiasm are no match for old age and treachery.

  • Member since
    December 2015
  • From: providence ,r.i.
Posted by templar1099 on Thursday, June 30, 2016 4:31 AM

Last pic is very good. To my eye the hatches could be flattened a bit, but then again the last deck I saw had 52 cards in it.

"le plaisir delicieux et toujours nouveau d'une occupation inutile"

  • Member since
    July 2014
  • From: Franklin Wi
Posted by Bakster on Thursday, June 30, 2016 4:35 PM

First... thanks to all that responded, and it's great to hear that you approve. 

JT: "Steve. I see the reddish cast all right, but I think that's due to the camera."

Agreed. The HDR process is a neat tool but it can really play havoc with color saturation and color shift. A person needs to fine tune things and that is something that I didn't worry too much about. It does need it though.

"Now, a bit of a wet blanket. As I understand it, the piece we're seeing is not the one you're going to incorporate into the model. When you do paint the quarterdeck "for real," watch out for those two little rectangular holes in the port side aft (just aft of the hole for the mizzen mast). If I remember right, they're locating holes for the ladder that leads up to the poop. There's likely to be a visible joint where the ladder stiles go through the hole."

That is correct, and thanks for mentioning that! I will check the fit of the ladder before I start the final paint process. I will fill the holes if there is too much slop. 

I am really glad that you mentioned that.  Good catch, JT.


  • Member since
    July 2014
  • From: Franklin Wi
Posted by Bakster on Thursday, June 30, 2016 5:22 PM

Rob:

"Now I'm not sure if the acrylic paint within the alcohol matrix will have issues seporating and or drying stangly"

This is true. We'll see I guess. I'll be sure to let you guys know if it goes weird on me.


Your process sounds good. Contests and all! You certainly have more control over where you want the accents to go too.


Since that you are doing this similar weathering process... I am curious about your approach to painting the coaming and hatchways? What color and such? How do you balance a weathered look on that in relation to the weathered deck? Can you share?


Thanks, Rob.


  • Member since
    December 2012
Posted by rwiederrich on Thursday, June 30, 2016 7:43 PM

Highlights.  Once you have the overall look..go back and dry brush highlights on the edges of hatches, bullwarks and any edge that would have eccessive wear and or sun exposure.  Not to mention, the highlights represent light reflection on those areas.

Remember, in a salty sun bleached environment everything weathers about the same...cept..for high traffic areas that may appear slightly lighter.  Most decks were exposed wood that possibly had oil applied for water repelling.  Holly stones were in use regularly to keep the decks clean and smooth...however, they did grey over time.  Hence the dark alcohol stain to mimic this condition.

Masking tape hatch covers...sprayed with a fine mist of this weathering solution look extremely real and naturally weathered.

The skies the limit....have fun.

Rob

  • Member since
    September 2012
Posted by GMorrison on Thursday, June 30, 2016 8:05 PM

Rob- I do not think that the Mayflower crew holystoned their decks.Pirate

The ship was apparently a whaler for some part of her life. That'll crud up a ship fast.

 Modeling is an excuse to buy books.


  • Member since
    July 2014
  • From: Franklin Wi
Posted by Bakster on Thursday, June 30, 2016 8:11 PM

Mm-k. I just need to sort out this last weathering bit and then finish this.

  • Member since
    February 2016
  • From: Western No. Carolina
Posted by gene1 on Friday, July 1, 2016 3:54 PM

Hi Steve, I just found your forum on the Mayflower. It is the big one isn't it? Mine is the little one. It is so nice if the deck lines are recessed. Your's looks great. It was a lot of work. I really liked your clear resin casting. If you can do that, you can do anything. I have trouble finding forums on this site. It is just me, not the site.

    If you do have recessed lines, I use a pencil like ,I forget who said to do, & blacken the lines after painting with tamiya deck tan & then a black wash over that. Then I come back with a fine brush & do individual planks. With the recessed line, it is easy to do one plank at a time. You don't need to do many to make it look good.  I did this a lot on my train layout buildings & they looked great.

   Where are you with your hull on the Mayflower? The little one had really bad fits on the rear & I filled in with strip plastic & filled & sanded & it still looks just fair.  Steve, I use denatured Alcohol to thin Tamiya & I even tried laquer thinner, like someone said & it works good. 

  • Member since
    July 2014
  • From: Franklin Wi
Posted by Bakster on Friday, July 1, 2016 9:17 PM

Hi Gene... I am glad that you found my WIP. Yes, mine is a long one, and I still have a long way to go.

I have the small one, and sadly, no recessed panel lines on the deck.

I have the hull glued together and painted. I am sorting out the deck weathering and then I will move to the hull weathering.

Thanks for your insights and tips!


  • Member since
    September 2012
Posted by GMorrison on Friday, July 1, 2016 9:21 PM

With respect to Gene, I can't reccomend the sharp pencil trick. Because of the way the plank joint is shaped, like an open groove, it's difficult not to get a pair of lines- one on each edge of each plank. I've had better results with a wash over a clear gloss coat, then wipe it off. Flat coat at the end after you've done all of your magic.

 Modeling is an excuse to buy books.


  • Member since
    July 2014
  • From: Franklin Wi
Posted by Bakster on Friday, July 1, 2016 9:28 PM

That is interesting GM. I hadn't realized the joint was shaped like an open groove.

  • Member since
    May 2003
  • From: Greenville, NC
Posted by jtilley on Friday, July 1, 2016 10:25 PM

During that period, and for centuries after, the usual practice was to plane the sides and ends of each plank at a slight angle, so there would be a V-shaped groove 1/2" or 3/4" wide at the top of each joint. Then the shipyard's caulker would come with his caulking irons, and pound strips of oakum (thin rope impregnated with tar) into the grooves. Caulking the decks of a good-sized ship was a huge job, and the professionals who did it were respected artisans. 

The idea was to form a slightly flexible joint between the planks that would remain watertight as the planks shifted due to the working of the ship and changes in the humidity.

When the caulker was done pounding in the oakum, he would use the other end of the mallet to scrape the joint more-or-less smooth. The result was that the joint might be a little lower than the surrounding wood - but not much. (On the other hand, in hot weather the caulking might swell a pile proud of the planks' surface - and get sticky, and stick to people's feet.

So neither countersunk or raised lines between planks are really accurate. But countersunk lines are easier to treat - with a very dark grey (not pure black, please) wash.

My favorite trick for planking wood decks is simply to run a fairly hard pencil around all four sides of each plank before I glue it down. That takes a pretty long time, but the result is worth it.

Quite a few years ago I happened to go on board the Cutty Sark just in time to watch a guy replace the planks on the forecastle deck. He used an electric drill with a spade bit to drill the counterset holes for the bolts that held the planks to the iron beams below, and then used an electric router to cut a rabbet along the edges of the plank. When he had all the planks on the forecastle deck in place, he picked up a caulking gun full of some modern black acrylic caulk and sqeezed it into the gaps. He also put a blob of the stuff into each bolt hole, and whacked a pre-cut, tapered wood bung into the hole. When all was dry, he came back with a belt sander and smoothed everything flush. The whole process, as I recall, took about a day. A seventeenth- or eighteenth-century shipwright would have turned green with envy.

Youth, talent, hard work, and enthusiasm are no match for old age and treachery.

  • Member since
    July 2014
  • From: Franklin Wi
Posted by Bakster on Saturday, July 2, 2016 1:35 PM

Say John, this is an excellent history lesson. I am a little smarter today as a result of it. I like the Cutty Sark story too! That had to be fun and interesting to see how they do it in today's time. Great info! Thanks for sharing all that. Yes

  • Member since
    May 2003
  • From: Greenville, NC
Posted by jtilley on Saturday, July 2, 2016 6:37 PM

We tend too often to forget just how smart those old shipwrights were. As another example, I recall a story that was told to my by the captain of North Carolina's reconstructed sailing ship, the Elizabeth II. Here's a link: http://www.roanokeisland.com/ElizabethTwo.aspx .)

The people who built this ship, in the 1980s, knew what they were doing. (They used an old phone pole for the keel - but why not?) One of their primary sources was the Seaman's Grammar, by Captain John Smith. (Yes, that John Smith.) It explains how to make a sheave for the main jeer bitt out of four pieces of wood. The workmen on the Elizabeth II project had a board that was big enough to make it out of one piece (and a wood lathe big enough to turn it), so they decided to do it that way. (After all, nobody would be able to see how many pieces it was made of.) A week or so after the finished ship started sailing, the sheave jammed. It had swollen out of shape in the sea air. So they made another one to John Smith's specifications. Thirty years later it's still working fine.

One of my favorite TV shows (though my wife can't figure out why) is PBS's "The Woodwright's Shop," with Roy Underhill. He builds furniture and various other stuff using nothing but hand tools - in many cases genuine eighteenth- and nineteenth-century ones. It's fascinating to see how those guys, in the days before electricity, were able to do such beautiful and elaborate woodworking without power tools. (I like Norm Abram's "New Yankee Workshop too, though.)

Steve, one of the photos on that link shows the Elizabeth II's main deck. The color of the planks looks remarkably like yours.

Youth, talent, hard work, and enthusiasm are no match for old age and treachery.

  • Member since
    September 2012
Posted by GMorrison on Saturday, July 2, 2016 6:55 PM

That's a good story about the sheave.

In architecture school we were forced to watch (among many others) a movie made by the Navy about building one of the ubiquitous two story barracks buildings.

Handtools only, right down to brace and bit, and mixing concrete in a hand powered mixer.

I did learn how to mark and make a stair stringer in my abbreviated try at being a carpenter.

On my research for my Viking ship, there was an explanation of how the builders made hull strakes.

In extremely dumbed down language, they took a piece of wood maybe 20 feet long. Tapered it at each end to account for both the decrease in beam and slight upsweep along the thwarts, made a dado all along the top outer edge, and the bottom inner edge for the lap, and this is where I shake my head. The method for building the ship was not to build a frame of ribs, frames etc. but to nail together all of the strakes first in a form, and then fit the ribs from the inside. In order to attach the hull to the ribs ,in the coarse of shaping the strakes, a pair of raised (what, Tilley?) cleats were created at each future rib location, bored with holes, and ultimately used to lash the hull strakes to the ribs.

As Mr. Hilborn told us boys in 8th Grade shop- "it's easy to take wood away but it's real hard to put back".


 Modeling is an excuse to buy books.


  • Member since
    July 2014
  • From: Franklin Wi
Posted by Bakster on Saturday, July 2, 2016 8:37 PM

This is a great time to reflect on these things as we approach Independence Day. That looks like a very cool place to visit, John.I have bookmarked it. One of these days I really need to take trip east and visit these historic areas. Thanks for sharing all that John! Oh, and BTW. I have watched some of those shows too. Interesting stuff.

This must be the image you are talking about. I see a resemblance as well.

  • Member since
    July 2014
  • From: Franklin Wi
Posted by Bakster on Saturday, July 2, 2016 8:41 PM

That is interesting stuff as well, GM. You guys are really bring it. Smile


  • Member since
    February 2016
  • From: Western No. Carolina
Posted by gene1 on Sunday, July 10, 2016 10:34 PM

GM, It sounds like we have been down the same path in life. Design & building were a 40 year adventure for me. I really enjoyed it the most early on before the government got their grubby little fingers in everything & it took 6 weeks & $6000 + to get a permit. 

   My brother & I retired & moved to heaven (No. Carolina ) & got our own home permits in 15 minutes for about $125. 

   On those small models I have been building I still have the drafting lead holders & an electric sharpener & it works great on those small deck grooves. Probably not on the larger scales. On my wood Constitution I  put black thread between eack plank. I then sanded & sealed it. Looks great.

  GMorrison, I am now building the Airfix Wasa & I will put individual sail ties on it, if I use sails.  Promise......    Gene

  • Member since
    May 2003
  • From: Greenville, NC
Posted by jtilley on Sunday, July 10, 2016 11:14 PM

Gene, where in North Carolina do you live? I'm in Greenville.

Youth, talent, hard work, and enthusiasm are no match for old age and treachery.

  • Member since
    September 2012
Posted by GMorrison on Monday, July 11, 2016 1:49 AM

I worked on a nice building, the Wachovia Headquarters, up in W/S.

I probably went out there six times. I very much liked old Salem, and we did pretty nice work in the tower.

I really wanted to get over to Asheville, to see the Biltmore, but it was a little too far for the rental agreement.

http://www.debranicholsdesign.com/project.aspx?pid=177

That design was based on the Moravian star, from old Salem.

 Modeling is an excuse to buy books.


  • Member since
    July 2014
  • From: Franklin Wi
Posted by Bakster on Tuesday, July 12, 2016 3:53 PM

Not that anyone is waiting with bated breath, but it has been a bit since my last update.

Work continues on refining the old wood process. The last image that I posted was with the piece looking acceptable to me, but duplicating that look consistenly has been problematic.

The problem has been in getting the right mixture for the brown wash. If you recall the brown wash gives the piece some added wood tones. The color saturation has to be spot on because the dye wash does very little to filter the color below it. If there is slightly too much paint, then I lose the old wood look when the dye is applied. And if you go with too little brown, then you can't see it much.  Along with that, the dye seems to do it's best magic when it is applied to a white base, or a light gray. If there is too much color, the effect becomes much more subtle. Finding that happy ground has been a challenge, and it really is a delicate balancing act. I will admit though, I am pretty picky with the look that I want.

The good news is that I seem to have a process nailed down that will give me the consistent results that I am looking for. Having accomplished that, I can move forward with getting the grating/coaming the way that I want it.

Hopefully in a week or so I will post some pictures of the finished pieces along with the noted changes that I made.


  • Member since
    July 2014
  • From: Franklin Wi
Posted by Bakster on Sunday, July 17, 2016 7:54 PM

Removed

  • Member since
    July 2014
  • From: Franklin Wi
Posted by Bakster on Monday, July 25, 2016 11:51 AM


And then I remembered...


I was ready to start the final decking do-over when I remembered what John Tilley said about the ladders. I had hoped that the holes were not too oversized, but that would be just too easy.


Below: I can't turn a blind eye to this.


Below: Several months back I experimented with using melted sprue as a filler. In fact, I used it to fill some ejector pin marks on the catheads. This sample kept very well over the months and it is still very useable. I thought that I'd give it a whirl for these plugs.


Below: Probably self-explanatory.


Below: It looks like all heck. I glopped up those same areas on the reverse side as well. That will help give it a solid connection.


Below: With the tape in place, I sanded the hardened plastic until I could begin to see the outlines of the plugs. At that point, I pulled the tape back exposing the plugs. I then re-taped the surrounding area for final sanding. You can see that one little corner didn't get good coverage.


Below: I sanded the plug on the left as described above. On the remaining three sections, just for grins, I pulled up the tape without sanding. Surprisingly, the material surrounding the plugs broke free leaving the plugs. At this point, I would re-tape and then sand them flush. I think though, that I would side with caution by reducing the plastics thickness before pulling up the tape.


Final thoughts about this process...


The good:


1. Melted sprue gives an incredibly strong bond. When used on plastic, it literally melds to it. For non-plastic, like on the stir stick for example, it bonds like epoxy. You can't pull it off. This opens the door to some possibilities, particularly when using it on plastic. More than once I have used epoxy to strengthen some internal structures of a model, and the epoxy popped its connection when force was applied to it. Melted sprue would be a far better option. This stuff literally becomes one with the piece. I will try using it to secure the LED light assembly underneath the decking.


2. You can drill, sand, and cut it.


The bad:


1. It is pretty difficult to work with. It produces plastic string as you pull the applicator away. You can see examples of this in the fourth image. You need to be very careful about where those strings land because it sticks immediately, potentially ruining your model.

2. In the fifth image you can see that the hardened plastic has divots. These appear to be caused by air bubbles. This is somewhat disappointing. It adds another step to this process. I should probably apply a thin film of putty and fill those divots. It's not a huge deal, but it would be nice if the bubbles didn't form to begin with.


  • Member since
    July 2014
  • From: Franklin Wi
Posted by Bakster on Wednesday, August 10, 2016 10:54 AM

Deck Weathering

The goal this last several weeks was to define a more consistent process. The alternative was pretty much a wing and a prayer. It has been a long slog, but I feel that I have hammered out a procedure that seems to take the guesswork out of it. On a side note, this would have been done last week if I had not missed one seemingly unimportant step in the process. More on that later.


Here is a brief breakdown of the steps. I will go into more detail further down in this post.

1. Paint the deck with acrylic flat white.

2. Mix a brown oil wash and paint the boards.

3. Apply a gray acrylic wash.

4. Paint the grating.

5. Apply the dye wash.


I have said this before... I am amazed at how incredibly difficult it is to image these decks. I have again resorted to HDR photography. Otherwise, the decking would have little tonal detail and zero color. Even with the HDR process I can't seem to capture color that the human eye can see. Admittedly though, I have the color set to be very subtle. Just a reminder... in some cases weird light and color anomalies can occur with HDR. So, the colors are not very accurate and some tonal ranges are exaggerated. I hate to even post these images, but I have to post something. Sadly, this is the best that I can come up with to show you. You will have to take my word for it that there is some color.

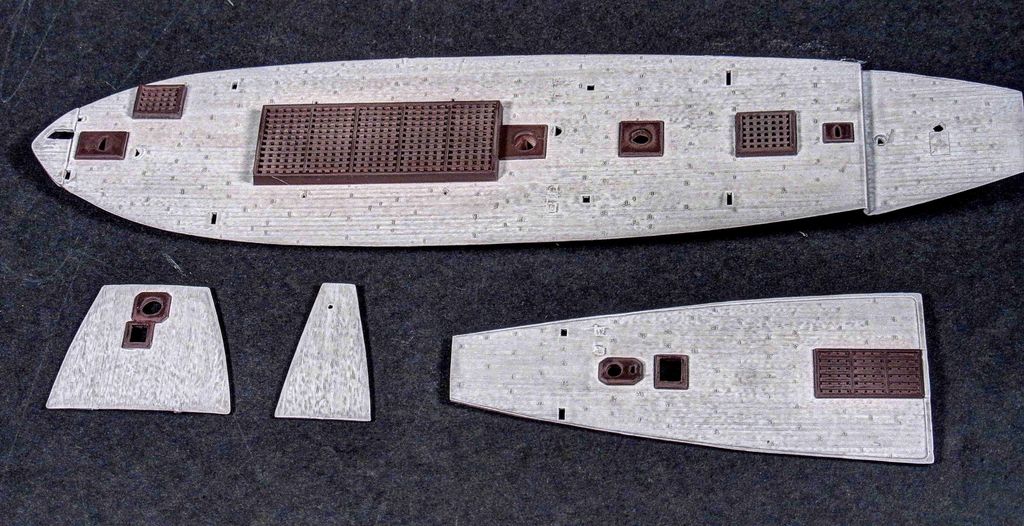
Below: I thought it would be fun to see how the decks look in my scrap hull.

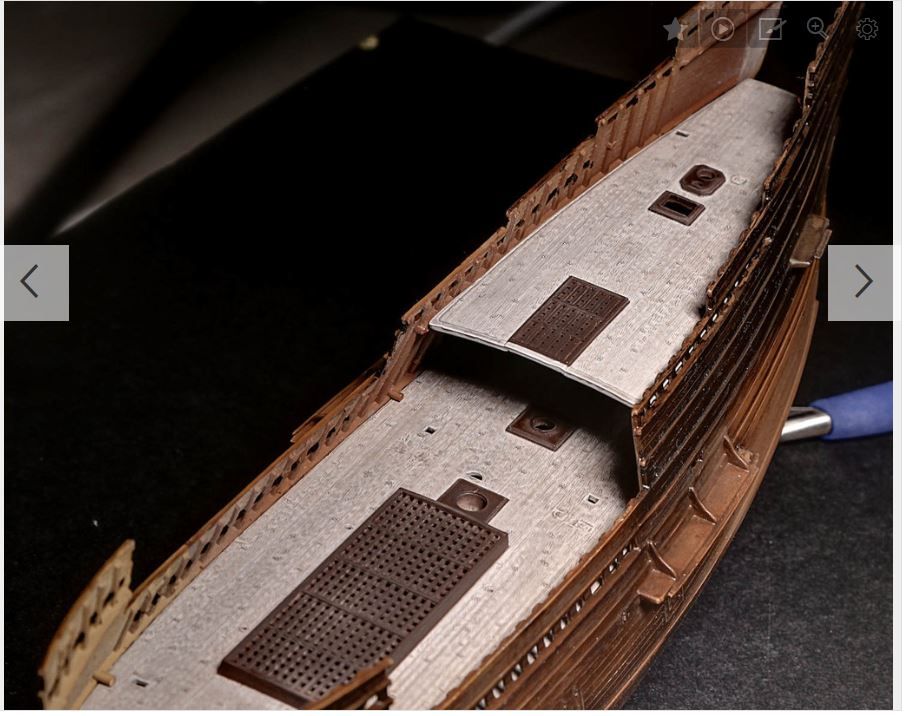
If I have any regrets with the end result of these decks, it would be that I am not too happy about the work that I did on the plugs. My impatience kicked in after a series of setbacks and re-dos. Ultimately, I rushed through the process of applying the surface putty. The ladders will hide some of this though and I don't feel that the problem is so terrible. One thing is for sure... I am in no mood to start over. This is a case for what JT likes to nudge me on, that the next model will be better.


Here is more detail for those that are interested.

Step 1: There is not much to say here. Painting the deck white seems to be the best color to start with. This helps ensure that the subsequent steps don't end up making the final colors too dark.

Step 2: This step changed. With the previous process I had applied a wash over the entire deck. I found that I could get a more realistic look by brush painting the wash onto each plank. I alternated areas of coverage, but I tried not to leave too many areas that do not have some wash applied.

I used Artist Van *** Brown for this. I made the wash so thin that when it is applied it produces a stain at best. This is important because if you go too heavy it undermines the look that you will get in the end. By the way, some credit goes to GMorrison for telling me about his plank painting process. It got me thinking. Thanks Morrison.

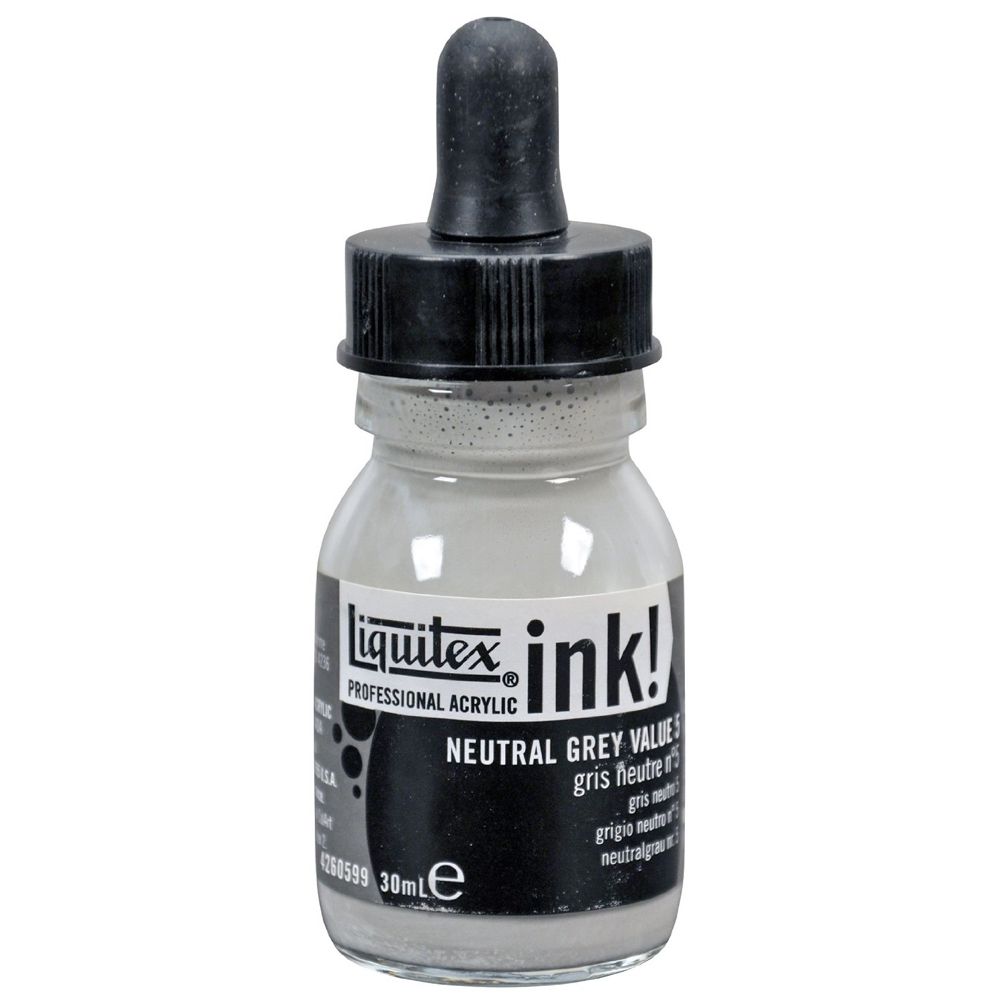
Step 3: This is an entirely new step, and there are two reason for it. The gray wash acts as a filter. It blends step 1 with step 2 giving it a more realistic look. The second reason fo the gray wash is that it tones down the almost white/gray tone that you get by the end of all this. I prefer an overall darker gray that could simulate dirt and or, water staining.

The gray paint that I used is acrylic, made by Liquitex. I found it at Michaels. This is interesting stuff. It goes on very much like a wash. In its own right, it does a decent job highlighting the woodgrain. With the dye added later on, the two seem to work together and further enhance the woodgrain effect.

You can apply it straight from the bottle using a brush, but I highly recommend an additional step. I would suggest that you add some of the paint into a paint pallet, or whatever you prefer, and then include some acrylic flow improver. This is a step that I didn't do last week. Based on previous testing I didn't think that I needed to, and the end result was a complete do-over. What happened was that the paint was slightly too viscous and more importantly, it was drying too fast. That left me with some serious brush marks on the main deck.

So... add a few drops of flow improver to the paint. This buys you time to get the coverage that you need and it really helps to minimize brush marks. Phew...

One other thing about this paint. I do not recommend airbrushing it for this purpose. Rather than going on like a wash, airbrushing causes the paint to spray like any other paint. It coats the deck in a nice gray paint layer and you lose all the underlying work that you did. I recommend that you use a larger flat brush to apply it.


Step 4: Paint the coaming/grating. I recommend doing this before the dye is applied because the dye helps accentuate the paintwork. Also, the IPA used with the dye tends to give acrylic paint a bleached look, and it does it at varying degrees depending on where the IPA sits the longest. This is my experience with using Tamiya brand anyway; I don't know about other brands. So, this helps to weather the paint in one easy step.

Step 5: Apply the dye. However, rather than brush it on like how I did it at first, I airbrushed it on. This eliminates the problem that I was having earlier. If you recall that at times the IPA softened the underlying paint and this made it too easy to smear all your work whilst brushing it on. Not good. I want to thank Rob for this idea. He mentioned that he uses a spray bottle. I didn't have a spray bottle, so I used an airbrush.

The Mixture: I can't say that my mixture is the best way to go, but for those that want to try this, it can be a good starting point for you.

I add IPA to an airbrush jar so that its about half full. I then put three drops of Dye-na-flow into the jar and mix it. Be careful about using a dye soaked stick for mixing. The dye on the stick adds to the color in the jar; this is strong stuff. I like to build up the effect verses taking a chance of going too strong. I grab a clean stick for mixing.

Spray the deck liberally, and then allow the IPA to evaporate off. If you have a dual action airbrush you can use the brush to blow air onto the wet deck. This dramatically speeds up the drying time. You can use this as a way to control the bleaching effect as well.

Check the coverage/effect and decide if you want to add another coat. It might take several coats depending on how thin a mixture it is. I sprayed about 6 coats in the example images. The look is subjective, so it's up to you.


Final thoughts

I am on the fence about what I have come up with. Part of this doubt might be because I have been looking at this problem for too long. What I do feel pretty certain about though is that I can't go much farther with this particular process. I have tried every angle that I can think of to tweak things, and this is the closest that I can get. Based on that alone, I will have to call it complete.


  • Member since
    July 2013
Posted by steve5 on Sunday, August 21, 2016 4:38 AM

looking sensational as alway's steve , don't know what happened , but I wasn't getting your feed's for some reason .your attention to detail far exceed's mine mate .

steve5


  • Member since
    September 2005
  • From: Groton, CT
Posted by warshipguy on Sunday, August 21, 2016 8:45 AM

Wow!  I am just returning to this thread, having left when the discussion centered on electrical wiring (just not my thing). I should have stayed! I am very impressed by how everyone seems to be contributing great ideas. When this model finally comes together, it will be a masterpiece!

Bill

  • Member since
    July 2014
  • From: Franklin Wi
Posted by Bakster on Sunday, August 21, 2016 11:34 AM

Hey Steve, thank you sir. 

  • Member since
    July 2014
  • From: Franklin Wi
Posted by Bakster on Sunday, August 21, 2016 11:43 AM

Hey Bill, glad to see that you are back and that you like what you are seeing.

And yes... the contributions from people have been outstanding. They are really helping me to try and take things to the next level.

We will see about this masterpiece business... I doubt it, but thanks for the encouragement anyway!

I will be posting an update later today.

Thanks!

Steve

  • Member since
    July 2014
  • From: Franklin Wi
Posted by Bakster on Sunday, August 21, 2016 1:28 PM

What's next...

Currently, I am sorting out what the hull and bulkheads will look like. In keeping with the severe weathering of the decks, I plan to translate that over to the hull. A battered ship is in the offing. That is the goal anyway, and getting there will take some time to sort things out.

Below: Not related to the above, here is something that I worked on yesterday. Its not much, but every little bit gets me closer to the goal.

I figured that I might as well install the lamp assembly. To simplify things on this, I had placed some tape where the table will sit, prior to painting and weathering the deck. I did not want to deal with a poor glue join because of paint. Or for that matter, deal with trying to scrape away the paint to get that clean connection. By doing this it was just a matter of removing the tape exposing the virgin plastic for bonding. BTW--I used my melted sprue concoction to bond the two. This morning I tested it some and that sucker is not coming off. At least, not on it's own.

Below: Installed.


Below: The light housing is secured. I will probably add more sprue goo for good measure.


  • Member since
    July 2014
  • From: Franklin Wi
Posted by Bakster on Tuesday, August 30, 2016 10:05 PM

I may not be completely there, and I might try a few more things before I hit the final copy, but I am 90% there as far establishing the base-look that I will use to build upon.

I mentioned in my last post that my goal was to weather the hull in concert with the weathered decking. The vision that I have for this was a dark wood, almost black, but yet transparent enough to show lighter shades of wood beneath. I want to give this ship some serious character, a character of one having served it's maker relentlessly. 

As with some of the decking images, the camera does not do it justice. In the images below you will see a finish that seems almost glossy. That is not the case. The finish is much closer to flat, but not totally. Secondly, the lighter wood tone shows up more than the darker. Again, so much tonal range is lost. I can tell you that if you move the hull away from my photo lights by maybe two feet, that the hull goes very dark, almost black. The images below are with the model just inches from the lights. Natural sunlight seems to give the best of both worlds where all the tones are easily visible. Anyway, that is enough about that.


The basic formula I used is as follows:

1. A base of acrylic brown. This was a mixture of flat brown and gloss brown, with some flat white added to lighten the shade.

2. A series of oil washes are applied. Once again I used artist oil vandyke brown, heavily thinned. I applied about 4 coats allowing a day or two between coats. On the final coat I removed some using a swab. It seemed a little too dark. Unfortunately, that by doing so, some of the raised areas went too light. On the final copy I would touch up those areas adding to the effect. And from there, I will paint other things.

One possible tip for you: In a side conversation that I had with our good friend Gene, he advised me to make sure that I use Grumbacher thinner for the oils. He stressed that point and I was determined to do so. I am glad that I did. I had been using a cheaper odorless thinner on all my previous experimenting, and I have to say, that I was not impressed with this artist oil business. I really struggled trying to get a convincing look. The Grumbacher made a huge difference for me. The wash went on like silk, covered nicely, dried fast, and it dried with just the right sheen that I was looking for. It really does give a convincing look of wood. Thanks Gene!

I am still open to other suggestions.


JOIN OUR COMMUNITY!

Our community is FREE to join. To participate you must either login or register for an account.

SEARCH FORUMS
FREE NEWSLETTER
By signing up you may also receive reader surveys and occasional special offers. We do not sell, rent or trade our email lists. View our Privacy Policy.