SEARCH FINESCALE.COM

Enter keywords or a search phrase below:

Messerschmitt BF109 GB 2012

245479 views
1198 replies
1 rating 2 rating 3 rating 4 rating 5 rating
  • Member since
    January 2012
  • From: East Peoria, IL
Posted by stoutfella on Tuesday, July 3, 2012 7:45 PM

Greetings,

OK, can I dive in, too? It'll be the 1/48 Tamiya E-3, with markings for Hans-Hugo Witt, Geswaderkommodore of JG 26.

Cheers,

Stoutfella

On the bench: 1/48 Tamiya Bristol Beaufighter

On deck: 1/48 Tamiya P51-B

  • Member since
    March 2012
  • From: Corpus Christi, Tx
Posted by mustang1989 on Wednesday, July 4, 2012 12:30 PM

Wow Mustang, just love the detail you have there, especially the scratches the paracute harnass made on the seat pan!

On my side I have decided tocall it a day with trying to make this 1/48 ICM 109 F-2 any nicer. I have been filling and sanding/re-scribing for longer than I care to, so I am going to do final light sanding after the canopy is on and slap the paint on it LOL!

The fine pinholes in the putty of the wingroot will hopefully be sorted with paint, if it doesn't I really don't care to much.

i803.photobucket.com/.../BF109001.jpg

i803.photobucket.com/.../BF109002.jpg

Theuns

Hey Theuns,

Thanks for the comments. Man you don't look like you have much to do in the matter of body work. Just a little sanding while you are watching TV and your ready for paint.


 Forum | Modelers Social Club Forum (proboards.com) 

  • Member since
    March 2012
  • From: Corpus Christi, Tx
Posted by mustang1989 on Wednesday, July 4, 2012 12:36 PM

Well since I am back up and running on the forum just wanted to insert some more pictures. I started building the R/H cockpit wall from Verlinden and it turned out great!!!!!!!!!!!! However the thing was entirely too thick and bulky so I had to ditch it after fully completing it and use the kit supplied wall molded into the fuselage. Thats ok though. I used the oxygen apparatus gauge pod and the oxygen hose from the Verlinden wall and used a valve knob from a 1/24 scale nitrous bottle kit for automobiles. It came out good in my book.


 Forum | Modelers Social Club Forum (proboards.com) 

  • Member since
    March 2012
  • From: Corpus Christi, Tx
Posted by mustang1989 on Wednesday, July 4, 2012 12:39 PM

 Ok lets try the picture thing again. I used rich formatting and it didn't work ....let's see now


 Forum | Modelers Social Club Forum (proboards.com) 

  • Member since
    March 2012
  • From: Corpus Christi, Tx
Posted by mustang1989 on Wednesday, July 4, 2012 12:40 PM

I added a wash after this picture. I have to upload more from my computer so I'll be posting those soon.


 Forum | Modelers Social Club Forum (proboards.com) 

  • Member since
    February 2011
  • From: Bent River, IA
Posted by Reasoned on Wednesday, July 4, 2012 2:24 PM

stoutfella

Greetings,

OK, can I dive in, too? It'll be the 1/48 Tamiya E-3, with markings for Hans-Hugo Witt, Geswaderkommodore of JG 26.

Heck yeah, in fact when it comes to 109's, I decree a perpetual group build! Stick out tongue

Science is the pursiut of knowledge, faith is the pursuit of wisdom.  Peace be with you.

On the Tarmac: 1/48 Revell P-38

In the Hanger: A bunch of kits

  • Member since
    October 2008
  • From: Georgia
Posted by Rigidrider on Wednesday, July 4, 2012 6:55 PM

Perpetual 109 build... I Like It!

When Life Hands You A Bucket Of Lemons...

Make Lemonade!

Then Sell It Back At $2 Bucks A Glass...

  • Member since
    June 2010
Posted by NavyChris on Thursday, July 5, 2012 7:30 AM

I want in.. put me down for Revell BF 109G-10.  I am almost finished.  I will post pictures soon


at the start

  • Member since
    April 2010
Posted by Theuns on Thursday, July 5, 2012 8:06 AM

After all the filling sanding (and repeating!) I slapped some paint on it just now while it is nice and hottish.

109 F2 Preshading

I was way to heavy on the shading (out of practice I guess) but managed to hide allmost all of it under the Trop Blue anyway LOL!  You can just make some out under the blue. Hopefully some more will show through when it dries a bit....

109- F2 Trop Blue

109 F-2 Trop -blue

The desert brown to follow tomorrow.


Theuns

  • Member since
    April 2010
Posted by Theuns on Thursday, July 5, 2012 9:51 AM

I was lucky with the weather so I decided to quickly shoot on the brown.

freehanded it with my trusty odl Badger 100LG and needless to say the blue/brown demarcation line was re-did atleas 3 times to get it OK LOL!
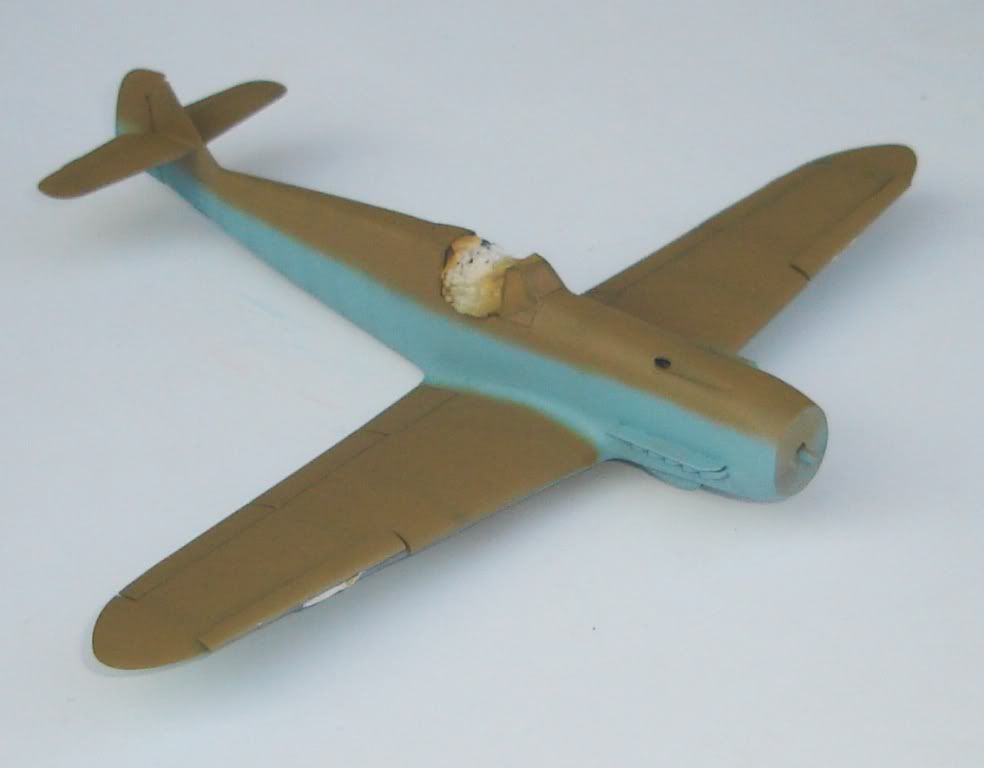
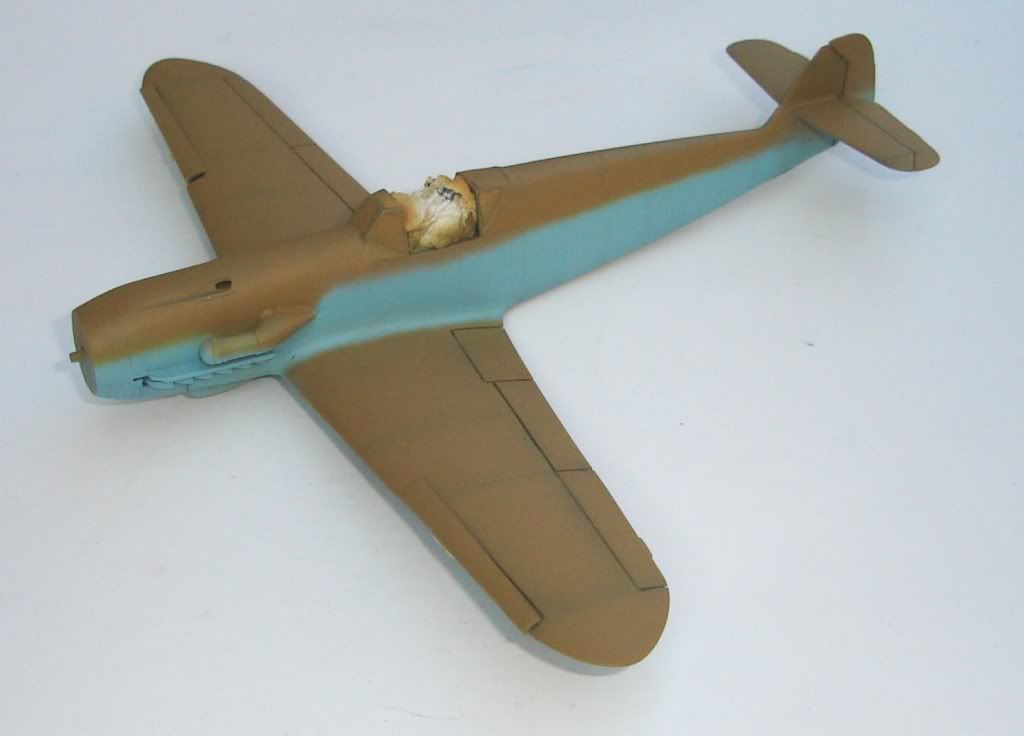
109 F-2

109 F-2

The slats are held inplace with presticc just for the painting. When fully cured I will Future and do all the weathering/decaling.

The side code for this SAAF 109 was "? AX"

 I'll have to mask and paint it as I do not have decals for it.


Theuns

  • Member since
    March 2012
  • From: Corpus Christi, Tx
Posted by mustang1989 on Thursday, July 5, 2012 11:28 AM

Theuns

I was lucky with the weather so I decided to quickly shoot on the brown.

freehanded it with my trusty odl Badger 100LG and needless to say the blue/brown demarcation line was re-did atleas 3 times to get it OK LOL!

109 F-2

109 F-2

The slats are held inplace with presticc just for the painting. When fully cured I will Future and do all the weathering/decaling.

The side code for this SAAF 109 was "? AX"

 I'll have to mask and paint it as I do not have decals for it.


Theuns

Dang Theuns,

That turned out pretty good. You seem a little bit more upbeat with it now than you did. I kept meaning to post something your way hoping you would hang in there but it looks like you did just that. Good going man, Joe


 Forum | Modelers Social Club Forum (proboards.com) 

  • Member since
    March 2012
  • From: Corpus Christi, Tx
Posted by mustang1989 on Thursday, July 5, 2012 11:42 AM

Ok guys,

 I may have the picture off a little bit but photo bucket and FSM aren't jiving too much with me today. Here is a picture of the L/H wall and cockpit floor that I finished in early June. I was thankful for the save on this because I was using the Verlinden wall and there was no way I could make it fit so I used the kit supplied stuff with some niceties from the Verlinden wall and a couple of tricks of my own.


 Forum | Modelers Social Club Forum (proboards.com) 

  • Member since
    March 2012
  • From: Corpus Christi, Tx
Posted by mustang1989 on Thursday, July 5, 2012 11:43 AM

 Let me try that again.......


 Forum | Modelers Social Club Forum (proboards.com) 

  • Member since
    March 2012
  • From: Corpus Christi, Tx
Posted by mustang1989 on Thursday, July 5, 2012 11:44 AM

Rats..........I can't get the picture to rotate so you all won't have to do the taco eating tilt with your heads.........Wow!


 Forum | Modelers Social Club Forum (proboards.com) 

  • Member since
    March 2012
  • From: Corpus Christi, Tx
Posted by mustang1989 on Thursday, July 5, 2012 11:58 AM

 Now Now for the problem child pic. Everything was going fairly smooth until I wanted to sand the back of the landing gear bay area so that the openings would be openings instead of molded in "openings". I wanted to save a little time and grabbed my fine grinding stone on my dremel and carefully started to work. Well as you can see from the photo I ground too far. It aint terrible but its noticeable. I was going slow enough before any major damage took place. I applied 5 minute epoxy to the back of it and walked away from it for the day. After thinking about it a while I have 3 options: 1) sand the affected area and try to repair it, 2) replace the lower wing altogether because I had to grind away some of the landing gear opening on the OTHER side due to my AM parts not agreeing with the wing ( I let that one go because I can overlook one or even two blemishes but not three) , and 3) ask you guys what remedies you have in mind or if anyone has a spare lower wing for this thing so I can cut my loss and start over with the wing. I'm open to suggestions fellas. Here's the pic and thanks in advance for ANY help.


 Forum | Modelers Social Club Forum (proboards.com) 

  • Member since
    April 2010
Posted by Theuns on Thursday, July 5, 2012 12:46 PM

No worries on the sideways pic, I simply turned the monitor on it's side - sorted. LOL!

Theuns

  • Member since
    July 2011
  • From: minnesota
Posted by handiabled on Thursday, July 5, 2012 1:04 PM


Looks like you hit a spot that could be opened up pretty easy,,  heres an example on one of my 109 wheel bays

You can add detail in the openings as well............


  • Member since
    March 2012
  • From: Corpus Christi, Tx
Posted by mustang1989 on Thursday, July 5, 2012 6:01 PM

Handiabled,

 I got a little off of the beaten path with that opening. I'm outside the oval. I've been thinking on it all day. Its been driving me nuts. I think I can recover but it will take some work. I have a 3 blemish rule on models. One is fine, two I scratch my head but it'll be ok and three is enough and thats where I am. My aim is to open those holes up to where I can pack some detail in there. Thanks for the input chief.

Theuns, thanks for the laugh. I've needed it after today. Will post more pics along the way to catch up to where I am at now.


 Forum | Modelers Social Club Forum (proboards.com) 

  • Member since
    December 2011
  • From: AZ
Posted by Luft Modeler on Thursday, July 5, 2012 7:50 PM

Keep at it buddy, its looking great thus far!

  • Member since
    August 2009
  • From: MOAB, UTAH
Posted by JOE RIX on Sunday, July 8, 2012 8:49 AM

Remember Mustang it's not about the mistake, it's all in the recovery. I do believe you will carry the day.

                                           Joe

"Not only do I not know what's going on, I wouldn't know what to do about it if I did". George Carlin

  • Member since
    July 2011
  • From: minnesota
Posted by handiabled on Sunday, July 8, 2012 9:00 AM


                                                                                                  Ditto

  • Member since
    March 2012
  • From: Corpus Christi, Tx
Posted by mustang1989 on Sunday, July 8, 2012 11:57 AM

It's ok fellas. I just had a "human" moment. I'm over it now and will concentrate on the recovery as my good buddy Joe Rix says. I've been working on my engine cowlings in the interrum while figuring out how to correct the mess up. Thanks you guys....


 Forum | Modelers Social Club Forum (proboards.com) 

  • Member since
    January 2007
  • From: Cherry valley il.
Posted by invertman on Sunday, July 8, 2012 9:29 PM

looks like some pretty awsome 109's being built!

made some progress this last week,with the cockpit...kinda rusy at building aircraft.,but we will see how it turns out.


  if you want permission for a test flight.... the answer is "no".

  • Member since
    March 2012
  • From: Corpus Christi, Tx
Posted by mustang1989 on Monday, July 9, 2012 11:50 AM

Thats some nice work on the cockpit for somebody who's rusty at buildiing aircraft invertman.

I've got one or two more pics until I am caught up to where I am at right now on my Trumpeter 109. The first two are just prior to closing the fuselage up.


 Forum | Modelers Social Club Forum (proboards.com) 

  • Member since
    March 2012
  • From: Corpus Christi, Tx
Posted by mustang1989 on Monday, July 9, 2012 11:54 AM

I'm really not too worried about the sloppy paint job on THIS side of the flap and trim control pullies/chains. It can't be seen from the overhead view with the other side of the fuselage covering it up.

The next one is where I am at right now with the fuselage assembled.


 Forum | Modelers Social Club Forum (proboards.com) 

  • Member since
    December 2011
  • From: AZ
Posted by Luft Modeler on Monday, July 9, 2012 12:25 PM

Awesome awesome work!!

  • Member since
    January 2007
  • From: Cherry valley il.
Posted by invertman on Monday, July 9, 2012 4:45 PM

great work mustang,amazing detail!

  if you want permission for a test flight.... the answer is "no".

  • Member since
    March 2012
  • From: Corpus Christi, Tx
Posted by mustang1989 on Monday, July 9, 2012 9:39 PM

Thanks you guys. It's been about 6 months worth. Its been nothing but sanding and filling for the past month now. Trumpeter has a nasty habit with excessive ejector pin marks!!!!


 Forum | Modelers Social Club Forum (proboards.com) 

  • Member since
    April 2010
Posted by Theuns on Tuesday, July 10, 2012 1:55 AM

Well guys as you by now know I have had all sorts of trouble with my 1/48 ICM F-2. It seems I continued this trend with the painting aswell!

After the future was applied (and evedently not cured enough) I decaled and tried micro sol on the decals. Nothing hapened to the decals but the future was damaged :-(

I have been able to mostly repair the damage with some sanding and re coating with future.


109- F2 Trop Blue


Theuns

  • Member since
    March 2012
  • From: Corpus Christi, Tx
Posted by mustang1989 on Tuesday, July 10, 2012 6:43 AM

Hang in there Theuns,

 Youre doing a good job trying to recover it.


 Forum | Modelers Social Club Forum (proboards.com) 

JOIN OUR COMMUNITY!

Our community is FREE to join. To participate you must either login or register for an account.

SEARCH FORUMS
FREE NEWSLETTER
By signing up you may also receive reader surveys and occasional special offers. We do not sell, rent or trade our email lists. View our Privacy Policy.