SEARCH FINESCALE.COM

Enter keywords or a search phrase below:

Messerschmitt BF109 GB 2012

245521 views
1198 replies
1 rating 2 rating 3 rating 4 rating 5 rating
  • Member since
    December 2004
  • From: Houston, Texas
Posted by panzerpilot on Wednesday, January 25, 2012 11:37 PM

pzl66

Ok game over I quit!!! Lol geez can you put anymore detail in there? Looks way too real, very nice!

Ditto That looks really nice!

-Tom

  • Member since
    December 2011
  • From: AZ
Posted by Luft Modeler on Wednesday, January 25, 2012 9:39 PM

Ok game over I quit!!! Lol geez can you put anymore detail in there? Looks way too real, very nice!

  • Member since
    March 2010
  • From: MN
Posted by Nathan T on Wednesday, January 25, 2012 9:30 PM

All that beauty and You're gonna cover it up?


  • Member since
    December 2009
  • From: Laurel, MD
Posted by Tucohoward on Wednesday, January 25, 2012 8:47 PM

A little more progress. I am not planning on displaying it with the cowl off but I thought I would paint the engine and related stuff anyway. Good practice.

The Mighty Mo says no.

  • Member since
    February 2011
  • From: Monterey Bay,CA-Fort Bragg, NC
Posted by randypandy831 on Tuesday, January 24, 2012 6:16 PM

that build thread on brit makes me want that airfix kit.

tamiya 1/48 P-47D $25 + shipping

tamiya 1/48 mosquito $20+ shipping

hobby boss 1/48 F-105G. wings and fuselage cut from sprue. $40+ shipping. 

  • Member since
    July 2011
  • From: minnesota
Posted by handiabled on Tuesday, January 24, 2012 4:15 PM

70gtvert

 jgeratic1:

70gtvert - looks good from here, grats on being first completion of the GB.   Toast

Only thing I'd suggest is to address the sheen on the tires which will help give more contrast with the hubs.  Some weathering powders would likely do the trick.

regards,

Jack


Yeah, one of the things I may do with it is sharpen up my weathering skills. Kinda been out of the hobby for the better part of 15 years but due to some health issues I have all day any day to work on these. Ultimately this one is not a keeper, too many small issues I'm not pleased with (mainly the canopy finish and fit). In the end I'll likely donate it to my local hobby shop to display, but not until after I play with some weathering techniques (also looking to use oils, never used those before).

 If my 109 turns out close to yours I'll consider it a success!!  Nice lookin bird my friend,,,  don't be too hard on yourself,,,,  I hear ya with the health,, this weather ( winter Sad ) sucks to try to build in for myself anyways,,,,Snail like to see some more pics after weathering


  • Member since
    December 2010
  • From: Colorado Springs
Posted by Geof on Tuesday, January 24, 2012 2:47 PM

Overall they look great. Maybe a middle ground between the two. The overall quality looks great for having been out of the game for awhile!

Photobucket

On the Bench: Tamiya's 1/48 A-10a Thunderbolt 

In the Hangar:  Hmmm???


  • Member since
    February 2011
  • From: Bent River, IA
Posted by Reasoned on Tuesday, January 24, 2012 2:20 PM

70gtvert

Really toned down the weathering and panel lines over what I did with the desert camo G-4 I completed earlier. This one is overall fair as far as I am concerned, no show winner that's for sure. May try to add a little more weather down the road to practice. http://carphotos.cardomain.com/ride_images/1/2268/4209/5669604033_large.jpgSo http://carphotos.cardomain.com/images/0015/20/40/15480204_large.jpg

I like both! Beer   but then again I'm a 109 groupie Embarrassed  I would agree the weathering on the top is a little "better" than the trop but I might expect the trop to be a little more weathered given it's operating environment.

Science is the pursiut of knowledge, faith is the pursuit of wisdom.  Peace be with you.

On the Tarmac: 1/48 Revell P-38

In the Hanger: A bunch of kits

  • Member since
    November 2011
Posted by 70gtvert on Tuesday, January 24, 2012 1:07 PM

jgeratic1

70gtvert - looks good from here, grats on being first completion of the GB.   Toast

Only thing I'd suggest is to address the sheen on the tires which will help give more contrast with the hubs.  Some weathering powders would likely do the trick.

regards,

Jack

Yeah, one of the things I may do with it is sharpen up my weathering skills. Kinda been out of the hobby for the better part of 15 years but due to some health issues I have all day any day to work on these. Ultimately this one is not a keeper, too many small issues I'm not pleased with (mainly the canopy finish and fit). In the end I'll likely donate it to my local hobby shop to display, but not until after I play with some weathering techniques (also looking to use oils, never used those before).

  • Member since
    April 2006
  • From: ON, Canada
Posted by jgeratic on Tuesday, January 24, 2012 12:24 PM

70gtvert - looks good from here, grats on being first completion of the GB.   Toast

Only thing I'd suggest is to address the sheen on the tires which will help give more contrast with the hubs.  Some weathering powders would likely do the trick.

regards,

Jack

  • Member since
    November 2011
Calling it "done", sorta.
Posted by 70gtvert on Tuesday, January 24, 2012 11:07 AM

Really toned down the weathering and panel lines over what I did with the desert camo G-4 I completed earlier. This one is overall fair as far as I am concerned, no show winner that's for sure. May try to add a little more weather down the road to practice. So now that I warmed up with a pair of G-4's I will finish up a 1/43 AMT 36 Ford coupe then start my Eduard 1/32 E-3. I am going to try and get the cowl to cover the completed motor in that one.

  • Member since
    June 2010
  • From: Austin, TX
Posted by DoogsATX on Monday, January 23, 2012 11:21 PM

jgeratic1

Quite the work on those engines,  guys - look'n good.

For those interested, I've stumbled upon an in progress build/review of the 1/48 Airfix 109E on Britmodeller.

regards,

Jack

Jack - thanks for the link. I've got it bookmarked. Looks like I'll be in for a treat with that kit!

On the Bench: 1/32 Trumpeter P-47 | 1/32 Hasegawa Bf 109G | 1/144 Eduard MiG-21MF x2

On Deck:  1/350 HMS Dreadnought

Blog/Completed Builds: doogsmodels.com


  • Member since
    December 2010
  • From: Colorado Springs
Posted by Geof on Monday, January 23, 2012 11:06 PM

Ah a Trump kit. That explains it! Looks great either way!

Photobucket

On the Bench: Tamiya's 1/48 A-10a Thunderbolt 

In the Hangar:  Hmmm???


  • Member since
    July 2011
  • From: minnesota
Posted by handiabled on Monday, January 23, 2012 7:11 PM

[quote user="Geof"]

handiabled:


Nathan T:


Geof

Round one well under way. I was surprised that Zvezda didn't add the plug wire complex to this little engine. As detailed as this kit is, it is an odd omission IMO. Particularly given the option to display the motor in the kit. I have chosen to display only one open side which requires a bit of planning on what to add to which side. I only did the left side as this is the side I want to display, the right will be pretty much devoid of anything so the cowl will fit properly. I did the plug wiring as individual wires and then sealed the individual wires into a bundle to produce the whole. HOPEFULLY... when painted this will resemble the rail as a single unit branching into the individual wires. After seeing the pics I think the "rubber fittings" need to be a bit smaller in diameter, what do you guys think? So next step, time to paint.


She's gonna look sweet with some paint!


Looks great Geof !!    I think your "rubber fittings" look smaller than mine actually,,,if anything I need to scale mine down ,,,yours look right on!!


Thanks man. I was looking at yours and it seems different. I thought you were doing the zvezda as well. Are you doing some scratch building there? For instance your coolant res is different and your engine mounts are the later G style. Are those kit parts?

A little more plumbing to go then to the dressy up...

 This Trump kit is a mishmash of supposed to be F-4 but really like a G-6,,,, what you see around the engine is scratched except the mounts,,, tried screwing with that but couldn't get the cowls to fit correctlyBang Head,,,,so instead I added the 2 res tanks ,, lines and other engine connections,,fuel line ect,, yours looks great !!  I blame Herman for any G looking pieces that I can't rectify,, Whistling,,, at least the wheel bays look right now,,,,,

               Tucohoward great start on your 109!!   can't wait to see more!

  • Member since
    December 2009
  • From: Laurel, MD
Posted by Tucohoward on Monday, January 23, 2012 6:06 PM

Made some progress on my Dragon 1/32 E-4. Very nice kit so far. Fit has been excellent and level of detail very good. Cockpit built OOB except for instument panel decals from MDC and Airscale, wire for gunsight, and wire for rudder pedal straps(kit includes PE for them). Keeping alert for the issues mentioned in the FSM 9/11 build review.

The Mighty Mo says no.

  • Member since
    April 2006
  • From: ON, Canada
Posted by jgeratic on Monday, January 23, 2012 5:45 PM

Quite the work on those engines,  guys - look'n good.

For those interested, I've stumbled upon an in progress build/review of the 1/48 Airfix 109E on Britmodeller.

regards,

Jack

  • Member since
    December 2010
  • From: Colorado Springs
Posted by Geof on Monday, January 23, 2012 3:25 PM

[quote user="handiabled"]


Nathan T:


Geof

Round one well under way. I was surprised that Zvezda didn't add the plug wire complex to this little engine. As detailed as this kit is, it is an odd omission IMO. Particularly given the option to display the motor in the kit. I have chosen to display only one open side which requires a bit of planning on what to add to which side. I only did the left side as this is the side I want to display, the right will be pretty much devoid of anything so the cowl will fit properly. I did the plug wiring as individual wires and then sealed the individual wires into a bundle to produce the whole. HOPEFULLY... when painted this will resemble the rail as a single unit branching into the individual wires. After seeing the pics I think the "rubber fittings" need to be a bit smaller in diameter, what do you guys think? So next step, time to paint.


She's gonna look sweet with some paint!


Looks great Geof !!    I think your "rubber fittings" look smaller than mine actually,,,if anything I need to scale mine down ,,,yours look right on!!


Thanks man. I was looking at yours and it seems different. I thought you were doing the zvezda as well. Are you doing some scratch building there? For instance your coolant res is different and your engine mounts are the later G style. Are those kit parts?

A little more plumbing to go then to the dressy up...

Photobucket

On the Bench: Tamiya's 1/48 A-10a Thunderbolt 

In the Hangar:  Hmmm???


  • Member since
    July 2011
  • From: minnesota
Posted by handiabled on Monday, January 23, 2012 8:14 AM

[quote user="Nathan T"]

Geof

Round one well under way. I was surprised that Zvezda didn't add the plug wire complex to this little engine. As detailed as this kit is, it is an odd omission IMO. Particularly given the option to display the motor in the kit. I have chosen to display only one open side which requires a bit of planning on what to add to which side. I only did the left side as this is the side I want to display, the right will be pretty much devoid of anything so the cowl will fit properly. I did the plug wiring as individual wires and then sealed the individual wires into a bundle to produce the whole. HOPEFULLY... when painted this will resemble the rail as a single unit branching into the individual wires. After seeing the pics I think the "rubber fittings" need to be a bit smaller in diameter, what do you guys think? So next step, time to paint.


She's gonna look sweet with some paint!

Looks great Geof !!    I think your "rubber fittings" look smaller than mine actually,,,if anything I need to scale mine down ,,,yours look right on!!


  • Member since
    December 2011
  • From: AZ
Posted by Luft Modeler on Monday, January 23, 2012 12:30 AM

jgeratic1

Doogs, thx for posting the above pics/blog from Eduard.  I made a pact with myself to cease and desist on the stash growth, but might have to make an exception with this one.    Stick out tongue

regards,

Jack

I tried that and some how ended up with two revell ag 1/72 B-17 ( one f and one g) told myself I need to get cracking on the 109 but I see a B-17 and money starts burning in my pockets.

  • Member since
    March 2010
  • From: MN
Posted by Nathan T on Monday, January 23, 2012 12:11 AM

[quote user="Geof"]

Round one well under way. I was surprised that Zvezda didn't add the plug wire complex to this little engine. As detailed as this kit is, it is an odd omission IMO. Particularly given the option to display the motor in the kit. I have chosen to display only one open side which requires a bit of planning on what to add to which side. I only did the left side as this is the side I want to display, the right will be pretty much devoid of anything so the cowl will fit properly. I did the plug wiring as individual wires and then sealed the individual wires into a bundle to produce the whole. HOPEFULLY... when painted this will resemble the rail as a single unit branching into the individual wires. After seeing the pics I think the "rubber fittings" need to be a bit smaller in diameter, what do you guys think? So next step, time to paint.


http://i1113.photobucket.com/albums/k519/Geof3/Bf-109%20F4%20Trop%20Sinner/DSCF6002Medium.jpg http://i1113.photobucket.com/albums/k519/Geof3/Bf-109%20F4%20Trop%20Sinner/DSCF6003Medium.jpg http://i1113.photobucket.com/albums/k519/Geof3/Bf-109%20F4%20Trop%20Sinner/DSCF6005Medium-1.jpg

She's gonna look sweet with some paint!


  • Member since
    December 2010
  • From: Colorado Springs
lets try some plumbing!
Posted by Geof on Sunday, January 22, 2012 11:21 PM

Round one well under way. I was surprised that Zvezda didn't add the plug wire complex to this little engine. As detailed as this kit is, it is an odd omission IMO. Particularly given the option to display the motor in the kit. I have chosen to display only one open side which requires a bit of planning on what to add to which side. I only did the left side as this is the side I want to display, the right will be pretty much devoid of anything so the cowl will fit properly. I did the plug wiring as individual wires and then sealed the individual wires into a bundle to produce the whole. HOPEFULLY... when painted this will resemble the rail as a single unit branching into the individual wires. After seeing the pics I think the "rubber fittings" need to be a bit smaller in diameter, what do you guys think? So next step, time to paint.


Photobucket Photobucket Photobucket

Photobucket

On the Bench: Tamiya's 1/48 A-10a Thunderbolt 

In the Hangar:  Hmmm???


  • Member since
    July 2011
  • From: minnesota
Posted by handiabled on Saturday, January 21, 2012 2:27 PM


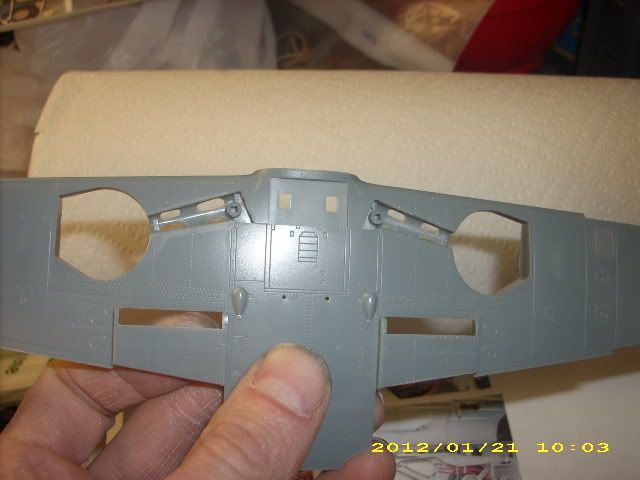
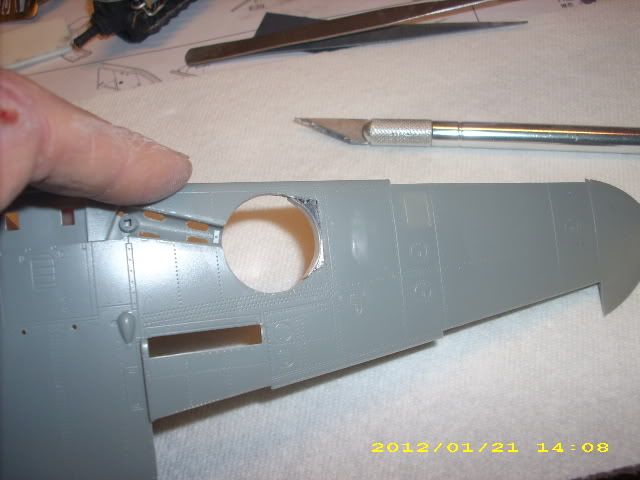
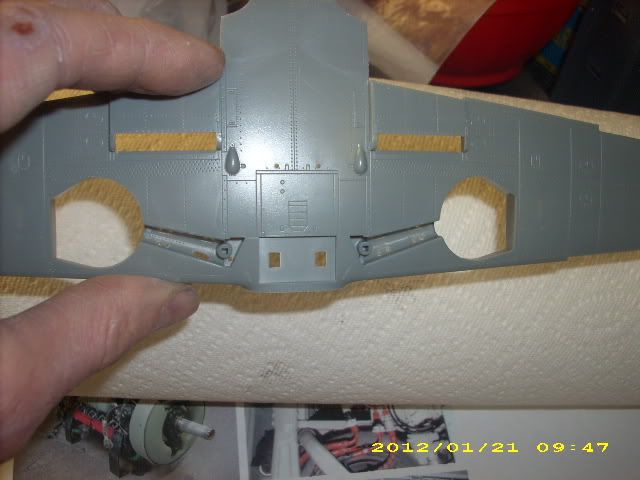
                          Fixing wheel bay issues,,,,,,, first drilled and cleaned openings to be able to add more detail,,,


[View:/themes/fsm/utility/
Photobucket:550:0]


[View:/themes/fsm/utility/Photobucket:550:0]


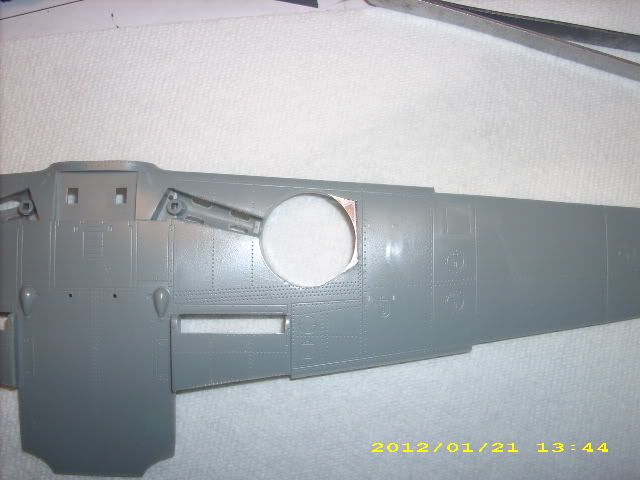
              Next put the Eduard "fix" in place


[View:/themes/fsm/utility/
Photobucket:550:0]


         Cut out a cardboard  template and transfered it to a piece of .030 sheet styrene,,,,


[View:/themes/fsm/utility/
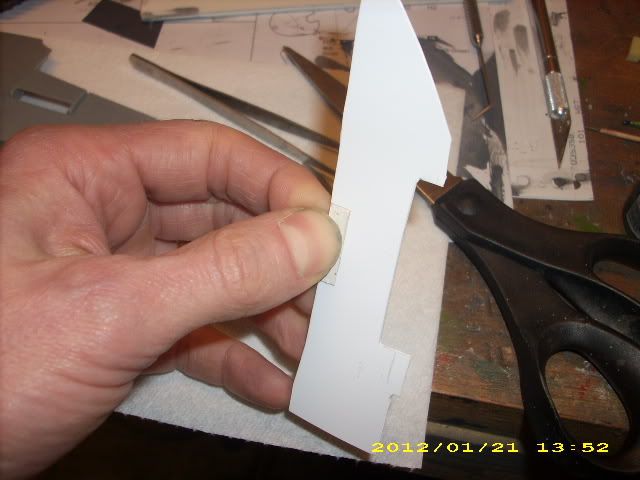
 

Photobucket:550:0]


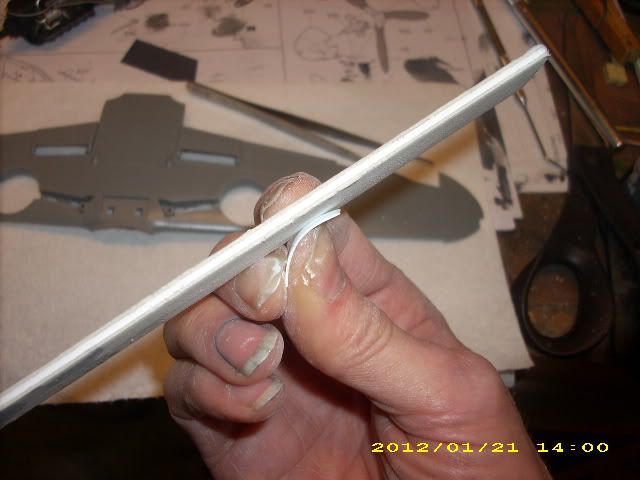
           Tapered the edges and made the piece much thinner,,,,,,,,,,,,


[View:/themes/fsm/utility/Photobucket:550:0]


                    Tah  Dah ,,,,,        round wheel bay,,,,,,,,,,,,, rinse repeat,,,,,,,,,,,,,,,,,,,,,Smile  a bit more sanding and its ready,,,,,,,,,,,,,,


[View:/themes/fsm/utility/Photobucket:550:0]
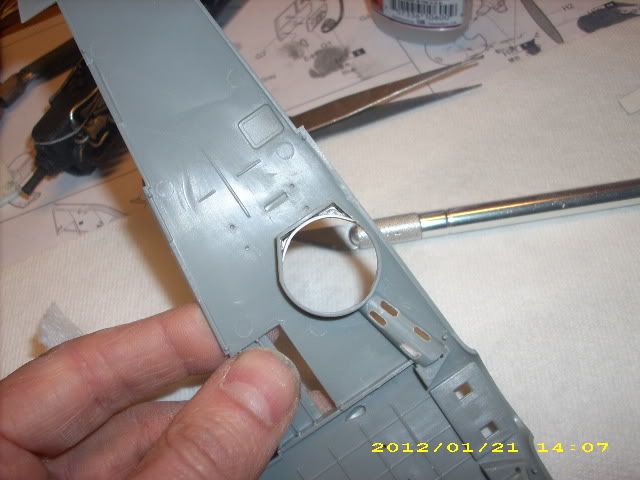
 

[View:/themes/fsm/utility/Photobucket:550:0]

  • Member since
    February 2011
  • From: Bent River, IA
Posted by Reasoned on Saturday, January 21, 2012 2:19 PM

DoogsATX

 jgeratic1:

Doogs, thx for posting the above pics/blog from Eduard.  I made a pact with myself to cease and desist on the stash growth, but might have to make an exception with this one.    Stick out tongue

regards,

Jack


I made a similar pact, and have since acquired Revell's new PV-1, a 48th Tamiya Ki-84, 32nd Hasegawa Ki-61, and pre-ordered the Great Wall TBD. Sigh...

You know, there are support groups for such disorders........ nah, just clean out another closet for storage. Wink

Science is the pursiut of knowledge, faith is the pursuit of wisdom.  Peace be with you.

On the Tarmac: 1/48 Revell P-38

In the Hanger: A bunch of kits

  • Member since
    June 2010
  • From: Austin, TX
Posted by DoogsATX on Saturday, January 21, 2012 12:57 PM

jgeratic1

Doogs, thx for posting the above pics/blog from Eduard.  I made a pact with myself to cease and desist on the stash growth, but might have to make an exception with this one.    Stick out tongue

regards,

Jack

I made a similar pact, and have since acquired Revell's new PV-1, a 48th Tamiya Ki-84, 32nd Hasegawa Ki-61, and pre-ordered the Great Wall TBD. Sigh...

On the Bench: 1/32 Trumpeter P-47 | 1/32 Hasegawa Bf 109G | 1/144 Eduard MiG-21MF x2

On Deck:  1/350 HMS Dreadnought

Blog/Completed Builds: doogsmodels.com


  • Member since
    April 2006
  • From: ON, Canada
Posted by jgeratic on Saturday, January 21, 2012 12:07 PM

Doogs, thx for posting the above pics/blog from Eduard.  I made a pact with myself to cease and desist on the stash growth, but might have to make an exception with this one.    Stick out tongue

regards,

Jack

  • Member since
    June 2010
  • From: Austin, TX
Posted by DoogsATX on Saturday, January 21, 2012 10:56 AM

Here's the forthcoming 1/48 E-1 from Eduard. I've only built their 1/32 E-7, but it definitely looks like they've scaled down from the larger kits. I'm sure they'll be fixing canopies and wheels and such - they did so moving from the E-4 to the E-7 Trop. Hopefully they'll work on cowl fit too!

More info here: http://www.eduard.com/blog/bf-109e-1-in-148th-scale-test-molds-build/

On the Bench: 1/32 Trumpeter P-47 | 1/32 Hasegawa Bf 109G | 1/144 Eduard MiG-21MF x2

On Deck:  1/350 HMS Dreadnought

Blog/Completed Builds: doogsmodels.com


  • Member since
    March 2010
  • From: MN
Posted by Nathan T on Saturday, January 21, 2012 10:18 AM

Nice job on the Emil jack, those big underwing cross decals are a bear to get to settle down. Is Eduard including an engine for the 48th too?


  • Member since
    April 2006
  • From: ON, Canada
Posted by jgeratic on Saturday, January 21, 2012 5:35 AM

DoogsATX

I'm tackling the Airfix next so I'll let y'all know. Also, Eduard is going to be doing their Emil line in 48th. Been plugging the new E-1 hard on Facebook this week. 

It will be interesting to see if they will serve up a scaled down version of the 1/32 or incorporate some fixes.  They admitted to the E-4 canopy section being too narrow, but there is still the hump on top of the fuselage along with some minor refinement/corrections on details.

Well, not to be left out, here is my current best 109, albeit 13 years old.  During that time it's been dusted a few times and has lost the tail wheel and the antenna wire.  It's the old Tamiya E-3 with original (incorrect) cowl.  I had chosen this scheme due to the unique oversized crosses on the underwings.


regards,

Jack


  • Member since
    March 2010
  • From: MN
Posted by Nathan T on Saturday, January 21, 2012 12:14 AM

[quote user="randypandy831"]

i want to start on my G-10 but school is overwhelming me. hope to get some work done on sunday. 

Tell your teacher the G-10 is history related...


  • Member since
    February 2011
  • From: Monterey Bay,CA-Fort Bragg, NC
Posted by randypandy831 on Friday, January 20, 2012 10:04 PM

i want to start on my G-10 but school is overwhelming me. hope to get some work done on sunday. 

tamiya 1/48 P-47D $25 + shipping

tamiya 1/48 mosquito $20+ shipping

hobby boss 1/48 F-105G. wings and fuselage cut from sprue. $40+ shipping. 

JOIN OUR COMMUNITY!

Our community is FREE to join. To participate you must either login or register for an account.

SEARCH FORUMS
FREE NEWSLETTER
By signing up you may also receive reader surveys and occasional special offers. We do not sell, rent or trade our email lists. View our Privacy Policy.