SEARCH FINESCALE.COM

Enter keywords or a search phrase below:

Weekend Madness GB November 13-15th 2009

71925 views
664 replies
1 rating 2 rating 3 rating 4 rating 5 rating
  • Member since
    October 2008
  • From: New Jersey
Posted by oddmanrush on Friday, November 13, 2009 11:39 PM

Every one's build is coming along quite nicely, I'm still trying to follow every one. I can't keep up! Any way, here's where I'm at at 12:36 Am Saturday morning in beautiful southern New Jersey

Construction is complete. Now for paint. I didn't do any pre painting except for whats in the cockpit. I don't know if that will hurt me in the long run, we shall see. The only thing I didn't attach is the ordnance. That will wait til later. I'm going to putty a little then go to bed, early day tomorrow.

Every one is looking good even at this intense pace. I see why its called 'weekend madness' now.

Jon

My Blog: The Combat Workshop 

  • Member since
    August 2006
  • From: Amherst, MA
Posted by M1 A1 A2 Tanker on Friday, November 13, 2009 11:45 PM

Well, a little over and hour in and have sprayed all the parts with Mr. Surfacer 1000 and applied Future to the clear parts.

Got interupted for vacuum duty as my father in-law is coming over tommorow. No biggie though need to get out of the workshop while the Mr. Surfacer dried and it aired out. Love that stuff but man it stinks! LOL.


See ya


Scott


“Computers are like Old Testament gods; lots of rules and no mercy.”  ~ Joseph Campbell


  • Member since
    July 2004
  • From: Sonora Desert
Posted by stikpusher on Friday, November 13, 2009 11:47 PM

OK I got some pics of my less than three hours work today. Academy 1/48 F-16 Thunderbird

the box

the sprues

all sub assemblies completed so far

cockpit area

lower fuselage with intake placed in location

all sub assemblies placed together (not glued yet)

to be continued Sunday afternoon...


F is for FIRE, That burns down the whole town!

U is for URANIUM... BOMBS!

N is for NO SURVIVORS...

       - Plankton

LSM


  • Member since
    September 2003
  • From: South Central Wisconsin
Posted by Daywalker on Saturday, November 14, 2009 12:18 AM
 sfcmac wrote:

 Frank  some how some way it always goes back to Corsairs with you!

Hehehe... Is there any other plane worth modeling?

(Ducks and runs outta the room...)

Looking good here everyone! Thumbs Up [tup]

Aaron- That Tamiya primer really is good, isn't it?  Thanks for turning me onto it. Approve [^]  How much coffee have you had today?

I have managed to get all of the parts off of the sprues, and cleaned up the prop and painted the tips.  Added some Tamiya tape seatbelts and painted the engine.  Went to take some pics, and the camera batteries were dead after leaving the camera on from the last pics!

Sign - With Stupid [#wstupid]

I tell ya... someone has got to watch me every second. Sigh [sigh]  I'll post some pics tomorrow am, night all! Zzz [zzz]

Frank 


  • Member since
    November 2012
Posted by dioramator on Saturday, November 14, 2009 12:25 AM


I'm now finished for today (but will be back again this evening), thats another 7 1/2 hours work today, It's just gone 4:30 pm, and it's time to get dinner organised for me and the family.

the oil wash went down, and dried a treat, I even used oil paint on the wooden handles of the pioneer tools. then flash dried it with Testors dullcote. 

I've just finished the tracks, and the glue can dry over this break, then I can remove them and give them some finishing touches. I think one more good session, and the build should be finished (although I shouldn't count my chickens just yet). So it looks like another marathon session this evening.

dougums -  I will write a bit of a review of the kit once I get it finished (I did notice the one sitting on your bench in the photos), Andrew also has one he is going to build. That will give me something to do while I'm sitting around eating popcorn tomorrow.

Brett


  • Member since
    September 2004
  • From: Vernon, BC, Canada
Posted by razordws on Saturday, November 14, 2009 12:35 AM

Just finished going through the last three or four pages and updated all the builds.  If I missed anyone please give me a shout.

There are some fantastic efforts and builds going on here.  Too many for me to mention individually at this point but I am awed and impressed with everyone's talent and enthusiasm.  Bow [bow]Bow [bow]Bow [bow]

Katie, welcome aboard!!!  Please make sure Frank charges those batteries and doesn't hurt himself again will ya?  Looking forward to the Tempest.

I got a bit of a start already, no pit on this kit but found a seat and a pilot in the spares box which is all that will be seen.  Think I am going to do this one wheels up but we'll see.  I'll post some pics shortly.

Dave

  • Member since
    March 2007
  • From: Carmel, CA
Posted by bondoman on Saturday, November 14, 2009 1:19 AM

Well I'm calling it a night. Day one went well, if a little slowly. I was at the office all day, and went by the LHS one last time on the way home to buy my Xmas Santa stuff for two of you.

First I primed both kits. The Mach 2 1/72 Douglas Skyshark A2D-1 and the Tamiya 1/72 Douglas Skyray F4D-1. I had originally purchased the Skyray with the goal of using it's pit as a model for scratching the Skyshark, which did not come with one and had a closed canopy, but that wouldn't do. I've put the Ford aside because it'll fall together later if I give it's box a good shake, I'm sure.

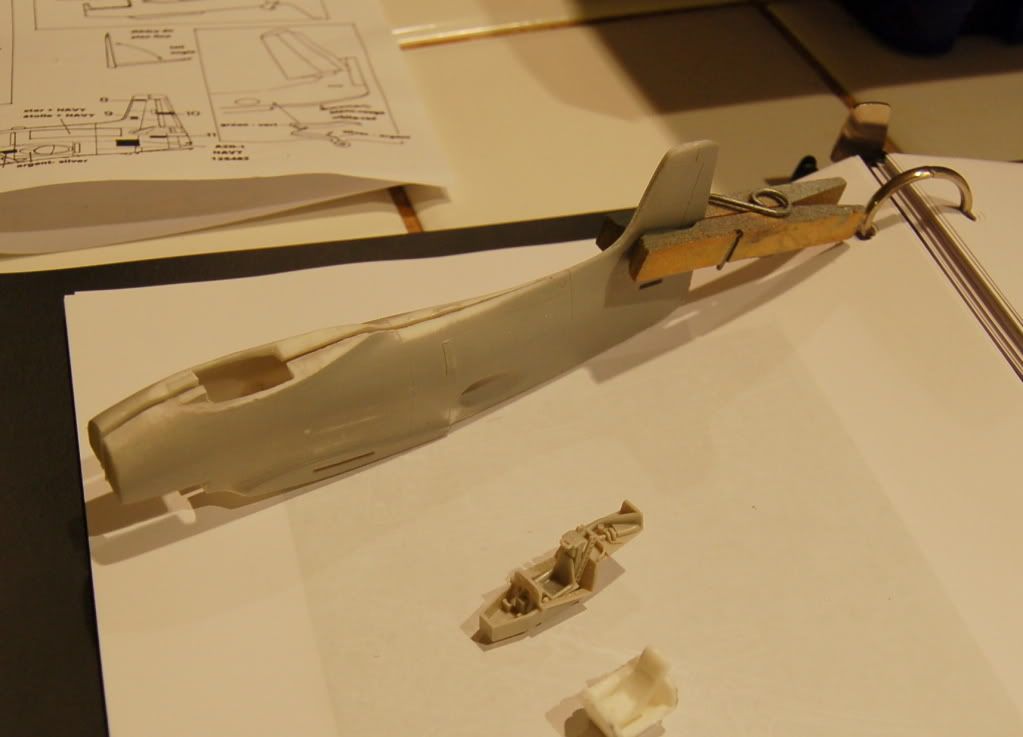
First I separated from the sprues and cleaned up the Shark fusey halves. Out of four or five points of alignment- the front where the spinner goes, the IP in the cockpit, the blade antenna on the spine, the tailwheel well, the tail or the wings, NO TWO paired up. So when the time comes, I'll line up the wing roots and everything else will have to be sanded to match. I cut the pit opening much larger based on this alignment.


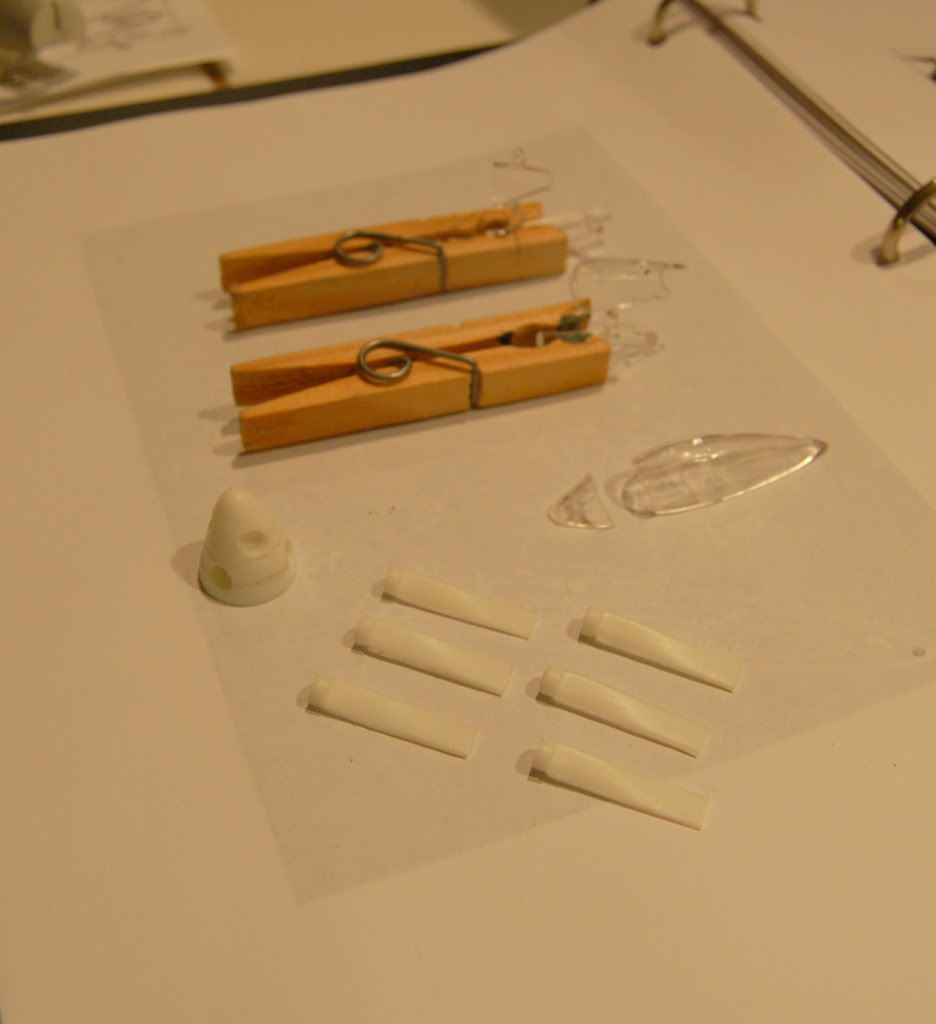
Next I dipped the clearies in Future, and cut the Shark canopy in two. I built up the Shark spinner, and that'll be a whole project to smooth out. I cleaned up the prop blades.

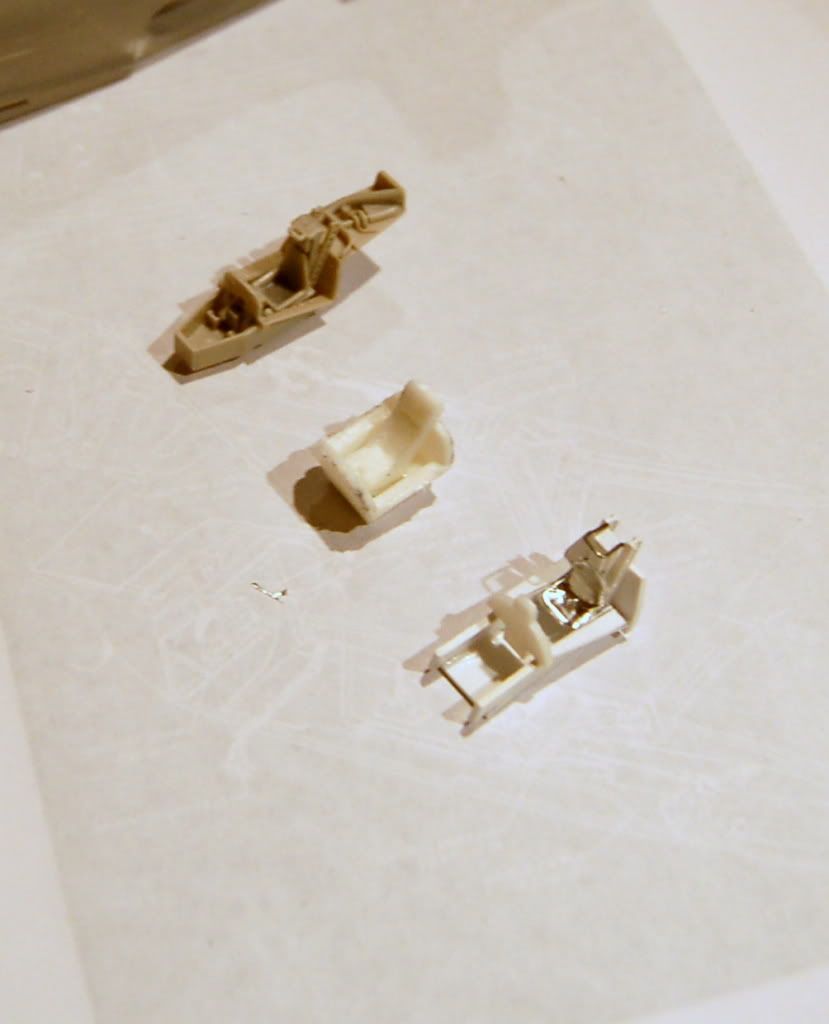
Last I spent most of the evening scratching up a pit for the Shark. Here's from back to front: Tamiyas Skyray pit, the Mach 2 Shark pit, and in the front my all new one. I'll take better pictures when it's painted but I'm real happy with it. Tomorrow I hope to finish the offices, build both airframes and start painting final colors. They're both really pretty schemes.

See you all tomorrow.

Bill


  • Member since
    May 2009
Posted by -Neu- on Saturday, November 14, 2009 1:50 AM
Looking good Bondo.... I like how the skyshark uses a naca airfoil wing... like most planes from that age

Brett you can call that done and none of us would be none the wiser... great job! Oddmanrush your corsair II looks like its progressing nicely.

Aaron. Forgive me, for I have sinned in the great eyes of the great weekend build god. I have been guilty of not posting enough build photos of my Hayate build... so let me commit my penance here.

The initial coat for some highlights


Masking them


And the result


The another view with the cockpit


aand the underside.


I'll probably do some more tonight because I have some stuff to do tomorrow afternoon... most of the decaling at least.
Weekend Madness GB tag
  • Member since
    October 2004
  • From: League City, Texas
Posted by sfcmac on Saturday, November 14, 2009 1:58 AM

 What the heck? Did I miss the memo that said we could sleep?  Thought this was a slumber party!   Heck your hobby knifes have yet to be unsheathed bandits!  Even Cpt Bondo ? Going to bed?  Fine work btw Capt!

 Heck FRank barely smelled the glue and nodded off. Cuz he is old I reckon!.

Brett has his clock all messed up. It's 2AM! Here !  You talk as if the sun were shining!

 Those who have posted progress pics?  Bravo!  I'd feel lonely with out ye?  Those who posted  parts on the sprue? Donna spect me top be falling ferthat!  Tis a thousnd  models ye will be building  hile I will only one!

 Cpt Bondo e explaining the code to ye bt he has been drugged no doubt by the freeloading gonna build the plastic potty seat types !

How'd that get so big? Shock [:O]

 4 pots o Coffe and 3 bean burrito's and a Big Mac for me heath later I is roaring to build!  I have enlisted help to assure a timely and proper finish too!

Meet Trojan Man!!!! ( not to be confuzed with der commericial for their pleasures)

and his crew! Bobba Fetish and Furbyalishis!

With much work being done those who sleep shall miss the show and waste err so much of the time so precise!  Burp, drink coffee and be merry for tomorrow we diet!

  • Member since
    September 2004
  • From: Vernon, BC, Canada
Posted by razordws on Saturday, November 14, 2009 2:08 AM

Looking great so far Bill but it looks like you've got a lot of work ahead of you.  Good luck Sailor!!!

Didn't get a whole lot done tonight but it's a start.  This kit may say Tamiya on it but it is certainly not the modern shake and bake kit that we all love. Here's thebox art and sprues.

I quickly hand painted the interior.  The seat s from the spares box as is the pilot.  The kit figure had the mold lines way out of alignment so I had to replace it.

A quick dry fit to check the alignment.

Past midnight here and it's been a long day, think I'll pack it in for the night.

Dave

  • Member since
    September 2004
  • From: Vernon, BC, Canada
Posted by razordws on Saturday, November 14, 2009 2:16 AM

Neu, fantastic results with that finish.  Thumbs Up [tup]Thumbs Up [tup]  Can't wait to see more.

Aaron, me thinks you misinterpreted the definition of a group build.  ONLY ONE PERSON IS TO BE WORKING ON THE MODEL!!! LOl!!!  Glad you've found some friends to keep you company on your all nighter though they may regret it later after you've eaten all those burritos. Yuck [yuck]

Dave

  • Member since
    October 2004
  • From: League City, Texas
Posted by sfcmac on Saturday, November 14, 2009 2:53 AM

 Oh I must be at an advantage as I am a night shift person! Got my second wind and all my pre-painting I did this AM is paying off!

 Sure Dave yell at me for making my own company!  All you fellers went to bed so I have to make my own company! LOL! Laugh [(-D]

 Things are simply getting simple which is only proper for a simple minded bloke like meself! The fellers in England shall be up soon I fear!

 Undisturbed building in the middle of the night is the ticket!

 Lets put it together!

 What is this thang? and it takes C-batteries?!  The horror!

Blush [:I]

She has wings and wheels!  Guys are working hard I tell ya!

The paint for the most part is all Tamiya rattle can. Have to match the colors accurately. No airbrush cleaning and fast drying too! Sticks well to the primer and is allowing me to handle it fairly quickly which is good.

On to the motors!Thumbs Up [tup]

  • Member since
    November 2012
Posted by dioramator on Saturday, November 14, 2009 3:22 AM


Howdy sfcmac

I'm not sure what they put in the water there in Texas, but I'm sure it would be illegal in Australia.

just have to settle the kids, and I'll be back to the build.

Brett


  • Member since
    October 2004
  • From: League City, Texas
Posted by sfcmac on Saturday, November 14, 2009 3:45 AM
 razordws wrote:

Looking great so far Bill but it looks like you've got a lot of work ahead of you.  Good luck Sailor!!!

Past midnight here and it's been a long day, think I'll pack it in for the night.


 Et too  Dave?  Very well then alone It shall be!  Happened to Britian and they turned out just fine!  Man these wings are a pain!  Not quite a shake in bake here either but I'm not telling the kit that!

Another hour down!  Things are moving along well! Thumbs Up [tup]

Well Future is dry and engines are in. They just plug in. Too easy. I see no reason not to stick some decals on!

 Had to get a Muscle Man for that 22,000 lb bomb though! Thing is huge!

Furbilicious likes this stuff to do some quick masking! Thanks for the tip Frank! Between that and silly putty it is kinda a breeze or is that the 3 fans I have a blowing?

Muscle man finished painting the bomb and dropped it on Bobba Fetish to dry! Poor fellow got a hernia!

The cowlings are removable so they don't fit seam free outta necessity. I did the best I could. The Handitak will make a good mask to paint the curvy color demarkation on them.

 Having to make my own letter codes. I misplaced the decals. Haven't seen them since I built the Halifax way back when. Looked for 2 weeks  to no avail.  I'll make due with what I have and can make for now until they turn up again. Probably stuck them in a book somewhere. I am my own worst enemy sometimes. Banged Head [banghead]


  • Member since
    May 2009
Posted by -Neu- on Saturday, November 14, 2009 4:37 AM
Well I guess its down to the three of us Aaron... then again, being in Australia is kinda cheating in my books. Decalling is going okay... but they are a bit tight and yellowing, so its a bit of a slog.


I've also enlisted the help of a friend, cuz it seems to have helped your progress..

Weekend Madness GB tag
  • Member since
    November 2012
Posted by dioramator on Saturday, November 14, 2009 4:56 AM


I've just hit the 36 hour mark, 12 to go (8 of which I intend on being asleep!)

currently doing silvering on the tracks. still have drybrushing and pastel chalks to do yet. I'll see how I'm doing for time before deciding how far to go with chips and scratches.

Brett


  • Member since
    May 2009
  • From: Hobart, Tasmania
Posted by Konigwolf13 on Saturday, November 14, 2009 4:58 AM

Ok done base coat, then had to do some sanding


Redone base the grey then maskol'd ready the next colour. Havn't done a camo coat with the airbrush yet so this just an experiment.

Andrew

  • Member since
    October 2004
  • From: League City, Texas
Posted by sfcmac on Saturday, November 14, 2009 5:05 AM

 Yeah Neu We are  die hards!  Wonder why Brett lets his kids stay up until 4 AM?  Smile,Wink, & Grin [swg] Austrailia!  Where the Roos run for cover and the women sing at the beach!  Cool!

Well 5 AM here and another hour gone!  Ran into a stumbling block finally. Hooked up the motors and battery and nodda!  No spin.

Muscleman followed the wiring instructions right but there is a short somewhere!

Bobba fetish even tried a diff battery to eliminate the obvious so I had to callsome electrictians in.

Yeah ever since the sorcerous with the nice legs left castle grayskull, ol, skeletor had to find another hobby!

 Anyways turns out I have a bum motor. once I unhooked the right outboard motor the other 3 spin fine.  So the gimicky part of this kit is somewhat of a bust, A real shame since some fit and details are sacrificed for this gimmic.

 The bomb acts as the switch which is kinda novel but to get a flush fit is very hard without glue.

 Anyhow I am not gonna worry much about it. Someday if I find a spare micro motor I shall replace it but until then. 3 outta 4 ain't bad. Confused [%-)]Thumbs Down [tdn] No broken wires so Micro motor repair is beyond me. Plus they don't come apart.

  • Member since
    May 2009
Posted by -Neu- on Saturday, November 14, 2009 5:22 AM
So my GM is wondering if I'm crazy...


I've decided to do my final glosscoat now instead of the morning. Its really the last thing I need to do. Things aren't completely dry so its a bit of a risk... but lets see.
Weekend Madness GB tag
  • Member since
    May 2009
  • From: Hobart, Tasmania
Posted by Konigwolf13 on Saturday, November 14, 2009 5:28 AM

AAARRRRRRRGGGGGGGGHHHHHHHHHHH, its green!!!

Hmmmmm, how long till I take the maskol off, I'll give it 30minutes I guess


Andrew

  • Member since
    November 2012
Posted by dioramator on Saturday, November 14, 2009 5:46 AM
 sfcmac wrote:

  Anyways turns out I have a bum motor. once I unhooked the right outboard motor the other 3 spin fine.  So the gimicky part of this kit is somewhat of a bust, A real shame since some fit and details are sacrificed for this gimmic.


Struth ay... wouldn't that rot ya jocks.

Smile,Wink, & Grin [swg]

Brett


  • Member since
    May 2009
  • From: Hobart, Tasmania
Posted by Konigwolf13 on Saturday, November 14, 2009 5:50 AM

A quick half hour (well it was 1/2 from when I finished). The maskol came of jagged and the paint was flaky, is that normal? I'll try touching it up free hand soon.


Andrew

  • Member since
    May 2009
Posted by -Neu- on Saturday, November 14, 2009 6:02 AM
Konigswolf its looking good; I had to do a bit of freehand painting at the tail too with royal blue where the decals tore. Brings me back to the days when I did it all with a paintbrush.

So I decided to cheat and forgo the glosscoat and just do a quick overcoat with my favorite pollyscale flat overcoat... it came out pretty well as the GM seems to think.


With that I'm off to bed... all I need to do tomorrow is final assembly and I'm done. Good luck to you all and stop playing with your Tallboy, Aaron, and finish that lanc.

Weekend Madness GB tag
  • Member since
    October 2004
  • From: League City, Texas
Posted by sfcmac on Saturday, November 14, 2009 6:39 AM

Andrew that maskol  liquid mask stuff is kinda hit or miss.  Never had a lot of luck with it myself. Next time give some clay or silly putty or Handy tack a go. I think you will like the results better. A little touch up and it will be good to go though.

Brett struth?  Must be one of those boomerang words that comes back at ya? 

That's it Neu see how far you can push it!   It is a gamble!

 Renmember if everything worked great we would never be able to learn from our mistakes eh?

 Where am I besides on my 4th pot O coffee?

 Oh Yeah made the decals and applied them. Not too shabby.  A bit light on stenciling but oh well my fault I put them some where safe eh?

Took off the masking canopies and cleaned up the area to receive the pre painted ones.  Heck I am running outta parts. After that just the little counter balance weights and easy to bust off stuff left?

 A coupple places I gotta touch up to Andrew but while that is normal some argue that I am probably not. Dunno why?

  • Member since
    May 2009
  • From: Hobart, Tasmania
Posted by Konigwolf13 on Saturday, November 14, 2009 6:52 AM

Aaron, thanks for the tips, I was going to try some blu-tak (prolly the same as your handy tack) but I cant find stuff all, I'll pop out to the shop first thing and grab a pack or two. I'd have to agree as a cammo masking item maskol isnt the best, seems fine on canopies though.

As far as the free hand went, it went marginally better than the maskol (so yeah off to the shops first thing for some blu-tak). Would of gone better me thinks with a fine for super fine tip for my airbrush (aztek with interchangeable tips, I currentley only have medium and large cover tips). Think I should of gone with a 48 or 35th scale Whistling [:-^]. But on the brighter side its good learning :D


Andrew

  • Member since
    November 2012
Posted by dioramator on Saturday, November 14, 2009 7:02 AM


Aaron... slow down on that coffee, or you won't sleep for a week.

Andrew... I use an Aztc as well

I'm almost done, just doing some pastel chalks.

Brett


  • Member since
    May 2009
  • From: Hobart, Tasmania
Posted by Konigwolf13 on Saturday, November 14, 2009 7:27 AM

Ok just decided to not build this girl OOB, Gotta add sidewinders to her (I know huge move :P). Have painted the ordnance and racks as well, Gotta do some looking find out what colours to do the sidewinders.

Andrew


  • Member since
    October 2004
  • From: League City, Texas
Posted by sfcmac on Saturday, November 14, 2009 7:59 AM

 Already looking much better Andrew! Thumbs Up [tup]  Brett slow down on the coffee?!!  Whatever do you mean? Whistling [:-^]

Neu Looking smoking fine!

 Ok I am out of parts and outta stuff to paint.  I guess it is as far as I can go !

 Still drying but the sun is now up and I have a Landcaster.

  • Member since
    September 2003
  • From: South Central Wisconsin
Posted by Daywalker on Saturday, November 14, 2009 8:22 AM

Shock [:O]Shock [:O]Shock [:O]

Aaron- She's nearly done???  OMG!!!  How did you do that so freakin fast?

I wanna see her with the spinning props! Tongue [:P]

Here's a pic of my Corsair-

Tamiya tape seatbelts added

Textured the bombs with Mr. Surfacer 500 stippled on with a sponge

Glued the fuse halves together

Engine is painted

Prop tips painted

Cut off the nubs that were supposed to be machine guns (ala P-47) and drilled them ala Corsair


Frank 


  • Member since
    November 2012
Posted by dioramator on Saturday, November 14, 2009 8:26 AM


Well that's it for me tonight as well.

It's just gone 1:00 am tomorrow (to most of you). so that leaves me 8 1/2 hours.

Here's where it's up to.


All I have left to do is fit the M.G.

Brett


JOIN OUR COMMUNITY!

Our community is FREE to join. To participate you must either login or register for an account.

SEARCH FORUMS
FREE NEWSLETTER
By signing up you may also receive reader surveys and occasional special offers. We do not sell, rent or trade our email lists. View our Privacy Policy.