SEARCH FINESCALE.COM

Enter keywords or a search phrase below:

Achtraden! 8x8 Group Build '09-'10

45450 views
373 replies
1 rating 2 rating 3 rating 4 rating 5 rating
  • Member since
    August 2009
  • From: Cary, North Carolina
Posted by M1Carbine on Friday, March 5, 2010 10:18 AM

Looking great Gents


Bob

  • Member since
    May 2009
  • From: Hobart, Tasmania
Posted by Konigwolf13 on Friday, March 5, 2010 6:37 AM

Mike feel free to use one already posted or wait a week or two and I add a shot with finished base.


Andrew

PS Maybe I should add some road kill.


PPS OK bad joke


  • Member since
    April 2005
Posted by Thunderbolt379 on Friday, March 5, 2010 6:01 AM

No probs, do you want to do that and post a finished-finished shot or two before I add a pic to the leaderboard?

Cheers, M

http://worldinminiature.blogspot.com/

  • Member since
    May 2009
  • From: Hobart, Tasmania
Posted by Konigwolf13 on Friday, March 5, 2010 5:44 AM

Thanks Mike. I realized looking at those shots I need to add alot more weather to the wheel well areas.

Andrew

  • Member since
    April 2005
Posted by Thunderbolt379 on Friday, March 5, 2010 5:31 AM

Andrew -- that is one beautiful ASLAV! A credit to this GB, I reckon, and a subject I must add to my own collection in due course. I photographed the Aussie version many years ago but never in the detail I would have prefered. I'm sorry to hear about the turret mis-hap, but you pulled off a neat save with repairs that are invisible to the observer. Very well done!Yes I'll get one of your photos up on the leader page with a completion date of March 5th.

Okay, finally, here are some WIP shots of the Stryker!

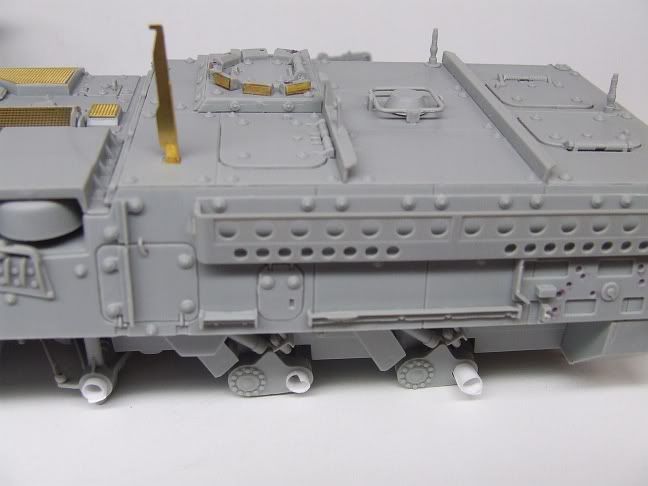
I masked the wheel locators with rolls of paper, held in place simply by their own tendancy to unroll:
 

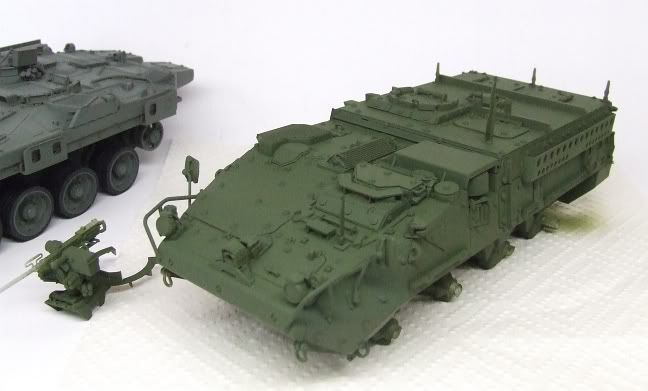
The overall scheme is NATO Green, Tamiya XF-67, and it took a lot of paint to cover this animal. There are so many twists and turns, so much three dimensional detail, that you have to hit every part of it from every angle, and I ended up mixing three or four batches of paint to get a solid coat onto everything, including the wheels and the weapon station, painted seperately. Here it is fully basecoated:


That's Trumpeter's S-tank in the background, see how grey the colour mix looks by comparison (yet it looked so green when I first mixed it...!) Anyway, the next job was to fade'n'shade. I mixed 20% white with the base colour to do the centers of panels, then 20% black to hit all shadow areas and outline panels, divisions and hatches. Here she is with the contrasting highlights:
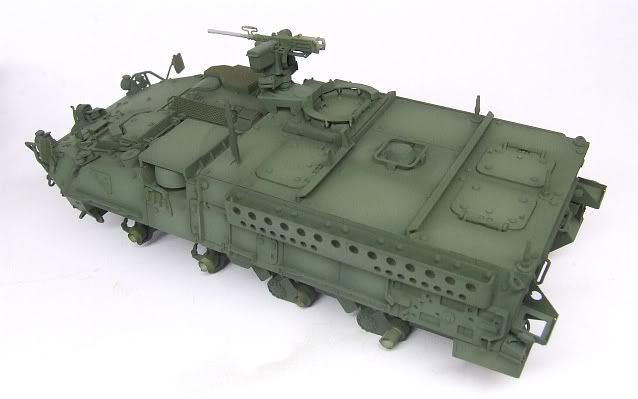


It looks quite subtle in the photo, it's rather more stark in the flesh. Next up, wash and drybrushing, then decals and pigments, and add some anentennas. I'm thinking of spraying a mixed tire-black also, the shiny vinyl is just too factory-fresh and I can't be sure pigments will stick well enough to tone it down.

If I could get a few hours to invest in it, this project would finish up pretty quick!

Cheers, all comments welcome,

Mike/TB379

http://worldinminiature.blogspot.com/

  • Member since
    May 2009
  • From: Hobart, Tasmania
Posted by Konigwolf13 on Friday, March 5, 2010 5:22 AM

WOOT! Done

Ok ASLAV is done, but I thought It looked shocking without a base so I cooked one up. Still needs a couple of things but since I can't get them till next Friday at the earliest I'll call it quits for this GB. Thanks for having me aboard seen some great builds :)

OK First Two shots are finished build, no (real) weathering.

You may of noticed a different flag, I dropped the turret while painting the periscopes. The flag tore and broke the end off the 25mm.Yeah I was ticked. I replaced the flag by photocoping the one out of my other ASLAV, the barrel end was a little piece of sprue.

Next are the final weathered shots of the beast on base. I need some sand for the side of road, paint lines and put a red reflector on the roadside marker. An yes for all you aussies out there its not a standard warning sign, I didnt have a roo decal big enough so I adlibbed.


Andrew Beer

  • Member since
    April 2009
  • From: Carmel, IN
Posted by deafpanzer on Thursday, March 4, 2010 1:42 PM

Terry- Don't tell me you made the chains?  If so, how did you do it?  I really think the chains are GREAT.  Beats spending big bucks on AM/PE chains.

Andrew-Looking great as usual! Yes  You are almost there...

Guys- Last night I was able to tone down the camo using wBill's method spraying mist of base paint MM Grunbraun all over and it worked out pretty good.  Then I applied two coats of Future.  Like Andrew, it will be ready for weathering after final assembly such as adding tools and stuff to the hull.  Unfortunately, I broke two wheels...dropped it onto the floor in the garage but it can be fixed.  AAARRRRGGGHHHHH!!!!!!!!! Angry

Andy

  • Member since
    May 2009
  • From: Hobart, Tasmania
Posted by Konigwolf13 on Thursday, March 4, 2010 8:03 AM

Mike, the antenna's are guitar strings, an steel one on top of a e-string. Read about it before thought I might try it, Worked fine on one, need to redo e-string on the other two as a little much glue has made the deatil dissapear.

Terry, nice smoke grenade canisters, I left the PE chains off mine to use as spares next build.


Well all decaled up, need to do tiny bits here and there paint wise, u-bolts, ammo chute etc, otherwise shes ready for weathering.


Andrew

  • Member since
    May 2005
  • From: Dublin Rep Of Ireland
Posted by terry35 on Wednesday, March 3, 2010 5:48 PM

Mike Looking forward to seeing the stryker with a coat of paint. K/W great progress on the ASLAV looks brilliant, looking forward to seeing it weathered.

Andy that 234/1 is really comming along well. Nice and sharp.

Well got some small update only the chains on the smoke dischargers. Narrow gauge wire and the twisty twisty method.

Regards,

Terry.

  • Member since
    April 2005
Posted by Thunderbolt379 on Wednesday, March 3, 2010 6:39 AM

Looking GOOD, KW! Top stuff! What are the antennas made from? It'll be great to have some extra moderns hardware on this lineup, to go with all the fab period vehicles!

My Stryker has it's full paintjob on now, base, fade and shade coats around NATO Green, and is awaiting weathering -- pics as soon as I can remember to get them uploaded!

Cheers, great work guys,

Mike/TB379

http://worldinminiature.blogspot.com/

  • Member since
    May 2009
  • From: Hobart, Tasmania
Posted by Konigwolf13 on Monday, March 1, 2010 5:25 AM

Ok cammo is on, needs some touch up, then redo the parts that came off when I took the blue tac off. Then to add parts that had to wait until after the main job then a light weathering.

Pic two shows some quick experimental weathering applied using tamiya rust powder

Andrew

  • Member since
    April 2009
  • From: Carmel, IN
Posted by deafpanzer on Sunday, February 28, 2010 10:15 PM

Guys,

I have been fighting cold for last two days but managed to do work... ENJOY the pictures! Ick!

Yikes! What is happening to my work?  Actually I applied another set of silly putty to cover the brown-red paint.  Final step of camo painting... it really looks like a blob!

Here's the result...

My objective was to paint it like the drawing of 234/1 that I found in one of my referrence books... fell in love with its hard lined camo (not sure if I said it correctly... not soft toned camo). 

I have to figure it out to tone down the camo... will spray tan paint 12 inches away from the kit or you have a better suggestion? 

This week I plan to work inside the gun turret and weatherize the body... but not too much... because the picture of actualy 23/41 I have didn't show much of damage or dirty. 

Andy

  • Member since
    November 2006
  • From: Coastal Maine
Posted by dupes on Friday, February 26, 2010 4:29 PM

deafpanzer

Dupes, don't be shy... come and join us!  I have been watching your last build... that Japanese tank with winter camo using white spots only was freakin' awesome!  

Why don't you build Sd.Kfz.234/4?  I don't think anybody has done it for our GB as we have one or two 234/1, several PUMAs 234/2 and one 234/3 which was signed up but not built yet if I am correct.  It would be cool to hit all four bases... home run we can say!

Hey, thanks man! Big Smile

A 234/4 to complete the cycle, eh? I don't see why I couldn't. Turns out the only things in the stash that qualify anyway are DML 234/1-4's and a Trumpeter LAV-AD variant (which is really cool, but only has a plain OD scheme? Need to see how else that thing was done up). Let me give it a once-over and see how long it'll take me to build up. Yes

Of course, I still reaaaaaaly want to put together an F-4 for T-Bolt's other GB. And of course, finish up that Type 90. Sigh.

  • Member since
    April 2009
  • From: Carmel, IN
Posted by deafpanzer on Friday, February 26, 2010 10:18 AM

Mike- Can't wait to see your Stryker... I want pictures! LOL 

Andrew- Your ASLAV looks awesome especially its PE... I think you did GREAT! 

I think I have a problem at home... my wife thinks I am crazy... played with silly putty for more than two hours last night.  Following the silly putty tip I learned from the forums, I am using it for the camo painting... NO I am not painting it PINK... dream on!


The color of MM Afrika Grunbraun  under the silly putty... I painted first set of camo using MM Brown but I had it lighted it up a bit with very little white paint.  Tonight if I have time I will apply second set of silly putty to protect brown before I paint dark green.  Hope this technique really works...

Andy

  • Member since
    April 2005
Posted by Thunderbolt379 on Friday, February 26, 2010 5:19 AM

I got some NATO Green on the Stryker today, it took a lot and I'll need to mix some more tomorrow to catch spots I missed, before going on to the shade and fade coats. Next to the Stryker, you can really see the S-tank for a grey rather than a green, but without the richer green to compare it to the other mix looked really green.

I'm thinking I'll need to mix a tyre black, the vinyl is too shiny and perfect, so that's another round of spraying. There's a fair bit in getting round even a monocolour project.

I'm hoping to have this one done in a week, along with the S and to get the F-84 on the bench around the same time, as there are lots of new projects beckoning. I launched the Phantom GB seven weeks ago and have hardly made a start on mine!

Cheers, Mike/TB379

http://worldinminiature.blogspot.com/

  • Member since
    April 2005
Posted by Thunderbolt379 on Thursday, February 25, 2010 5:22 PM

Oh! I must check and see if I have the same edition, because the PE fret was not included when the kit was first released (It was reviewed in FSM and at the time it had vinyl mesh, and no grills or wire cutters). I have the same box, so hopefully there's brass in there!

Cheers, Mike/TB379

http://worldinminiature.blogspot.com/

  • Member since
    May 2009
  • From: Hobart, Tasmania
Posted by Konigwolf13 on Thursday, February 25, 2010 5:08 PM

Mike, the PE comes standard with trumpy's ASLAV(kit 00392), so theres no AM its all OOB.

Andrew

  • Member since
    April 2005
Posted by Thunderbolt379 on Thursday, February 25, 2010 4:23 PM

Dupes -- hey, buddy, if you wanna come aboard with an eight-legger, you're more than welcome! Just let me know what to put on the leaderboard!

K\W13 -- the LAV is looking GREAT! The PE came out very nicely, especially for a first shot. My Stryker is my first PE job as well, it's a whole new technique, isn't it? Remind me, which PE set is that? I have the same kit and would love to add the metal as it seems to address the shortcomings picked up on by reviewers.

Speaking of the Stryker, I picked up NATO Green yesterday and I'm hoping to get the paint on today -- pics tonight, all being well.

Cheers, Mike/TB379

http://worldinminiature.blogspot.com/

  • Member since
    May 2009
  • From: Hobart, Tasmania
Posted by Konigwolf13 on Thursday, February 25, 2010 7:50 AM

All parts on, except for a few to go on after the final paint job (eg tail lights, spare tire storage, tools, etc). I lost a couple of parts. most of note one of the smoke grenade lauchers the other being a tie down handle. I wont be adding the propeller guards for two reasons, one I've seen some ASLAVs with out them and two, some fool glued the props on upside down so they wont fit anywaysPropeller.

Here's the pics

All in all I  know I've made a few "errors" in this build, probably the worst bit being a few messy bits around the PE, but being the first kit I've ever done with more than 3 PE parts to use I'm not dissapointed. I also used it as a practice build for my next pair of ASLAVs with planned interiors on them, so I have taken plenty of notes of innacurate parts or my stuff ups or easier ways. Example being the storage area mesh should go on the inside bottom trumpeter have it on the outside bottom. I learnt the hard way to trim first before making the correct fit to trim it first or it gets messy.

Andrew

  • Member since
    April 2009
  • From: Carmel, IN
Posted by deafpanzer on Wednesday, February 24, 2010 8:36 PM

Dupes, don't be shy... come and join us!  I have been watching your last build... that Japanese tank with winter camo using white spots only was freakin' awesome!  

Why don't you build Sd.Kfz.234/4?  I don't think anybody has done it for our GB as we have one or two 234/1, several PUMAs 234/2 and one 234/3 which was signed up but not built yet if I am correct.  It would be cool to hit all four bases... home run we can say!

Terry, many thanks!  Will do camo and weathering so I am not sure how much of shading I will see at the end. 


Andy

  • Member since
    May 2005
  • From: Dublin Rep Of Ireland
Posted by terry35 on Wednesday, February 24, 2010 5:28 PM

Andy great Puma, I like the pre-shading, theh effort seems to have paid off, subtle but noticable will make for good viewing as you progress.

Ha...Dupes..... God I know you love group builds, I think this one has an over run.

Sorry I hoipe this one has an over run.............might need it .

Guys the weather is killing me here. Rain rain and even snow..... can't get outside to prime.

Terry.

  • Member since
    November 2006
  • From: Coastal Maine
Posted by dupes on Wednesday, February 24, 2010 3:50 PM

Man, you guys are cranking out some great stuff! Hoping I might find a way to cobble something together that qualifies before the end of April. Yes

  • Member since
    April 2009
  • From: Carmel, IN
Posted by deafpanzer on Wednesday, February 24, 2010 1:20 AM

After painting MM Italian Brown as primer, I painted all corners, edges & outlines black hoping that it will show different shades of color that I learned from Doog or somebody's forum earlier.  I think it worked and it was easy and fun...

After allowing the black paint to dry overnight, I painted MM Afrika Grunbraun instead of MM Panzer Dunkelgelb 1943 because I wanted the color to match the camo of 234/1 drawing that I really liked very much in one of my reference books.

I am pleased with the process to ensure that the paint is not looking too monotoned so far... reading the forums really helps.  I will let it try for couple of days before I can paint camo.  Feel free to make comments.  Yup I am still using that little space heater to allow me do airbrushing in the freezing garage. Stick out tongue  No major disaster yet... knocking wood!

Andy

  • Member since
    April 2009
  • From: Carmel, IN
Posted by deafpanzer on Sunday, February 21, 2010 9:50 AM

Jmart- I don't have any problem for you to join us.  More the merrier I always say as long as we still have time until end of April. 

My process has been stalled because it was too cold to do airbrushing in the garage but thanks to Bob (M1carbine) as he pushed me to take the risk using a space heater and it worked out.  I think I need a bigger one to keep ME warm not just the kit! 

Used MM Italian Brown as primer... I am plan to paint first coat of MM Panzer Dunkelgelb 1943 today! 

Andy

  • Member since
    May 2005
  • From: Dublin Rep Of Ireland
Posted by terry35 on Saturday, February 20, 2010 4:31 PM

Mike that is some serious progress, beautiful  vehicle. Now I only have to stay away from HLJ for the evening. ha..ha...

Well here is my update.

 I got a lot done since the first post but I must admit  that I am not happy with the images as the plastic does not seem to like being photographed.I got most of the welds done and I am pretty satisified with the results. Trumpeter included some photo etch parts, what I have used so far I found pretty ill fitting and they would probably have been betterr done in plastic but that is only a personal opinion.I hope to get the turret done asap and then on with the paint. I am very undecided as to the weathering and I will wait until the vehicle is p[ainted before I decide.

Well on with the pics

This just about shows some of the weldind up close.

I painted over the anti slip stuff only for my own reason and that was just to see it.

That is a big turret and this is going to be a big puppy. the wheels are just fine and I don't want to go off the OOB track. The subject is not important to me and the kit seems fine.

One reason for not adding too much extra detail to the suspension, its done well enough in theh kit and will be covered by thos monster wheels.

I took this one just to show people the tools they are fine even against photos of the real thing.

http://www.afvplanet.com/especial/centauro/pages/P5227221.html

Thanks for looking in again.

Terry.

  • Member since
    March 2007
  • From: NJ
Posted by JMart on Saturday, February 20, 2010 2:09 PM

I was just going over this GB… LOADS of great stuff! Those Pumas are just gorgeous.

I just joined the anti-aircraft GB with the 1:35 Italieri LAV 25 Air Defence with Eduard Zoom PE. Can I cross-over in here? If time permits, what I REALLY want to do is crack open my old copy of the Testors/Italieri 1:35 234/2 PUMA and shamelessly copy the main great build ideas and techniques displayed in this GB, like Mike’s  camo job : )  of course, seeing the Dragon kit, I feel like giving the Old Puma the firecracker treatment lol


  • Member since
    April 2009
  • From: Carmel, IN
Posted by deafpanzer on Thursday, February 18, 2010 11:12 AM

Mike,

Ditto  Your kit looks great without paint! Yes Do you really have to paint it? Kidding!  Looking forward to your next posting.

Andy

  • Member since
    May 2009
  • From: Hobart, Tasmania
Posted by Konigwolf13 on Wednesday, February 17, 2010 8:22 PM

Mike, Love it :)

Cant wait for the paint job. Except for grab handles mines finished, ready for paint been spending time on my Yamato. Will do a proper post later, 1/2 way through lunch at moment Chef


Andrew

  • Member since
    August 2009
  • From: Cary, North Carolina
Posted by M1Carbine on Wednesday, February 17, 2010 10:08 AM

Mike....That is beautiful with out paint...................LOL


Great build, what camo are you doing?


Bob

  • Member since
    April 2005
Posted by Thunderbolt379 on Wednesday, February 17, 2010 7:26 AM

Hi guys,

A little progress -- the Trumpeter 1:35 Stryker is essentially done building and ready for paint. Here she is yesterday:


And tonight, with the photoetched parts added (with the exception of the two loose ones seen below, which simply don't fit).


And a closer angle:


This is my first time folding brass and I'm cautiously optimistic, it seemed to work fairly well, though the stuff is pretty fragile. We'll see what the future brings...

Paintjob next, I'm not sure exactly when I'll get to it but hopefully soon.

Cheers, Mike/TB379

http://worldinminiature.blogspot.com/

JOIN OUR COMMUNITY!

Our community is FREE to join. To participate you must either login or register for an account.

SEARCH FORUMS
FREE NEWSLETTER
By signing up you may also receive reader surveys and occasional special offers. We do not sell, rent or trade our email lists. View our Privacy Policy.