SEARCH FINESCALE.COM

Enter keywords or a search phrase below:

Rocket Power Group Build 2010-2011

35869 views
186 replies
1 rating 2 rating 3 rating 4 rating 5 rating
  • Member since
    March 2007
  • From: Atlanta, Ga.
Posted by MrSquid2U on Thursday, February 3, 2011 2:43 PM

I am still alive and plugging away! Despite rumors.Indifferent

LOL- So I totally squandered away the couple of days which reached mid 60s! And today I got back to painting. We now have FREEZING rain falling and my garage is back to 'winter cold' temps?Angry

BUT, I went ahead and preshaded followed by my color coats of RLM02. I really wanted the preshading just to give a panel effect since I'll still apply a wash to the panel lines. To that end it was effective enough.


  • Member since
    March 2007
  • From: Atlanta, Ga.
Posted by MrSquid2U on Wednesday, January 19, 2011 10:52 PM

Scorpiomikey

Lagging? dude your the only one building at the moment. There were a couple others who started but seem to have shelved their builds. Oh well.


Well I feel like I'm lagging? Oh wait, that's just my usual DRAGGING. False alarm.Stick out tongue


  • Member since
    March 2010
  • From: New Zealand
Posted by Scorpiomikey on Wednesday, January 19, 2011 1:40 PM

Lagging? dude your the only one building at the moment. There were a couple others who started but seem to have shelved their builds. Oh well.

"I am a leaf on the wind, watch how i soar"

Recite the litanies, fire up the Gellar field, a poo storm is coming Hmm 

My signature

Check out my blog here.

  • Member since
    March 2007
  • From: Atlanta, Ga.
Posted by MrSquid2U on Wednesday, January 19, 2011 4:29 AM

The kit main gear was leaps and bounds better than the blob they gave you up front. I carefully cleaned them up to add some definition and then made up new brass "doors" again which entailed making some mounts for those. I used some reshaped U-Channel to help them conform to the struts and shave them down to be closer to scale. This allowed the doors to stand off from the gear. I also added brake lines and a clamp which doubled to add definition in that area. A couple of pieces of brass wire were added inside the wells just to busy it up again.

Sorry to be the straggler around here but with that- I think I'm ready for paint.Embarrassed


  • Member since
    March 2007
  • From: Atlanta, Ga.
Posted by MrSquid2U on Saturday, January 15, 2011 1:01 PM

^^^

Thank you Mikey!Smile


Well, it's warming up again so I actually crawled back to the bench.

I added a landing light to the wing. The usual way of filing a notch, painting the surround in silver and drilling lil dimples in the back of clear sprue to represent the bulbs and finally shaping the clear lens to the wing then buffing until clear again. I'll just mask this off while painting and voila- landing lights!


  • Member since
    March 2010
  • From: New Zealand
Posted by Scorpiomikey on Friday, January 7, 2011 2:52 PM

looks good so far squid.

"I am a leaf on the wind, watch how i soar"

Recite the litanies, fire up the Gellar field, a poo storm is coming Hmm 

My signature

Check out my blog here.

  • Member since
    March 2007
  • From: Atlanta, Ga.
Posted by MrSquid2U on Thursday, January 6, 2011 9:27 PM

While researching this plane on the Net I came across several buildups of this same kit. In looking at them I was struck by a few features which really gave away the scale and lack of refinement in the plastic parts. To that end I made note of what I would change. One item was the front gear well doors. So I made new ones from two layers of brass to represent what I assume should have been reinforced stampings of some sort. I also busied up the bay with some "conduits".


  • Member since
    March 2007
  • From: Atlanta, Ga.
Posted by MrSquid2U on Thursday, January 6, 2011 2:46 PM

 Made a new wheel assembly out of a tire, rim and axle from styrene, aluminum and brass. Located that with the gear which was given new scissors and brake line.


  • Member since
    March 2007
  • From: Atlanta, Ga.
Posted by MrSquid2U on Wednesday, January 5, 2011 11:58 AM

Scorpiomikey

Looks good squid. Ill add you to the roster.


Thank you!

Staring on the bottom side I cleaned up the wings to root area further with some shaping and sanding.

Built in the front well.

And started to see what I might do with the softly molded nose gear assembly.


  • Member since
    March 2010
  • From: New Zealand
Posted by Scorpiomikey on Saturday, January 1, 2011 8:05 PM

Looks good squid. Ill add you to the roster.

"I am a leaf on the wind, watch how i soar"

Recite the litanies, fire up the Gellar field, a poo storm is coming Hmm 

My signature

Check out my blog here.

  • Member since
    March 2007
  • From: Atlanta, Ga.
Posted by MrSquid2U on Saturday, January 1, 2011 5:06 PM

Hi guys/gals,

 Noticed the GB and have enjoyed seeing the projects on display. As a subject it's one that I really like and over the years I've collected some examples that have been in my stash. Wanting to do one kind of 'different' within such an already unique subject though I've chosen the Heinkel HE-280 as outfitted with four Argus AS-014 engines. The same powerplant that the V1 "Buzz Bomb Rockets" used. During a trial flight the prototype was released from it's tow plane, the engines fired and then the pilot discovered his control surfaces were iced up. This led to the very first in flight use of an ejection seat since the Heinkel was so equipped. So I thought it an interesting project from a few aspects.

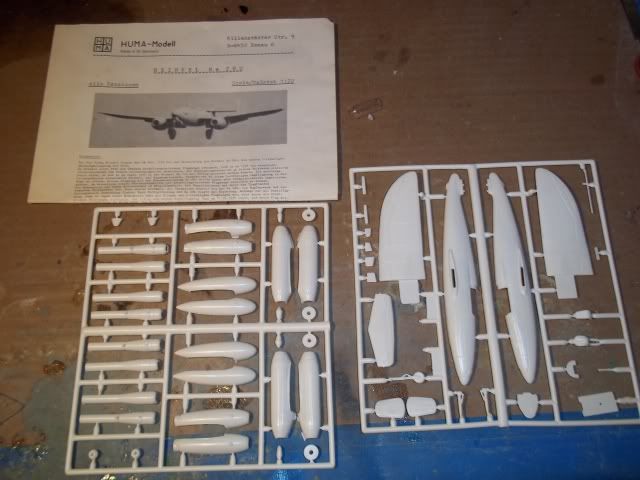
 I'd picked up a vintage 1/72nd scale Huma kit in a clear plastic bag from a clearance bin many years ago. I probably gave something like 3-5 dollars for the whole thing. It included options for the various fitments of powerplants which were tested on this airframe. While an in house Heinkel jet was trialed the more familiar Jumo's used on the ME 262 were there as well as the Argus AS-014s and even some drop tanks that took the place of engines when trialed as a glider. A pretty neat kit but with sparse detailing and castings that make a very old Airfix or even MatchBox kit look like a modern Hasegawa!

The kit contents.

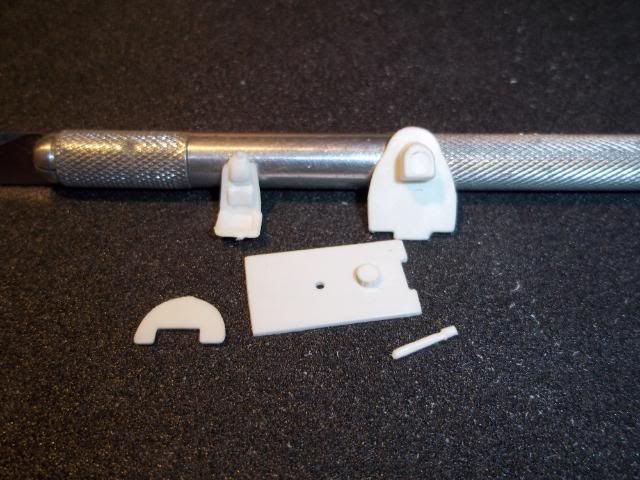
The kit cockpit components.

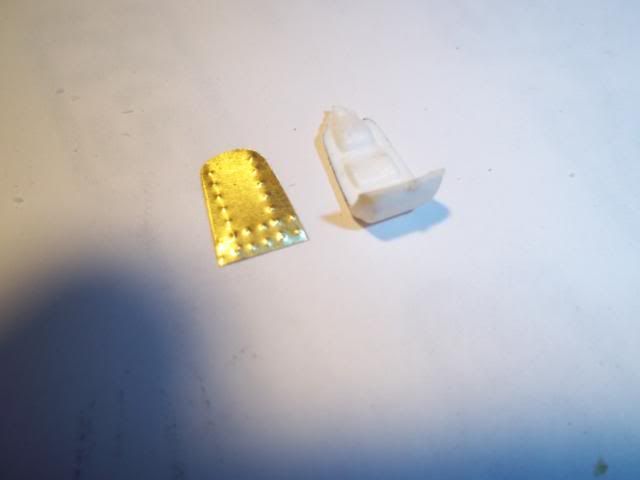
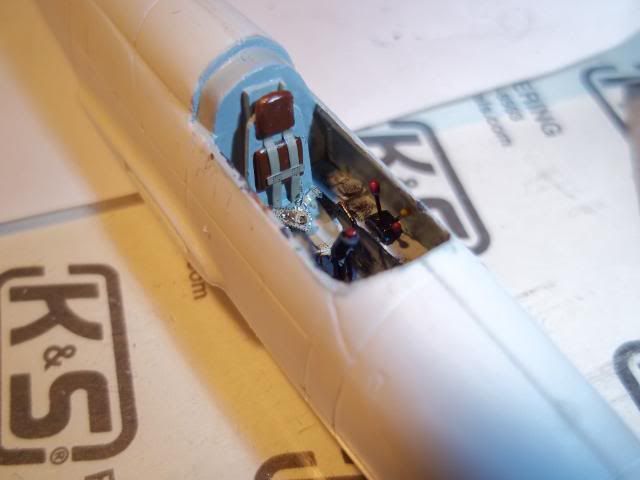
The ejection seat was remade since it's an interesting historical focal point.

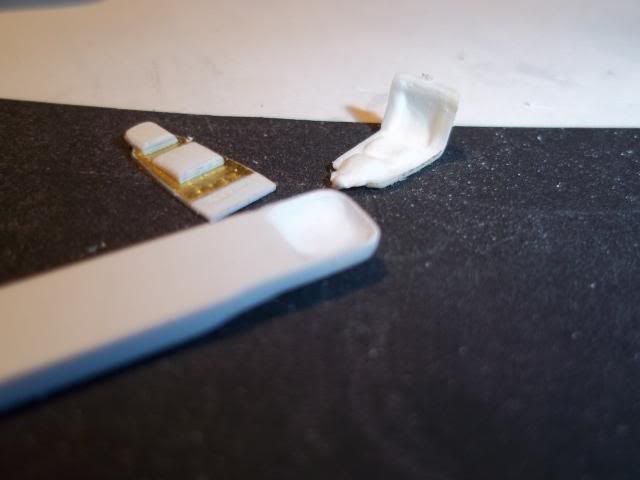
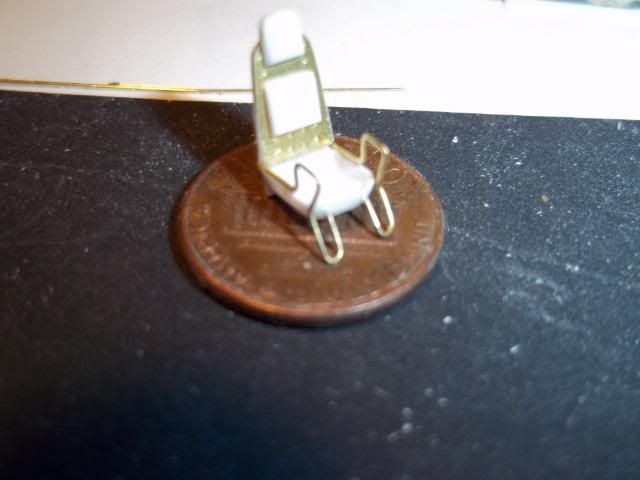
Busied up the cockpit with some styrene, brass and glue glob knobs.

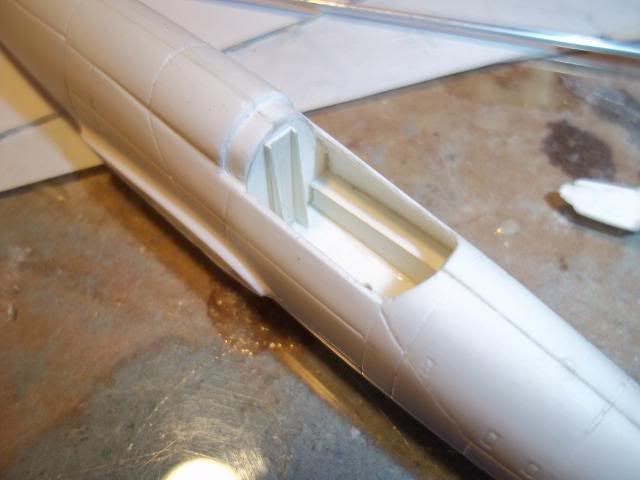
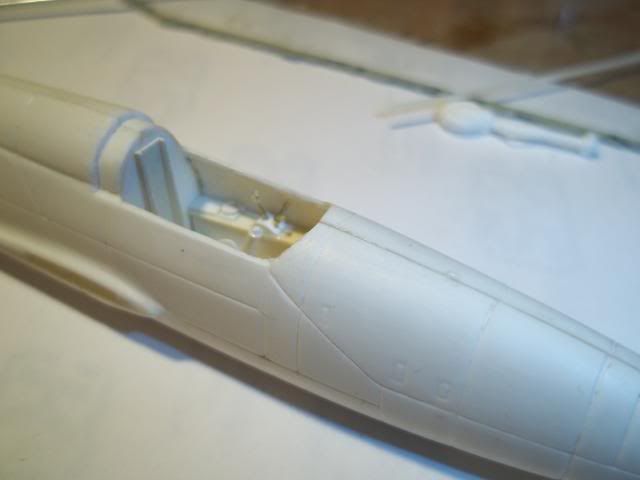
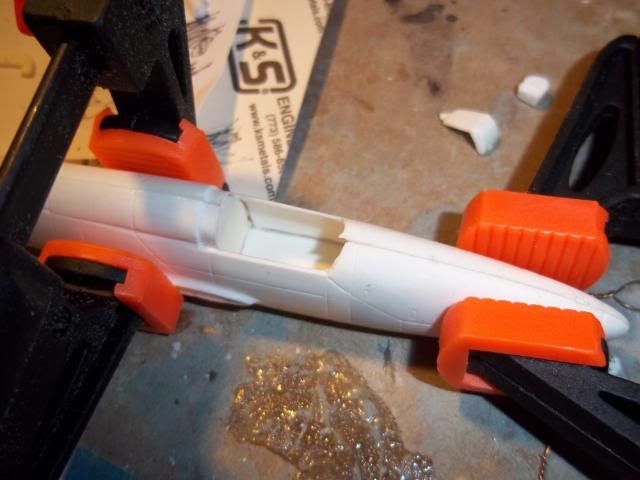
Fought, er, I mean finessed the ill fitting pieces together.

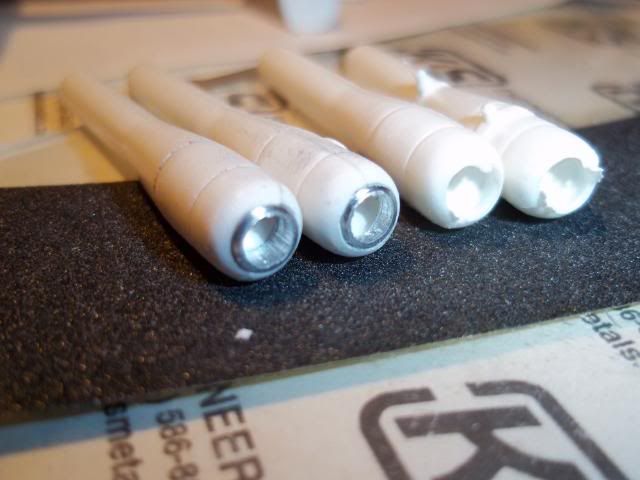
Since the engines were barely round I cleaned up the intakes with turned aluminum tubing while some sanding, shaping and rescribing helped the overall shape.

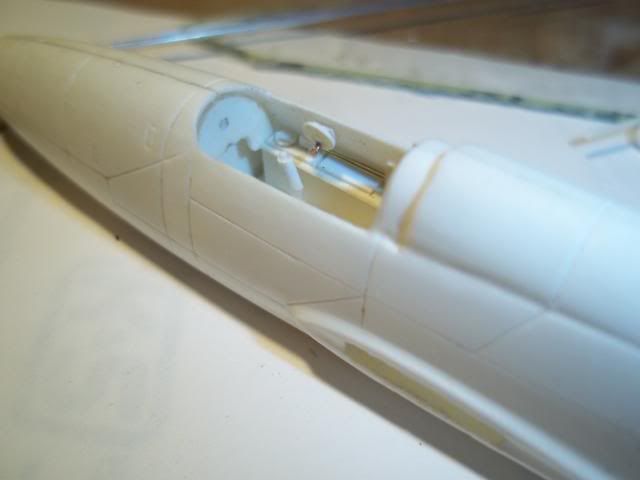
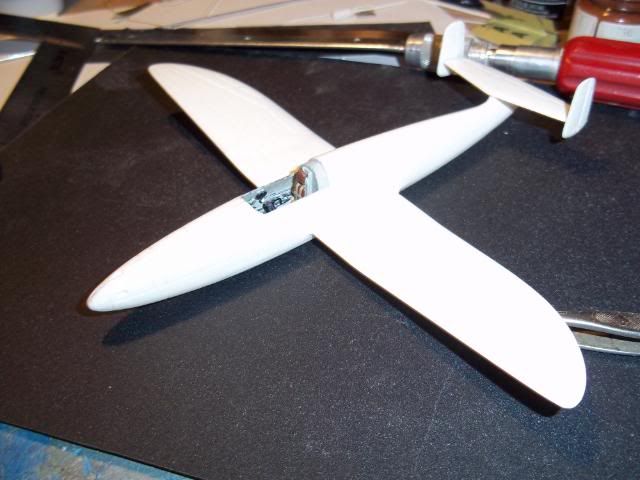
And that's where it's at so far.

Thanks for keeping a seat at the bar warm for me gents.


  • Member since
    March 2010
  • From: New Zealand
Posted by Scorpiomikey on Saturday, December 11, 2010 4:43 PM

And last but not least, My ME-163

It was an ok kit, wings didnt fit very well. spent alot of time fixing them, nose cone didnt fit either. neight did the tail come to think of it lol.

With a bit of work it builds to an alright kit though.

"I am a leaf on the wind, watch how i soar"

Recite the litanies, fire up the Gellar field, a poo storm is coming Hmm 

My signature

Check out my blog here.

  • Member since
    March 2010
  • From: New Zealand
Posted by Scorpiomikey on Friday, November 5, 2010 10:59 PM

All Done.

"I am a leaf on the wind, watch how i soar"

Recite the litanies, fire up the Gellar field, a poo storm is coming Hmm 

My signature

Check out my blog here.

  • Member since
    March 2010
  • From: New Zealand
Posted by Scorpiomikey on Thursday, November 4, 2010 4:03 PM

Well tommorow ended up being a week lol. Heres the photo.

And whats been distracting me as of late.

"I am a leaf on the wind, watch how i soar"

Recite the litanies, fire up the Gellar field, a poo storm is coming Hmm 

My signature

Check out my blog here.

  • Member since
    March 2010
  • From: New Zealand
Posted by Scorpiomikey on Monday, October 25, 2010 4:00 PM

Well, i started my bel X-1 last night. Ill be doing it up as Chuck Yeagers "Glamorous Glennis" It comes with clear sides which looks pretty cool. Ill see what i can come up with. Should be a pretty quick build. Il post photos tomorrow hopefully.

"I am a leaf on the wind, watch how i soar"

Recite the litanies, fire up the Gellar field, a poo storm is coming Hmm 

My signature

Check out my blog here.

  • Member since
    March 2010
  • From: New Zealand
Posted by Scorpiomikey on Wednesday, September 29, 2010 3:22 PM

sweet, sory for being AWOL, not that anyone really noticed. whos next to finish i wonder?

"I am a leaf on the wind, watch how i soar"

Recite the litanies, fire up the Gellar field, a poo storm is coming Hmm 

My signature

Check out my blog here.

  • Member since
    October 2007
  • From: Rhode Island
Posted by jmabx on Friday, September 24, 2010 8:21 PM

Nicely done Borg! I've never heard of polishing using graphite powder but I don't think the finish looks too dark. I like it! Yes

Jeremy    Propeller


  • Member since
    September 2004
  • From: Utereg
Posted by Borg R3-MC0 on Thursday, September 23, 2010 10:09 AM

Scorpiomikey

Wow, thats a tiny kit. What about polishing with a bit of toothpaste? Could be effective for polishing it up nicley. then go a bit lighter on the graphite polish afterwards. She looks really good though man. Seems strange that it has no markings whatsoever on it. Ill pop it on the front page and you already have the badge. so im not sure if u wanna add a star to it or something.

I thought about thouching it up with toothpaste or tamiya compund...but I am calling this one finshed. The reason for that is that I have very bad expiences with thinkering (almost) finshed models for them to be "perfect".

The no markings may seem strange for us but at the time was not unuseal for protoypes.

The badge is good, I do not need stars or something like that. I just like to paticipate, not to brag how much I have build. Big Smile

  • Member since
    March 2006
Posted by simpilot34 on Monday, September 20, 2010 2:10 AM

Borg those are two very nice looking shooters!!!! WOW!!! Hope mine comes out half as good!!! Whenever I get to it...Tongue Tied

Cheers, Lt. Cmdr. Richie "To be prepared for war, is one of the most effectual means of preserving the peace."-George Washington
  • Member since
    March 2010
  • From: New Zealand
Posted by Scorpiomikey on Saturday, September 18, 2010 4:39 PM

Wow, thats a tiny kit. What about polishing with a bit of toothpaste? Could be effective for polishing it up nicley. then go a bit lighter on the graphite polish afterwards. She looks really good though man. Seems strange that it has no markings whatsoever on it. Ill pop it on the front page and you already have the badge. so im not sure if u wanna add a star to it or something.

"I am a leaf on the wind, watch how i soar"

Recite the litanies, fire up the Gellar field, a poo storm is coming Hmm 

My signature

Check out my blog here.

  • Member since
    September 2004
  • From: Utereg
Posted by Borg R3-MC0 on Saturday, September 18, 2010 1:13 PM

Thanks for all your positve feedback.

And now I would like to present you....the Heinkel He-176!

I am not totally happy with the finish. I tried to polish the metal with grafite powder but I feel that it has become to dark....


  • Member since
    October 2007
  • From: Rhode Island
Posted by jmabx on Thursday, September 16, 2010 7:46 PM

Well done Borg! I like the little display with the pick-up tractor. Yes

Mikey - I've been wanting a 1/48 Dragon Me-163 but all I have is a Testors kit for now and I don't plan on tackling that thing anytime soon! Big Smile  Looks like your busy and heading up the round 2 for the air racer GB. I may have to join in that one because I still have alot of racers in the stash. For right now though, I want to concentrate on finishing what I've started. Wink

Jeremy    Propeller


  • Member since
    March 2010
  • From: New Zealand
Posted by Scorpiomikey on Thursday, September 16, 2010 7:20 PM

Nicely done borg. Pictures on the front page. Grab the badge if you havent already.


And im in again (god whats wrong with me, ive already got like 2 other GB's to host and 5 more builds lol)

This time its a wee beauty of a kit. Its the dragon 1:48 ME-163B Master series With engine.

I just hope i can come close to borgs effort. Thats really well done mate. 

"I am a leaf on the wind, watch how i soar"

Recite the litanies, fire up the Gellar field, a poo storm is coming Hmm 

My signature

Check out my blog here.

  • Member since
    May 2009
  • From: San Jose, CA
Posted by hedorah59 on Tuesday, September 14, 2010 11:04 AM

jmabx

Looking great Borg! Yes  Looks like the finish line is in sight!

Boy, I need to get my a$$ in gear here! Embarrassed

Ditto Ditto Ditto

Your 163 really came out nicely, Borg! Beer

Kirk

  • Member since
    September 2004
  • From: Utereg
Posted by Borg R3-MC0 on Tuesday, September 14, 2010 3:34 AM

I have a book by Mano Ziegler but I think it is a different one. But that book has been quite helpful.

Anyway: here is the finshed Me-163 B0, V41, the personal mount of Wolgang Spaate.


The He-176 is not finshed yet, but since the komet is done I will add the GB badge to my profile. 


  • Member since
    March 2010
  • From: New Zealand
Posted by Scorpiomikey on Wednesday, September 8, 2010 5:20 PM

My thoughts exactly Borg. if your interested there's a book by a pilot named Mano Zeigler (i think thats how you spell it)  called Rocket Fighter. its his biography of the aircraft and his experiences with it. really really interesting. i recommend it to anyone.

"I am a leaf on the wind, watch how i soar"

Recite the litanies, fire up the Gellar field, a poo storm is coming Hmm 

My signature

Check out my blog here.

  • Member since
    September 2004
  • From: Utereg
Posted by Borg R3-MC0 on Tuesday, September 7, 2010 2:26 AM

I am happy with the paint worh on both aircraft. The red Komet will look good next to its siblings (I already have a J8M1, Me-163 A and DFS 194)

I normally build quite slow so these are quick builds for me. The Komet is a wonderfull kit, very easy to build, good fit and detail. Being a short-run kit, the He-176 is a bit rougher. But because of its small size and simple layout there is not a lot that can go wrong or need filling and sanding (it would be a ideal first short run kit)

I highlighted the panel lines with a wash yesterday. I will not do much wheathering since both are not fully operational aicraft.

I hope to see some progres from you to! Remeber, rocket powered aircraft are cool, so they should be high on your build list!

  • Member since
    October 2007
  • From: Rhode Island
Posted by jmabx on Sunday, September 5, 2010 10:36 PM

simpilot34

 jmabx:

Looking great Borg! Yes  Looks like the finish line is in sight!

Boy, I need to get my a$$ in gear here! Embarrassed


Ditto

Haha!!! Wink  I have so much on the bench, I have to work in my lap! Surprise  The Thunderceptor is still there though... all the way to the left.

Jeremy    Propeller


  • Member since
    March 2006
Posted by simpilot34 on Sunday, September 5, 2010 9:47 PM

jmabx

Looking great Borg! Yes  Looks like the finish line is in sight!

Boy, I need to get my a$$ in gear here! Embarrassed

Ditto

Cheers, Lt. Cmdr. Richie "To be prepared for war, is one of the most effectual means of preserving the peace."-George Washington
JOIN OUR COMMUNITY!

Our community is FREE to join. To participate you must either login or register for an account.

SEARCH FORUMS
FREE NEWSLETTER
By signing up you may also receive reader surveys and occasional special offers. We do not sell, rent or trade our email lists. View our Privacy Policy.