SEARCH FINESCALE.COM

Enter keywords or a search phrase below:

FW-190 Reich Defender III 5/10-2/11

437394 views
1810 replies
1 rating 2 rating 3 rating 4 rating 5 rating
  • Member since
    September 2003
  • From: South Central Wisconsin
Posted by Daywalker on Monday, June 14, 2010 9:52 PM

Great looking work there Mike, especially the office!

Love that sig line work too.  Your artistic work on those banners are AWESOME!

Frank 


  • Member since
    January 2007
  • From: Cleveland, OH
Posted by Clebode on Monday, June 14, 2010 9:52 PM

sk3tch

Lufttwaffle:  That cockpit dial painting it fantastic!

I totally agree with sk3tch.  I have been studying your work there because my BoB 70th build is a Hasegawa 1:32 Bf 109E.  I assume the IP will be of similar quality OOB.  Did you use any special techniqoue?

Coach Crusher--I apologize if I have sounded a bit negative.  I am proud of the plane even with its flaws.  The adversity of the build was a real positive as it forced me to find solutions to issues, like your first tip on how to deal with no locator pins.  Thanks again for your support and encouragement.  I am now hooked on GBs. 

Frank--Thanks for hosting this fun GB.  Toast  You can call my Ta152H-1 done.  I will post final picture next week end.


Hugh

  • Member since
    January 2007
  • From: Cleveland, OH
Posted by Clebode on Monday, June 14, 2010 10:08 PM

Daywalker

...are the gear legs sticking awfully far in front of the wing LE?  Just curious from the photo.  Would it be impossible  to move them back a bit?


Frank--Milliput and CA  binds the struts to the wings.  I made new locator holes by putting in the MP and pressing the struts in to make locating impressions.  When the MP cured I used CA to bond the resin struts to the MP.  I think I would need the world's smallest jack hammer to detach the struts.  I'll get you a measurement on the exact placement of the wheels forward of the LE.  Do you have a tip on removing MP?  Thanks for the exhaust tip.  I have those paints so I will test it out on some styrene sheet. 

Hugh

  • Member since
    March 2006
Posted by simpilot34 on Monday, June 14, 2010 10:17 PM

Frank I am still amazed about you G-6!!! Beautiful work again!!!! Seeing it in RA colors is ironic of sorts. I remember Guy or Crush going on about a book that was stunning to say the least and I think I got my hands on it or it's sister. It is called 'Camouflage and Markings of the Aeronautica Nazionale Repubblicana 1943-1945' I'm sure there is a vol. 1 I must find now. The Lufwaffe camo and markings ones too. RESEARCH, can never get enough!!!

Cheers, Lt. Cmdr. Richie "To be prepared for war, is one of the most effectual means of preserving the peace."-George Washington
  • Member since
    February 2003
  • From: Melbourne, Australia
Posted by darson on Tuesday, June 15, 2010 1:33 AM

Mike the detail work on the front office looks fantastic, nice job.

Clebode awesome job on the 152, I'll be looking forward to seeing the final photos

  • Member since
    February 2007
  • From: Bournemouth UK
Posted by Luftwoller on Tuesday, June 15, 2010 2:38 AM

Hi Clebode, Im with Frank eccept i use flat black for my exhaust stains. Ive seen restored German fighters flying and they kick out some filthy black stains and thats using positively drinkable fuel!! Think what theyd kick out with the muck they were using in 45. Yummy,

Great looking work everyone. sorry i havent been here in a bit, pc probs. But now i think im there, pc wise and everything is Golden.

Frank, my Dual combo D-11/ 13's have a arrived but i think im going to build one (Or both) of the Eduard 190's 1st. Its great having the choice LOL. I have to finish a little BMW thats on the bench 1st though.

Sir Crushlikins. I got your birthday package and you Sir are a gent. That video has bored my missus senseless (Dint take long btw) but i love it. Ive seen Black 6 fly but never Black 2. Simply awesome. Fire me an Email and we can chat out of the forums. You probably diod already but ive lost it. Sorry for the sidetrack all,

...Guy

..'Your an embarrassment to the human genus, makes me ashamed to call myself Homo'.
  • Member since
    September 2003
  • From: South Central Wisconsin
Posted by Daywalker on Tuesday, June 15, 2010 5:43 AM

Clebode- Thanks mate, it was a pleasure watching your build!  I shall post up that it is finished when you post the finished photos.  Let me know how the exhaust stains work out!

Frank 


  • Member since
    September 2003
  • From: South Central Wisconsin
Posted by Daywalker on Tuesday, June 15, 2010 5:45 AM

Thanks Richie, you are too kind!  I had a hard time painting a 109 in RA colors, first time I have ever finished a model in colors other than the country of the manufacturer.  It's all the Sarge's fault this time!

Frank 


  • Member since
    September 2003
  • From: South Central Wisconsin
Posted by Daywalker on Tuesday, June 15, 2010 5:48 AM

Guy- Just say the word, and I'll add whichever one you choose first to the list!

Frank 


  • Member since
    December 2004
  • From: Yokosuka, Japan
Posted by luftwaffle on Tuesday, June 15, 2010 9:29 AM

Clebode

 sk3tch:

Lufttwaffle:  That cockpit dial painting it fantastic!


I totally agree with sk3tch.  I have been studying your work there because my BoB 70th build is a Hasegawa 1:32 Bf 109E.  I assume the IP will be of similar quality OOB.  Did you use any special techniqoue?

Coach Crusher--I apologize if I have sounded a bit negative.  I am proud of the plane even with its flaws.  The adversity of the build was a real positive as it forced me to find solutions to issues, like your first tip on how to deal with no locator pins.  Thanks again for your support and encouragement.  I am now hooked on GBs. 

Frank--Thanks for hosting this fun GB.  Toast  You can call my Ta152H-1 done.  I will post final picture next week end. 

Frank- Great to see that 109 again, what a beauty!

Thanks for the comments guys.  Believe it or not, the IP was done with decals from the kit.  The IP decal comes as one piece so I cut out each gague individually and applied them that way.  A liberal drop of Micro-Sol to get them to settle down and then a drop of Future after the flat coat was applied to simulate the lens.  Easy stuff and I think it came out as nearly as well as a pre-painted Eduard unit, plus you don't that "speckled" look that some of the Eduard pre-painted pieces seem to have.

Work continues on the rivets, upper wings, and the lower port wing and fuselage half are done.  Really tedious work but hopefully it pays off.  Have some good schwag on the way in the mail for this one that I'll share once it arrives!


aka Mike, The Mikester My Website

"He has all the virtues I dislike and none of the vices I admire."   -Winston Churchill

  • Member since
    December 2005
  • From: back seat of your car with duct tape streched out
Posted by soulcrusher on Tuesday, June 15, 2010 1:11 PM

Luftwoller

Sir Crushlikins. I got your birthday package and you Sir are a gent. That video has bored my missus senseless (Dint take long btw) but i love it. Ive seen Black 6 fly but never Black 2. Simply awesome. Fire me an Email and we can chat out of the forums. You probably diod already but ive lost it. Sorry for the sidetrack all,

...Guy

Everybody whish Guy a happy birthday today!I:fest30:  :birthday:  I knew you would love the video Guy. I have expensive studio speaker for my television  sound so I love to crank the sound up and listen to the whine of the motors as they crank over and catch then bark to life. Even my buddy who is a car person and not really into airplanes loves the sound. It takes a poop load of compresion to make an engine whine like that when it cranks over. Enjoy your birthday Guy and have a pint for me buddy! I did send you my email about a week ago but I'll send it agian.


Soulcrusher:hitwithrock:


  • Member since
    July 2003
  • From: waynesboro va, via Ireland
Posted by sidure on Tuesday, June 15, 2010 8:27 PM

HAPPY BIRTHDAY GUY

I havent posted much lately but progress is being made. I just finished doing a panel wash and have to redo the underside

Now its time for detail touch ups and then onto putting on the fiddly bits

Steve


  • Member since
    April 2005
Posted by Thunderbolt379 on Tuesday, June 15, 2010 8:39 PM

Oh, WHAT A BEAUTY! Going by the DOR band, is this Hasegawa's 1:32? If so, I have the same one in my stash and it's calling me... Every time I need to mix up some RLM 66 it whispers come, on slap some of that in my cockpit, you know you want to...

Steve, she's a stunner!

Mike/TB379

http://worldinminiature.blogspot.com/

  • Member since
    January 2007
  • From: Cleveland, OH
Posted by Clebode on Tuesday, June 15, 2010 9:14 PM

soulcrusher
Everybody whish Guy a happy birthday today!Ihttp://www.gunandgame.com/forums/images/smilies/fest30.gif  http://www.gunandgame.com/forums/images/smilies/birthday.gif 

Happy birthday Guy

Hugh

  • Member since
    March 2006
Posted by simpilot34 on Tuesday, June 15, 2010 9:16 PM

Steve she is looking great mate!!!! Toast

BalloonsHappy BirthdayGuy!!!!!! Have a pint for me too!!!!!Toast

Cheers, Lt. Cmdr. Richie "To be prepared for war, is one of the most effectual means of preserving the peace."-George Washington
  • Member since
    January 2007
  • From: Cleveland, OH
Posted by Clebode on Tuesday, June 15, 2010 9:20 PM

Steve,


She looks fantastic!  You should post more WIP photos.

Hugh

  • Member since
    December 2004
  • From: Yokosuka, Japan
Posted by luftwaffle on Tuesday, June 15, 2010 9:26 PM

Steve- That really looks great, beautiful work on your paint.  One comment: it appears that both of the ailerons are in the down position, if I'm not mistaken these induce roll so when one was up the other was down, i.e. they should always be opposite each other.  I know there were some scenarios where the ailerons on the 109 could both be in the down position for landing, I don't know if the 190 had the same setup, anyway just thought I'd throw it out there.

aka Mike, The Mikester My Website

"He has all the virtues I dislike and none of the vices I admire."   -Winston Churchill

  • Member since
    December 2005
  • From: back seat of your car with duct tape streched out
Posted by soulcrusher on Tuesday, June 15, 2010 9:38 PM

She is really shaping up Steve. Looks like a nice little collection of parts you have there.

Soulcrusher


  • Member since
    September 2003
  • From: South Central Wisconsin
Posted by Daywalker on Tuesday, June 15, 2010 10:12 PM

Happy Birthday Guy!  How old are you now?

Steve- That is looking VERY good indeed, more pics please!  I wanna see how you do that stuff.

Frank 


  • Member since
    July 2003
  • From: waynesboro va, via Ireland
Posted by sidure on Tuesday, June 15, 2010 10:18 PM

Thanks for the comment guys, its much appreciated. Mike(tb) its the Eduard 1/48 kit. Mike(lw) yep your right I deliberately put both flaps down as I like the look of it that way. Im not sure if it would ever be seen that way on the ground though. The way Eduard molds the flaps they have tabs that just slide into position. They sit natuarally down but a little push or trimming and they will sit flush or neutral position. They cant be up and down withouth surgery so I opted for both down. I forgot to set the elevatord down but did offset the rudder

Steve

  • Member since
    July 2003
  • From: waynesboro va, via Ireland
Posted by sidure on Tuesday, June 15, 2010 10:23 PM

I have a quick dumb question for you guys. I work with MM enamels but recently picked up Polly S gloss, satin and flat finishes. Can I just spray it on top of my Testors Gloss coat for my flat finish. I would like to try this stuff. I normally use Testors dullcoat but Ive had problems with it wrinkiling decals if applied too heavely

Steve

  • Member since
    December 2005
  • From: back seat of your car with duct tape streched out
Posted by soulcrusher on Wednesday, June 16, 2010 12:32 AM

Steve I know some people  do use Pollyscale paints but I have had to many bad experiences with them over the years. I never used their clear coats but I experienced problem like chalky apperance of the paint when dried and it does not work good for adding brush details either.

I use to use Testors dullcoat for years until I got a bad batch and it dried cloudy and ruined a finished models. I do not lioke Laquers for plastic models. They generate way to much heat as they dry which is why they can eat certain decals. I like to either use MM Acrylic dullcoat. The MM acrylic dullcoat is not perfect either. I did have a jar go bad on my and dry cloudy once and I am not sure why. I am thinking of making my own from what I have heard some other people do. Using Future and adding Tamiya flat base then test spraying it until you get the desired amount of dullness you like. I have not tried it yet but I think I am going to soon.

SoulcrusherPirate


  • Member since
    July 2008
  • From: USA California
Posted by vetteman42 on Wednesday, June 16, 2010 1:57 PM

Wow some stunning builds going on here Toast Cant wait to get mine started and see if I can measure up to the task and the builds here. I see Daywalker and I are building the same kit ruhrow


A belated Happy Birthday to you Guy CakePizzaToast

Randy So many to build.......So little time

  • Member since
    December 2004
  • From: Yokosuka, Japan
Posted by luftwaffle on Wednesday, June 16, 2010 3:28 PM

sidure

I have a quick dumb question for you guys. I work with MM enamels but recently picked up Polly S gloss, satin and flat finishes. Can I just spray it on top of my Testors Gloss coat for my flat finish. I would like to try this stuff. I normally use Testors dullcoat but Ive had problems with it wrinkiling decals if applied too heavely

Steve

Steve, I use Polly Scale clear flat thinned 50/50 with clear Windex and have never had any problems. 

aka Mike, The Mikester My Website

"He has all the virtues I dislike and none of the vices I admire."   -Winston Churchill

  • Member since
    March 2009
  • From: Wirral. UK
Posted by Spike190 on Wednesday, June 16, 2010 5:29 PM

Steve you've done a great job, the paint looks great, cant wait to see her finished up Yes.

Luftwaffle, lovely start you've made, the cockpit looks fantastic.

Sorry it's the end of the day but  Happy Birthday Guy, hope you had a good one.

Cheers....

Mike  Toast


  • Member since
    September 2003
  • From: South Central Wisconsin
Posted by Daywalker on Wednesday, June 16, 2010 10:19 PM

vetteman42

I see Daywalker and I are building the same kit ruhrow

LOL, don't worry about me!  I'm stuck with mine right now.  I glued and cleaned up the wing mounted bombs, and they are so oval that I am afraid I cannot use 'em.  Trying to figure out right now what to do.  Scratchbuild the empty mounts (Tamiya has the anti-sway brackets and such molded as part of the bombs), carefully cut the mounts off of the bombs, or try to make new ordnance.  I'm on hold until i decide how to proceed.

Frank 


  • Member since
    December 2005
  • From: back seat of your car with duct tape streched out
Posted by soulcrusher on Thursday, June 17, 2010 1:21 AM

Frank I have a whole cigar box full of 1/48 scale WWII stuff that was meant to hang under a plane. Are you in need of the 500kg centerline bomb and rack. I know I have several of thoses in the box some where. Post a picture of the hardware you need. I bet I have something that will work for you.

SoulcrusherPirate


  • Member since
    September 2007
  • From: Truro Nova Scotia, Canada
Posted by SuppressionFire on Thursday, June 17, 2010 6:19 AM

Need bombs?

I have a lot of ordinance that will be unused! Drop me a PM with your mail address Frank and I will send you the lot of them from my Edward FW 190 F-8. They are pictured on the first few pages of this GB. Most of the PE goes with the bombs as well!

http://i6.photobucket.com/albums/y211/razordws/GB%20Badges/WMIIIGBsmall.jpg


  • Member since
    September 2003
  • From: South Central Wisconsin
Posted by Daywalker on Thursday, June 17, 2010 7:13 AM

PThank you so much for that offer guys!  The parts I need are the SC50 bombs and hangers for the wings.

Crusher- The centerline rack and associated parts turned out well, so I think I have those parts covered.

Jason- If you are willing to part with some of that ordnance from your Eduard F-8, that would really help me out!  I took a look at the instruction sheet for the Eduard kit, and it looks like those parts would be perfect for what I need!  PM inbound!


Frank 


  • Member since
    April 2005
Posted by Thunderbolt379 on Thursday, June 17, 2010 10:16 AM

Hi Frank and all,

Well, while flying a holding pattern waiting for the Eduard masks for my Tamiya F-8 I decided I might as well give in to my styrene cravings and add something else to this GB. While waiting for things to dry on other builds I pulled out Academy's A-8 and did a bit now and then, and before I knew it she was together. (Really, guvner, I was going to mention it!) This one:

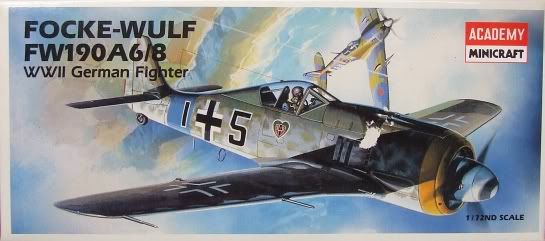
It's an intersting little kit, the fit is not bad though the gap at the port wingroot was so huge I shimmed it with ten thou card, and painted thinned putty over it. I had hoped to show you a pic tonight of the model at the pre-paint stage, but... The Fates seemed to be telling me I was doing a certain part wrong. The assembly behind the seat, the headrest/armor plate and the support. I knocked the parts off twice and the second time installed them with CA -- only then to realise I was adding the parts for the wrong variant. Hmmm, not sure what to do. Now those details and the canopy won't match the decals of either the kit or the sheet I was going to use. If I jimmy them off again, I'll have a fair bit of cleanup to do, and need to repaint the decking under the canopy. I'll have to sleep on it, maybe a few times... All advice appreciated, guys!

But I have plenty of Butcherbirds in the aviary, and today the call of the big Hasegawa just became too strong. I was weak, I gave in... Embarrassed This one:

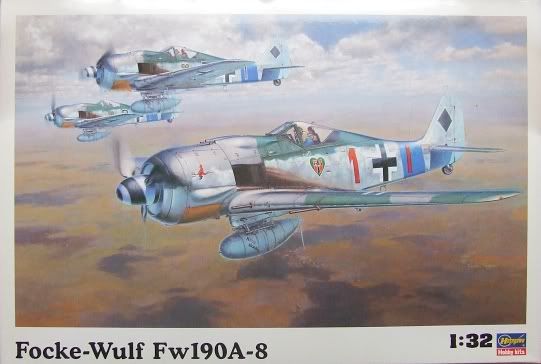
The fit and detail are gorgeous! What can I say? It's a beauty! I sprayed the RLM 66 today (discovering in the process that my AB needle seems to be damaged, I did some corrective therapy on it but was still getting some fine spatter in the paint, not noticeable on interior work but it'll never do for final finishes...) I then made up the hoirzontal tails and the drop tank as some quick stand-alone subassemblies.

If I manage to knock off all three, I'll have touched down on the three major scales in this build. Heck, Frank, would you accept the Airfix D-9 I started for the Farewell Airfix GB four years ago? It never got painted...

Cheers, more pics when there's more to tell,

Mike/TB379

http://worldinminiature.blogspot.com/

JOIN OUR COMMUNITY!

Our community is FREE to join. To participate you must either login or register for an account.

SEARCH FORUMS
FREE NEWSLETTER
By signing up you may also receive reader surveys and occasional special offers. We do not sell, rent or trade our email lists. View our Privacy Policy.