SEARCH FINESCALE.COM

Enter keywords or a search phrase below:

FW-190 Reich Defender III 5/10-2/11

437394 views
1810 replies
1 rating 2 rating 3 rating 4 rating 5 rating
  • Member since
    February 2007
  • From: Bournemouth UK
Posted by Luftwoller on Thursday, June 3, 2010 4:05 AM

Wow man, that is the shizzle (Gratuitous youth reference) Im loving the paint job. She looks fautless to me, you have excelled my gun toting friend. The UC legs look spot on. Any probs with em or is that as the kit intended. It is the Tam kit isnt it?

...Guy

..'Your an embarrassment to the human genus, makes me ashamed to call myself Homo'.
  • Member since
    December 2005
  • From: back seat of your car with duct tape streched out
Posted by soulcrusher on Thursday, June 3, 2010 5:55 AM

Hasegawa did their homework on this one Guy when it came to the crazy angle that the gear stick out at.. The legs have huge pins molded inot the top that fit very tightly into slots provided in the separately molded wheel wells. When you photograph it from the side they look funny but if you look at them from straight on they look spot on. The 1/48 Tamiya D-9 I build looked the same way when I photgraphed it also. I think this was the toughest airbrush job I have done to date. Then add the NMF bottom and man that was alot of work!

Guy PM me with your new addy. I have a little something to send your way for your birthday.:birthday: Will there be a new video of Guy pissed as a fart on his couch with some new kits this year?:alcoholic:

Soulcrusher:friday:


  • Member since
    September 2007
  • From: Truro Nova Scotia, Canada
Posted by SuppressionFire on Thursday, June 3, 2010 6:19 AM

soulcrusher,

Perfect finish on your D-9! It should hold its own at any contest you enter it in.Bow DownBow DownBow Down

I really can't wait until next week to break out the Edward F-8 onto the kitchen table and get building again!

The dilemma is even if I did purchase a airbrush at this time I have no where to properly set it up, no room to myself to run the proper venting. I will push my OOC (out of can) Kung Fu to the next level for this build.Cool

SC, Far as the gun thing... Back in the hills of western Alberta I decided I could only shoot one gun at a time, I decided it best have a lot of power as Grizzly bears frequented the area. I traded a .243 for a thumb through .300 Win. Mag. It has finally arrived after waiting 18 months! Going back to Alberta at the end of the month to pay for this beast (difference vrs trade)... then I will have to wait for new government papers to pick it up!Bang Head


http://i6.photobucket.com/albums/y211/razordws/GB%20Badges/WMIIIGBsmall.jpg


  • Member since
    September 2003
  • From: South Central Wisconsin
Posted by Daywalker on Thursday, June 3, 2010 7:32 AM

CRUSHER!!!  That is a splendid 190, LOVE IT!  Very well done, especially that paint job.  I really, really like that one mate! Bow Down

Frank 


  • Member since
    April 2005
Posted by Thunderbolt379 on Thursday, June 3, 2010 9:05 AM

SC -- we stand in awe, a truly fantastic build! I think we're all filing away your work for future reference -- I know I am!

WIP pic -- I've said it before and I'll say it again, Tamiyas build themselves! It feels like a couple of days since I cut sprue, and she's mostly together.


Engine and cowl tomorrow, maybe even paint the spinner and fan.

I think I've discovered why Tamiya 190s all "lean" when they're on their gear: the fuselage to wing fit is off-true. The horizontal tails went on easily and found their natural alignment, but are off-true to the wing, which made me look at the wing against the grid on my cutting mat, and the fuselage leans to the right despite the fact there is no gap showing anywhere around the wing joint. If this is real and not some optical illusion, the fuselage will lean to starboard when the model is on its gear, though the wing will be level. It's only subtle... Is this what other folks have spotted? I can't imagine how such a boo-boo would get through the CAD/CAM process...

Cheers, Mike

http://worldinminiature.blogspot.com/

  • Member since
    July 2003
  • From: waynesboro va, via Ireland
Posted by sidure on Thursday, June 3, 2010 11:26 AM

My Man SC, that is a terriffic finish buddy. This one is up to your usuall standards and the paint and work are top notch. Thats a good looking bird. Well done. My .303 is a No1 MKIII. I will send a pic soon.

Heres my latest progress. Hope to get some top paint on it tonight.

I have some 76 touch ups to do them the rlm 04 under the cowl and then onto the top.

Steve


  • Member since
    July 2003
  • From: waynesboro va, via Ireland
Posted by sidure on Thursday, June 3, 2010 12:49 PM

WARNING, viewer discression is advise. The following image may be offensive and hurtfull to rifle lovers all over the world. I got this from a friend of mine who for whatever reason chopped and cut this rifle and then painted it. I rescued this 303 in the hopes of restoring it back into at least good shape. The good news is that its a great and true firing weapon and is stil deadly accurate. I was in the Irish Army Reserves for three years and we used the Enfield .303 up until 1980 and I have had a love affair with it since then. One of the best weapons ever produced. Id love to get my hands on another one.

Steve

  • Member since
    December 2005
  • From: back seat of your car with duct tape streched out
Posted by soulcrusher on Thursday, June 3, 2010 6:39 PM

Suppresion fire Thanks for the compliments on the Dora. I understand now what you meant about the rifle. If you are out hunting it's not really feasable to be carring two rifles. A 300 Win mag is always nice!

Frank thanks. It means alot coming from you buddy.

Mike Thanks buddy. I built the Tamiya 190 Dora and your right. The kit practily build itself.

Steve thanks you for the kind words. Looking foward to seeing more of your 190. I hope you are going to rescue that poor Enfiled! Looks like it use to be a No4 MkI ? At least it does'nt look like they cut the barrel. I had good luck with a company called Sarnco and found a new stock for one of my No1 MkIII.

SoulcrusherPirate


  • Member since
    July 2003
  • From: waynesboro va, via Ireland
Posted by sidure on Thursday, June 3, 2010 10:26 PM

Crusher, believe it or not its stamped NO1 MK III. The sights are in the wrong place for that so I dont know.

Anyway back to the models. Im really in the groove now and paint is flying everywhere

Im going to be away from the bench for a few days so hope to get back to the paint on Sunday

Steve

  • Member since
    September 2003
  • From: South Central Wisconsin
Posted by Daywalker on Thursday, June 3, 2010 10:30 PM

Mike- Looking at the photo you posted, I thought it was of mine!  Looks like you, Steve, and I are at the same point in the build.  Looking good there!

Steve- You are really hauling now!  Preshade done, some paint on, WOW!  The mottle looks very good indeed!

Speaking of mottle painting, this video was posted over at Hyperscale tonight on painting mottle finishes:

Painting Luftwaffe mottle finishes

It mentions MM acrylic paint, but some of the ideas and techniques looked very good.  Check it out!

Frank 


  • Member since
    April 2005
Posted by Thunderbolt379 on Thursday, June 3, 2010 11:28 PM

Hi Frank -- Yep, I reckon we are! Fly together, these thing, don't they?

I detailed the engine today. The enamel base colour (silver mixed with black) was drybrushed with straight silver, then washed with Promodeler Dark Dirt and cleaned up witha Q-tip:


Macro/flash shot courtesy of my bro in law again.

Next I'll ring the LHS and see if they have XF-27 for the prop blades -- I'm keen to not spray enamels until I have to, such as the overall exterior paint job, which wil be in a few weeks. I've sprayed the satin black (XF-18) on the wheels, spinner, fan and gearbox, so I'll be able to get the powerpack together today. Oh, and spray the cowl interior flat black too. I'm using up the last couple of bars pressure in my gas bottle before ordering a refill. Main spraying will be from the new cyclinder.

More pics later,

Cheers, M/TB379

http://worldinminiature.blogspot.com/

  • Member since
    July 2008
  • From: USA California
Posted by vetteman42 on Friday, June 4, 2010 1:28 AM

Thunderbolt379 ruhrow ! Looks like I will have a tough act to follow again geeze Stick out tongue Your IP and pit are lookin great, and now the engine. I will be watching you Mike.

Sidure beautiful work on that there guy. I really like the way your motteling is coming together. And just to toss in my 2 cents worth, its a sin to do that to an Enfield. I am however guilty of sportsterizing one once with a walnut Monte Carlo stock with glass bedding and a 4X scope. Was a really nice shooting rifle. I have one now that was reworked at an armory and will be leaving it that way. I did clean it up and get all the grease off and oiled the stock. The stock is a bit short for me so it kicks like a mule but I still enjoy it.

Soulcrusher your painting skills are amazing Bow Down I cant find a thing I don't like about your Dora other than it isn't on my shelf. The NMF really makes stand out it too, hope you display it on a mirror.

Daywalker thanks for posting that link, it really helped me out, so much so that I might have to build another 262 sometime as I found things I did wrong on it. Wont make the same mistakes on the 190 I hope. Also I must have given you wrong info on my build, I will be building the F-8 and not the D-8 sorry about that.


Randy So many to build.......So little time

  • Member since
    April 2005
Posted by Thunderbolt379 on Friday, June 4, 2010 2:24 AM

Thanks, Randy -- I always appreciate your comments! I just sprayed the cowl interior and the prop, so hope to have the powerpack done tonight.

Cheers, M/TB379

http://worldinminiature.blogspot.com/

  • Member since
    September 2003
  • From: South Central Wisconsin
Posted by Daywalker on Friday, June 4, 2010 7:40 AM

Randy- Glad you enjoyed that link!  I also updated page one to reflect the F-8. Wink

Frank 


  • Member since
    April 2005
Posted by Thunderbolt379 on Friday, June 4, 2010 10:07 AM

Hi Frank and all,

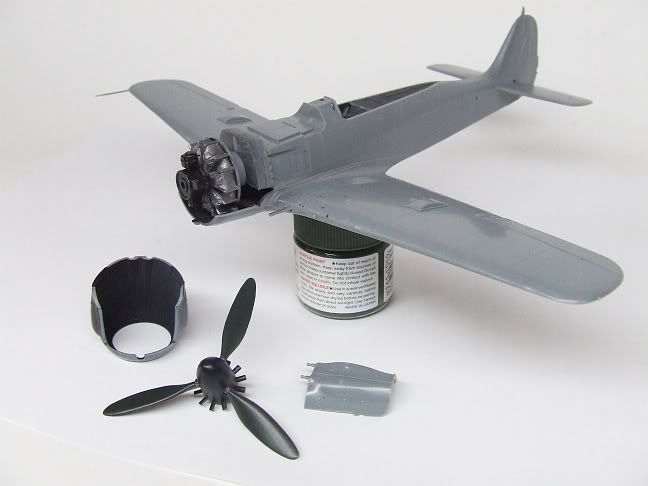
More WIP, I've had a good day today. The Tamiya F-8 is moving along smartly. Here's the powerpack, unpainted, but for the engine:

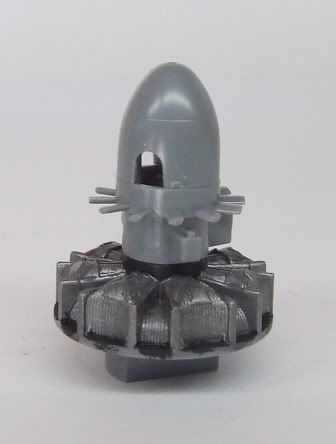
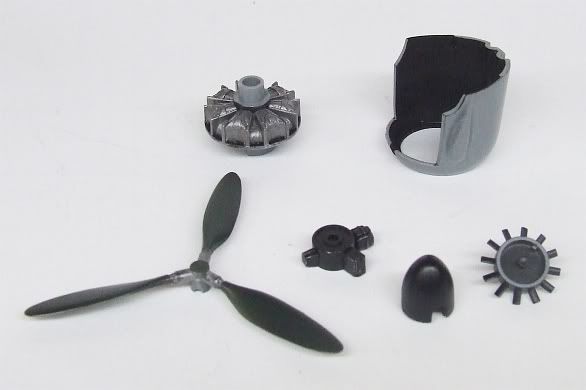
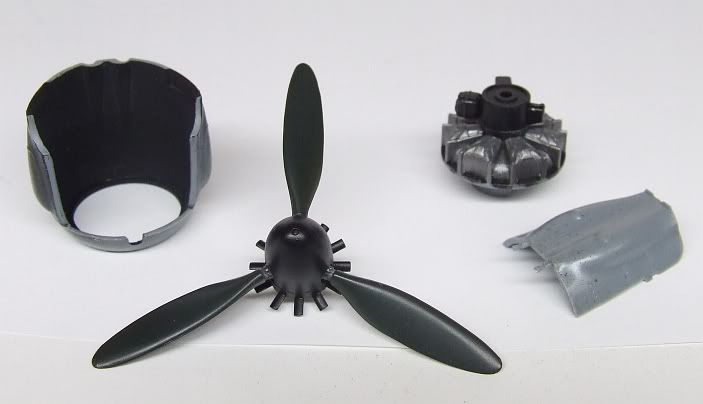
All components are painted, below. The spinner cone and base, plus the accessory pack of the engine, were sprayed XF-18, Satin Black, and drybrushed in silver enamel. The cowling was sprayed FX-1 flat black, the prop blades XF-27 Schwartzgrun. The Tamiya version is not quite the same as the Model Master enamel, it dries lighter and is dead flat rather than with the low sheen of the original RLMs. I brushed the blades over with two coats of Microscale satin to give them a lustre, which also darkened the finish slightly. The self-levelling characteristic of this stuff is truly remarkable -- no brush strokes! The connections at the base of the blades were brushed into Humbrol aluminium, and the castelations highlighted with Promodeller wash.


Powerpack assembled, no glue or polycap yet:


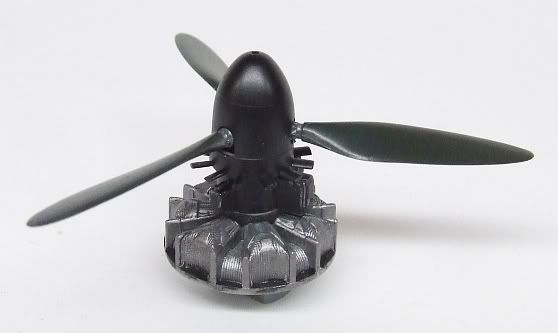
Engline assembled, prop secured, mating surface cleaned of paint:


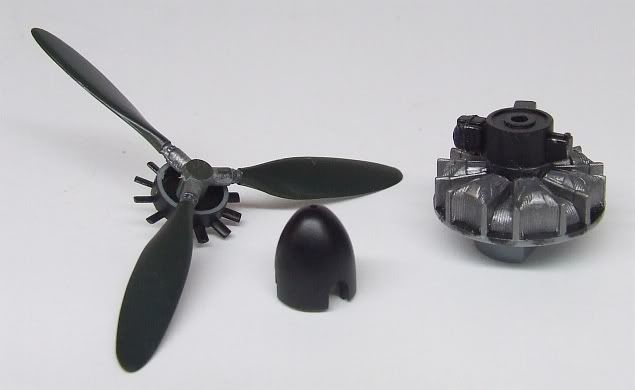
Prop assembled, plus cowlings painted and mating surfaces adzed clean:


Engine mounted:


And cowlings fitted:


Tomorrow should see the cowl ring, gunsight, payload racks and canopy hardware in place, and a lick of filler in a few spots. Then it'll be time to put her aside until the canopy masks arrive. That'll give me more time to decide which scheme I'll go with.

Cheers, Mike/TB379

http://worldinminiature.blogspot.com/

  • Member since
    February 2007
  • From: Bournemouth UK
Posted by Luftwoller on Friday, June 4, 2010 1:01 PM

Steve, Thunderbolt, your planes are coming on fantastically. Steve you must be itching to get the top colours on. I know i would be.

I have a couple of related videos that you may or may not have seen before.If you have i appologise,

This 1st one neesds to be watched while singing, 'If you go down to the woods today, your sure of a big surprise'

http://www.youtube.com/watch?v=OwZk7NtQMbI&feature=related

...and the second is just as awesome.

http://www.youtube.com/watch?v=C1bXBrnGsaA&feature=related

Frank, i have the D-11 D-13 kit on its way even as we speak. Found it £10 cheaper than  my LHS, coool.

Crushlikins, PM sent,

...Guy

..'Your an embarrassment to the human genus, makes me ashamed to call myself Homo'.
  • Member since
    December 2005
  • From: back seat of your car with duct tape streched out
Posted by soulcrusher on Friday, June 4, 2010 4:27 PM

Luftwoller

Crushlikins, PM sent,

...Guy

No PM received? It's going to be hard to send you your birtday present without your addy!

SoulcrusherPirate


  • Member since
    July 2008
  • From: USA California
Posted by vetteman42 on Friday, June 4, 2010 6:36 PM

Guys I maked a big booboo Embarrassed I went and opened the box !!!! And I think I am going to go with a I/SG4, summer of 1944 Italy paint scheme. I will post a picture of that scheme when I start my build.

Anyway I won this kit in a lot sale of 5 or 6 models a couple of years ago and just today opened the box. Must be some kind of sin I committed huh Stick out tongue Anyway in the box I found a True Details #48488 Cockpit Detail Set for the Tamiya FW 190 F-8. Now call me crazy if you like but I do not like working with resin stuff very much, so if one of you guys would like it PM me. The control stick does look to be broken.

Randy So many to build.......So little time

  • Member since
    December 2005
  • From: back seat of your car with duct tape streched out
Posted by soulcrusher on Friday, June 4, 2010 7:20 PM

I'll take it off your hands Randy if you have no use for it! I have the Hasegawa F-8 on the self that I am going to through in after I build my P-35 for your NMF GB. I sent you a PM.  (shameless plug)Smile Thanks for the nice compliment on my Dora. She is not perfect but she is cool looking with the patched up late war look is'nt she!

SoulcrusherPirate


  • Member since
    July 2008
  • From: USA California
Posted by vetteman42 on Friday, June 4, 2010 8:17 PM

Soulcrusher you got it, PM  me your addy 

Hey after that first build you did I just cant wait to see what you do with the P-35. I hope your Dora sees the contest table, she will be a winner.

Randy So many to build.......So little time

  • Member since
    April 2005
Posted by Thunderbolt379 on Friday, June 4, 2010 9:42 PM

Hi guys,

Update -- cowl ring and payload racks are now mounted:

There are a few items I can fiddle with now, assemble the bombs, sand the drop tank, get some filler into a few tiny areas. I decided I'll leave the canopy off till later, as that desert scheme is still calling me, and it demands the straight hood, while the other three are all Galland-type. The adaptor for the tank I'll paint off the model and add at the finish, along with the landing gear, Morane antenna and boarding step.

So I'll be slipping it back in the box for a few weeks until the masks arrive, and then... I might take a crack at mixing acrylics for the paintjob, rather than putting up with the stink of enamels!

Cheers, Mike/TB379

http://worldinminiature.blogspot.com/

  • Member since
    March 2006
Posted by simpilot34 on Saturday, June 5, 2010 2:03 AM

Crushlikins that is an absolute stunner mate!!!!!! What a great finish!!!!!!!! Hope my lil ones turn out half as good!!!Toast

Tbolt you are having great success in your progress!!!!Yes

Guy thanks for the links!!!!!

Frank, thanks for your link as well!!!! One thing that shocked me was, HOW MUCH PAINT HE PUT IN!!!!! But it worked fine and was looking good!!! Must try and find some of that flow-aid stuff!!!

Cheers, Lt. Cmdr. Richie "To be prepared for war, is one of the most effectual means of preserving the peace."-George Washington
  • Member since
    March 2010
  • From: Brisbane
Posted by Julez72 on Saturday, June 5, 2010 8:37 AM

Soulcrusher, Outstanding build buddy very well done indeedYesYesYes

Thunderbolt, She's coming along nicely mate, and quickly....Keep the pics comingToast

Steve, looks like your beating that Eduard kit.....I'm not going to even start mine until yours is finished, just so i know what to expect from it....It's cool following your build and getting multiple heads ups on the problem areas...Thanks again for thatYes BTW i've heard the cooling fan sticks out too far from the cowl when it's installed so i'd be intersted in getting your take on that....

Jason, Looking forward to seeing your kung foo painting mottle OOC, the only way i can think of is paper masks...


  • Member since
    December 2005
  • From: back seat of your car with duct tape streched out
Posted by soulcrusher on Saturday, June 5, 2010 10:07 AM

julez and Ritchie thank. I appreciate it.

Mike looks like your makeing great progress. I bet they will be somepaint going on real soon!

SoulcrusherPirate


  • Member since
    February 2007
  • From: Bournemouth UK
Posted by Luftwoller on Saturday, June 5, 2010 12:37 PM

I know i cant blame Dave this time, so Frank will have to do. Look what i bought at a show i went to today,

also the correction sets for future D-9's, from MDC,

...Guy

..'Your an embarrassment to the human genus, makes me ashamed to call myself Homo'.
  • Member since
    December 2005
  • From: back seat of your car with duct tape streched out
Posted by soulcrusher on Saturday, June 5, 2010 1:00 PM

Sweet Guy! I snagged on last year off eBay. What did you havbe pay for it if you do'nt mind telling? Did you check out your little piece of airplane in the box. Mabye if we buy enough of them we could have enough parts to put a wing together or something. Are you going to build yours or go at the D 11/13 kit next? Everytime I see it in the Squadron catalog it is calling my name!

Soulcrusher:drive:


  • Member since
    February 2007
  • From: Bournemouth UK
Posted by Luftwoller on Saturday, June 5, 2010 3:20 PM

I paid £70 for it. I think they retail at about £90 but they are rapidly going out of stock and getting harder and harder to find. As for the next build, i will probably do one of the A-8's but then again i really want to do the 110D i bought.... or the D-11/ 13 if they arrive in time. LOL

I like the idea of building a wing out of our bits. My bit is tiny but it definately looks a little green...Hey that last sentence sounds so wrong lol,

...Guy

..'Your an embarrassment to the human genus, makes me ashamed to call myself Homo'.
  • Member since
    December 2005
  • From: back seat of your car with duct tape streched out
Posted by soulcrusher on Saturday, June 5, 2010 4:54 PM

My little airplane piece definetely looks like it has some RLM 02 on one side also. That is just about what I payed for mine last year accept the only place you can find one here is on eBay. They have not been avalible for a while. You should definetely see a doctor about your tiny green bit!Ick!

SoulcrusherPirate


  • Member since
    January 2007
  • From: Cleveland, OH
Posted by Clebode on Saturday, June 5, 2010 6:46 PM

Hello All,

I am elated to see all the new build get started.  Tbolt and Steve, great progress!!  Tbolt, you seem to be a very organized builder based on your photos.  Frank, are you about ready for "stickers" as Coach Crusher calls them?

You all are much faster than me.  Guy and Sc are talking about a second plane and the new builds will no doubt zoom past me soon.  The saga of the jinxed Ta152 continues.  I have learned that Life Color paint does not adhere well to Alcad primer.  While I was working on the topside camo, severe chipping occered to the RLM 76 on the underside from a round edged plastic tub I was using as a stand.  Bang Head  Here is the damage.

I did get 90% of the topside camo on.  After final touch up, the top is getting a coat of future asap.  Hopefully that will prevent chipping on top.  The LC paint was also tricky to thin.  All 3 bottles opened behaved diferently.  Here is where I am.  The scheme is to match "Green 9", a plane captured by the Brits in 1945.  Frank, the spinner masks arrived today!   Big Smile  She is getting a red spinner! 

After hearing the exchange betwenn Guy and SC about the Eduard D-11/D-13 combo, I added it to my supplies order to Squadron.  Since the Ta152 will be only a mediocre result I will probably build another plane for this GB.


Hugh

  • Member since
    October 2007
  • From: Rhode Island
Posted by jmabx on Saturday, June 5, 2010 8:50 PM

SC - Your Focke Wulf is freakin' awesome!!! Bow Down  I love it! Between you and that crazy Brit, I'm always awestruck by the beautiful builds. Toast

Everyone is doing such great work. I've been very busy and haven't had much bench time so I'm on the slow track for now. Hopefully I can get some building done soon.

Clebode - I love the camo on your Ta... the mottling looks especially good. Yes  Regarding the underside mishap, it looks like peeling paint on a well used bird. If it was mine, I would throw a flat clear coat over it and call it abused. Whistling

Jeremy    Propeller


JOIN OUR COMMUNITY!

Our community is FREE to join. To participate you must either login or register for an account.

SEARCH FORUMS
FREE NEWSLETTER
By signing up you may also receive reader surveys and occasional special offers. We do not sell, rent or trade our email lists. View our Privacy Policy.