SEARCH FINESCALE.COM

Enter keywords or a search phrase below:

FW-190 Reich Defender III 5/10-2/11

437394 views
1810 replies
1 rating 2 rating 3 rating 4 rating 5 rating
  • Member since
    September 2003
  • From: South Central Wisconsin
Posted by Daywalker on Monday, May 24, 2010 11:10 PM

Excellent work here fellas, keep it up! 

Damon- That engine looks sublime, love the slightly aged metal look to it.  Well done!

I dunno about any mythical powers, just lucky me thinks!  Lots and lots of microsol and solvaset (sometimes even a little Tamiya extra thin cement) and patience! 

Thought about trying Aaron's method sometime, with the helmet, power drill, and all that.  A little scary, but sounds like fun.  I really miss that guy...

Boo Hoo


Frank 


  • Member since
    April 2013
Posted by nomad68 on Monday, May 24, 2010 11:26 PM

sidure

Hey Damon that is a good looking engine you have there I like the way it turned out. What colour did you use by the way I might want to try it some time

Steve

Steve I am glad you like it. I used for the block a aluminum buffing metalizer then sealed it. painted components RLM 74 and 66. I use two artist oil washes the block is brown the supercharger is black wash. accesories are chrome silver with black wash. Steve try different color washes it tints the aluminum different for what effect you want. Hope that answered your question. Thanks. Big Smile

Damon

  • Member since
    July 2008
  • From: USA California
Posted by vetteman42 on Monday, May 24, 2010 11:47 PM

Julez72

You guys are seriously talented, keep up the great work and keep the pics comingYesToast

Ditto what Julez72 said. I have learned a bunch from this group and the 262 group as well.

Randy So many to build.......So little time

  • Member since
    March 2006
Posted by simpilot34 on Tuesday, May 25, 2010 2:47 AM

Damon that is a great looking enginepop!!!!! Bow Down

Julez please don't tell me that Dragon a/c kits have fit issues too for the price they charge!!!??? I have but only one Dragon a/c kit and it is the 1/72 P-61 Black Widow and have AM engines, masks, and interior and exterior PE for it. One of those retirement builds me thinks LOL!!!

Just bought Academy's Dora today and looks to be pretty good. So now I have 2 Dora's and an A-6/8. One of the Dora's is an Airfix, Might start on that one and then go from there as the other two are Academy's. That is of course once I finish my 262. Good thing the bench is 3ft away!!Whistling

Cheers, Lt. Cmdr. Richie "To be prepared for war, is one of the most effectual means of preserving the peace."-George Washington
  • Member since
    December 2005
  • From: back seat of your car with duct tape streched out
Posted by soulcrusher on Tuesday, May 25, 2010 3:10 AM

Alright Ritchie lets see some work in progress pics of some 190's. Frank is waiting you know!

Soulcrusher:beerchug:


  • Member since
    March 2006
Posted by simpilot34 on Tuesday, May 25, 2010 3:52 AM

Yes and as with Frank's pics it will be worth the wait!! That's my story and I'm sticking to it!!!! Whistling

Cheers, Lt. Cmdr. Richie "To be prepared for war, is one of the most effectual means of preserving the peace."-George Washington
  • Member since
    March 2009
  • From: Wirral. UK
Posted by Spike190 on Tuesday, May 25, 2010 4:07 PM

Great looking work going on here chaps, some lovely airbrush work. I need to go back over quite a few pages to catch up after my hols.

Keep up the good work.

Cheers...

Mike  Toast


  • Member since
    January 2007
  • From: Cleveland, OH
Posted by Clebode on Wednesday, May 26, 2010 5:41 AM

Damon---The engine is awesome.  I have used the same technique myself but never got quite the realism you did.  You have to open the access panels to show it off.

Guy---I have ordered the spinner spirals from Eduard.  Ordered the mask set for the Ta152 also.  Eduard requires a $20 minimum so I ordered some other mask sets too.

We need more WIP pics!!!  Where is everyone?

Hugh

  • Member since
    December 2005
  • From: back seat of your car with duct tape streched out
Posted by soulcrusher on Wednesday, May 26, 2010 12:06 PM

I finally got all of the colors on the 190. Man that was some serious airbrushing! I'll have some pictures up later Clebode.

SoulcrusherPirate


  • Member since
    February 2007
  • From: Bournemouth UK
Posted by Luftwoller on Wednesday, May 26, 2010 12:31 PM

Well im calling mine done. As for my thoughts on the new D9 kit, mmm. I have mixed feelings. As ive mentioned before they (Eduard) really want you to build the thing with all panels open and if you chose not to, as i have, it makes for a difficult model to build. Add to that, thier usally impecable instructions making a boo boo. Yes a boo boo, buyers beware. In the beginning of the destructions, they say that if you are building the plane with the gun cover shut, omit the gun ammo cans and chutes and leave off the guns. This part of the instructions has clearly been lifted from thier A series aircraft that have closed in wheel wells! If its the D your building and you look up in the wheel well, it seems very sparten, due to the omitted items. Ask me how i know this. Bloody Eduard,

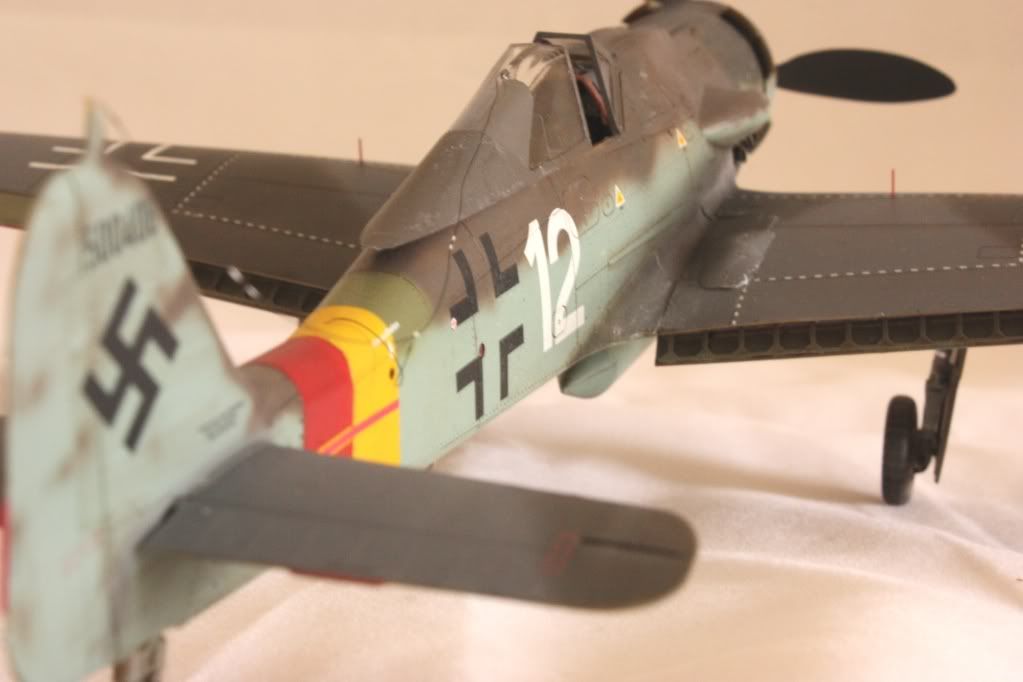
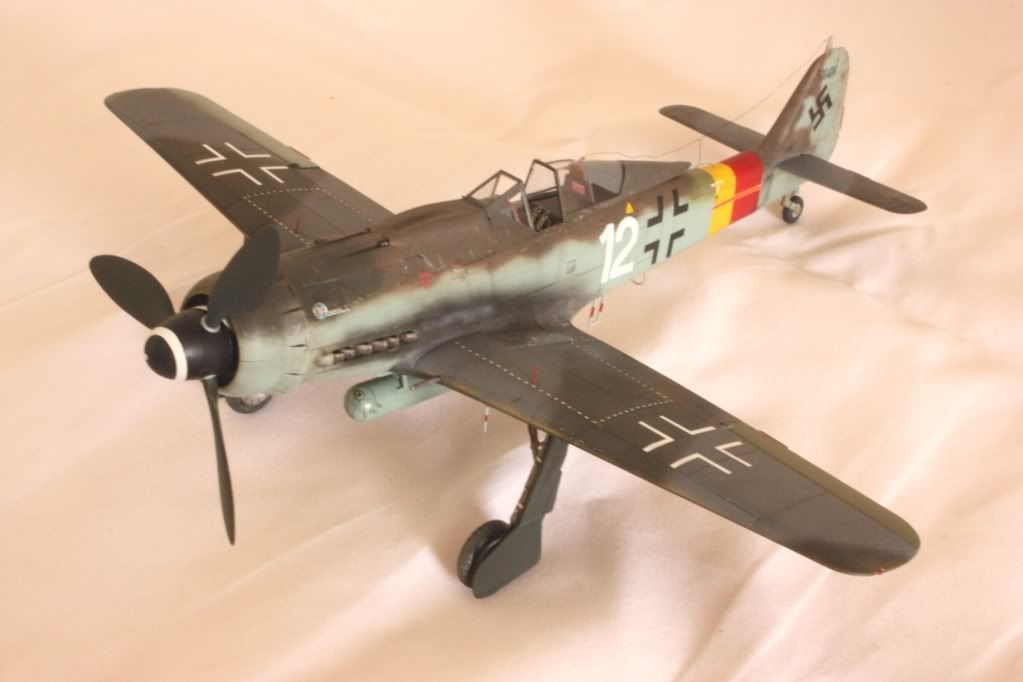
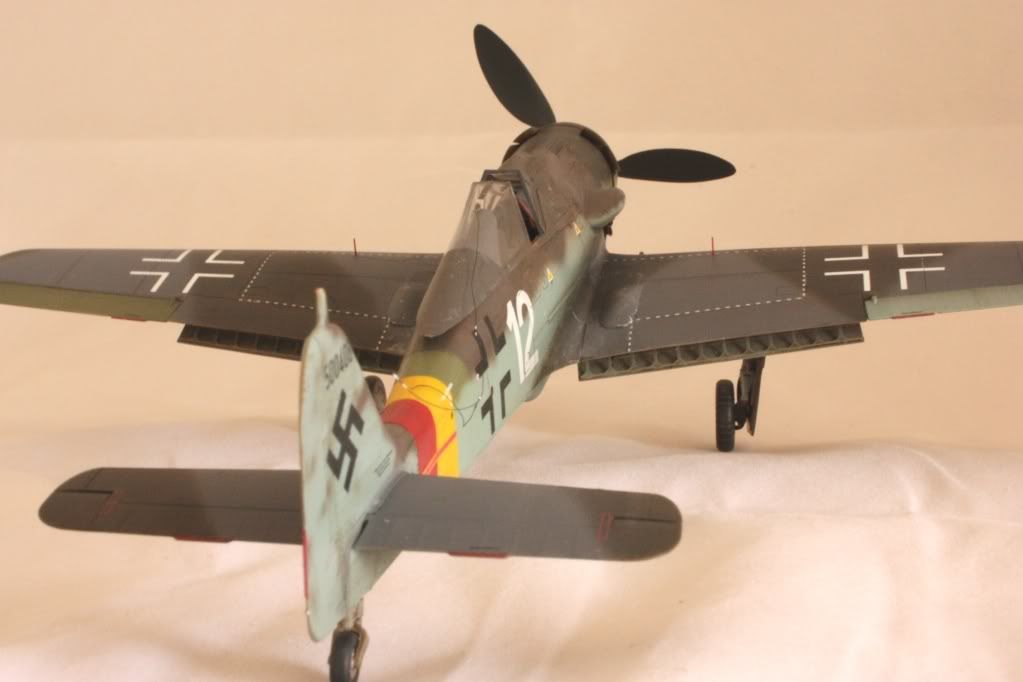
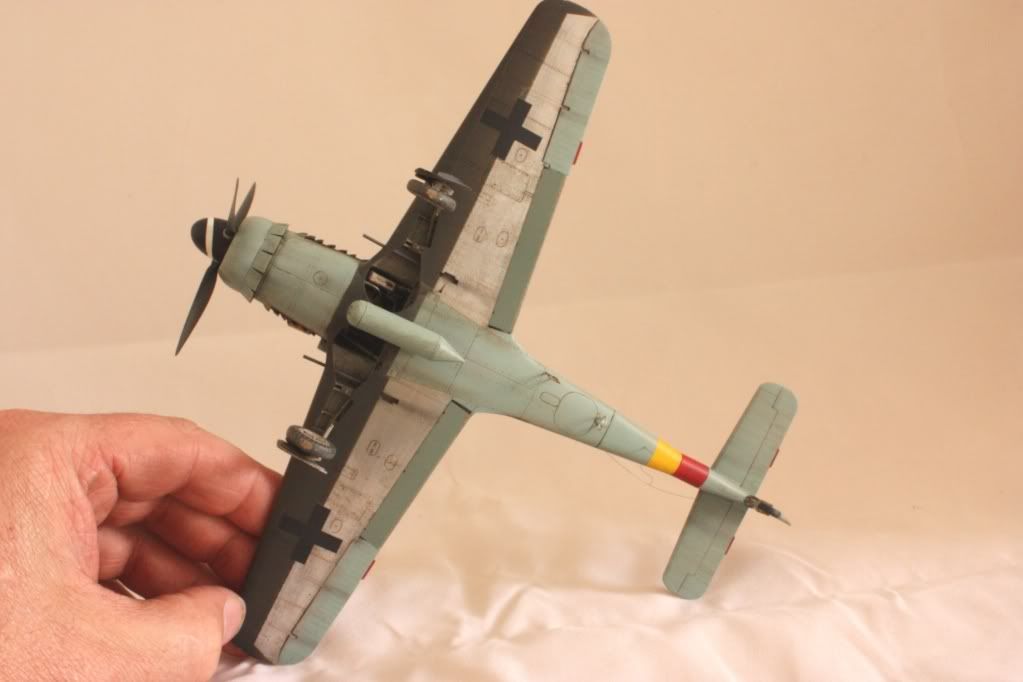
  Im pleased with how she turned out. The panel details, rivets, decals, all spot on. I need t6he D-13 combo me thinks,

Anyhoo, pics,

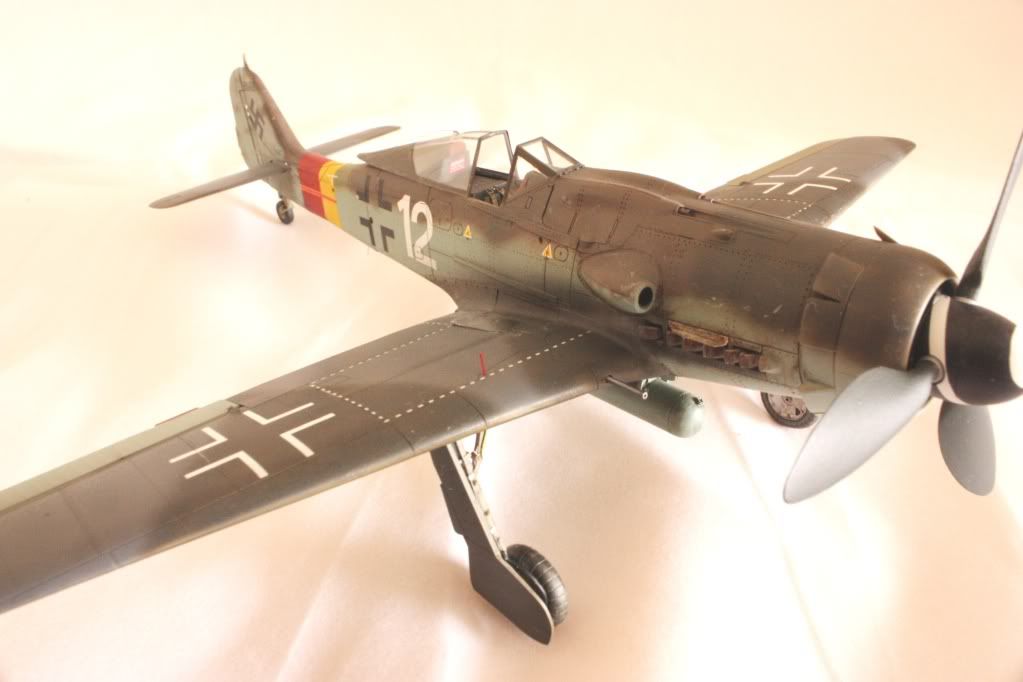
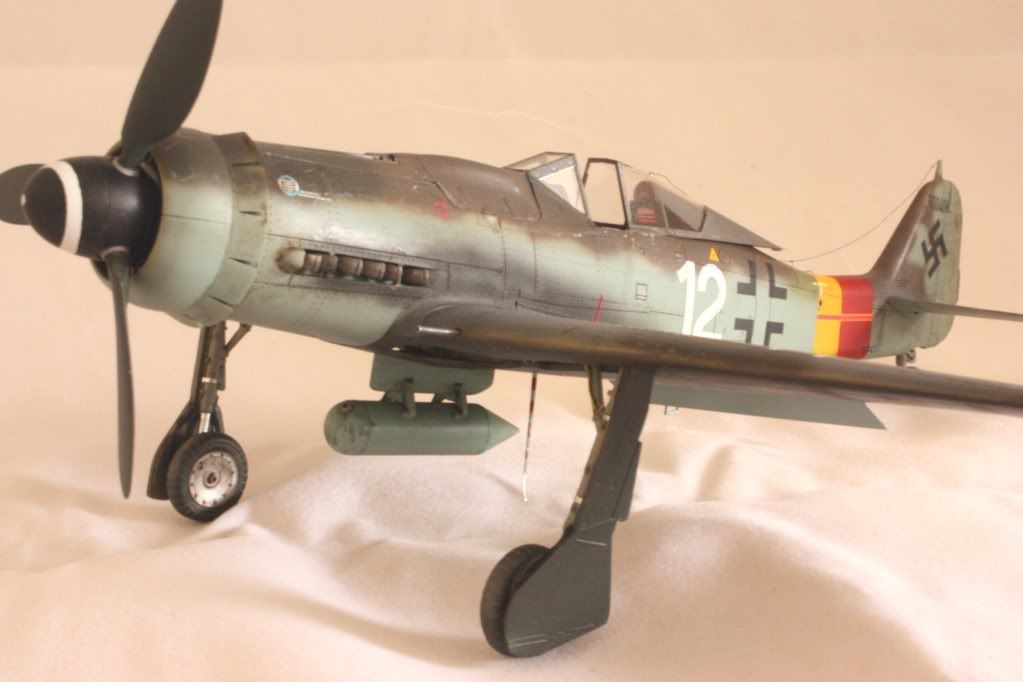
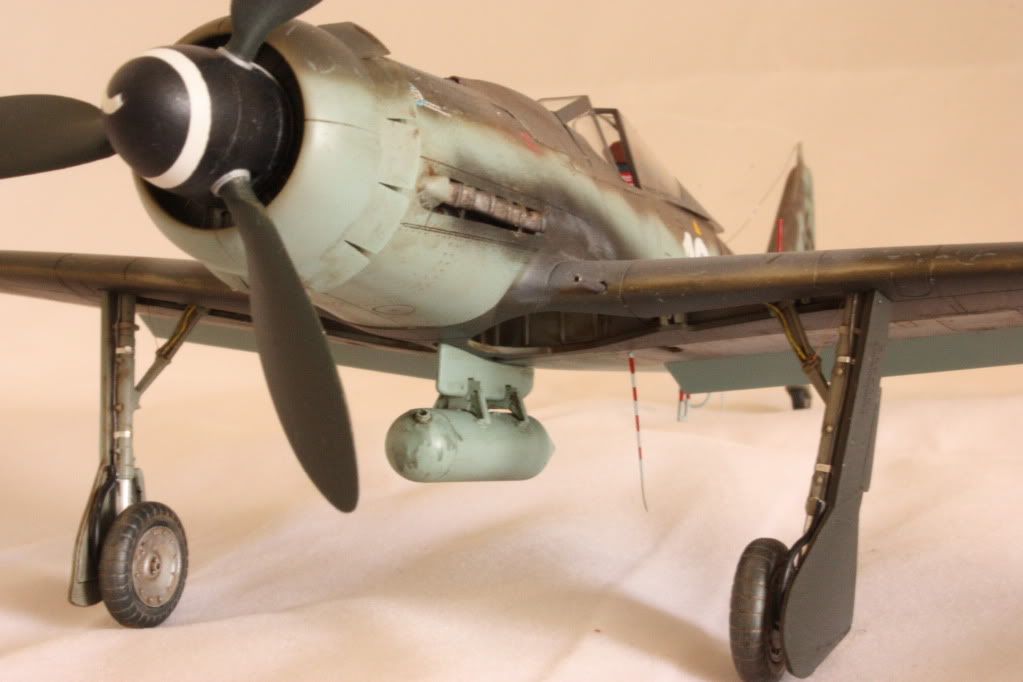
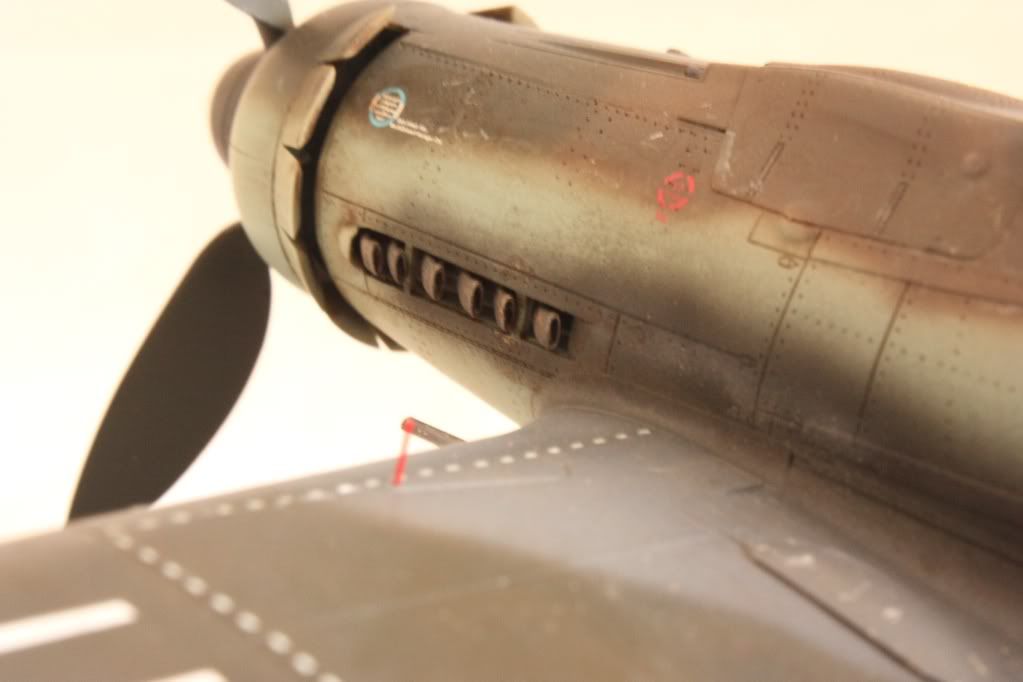
Oh and check out these glorious QB exhausts,

Thx to Frank for hosting this great GB and you never know i may be back with an A8 thats starting calling from the stash. Calling loudly as it happens LOL,

...Guy

..'Your an embarrassment to the human genus, makes me ashamed to call myself Homo'.
  • Member since
    April 2005
Posted by Thunderbolt379 on Wednesday, May 26, 2010 6:05 PM

Guy, tough build she may have been, you tamed her to perfection! This is one of the most detailed and truly visually believable models I think I've ever seen.

Salutations, sir, I hope I can crank out something half as good (when I ever get the chance!)

Cheers, M/TB379

http://worldinminiature.blogspot.com/

  • Member since
    December 2005
  • From: back seat of your car with duct tape streched out
Posted by soulcrusher on Wednesday, May 26, 2010 7:57 PM

Guy lovely job on the D-9! Thanks for the heads up on what to look for on the kit if I decide to add one to the stash.

I finally have all of the colors layed down. It only took three nights and anout 10 hours work of masking and airbrushong but its done. She's getting a shiney coat tonight so I can play with the stickers tomorrow!

Soulcrusher:wall:


  • Member since
    September 2003
  • From: South Central Wisconsin
Posted by Daywalker on Wednesday, May 26, 2010 8:34 PM

Guy- YOUDAMAN!!!  How did I know it would be you to be the first onto page one?  Very well done mate.  Paint is superb, and the chipping on the wing leading edge- sublime!  Exhaust is very well done too.  One question- is it just me, or is the forward rake of the main gear seem a bit off?  They almost look to be standing straight down from the bottom of the wing, as opposed to forward of the wing leading edge.  Just curious.  Lovely work fella! Toast

Crusher- That's another 190 in a perfect paint job, LOVE IT!  All of the hard work masking and painting is really going to pay off.  Maybe I'll send my F-8 to CT for it's paintjob! Whistling

Frank 


  • Member since
    October 2007
  • From: Rhode Island
Posted by jmabx on Wednesday, May 26, 2010 8:43 PM

Fantastic work Guy! She's an amazing looking bird! Bow Down  What did you use for the antenna wire? It looks to be the perfect size.

SC - Your hard work on the masking and painting paid off... looks great! I always love the finish on your birds. Did you use a template to mask the tail area for the swastika or did you just eyeball it? 

Jeremy    Propeller


  • Member since
    December 2005
  • From: back seat of your car with duct tape streched out
Posted by soulcrusher on Wednesday, May 26, 2010 9:44 PM

Sorry Frank I'dove to help you but I do'nt do request.:friday:

Jeremy for the swastika area on the tail I measured the kit decals and then cut the masks out of a wide piece of Tamiya masking tape. Then I tried to place it the best I could according to the color proflie. I can't wait to see how it is going to llok with all of the decals in place.

Soulcrusher:outtahere:


  • Member since
    July 2003
  • From: waynesboro va, via Ireland
Posted by sidure on Wednesday, May 26, 2010 11:55 PM

Guy, that is one beauty of a build you have there. Very well done and it looks perfect all round.

Crusher, well done on the paint job. All the hard work and masking and multiple colours really payed off. Great job.

Steve

  • Member since
    December 2005
  • From: back seat of your car with duct tape streched out
Posted by soulcrusher on Thursday, May 27, 2010 12:06 AM

Thanks Steve. Knowing that all of you like it makes all of the hard work worth while. I'm going to have to go restock my masking tape supplies after this build!

Soulcrusher:beerchug:


  • Member since
    February 2007
  • From: Bournemouth UK
Posted by Luftwoller on Thursday, May 27, 2010 3:59 AM

Thx guys,

Frank, I think that the rake is slightly off, this could be due to the dodgy fit of the main spar though. The wheels do come slightly forward of the leading edge but im not convinced its enough. I may go back and do a little adjusting but i nedd a good reference or 2 LOL,

Jeremy, The antenna wire was a single strand i stripped form an old RC servo wire and then painted black. It holds its shape pretty good i reckon.

Crusher, the paint is looking awesome, my friend. Your mottling looks spot on,

...Guy

..'Your an embarrassment to the human genus, makes me ashamed to call myself Homo'.
  • Member since
    September 2003
  • From: South Central Wisconsin
Posted by Daywalker on Thursday, May 27, 2010 6:16 AM

Guy- I hear ya!  Here is a link that might be of help...

FW-190 landing gear

Frank 


  • Member since
    March 2006
Posted by simpilot34 on Thursday, May 27, 2010 7:09 AM

Guy that is absolutely a stunning and well rendered build in all respects!!!!!! WOW!!!!!Bow DownBow DownBow DownToast

Crushlikins that is looking absolutely stunning mate!!! Love that mottle!!!!Bow DownBow DownBow DownToast

Frank thanks for the link, very helpful!!Toast

Cheers, Lt. Cmdr. Richie "To be prepared for war, is one of the most effectual means of preserving the peace."-George Washington
  • Member since
    March 2009
  • From: Wirral. UK
Posted by Spike190 on Thursday, May 27, 2010 11:23 AM

Guy, wow she turned out beautifully, A+ for the finish, I'd like to see it against an outdoor backdrop I think it would look excellent Yes Toast.

SC well done on all that masking and airbrushing, you've done a beauty and it's gonna look awsome with the decals in place.

Cheers...

Mike  Toast


  • Member since
    December 2005
  • From: back seat of your car with duct tape streched out
Posted by soulcrusher on Thursday, May 27, 2010 12:51 PM

Thank you Ritchie and Spike. I appreciate the kind words. As always I still feel I left a little on the plate. I think I brought the mottle line down a bit to far but mabye not. Alot of the late war Luftwaffe aircraft had heavy mottleing on the fuselage to hide them on the ground. I do not have an actual picture to go by just a color plate that was done from one black and white photo that is open to interpriation on its own. Eaglecal is know for their accurate decals and research so I tend to  talk most of their color plates as the best info out there.

I have to say somehow this build has really got be back in building mood after an extremely sluggish winter where I only finished I 1/72 scale kit right around Xmas and then nothingn since then. It must be Frank that brings out the best in me!:op:

Soulcrusher:trink26:


  • Member since
    January 2007
  • From: Cleveland, OH
Posted by Clebode on Thursday, May 27, 2010 1:46 PM

Coach Crusher - Great job!!  I don't think you took the mottling too low.  I have two color shots of late war Fw 190s that show mottleing all the way down to the lower suface color line.  Also, I assume that much of the camo was hand applied in the field and would be unique plane to plane.

Guy - You must be retired.  I have never seen anyone build something so xquisite so quickly.  Do tou know if the TA152 would have had the same type of antenna mount as your D-9?  I have heard some German planes had a reel device to keep the antenna wire taught when the canopy was open.

Also for  others just starting, I just received a amazing photo study of cockpits from the Smithsonian.  Here are impressive photos of a D-9 and an F-8 cockpits.

Hugh

  • Member since
    December 2005
  • From: back seat of your car with duct tape streched out
Posted by soulcrusher on Thursday, May 27, 2010 2:03 PM

Clebode the original design for the antenna wire had a spring loaded device build into the canopy that would reel in the wire as the canopy was opened and kept it taunt even when open. Later on to simply things the retractor was eleminated and when the canopy was open the wire would just go slacl as it potrayed in Guy's spectacular model. I can lookand see inmy pictures of the Ta 152 to see if I can find a picture of one with the canopy open but I would be willing to bet it would go slack when the canopy was opened.

BTW Guy cheates! He has  two helpers named Wingus and Dingus that run all of his errands for him leaving him more free time to model. That and he was feeling to old to go to the Football match this week to.

Soulcrusher:bad:


  • Member since
    February 2007
  • From: Bournemouth UK
Posted by Luftwoller on Thursday, May 27, 2010 4:15 PM

Dont let all my secrets out Crushlikins. Dingus is very private you know LOL.

Frank, look what you bin an gone and done. I was convinced the plane was going to stay as it was, but after looking at the link you posted, i just couldnt let it lie LOL,

Its all your fault, and not Daves, for once,

...Guy

..'Your an embarrassment to the human genus, makes me ashamed to call myself Homo'.
  • Member since
    July 2004
  • From: Northern KY
Posted by mucker on Thursday, May 27, 2010 8:32 PM
I'm gone for a mere 10 pages and come back to find that not only has Guy resurfaced from nowhere, but he's already got one and a half builds done!! I've got some catching up to do, but I've breezed through few pages of nice WIP's.

  • Member since
    September 2003
  • From: South Central Wisconsin
Posted by Daywalker on Thursday, May 27, 2010 10:02 PM

Glad you guys liked that link- very informative, yes?

Crusher- You have no idea how happy I am to see you building again!  It had been a while, and to hear your funk is gone is really good news.

Guy- LOL, I'm glad this one is my fault, and not some of those other debacles like Sarge gluing both wing bottom halves together on that Sunderland- YIKES!  The modified legs look mucho sexy, with that rakish stance.  Any chance of another photo showing the whole model with the modified gear?

Charles- Great to have you back!  Amazing how quickly this GB moves along, isn't it?


Frank 


  • Member since
    February 2007
  • From: Bournemouth UK
Posted by Luftwoller on Friday, May 28, 2010 10:35 AM

Your wish is my command, Daywaster!,

Charles, Your Highness. Great to see you again. Been ages. Have no fear, ill be keeping an eye on this GB for sure. Such a great subject and as i said, another FW is still on the cards,

...Guy

..'Your an embarrassment to the human genus, makes me ashamed to call myself Homo'.
  • Member since
    September 2007
  • From: Relocating
Posted by Mobious on Friday, May 28, 2010 10:50 PM

 Guy, Great looking finish! Top notch detail. The small drop tank looks cool. Exceptional work there! Bow Down

 SC, Wow, the paint is looking spectacular.Bow Down

 Inspiring work gentlemen!

"It's a problem of applied physics" Roy Brown

  • Member since
    April 2013
Posted by nomad68 on Friday, May 28, 2010 11:54 PM

I have been gone for three days, checked on this GB and Guy has his plane done already and fixed the gear. Nice work Guy that is a great job. Bow Down 

Crusher the cammo and mottle look great cant wait to see the decals on. Yes

JOIN OUR COMMUNITY!

Our community is FREE to join. To participate you must either login or register for an account.

SEARCH FORUMS
FREE NEWSLETTER
By signing up you may also receive reader surveys and occasional special offers. We do not sell, rent or trade our email lists. View our Privacy Policy.