SEARCH FINESCALE.COM

Enter keywords or a search phrase below:

Have Gun Will Travel: SP Artillery GB 2011

43855 views
290 replies
1 rating 2 rating 3 rating 4 rating 5 rating
  • Member since
    May 2003
  • From: Ft. Sill, OK
Posted by beav on Thursday, February 10, 2011 5:49 PM

She's lookin' mean Tony!

"First to Fire!"

Steven

  • Member since
    April 2005
Posted by Thunderbolt379 on Thursday, February 10, 2011 6:18 PM

Totally stunning work, Tony! Keep her comin'!

Cheers, M/TB379

http://worldinminiature.blogspot.com/

  • Member since
    August 2008
  • From: S.W. Missouri
Posted by Pvt Mutt on Thursday, February 10, 2011 6:33 PM

I'm trying,i'm trying alreadyBig Smile

Thanks guys

Tony leeSmile

Shoot Low Boys They're Ridin Ponys

  • Member since
    July 2006
  • From: New Jersey
Posted by redleg12 on Thursday, February 10, 2011 7:46 PM

Outstanding build work as usual Tony.....

Stay warm.....NJ no better....have not seen the fron lawn since Christmas

Rounds Complete!!

"The Moral High Ground....A Great Place to Emplace Artillery."

  • Member since
    March 2010
  • From: Buffalo, NY
Posted by macattack80 on Thursday, February 10, 2011 7:52 PM

Thunderbolt379

Totally stunning work, Tony! Keep her comin'!

Cheers, M/TB379

Ditto   Lookin great!

Kevin

[


  • Member since
    May 2003
  • From: Ft. Sill, OK
Posted by beav on Thursday, February 10, 2011 7:55 PM

Hey Guys, I'm calling it, here she is:

Trumpeters 1/35sc 122mm Type 89 Peoples Liberation Army Multiple Rocket Launcher finished as K01.


"First to Fire!"

Steven

  • Member since
    March 2010
  • From: Buffalo, NY
Posted by macattack80 on Thursday, February 10, 2011 8:07 PM

Beav, that is one wicked looking piece of armor!  Nice job!  I especially like the camo.  Bow Down

I finally finished up the B-1 Lancer so I have regained A LOT of bench space.  I hope to really get cracking on the M40.

Kevin

[


  • Member since
    April 2005
Posted by Thunderbolt379 on Thursday, February 10, 2011 8:17 PM

Mervelous work, Beav, she's a real credit to you! I hope i can do one as good when I get to that kit!

Updating page 1 now!

Cheers, Mike/TB379

http://worldinminiature.blogspot.com/

  • Member since
    August 2008
  • From: S.W. Missouri
Posted by Pvt Mutt on Thursday, February 10, 2011 8:30 PM

WOW Weeeeeee BeavToast

Tony leeSmile

Shoot Low Boys They're Ridin Ponys

  • Member since
    May 2003
  • From: Ft. Sill, OK
Posted by beav on Thursday, February 10, 2011 8:36 PM

Thanks for the comments guys, maybe I'll stick with this hobby after all Stick out tongue

Tony, your PE work inspires me, all I've ever managed with that material is to glue my hands together.

"First to Fire!"

Steven

  • Member since
    April 2005
Posted by Thunderbolt379 on Monday, February 14, 2011 6:55 AM

A little progress to report on the M110... Been busy with RL stuff but kept plugging away on the fine details. The wash and drybrush are done, and I'm picking out details as I go. The head and tail lights are done, the spade hydraulics are done. I just added pigment dust along the sides of the tub and mounted the running gear. I'll hopefully get the treads on tomorrow, then it's photo time.

Main gun hydraulics, some cabling to paint, mount the recoil spade, and she's about ready for decals...

Cheers, M/TB379

http://worldinminiature.blogspot.com/

  • Member since
    August 2008
  • From: S.W. Missouri
Posted by Pvt Mutt on Monday, February 14, 2011 3:32 PM

I took the resin off and used some PE storage boxes in their place:

Opinions appreciated you know.

Tony leeSmile

Shoot Low Boys They're Ridin Ponys

  • Member since
    March 2010
  • From: Buffalo, NY
Posted by macattack80 on Monday, February 14, 2011 3:55 PM

Pvt Mutt, That is something to behold!  Your PE work is fantastic!  Bow Down  You could probably leave that unpainted.   Looks cool with all the different media used so far.

I finally managed to get the tracks together and I hope to get working on the suspension soon. 

Kevin

[


  • Member since
    April 2005
Posted by Thunderbolt379 on Monday, February 14, 2011 4:53 PM

Tony Lee -- your etch work is so darn good you make me want to buy an etcjmate and give it a try on this scale!

Stunning work all the way!

Cheers, Mike/TB379

http://worldinminiature.blogspot.com/

  • Member since
    August 2008
  • From: S.W. Missouri
Posted by Pvt Mutt on Monday, February 14, 2011 5:24 PM

Thanks guys,the storage boxes still need to have the latches and the straps that hold the box to their base installed. I was just trying to figure out what looks best, the resin bits or the PE or maybe a mix of both.

Tony LeeSmile

Shoot Low Boys They're Ridin Ponys

  • Member since
    April 2005
Posted by Thunderbolt379 on Tuesday, February 15, 2011 6:16 AM

As promised, WIP pics -- the M110 is getting very close to done.

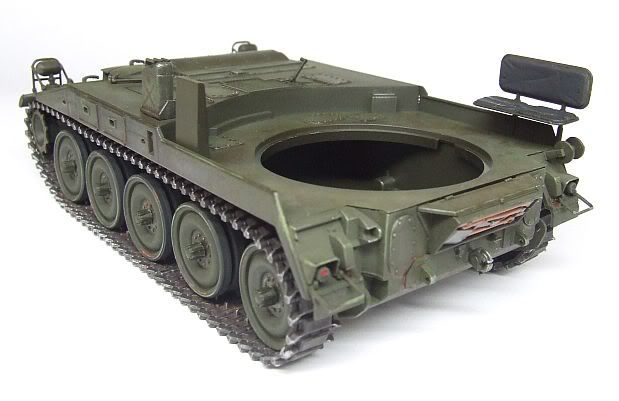
I've installed the running gear, seats, guide rods under the gun, pioneer tools and one of the jerry cans, painted numerous small details and pushed the weathering a bit more:

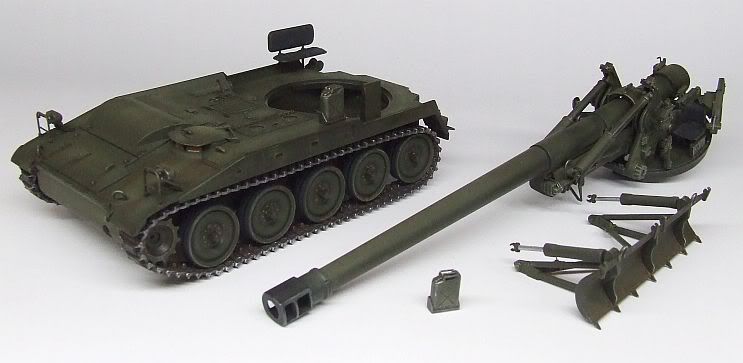
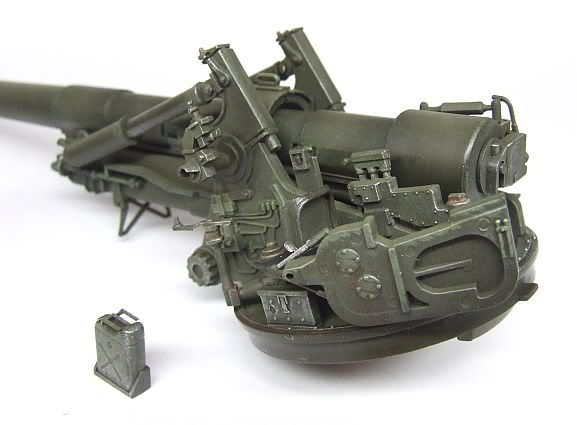
I had meant to use wire to create missing cables and connections but... The kit detail is frankly so simplified when compared to photos of the real thing, I wouldn't know where to start, or if I started, where to stop. There are lots of missing hydraulic connections and power leads or whatever, and in a larger scale I'm sure I could have fun reproducing them, but as it is I think I'll let the kit details stand. A little dust and you won't even tell what colour they were meant to be...

I'm thinking it may be simpler to apply the stern decals before mounting the spade, and they'll give me a look at how the decals behave over raw paint. I'd rather not deal with clear coats on this finish if I can avoid it. The German vehicle has more decals than the others, a dozen, with a splash of colour here and there.

Touch up around the periscopes, paint the fire extinguisher and the buckles of the seat belts, paint the spade mounting brackets, install the shell trays... Not far to go!

Cheers, Mike/TB379

http://worldinminiature.blogspot.com/

  • Member since
    August 2008
  • From: S.W. Missouri
Posted by Pvt Mutt on Tuesday, February 15, 2011 9:36 AM

Love those BIG gunsYes

SPGs Forever

Tony LeeSmile

Shoot Low Boys They're Ridin Ponys

  • Member since
    July 2006
  • From: New Jersey
Posted by redleg12 on Tuesday, February 15, 2011 10:12 PM

Looking very nice.....need a little wear on the drive sprocket teeth....tracks look good.

Rounds Complete!!

"The Moral High Ground....A Great Place to Emplace Artillery."

  • Member since
    May 2003
  • From: Ft. Sill, OK
Posted by beav on Tuesday, February 15, 2011 10:23 PM

Nice and clean, sometimes more difficult than a heavily weathered build.  I like it.  I can understand you giving up on all the hoses and wires; there are just insane amounts on this thing.

"First to Fire!"

Steven

  • Member since
    April 2005
Posted by Thunderbolt379 on Wednesday, February 16, 2011 12:59 AM

Thanks, guys!

Redleg -- you're right! I knew I forgot something... There's now bare metal on the drive teeth.

Beav -- it may be the registration of the photo, I was concerned I was getting her too skanky... There's plenty of dust to come, but I was not as enthusiastic with the rust streaks as I usually am as the paint displayed a tendancy to lift during the wash process. Yep, I'll leave accurising the hoses to retired artillerymen with time on their hands... Smile

I just installed the second jerry can and was about to apply the decals to the tail end before wrestling with the fittings for the recoil spade. But Italeri really does strike again. How do you get a 15mm decal into a space barely 11mm wide? GRR, research time. If the vehicle is accurate, the decals are too big. If the decals are also accurate, the instructions are wrong...

So close now!

Cheers, M/TB379

http://worldinminiature.blogspot.com/

  • Member since
    March 2010
  • From: Buffalo, NY
Posted by macattack80 on Wednesday, February 16, 2011 4:07 PM

Thunderbolt, your M110 is looking awesome!  Nice work.  I have been looking at trying to get on of those kits.  The price gets pretty steep on Ebay though.  I might have to bite the bullet.....

My camera is not working now.  Hmmm.  I will see if I can borrow someones to get some pics of what I have done thus far.  It isn't much but I should post a pic for inspection.

Kevin

[


  • Member since
    April 2005
Posted by Thunderbolt379 on Thursday, February 17, 2011 12:57 AM

Thanks, macattack, I got this one in the late 90s from Squadron on special, they do seem to be a bit rarer these days.

I'm applying the decals at this time. After a couple of days of Googling for research photos I could not identify exactly how the German markings were applied on the tail end, so I decided to use the US markings. I'm not terribly impressed with the Italeri decals, they're reluctant to part from their backing and I'll be amazed if they don't fall off when they're fully dry... I guess we'll see!

Recoil spade, dust, add a few extra bits, paint the fire extinguisher next time I'm spraying red, which should be quite soon... And she's done.

Cheers, Mike/TB379

http://worldinminiature.blogspot.com/

  • Member since
    August 2008
  • From: S.W. Missouri
Posted by Pvt Mutt on Thursday, February 17, 2011 6:33 PM

Two down and two to go.

There's a couple items in the fender box along with an oily rag.

Thanks for looking

Tony leeSmile

Shoot Low Boys They're Ridin Ponys

  • Member since
    April 2005
Posted by Thunderbolt379 on Thursday, February 17, 2011 9:45 PM

Tony Lee -- your brass work is nothing short of amazing!

Well, guys, I'm calling the M110 finished. I went with US markings because the decals for the German version simply wouldn't fit the available space. The Italeri decals conformed well enough with MicroSol, though it was a bit hairy getting them there. The shell trays that go on the spade bearers were not mounted, same with the spare track links, I've noticed they're not always there in photos and the plain fact is there was insufficient room for the parts to be fitted without obstructing the fit of the spade to the hull. I've put the painted items away (bagged and tagged...) and if I ever figure out how to mount them, I can do so. The two lower bearer bracket closing parts for the spade were also not fitted, there was again no way to get the parts into place and the bearers fit just fine in their pivots as it was. I got her good and dusty with MiG Europe Dust, maybe a bit too much, but I'm sure it'll fade with time!

Onto the pics -- all comments welcome. I know she's a bit simplified, but I'm more or less happy with her. This is my first completed Italeri kit.

Cheers, Mike/TB379

PS: Badges coming soon!

http://worldinminiature.blogspot.com/

  • Member since
    May 2003
  • From: Ft. Sill, OK
Posted by beav on Thursday, February 17, 2011 10:06 PM

Looks great Mike, those guns are so impressive.  I'll probably have to add one to my collection if they ever re-pop it.

That dust really completes it, btw.  Do you know where the markings place this vehicle in space and time?

"First to Fire!"

Steven

  • Member since
    April 2005
Posted by Thunderbolt379 on Thursday, February 17, 2011 10:16 PM

Thanks, Beav. The dust is a quick realism that it seems hard to go wrong with. One day I'll have to bite the bullet and try mud!

I'm not positive about the markings, the kit gives precious little information, but my impression is either US Army in Europe or at home in the 1980s. It's before the protective shelter was added to the A2s, but after the A2 resulted from the resumption of manufacture around '78 IIRC... Also the markings generally reflect 1980s style, with the small black star on the front end, not much of a national insignium but that big white star in WWII made a great target, I guess...

Cheers, glad you like it!

Mike/TB379

http://worldinminiature.blogspot.com/

  • Member since
    December 2009
  • From: Memphis<Tenn.
Posted by Monty Watts on Thursday, February 17, 2011 11:28 PM

Dang Bro. those boxes looks good.. Don't you wish there are more of them.....LOL   Monty

  • Member since
    April 2005
  • From: Australia
Posted by taxtp on Friday, February 18, 2011 2:45 AM

Fantastic model of a really impressive machine Mike. I wish mine had size like that ! I've learned a lot from your build, thanks.

BTW Tony - I've been adding some P/E to another build, and I keep coming back to this GB for inspiration from your work.I think its the best I've seen.

Cheers

Tony

I'm just taking it one GB at a time.

  • Member since
    April 2005
Posted by Thunderbolt379 on Friday, February 18, 2011 4:48 AM

Thanks, Tony! It's always great to have your work appreciated. This one has a few flaws but overall she has appeal, and that counts for much.

I'm thinking I'll field another model later in the build, either Trumpeter's 1:35 Chinese Type 83 SPG or Revell Germany's 1:35 Panzerhaubitzer 2000. I'm torm between them -- the Type 83 has a cool tri-tone camo and I've never completed Chinese armour before, but the PzHbtz 2000 is the most awesome SPG around... At least the parts look almost intimidating in the box, and it comes with an aluminium barrel too...

Cheers, M/TB379

http://worldinminiature.blogspot.com/

  • Member since
    July 2006
  • From: New Jersey
Posted by redleg12 on Friday, February 18, 2011 5:15 AM

Nice work on the M110A2. Always love light weathering, lets the model show. You may want to put a little more wear on the bottom of the recoil spade....the bottom edge takes a beating

Rounds Complete!!

"The Moral High Ground....A Great Place to Emplace Artillery."

JOIN OUR COMMUNITY!

Our community is FREE to join. To participate you must either login or register for an account.

SEARCH FORUMS
FREE NEWSLETTER
By signing up you may also receive reader surveys and occasional special offers. We do not sell, rent or trade our email lists. View our Privacy Policy.