SEARCH FINESCALE.COM

Enter keywords or a search phrase below:

Have Gun Will Travel: SP Artillery GB 2011

43857 views
290 replies
1 rating 2 rating 3 rating 4 rating 5 rating
  • Member since
    July 2006
  • From: New Jersey
Posted by redleg12 on Sunday, March 13, 2011 8:35 PM

OK…It’s been a couple of weeks. RL has been keeping my weekends busy. Hopefully I can finish this guy up soon though I will have a break when I go to AMPS International.  Nonetheless here is the latest progress

Besides continuing to assemble track (one just about complete) I have been working on the chassis. I applied Archer Transfer Bridge Crossing marker on the front. Next I pin washed the engine grill and air intake grills along with bolts and hatches. Letting that dry for a day, I did some dot filters using White, Sap Green and Flesh Oil paint. Here is a look after the filters

I completed filters on the side and top surfaces. In the track area I used a Ceramic Stucco tinted with Burnt Umber acrylic. This gives a good “chunky” base for a dirty track area. I applied the stucco using random splotching with buildup in areas which would normally hold dirt.


After the stucco dries overnight I will work the areas with Vietnam Earth pigment…..next week

As always thanks for stopping by. Your comments good or bad are always appreciated.

Rounds Complete!!

"The Moral High Ground....A Great Place to Emplace Artillery."

  • Member since
    July 2006
  • From: New Jersey
Posted by redleg12 on Sunday, March 20, 2011 7:33 PM

I had some time this weekend to push this one along. I concentrated on completing the chassis with the exception of the tracks.

For the headlights, I drilled out the kit supplied molded headlights and replaced them with #116 clear and 118 black MV lenses. Also I mounted the kit supplied barrel travel lock.

Then I worked on finishing the track area by weathering with MIG Vietnam Earth pigment. I also worked the side panel bolts and the chassis front with the same pigment mixture. After everything dried here is how things looked

Here is the other side looking from the rear.

Here is an underside view so you can see all that is weathered.

Next were the road wheels. The back of the wheels are easier to weather while off the vehicle.

Once the wheels dried, I assemble the pairs and mounted the main road wheels. The idler and drive will go on with the tracks.

That is it for the chassis except for tracks and final weathering. Next update, on to the turret.

As always thanks for stopping by. Your comments good or bad are always appreciated.

Rounds Complete!!

"The Moral High Ground....A Great Place to Emplace Artillery."

  • Member since
    May 2010
Posted by personman906 on Monday, March 21, 2011 5:32 PM

Put me down for Revell's 1/35 Panzerhaubitze-2000 please.

In Soviet Russia, MODEL BUILD YOU!

Still Building: Dragon 1/144 HH-60H

Ready for First Coat: Academy 1/35 MH-60G, Tamiya 1/35 Chieftain Mk5, Trumpeter 1/35 KSK Commandos

Finishing Touches: Revell 1/35 PzH-2000, Dragon 1/144 SH-60F, Revell 1/48 F-15E


  • Member since
    April 2005
Posted by Thunderbolt379 on Monday, March 21, 2011 5:55 PM

Redleg -- that's some spectacular mud work! What do you use for your binding agent? Water, or anything stickier?

Personman906 -- page 1 updated, welcome aboard! I was thinking of taking a crack at that one myself, it's an impressively large vehicle!

Cheers, Mike/TB379

http://worldinminiature.blogspot.com/

  • Member since
    July 2006
  • From: New Jersey
Posted by redleg12 on Monday, March 21, 2011 6:28 PM

Tbolt - No binder.....here is the stucco I use

http://www.liquitex.com/Products/texgelmedceramstuc.cfm

I added some burnt umber acrylic paste to give it the reddish orange color. That makes the MIG pigment cover much better. I like the acrylic paste to keep the stucco thick but you could also use the cheap acrylic paint.

After you mix it with some paint, just use a medium round brush and dab it on. It is a gel and sets in about a half hour but should dry overnight before weathering

Rounds Complete!!


"The Moral High Ground....A Great Place to Emplace Artillery."

  • Member since
    August 2008
  • From: S.W. Missouri
Posted by Pvt Mutt on Monday, March 21, 2011 6:42 PM

I guess i'll have to get some of that stuff and try it out Mike.Yes

At least you're back to work on it.Wink

Tony leeSmile

Shoot Low Boys They're Ridin Ponys

  • Member since
    March 2007
  • From: New york
Posted by JEFFB on Saturday, March 26, 2011 12:57 PM

I'm still here!!  The building has gone faster now..sorry guys, almost forgot to take pics!!   Before I get to the progress, heres the paint scheme.....

Everyone like it?????Try finding more pics of it.....

Back to the build..theres an engine hiding in the back..want to see it???  me too...

so I spent time building these....

My eyes were crossed after this one....and nearly glued my fingers together!!!

More to come.....I 've been busy....


  • Member since
    March 2007
  • From: New york
Posted by JEFFB on Saturday, March 26, 2011 1:04 PM

I heard there was incorect shape to stowage boxes...yep!!!  Pretty simple, theres a missing panel line...big deal...

so while I was there..I built the rear plate..

this isn't the back side..but pretty UGLY!!!!

LOL!!!!

I found some cool details I wanted to add to the right side of the turret


  • Member since
    March 2007
  • From: New york
Posted by JEFFB on Saturday, March 26, 2011 1:09 PM

I started the business end while my new favorite glue dried....

I even tried my skills at PE!!!  Did it pass muster?

I still need to add the left side turret, theres a view of the gunners periscope I'm trying to build/. I'm hoping to take this beast to BuffCon next month...

Hope ya'll enjoy the pics, it's been a fun build so far.  any  feedback welcome!!!

Jeff

  • Member since
    April 2005
Posted by Thunderbolt379 on Saturday, March 26, 2011 6:57 PM

Redleg -- that stuff looks great, I must keep it in mind!

JeffB -- she's really coming along, this is going to be a very spectacular model!

Cheers, M/TB379

http://worldinminiature.blogspot.com/

  • Member since
    September 2006
  • From: Central Texas
Posted by NucMedTech on Sunday, March 27, 2011 2:44 PM

Sorry I have not had any updates for a while; but, I have been doing some work. We'll get to that soon enough.

Redleg- As usual setting the bar high. Great work so far.

JeffB- That Dana looks to be a monster of a kit! Nice job, and the PE looks good. I've used it on ships and planes but not on AFV's, yet.

Anyway here is my progress so far:

The drivers compartment,

The recoil spade

Some of the upper hull together

And how it looks together (nothing glued yet)

And that's where it sits now. I'm Hoping to get enough done this week to be ready to paint this weekend.

-StephenCowboy

Most barriers to your successes are man made. And most often you are the man who made them. -Frank Tyger

  • Member since
    January 2006
  • From: Grand Bay, New Brunswick ,Canada
Posted by MECHTECH on Monday, March 28, 2011 8:27 AM

Redleg, I remember you saying something about the Paladin not having the 'BOOMERANG" piece mount on the vehicle. Is it that curved piece just behind the grilles in your first photo?Off Topic

  • Member since
    July 2006
  • From: New Jersey
Posted by redleg12 on Monday, March 28, 2011 11:57 AM

Mechtech - The carriage for this weapon has supported two different weapons, the 105mm howitzer M108 and the 155mm howitzer M109 series. Only one version of the M108 was ever produced. It had the "angular" barrel travel lock as seen in the first picture. The M108 saw limited production (~300) and was removed from US service somewhere in the late 1980s

The M109 has gone through multiple versions/upgrades including M109, M109A2 and the M109A6 Paladin. All of the M109 versions had straight barrel travel locks but differed slightly for each version. The M109A6 Paladen is currently in service as the US155mm SP howitzer.

Hopefully that answers your question

Rounds Complete!!

"The Moral High Ground....A Great Place to Emplace Artillery."

  • Member since
    March 2007
  • From: New york
Posted by JEFFB on Thursday, March 31, 2011 4:34 PM

Finally showing progess!!!  I finally found a spare minute to lay down some color, and the fun began!!!  The best part for me, is finally getting to this point. the paint makes or breaks a build...and I'm half way there. Next up is the white camo pattern, but not to get ahead of myself! 

Here's the paint, right out of the booth!

I added a few hoses on the gun assembly from small gage solder...

The color I had on hand was RAF dark green..and it looks pretty close to my pics.  The flash buggered me a few times...part of learning!

Any feedback welcome

Thanks for looking......next time..we go white camo!!!


  • Member since
    July 2006
  • From: New Jersey
Posted by redleg12 on Thursday, March 31, 2011 7:06 PM

JeffB - Looking very nice.....beginning to smell some muzzle blast!!

New Med Tec - The old girl is looking good.

Rounds Complete!!

"The Moral High Ground....A Great Place to Emplace Artillery."

  • Member since
    April 2005
Posted by Thunderbolt379 on Thursday, March 31, 2011 11:13 PM

Jeff -- looking great! Very impressive model of a rare and interesting subject.

Cheers, Mike/TB379

http://worldinminiature.blogspot.com/

  • Member since
    July 2008
  • From: Vancouver, the "wet coast"
Posted by castelnuovo on Friday, April 8, 2011 1:33 AM

Finally, some progres on ol' Hummel Smile

Cheers...

  • Member since
    March 2007
  • From: New york
Posted by JEFFB on Friday, April 8, 2011 6:48 PM

I'll just post my progress, see if any one recognizes my new zebra!

That was tons of fun!!!! 

  • Member since
    February 2010
  • From: New Jersey
Posted by 68GT on Sunday, April 17, 2011 4:45 PM

Well I finaly got started today on the M108. 

Its a start but there a ways to go.


On Ed's bench, ???


  • Member since
    July 2006
  • From: New Jersey
Posted by redleg12 on Sunday, April 17, 2011 6:28 PM

We all have to start somewhere....looking good

I should have an update to my M108 next week...working on indy tracks right now.

Feel free to PM or email if you have any questions

Rounds Complete!!

"The Moral High Ground....A Great Place to Emplace Artillery."

  • Member since
    May 2010
Posted by personman906 on Sunday, April 17, 2011 8:57 PM

OK, I've almost finished my PzH-2000.  I just need to add a few more washes and put another flat coat on it, then it's done.  Just a note, I hate Revell decals...

In Soviet Russia, MODEL BUILD YOU!

Still Building: Dragon 1/144 HH-60H

Ready for First Coat: Academy 1/35 MH-60G, Tamiya 1/35 Chieftain Mk5, Trumpeter 1/35 KSK Commandos

Finishing Touches: Revell 1/35 PzH-2000, Dragon 1/144 SH-60F, Revell 1/48 F-15E


  • Member since
    April 2005
Posted by Thunderbolt379 on Sunday, April 17, 2011 9:07 PM

Great going! Any WIP photos...?

Cheerss, M/TB379

http://worldinminiature.blogspot.com/

  • Member since
    July 2008
  • From: Vancouver, the "wet coast"
Posted by castelnuovo on Friday, April 22, 2011 10:42 PM

This is one mean lookin' gun...

Cheers...

  • Member since
    July 2008
  • From: Vancouver, the "wet coast"
Posted by castelnuovo on Sunday, May 8, 2011 5:18 PM

Just thought to bring up this GB from sinking  further down into the great void Smile. Where is everybody? Confused

Of 17 signups, only 3 are finished, mine is about 80%.

Cheers...

  • Member since
    April 2005
Posted by Thunderbolt379 on Sunday, May 8, 2011 5:50 PM

Hi all,

Good point Castelnouvo -- I've been busy with four other GBs and haven't looked in, but I remember Redlegs' M108 was on the home straight and we had a Panzerhaubitzer 2000 nearly ready for its badge as well... How's it coming, guys?

Cheers, Mike/Tb379

http://worldinminiature.blogspot.com/

  • Member since
    May 2010
Posted by personman906 on Sunday, May 8, 2011 8:06 PM

Thunderbolt379

we had a Panzerhaubitzer 2000 nearly ready for its badge as well... How's it coming, guys?


I'm almost finished, I just had a problem with the Bronco track link set, plus my airbrush is being loaned to a friend right now, but I'll be done within the month. Probably.

In Soviet Russia, MODEL BUILD YOU!

Still Building: Dragon 1/144 HH-60H

Ready for First Coat: Academy 1/35 MH-60G, Tamiya 1/35 Chieftain Mk5, Trumpeter 1/35 KSK Commandos

Finishing Touches: Revell 1/35 PzH-2000, Dragon 1/144 SH-60F, Revell 1/48 F-15E


  • Member since
    July 2006
  • From: New Jersey
Posted by redleg12 on Sunday, May 8, 2011 8:36 PM

From one mother to all you others….Happy Mothers Day!! In a nice way!!!!!

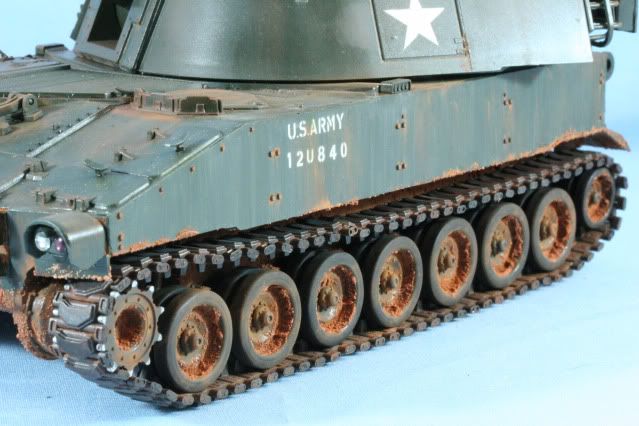
The tracks were washed with a burnt sienna wash and then dusted with MIG Viet Nam earth pigments. The road wheels received a coat of my stucco mix, mostly around the outside part of the rim where it would normally accumulate. After drying, they were dusted with MIG Viet Nam Earth pigments. The drive wheel tips were dry brushed with Alclad Steel.

After gluing the drive wheel in place, the tracks were then put on and the ideler wheel glued. Finally a light dusting with some more MIG VN Earth to make all the parts flow together.

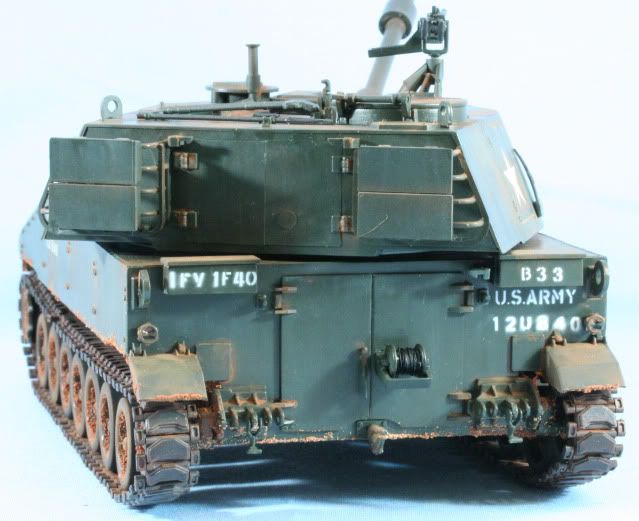
Some details on the back. You can see the tail lights done with Clear Red and Smoke. The communications wire spool was done with some painters tape to make under bulk. Then it was wrapped with 32 gauge SS wire to cover the painters tape. Then the wire bundle was painted Flat Black

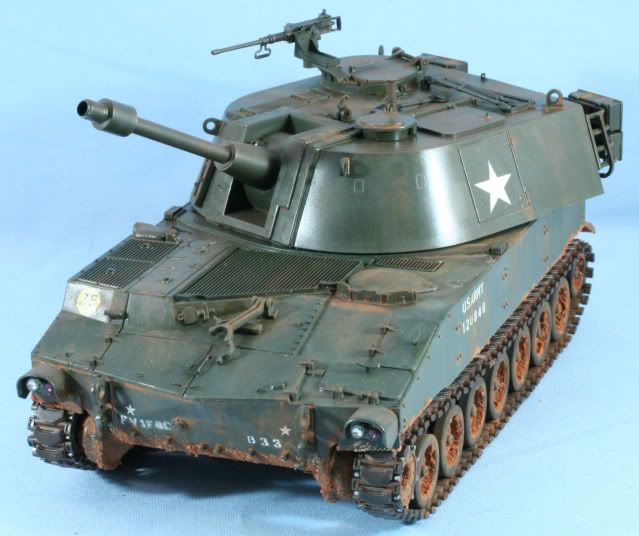
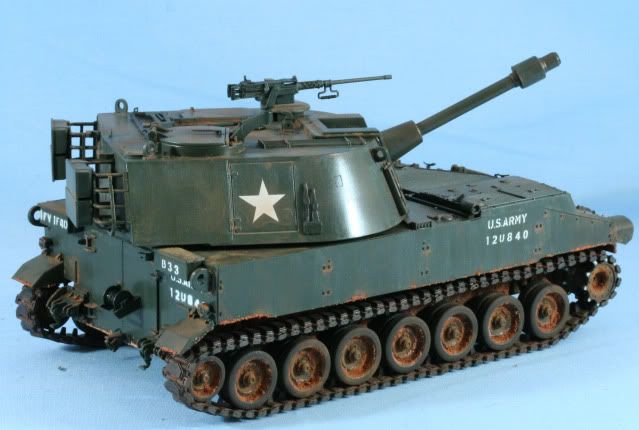
I finished the turret similar to the chassis. The vertical sides was given a dot filter using White, Flesh and Green oil paint dots and stroked to create the stain effect. The top surface was given a coat of MIG Grey for Dark Green filter. Then a solution of MIG VN Earth pigment and Mineral Sprits was used for pin washing. Nest a #2 pencil was used in some high spots to create ware. Lastly some dry dusting of MIG VN Earth was used to create highlights.

I have mounted a few tools, the tripod for the M2 and the M2 itself. The last few little items to complete are some ammo cans and ammo for the M2 and adding some straps on some of the storage, otherwise it is essentially complete.

On to finishing the base for my final and next update

As always thanks for stopping by. Your comments good or bad are always appreciated.

Rounds Complete!!

"The Moral High Ground....A Great Place to Emplace Artillery."

  • Member since
    July 2008
  • From: Vancouver, the "wet coast"
Posted by castelnuovo on Sunday, May 22, 2011 2:18 AM

Well, lets call this one done...


  • Member since
    April 2005
Posted by Thunderbolt379 on Sunday, May 22, 2011 3:17 AM

Well done, castelnuovo! Looks a treat, dusty, tough, businesslike, and the tracks sag very nicely indeed.

You have our fourth completion, and page 1 is updated.

Cheers! Toast Mike/TB379

http://worldinminiature.blogspot.com/

  • Member since
    March 2010
  • From: Buffalo, NY
Posted by macattack80 on Wednesday, June 1, 2011 4:09 PM

Thunderbolt379

Well done, castelnuovo! Looks a treat, dusty, tough, businesslike, and the tracks sag very nicely indeed.


Ditto  Nice work!  

My work schedule was changed for a while and I wasn't able to get to the bench for a bit.  I should be able to get working on the M40 tonight.  Sorry.

Kevin

[


JOIN OUR COMMUNITY!

Our community is FREE to join. To participate you must either login or register for an account.

SEARCH FORUMS
FREE NEWSLETTER
By signing up you may also receive reader surveys and occasional special offers. We do not sell, rent or trade our email lists. View our Privacy Policy.