SEARCH FINESCALE.COM

Enter keywords or a search phrase below:

Panzerjager GB (March 1st - June 30th, 2011)

62081 views
1090 replies
1 rating 2 rating 3 rating 4 rating 5 rating
  • Member since
    March 2006
  • From: Right Side of a Left State
Posted by Shellback on Saturday, April 30, 2011 11:26 PM

Too bad Thom ...... hope you hang around the G.B. and give us your input still .

Eric .........this thing needs help . If i wasnt so cheap i'd stick it back in the box and order one of these made by DML or Trumpeter , who ever makes it .But alas i have an entire stash of older kits and i cant replace them all so its off to scratch building and all of its insanity !

Good you were able to pick up some styrene rod and such , those cleaning rods should be easy to reproduce .... i hope .


  • Member since
    March 2003
  • From: Rain USA, Vancouver WA
Posted by tigerman on Saturday, April 30, 2011 11:08 PM

Sorry to hear it Thom, but I understand how life intervenes sometimes.

Okay, i got some rod styrene and some flat pieces and I'll see if i can scratch as Rob recommended. Too tired today, maybe tomorrow.

Bob. How did you do your magic tracks? They look fine. I recall Cookie Sewell saying they snap together, which we all know they don't.

Carl, whew, lots of scratching going on.

   http://i7.photobucket.com/albums/y269/wing_nut_5o/PANZERJAGERGB.jpg

 Eric 

  • Member since
    February 2004
  • From: Connecticut, East of the River
Posted by tlivancso on Saturday, April 30, 2011 10:06 PM

Hello All,

Everyone's builds look awesome, really a lot of impressive work being done or has been done.

I however at this time have not even started my Stug IV and I do not see when I wil be able to really get into it so at this point I am withdrawing from the build and I'll start the Stug another day.

Keep up the great work everyone.

Cheers,

Thom


IPMS Member #42958 /  AMPS Member #2091

IPMS Central Connecticut (President)

IPMS Northeast Military Modelers Association (Web Master)

Like Alice "I try to believe in three impossible things before breakfast"

  • Member since
    March 2006
  • From: Right Side of a Left State
Posted by Shellback on Saturday, April 30, 2011 7:32 PM

Looks good Rob , but i agree with Eric .(sorry guys , i meant Bob Embarrassed)

Ok then . I made some corrections on the the stand for the gun mount . I took a short cut and kept some of the original kit parts , then scratch built the new details with Evergreen styrene .

I forgot to take a picture of the original "table" type gun mount stand that was in the kit. here's a picture of it from the instructions. It has six legs for support.

And here are some pictures of the kit part after i hacked it up and rebuilt it . Looks like it is supported by the two angled "C" channel beams. I left 2 of the kit legs on to aid in the attachment . I dont think they will be seen when the top of the hull is in place.

Here's the gun and mount in place. I replaced the bulky kit sighting scope with a scratch built one .


  • Member since
    May 2005
  • From: Dublin Rep Of Ireland
Posted by terry35 on Saturday, April 30, 2011 7:26 PM

Wow Nate the Marder looks like the Tamiya box art, really "COOOOOOOL" congrats on a great build the winter whitewash effect really came out well.

Rob that little Czech 47mm looks like an evil little devil, I thought it was a 105 'till I noticed the paint bottle under it.

Bob the panzer jager is coming along great, the subdued effect on the camo paid off. Looking forward to seeing the weathering finished.

Everybody keep up the good work and I hope to visit soon.

Terry.

  • Member since
    November 2003
  • From: Nashville, TN area
Posted by bobbaily on Saturday, April 30, 2011 7:13 PM

tigerman

Tracks look good Bob, but I might have gone with a bit of sag between the 1st and 2nd rollers.

Thanks Eric.....and I agree regarding the sag (or lack of it) between the 1st & 2nd rollers.  Made the mistake of working on the tracks at night.....I was tired....just wanted to get it done.  The schurzen will hide it this time....next time I'll plan a little better.  This is my first experience with DML's Magic Tracks-I was hoping that they would 'click' together...they didn't....however, the Testor's cement provided enough bond & flexibility (and time) to get close.

Bob


  • Member since
    March 2003
  • From: Rain USA, Vancouver WA
Posted by tigerman on Saturday, April 30, 2011 6:42 PM

Tracks look good Bob, but I might have gone with a bit of sag between the 1st and 2nd rollers.

   http://i7.photobucket.com/albums/y269/wing_nut_5o/PANZERJAGERGB.jpg

 Eric 

  • Member since
    November 2003
  • From: Nashville, TN area
Posted by bobbaily on Saturday, April 30, 2011 4:35 PM

Hey all.....thanks again for the encouraging words regarding the camo.  I'm looking forward to giving it a 'buff' coat and some weathering.

Tracks are done and painted....kinda.  I was going to mix some Tamiya NATO Black & Metallic Grey, but only had a drop of NATO Black.  Ended up with subbing some Semi-Gloss Black-I think a black oil wash will give me the color I'm after....then some 'dirt' pastels after should even things out.

I had attached the road wheels & idler wheels with rubber cement but for some reason the idler wheels didn't want to come out and the pins stayed in.....so I ended up gluing them on this afternoon.

Hoping to paint the road wheels this evening during the NASCAR race or tomorrow.  Busy day in the yard and I'm not sure how active I want to be this pm.

I'll come back and post some pics after Photobucket finishes...

Bob


  • Member since
    December 2006
  • From: t.r.f. mn.
Posted by detailfreak on Saturday, April 30, 2011 1:32 AM

                                It's raining here in Mn. so you'll have to work inside,say at the model bench.Lightning

                                                         Greg"Detailfreak"RowleyYes

[View:http://s172.photobucket.com/albums/w1/g-earl828/]  http://i158.photobucket.com/albums/t104/cycledupes/1000Roadwheels4BuildBadge.jpg

  • Member since
    March 2006
  • From: Right Side of a Left State
Posted by Shellback on Saturday, April 30, 2011 12:37 AM

Bob , second camo came out great .

Rob , now i know what i can do with my  frayed brushes . Nice results with that technique.

  • Member since
    March 2003
  • From: Rain USA, Vancouver WA
Posted by tigerman on Friday, April 29, 2011 8:56 PM

Hinksy

Andy Deafpanzer and I are also looking into putting the feelers out for a Panzer III 'all variants' GB or something similar to be started soon.

Oh and I was thinking of that for my next GB, because it hasn't been done. LOL I might be willing to be a happy participant though. Big Smile

Bob, excellent second application of camo. I'd definitely call it a go. Yes Beer

   http://i7.photobucket.com/albums/y269/wing_nut_5o/PANZERJAGERGB.jpg

 Eric 

  • Member since
    November 2003
  • From: Nashville, TN area
Posted by bobbaily on Friday, April 29, 2011 7:32 PM

Thanks Ben & Eric.  For some reason, when I compared Before & After photos, the photos don't seem to show as much difference as I can see in person.  Oh well, I'm happy with it.....looking forward to starting the weathering process.  I printed out Doog's tutorial that he used for his Hetzer....that's gonna be my guide.

Left side of the tracks are complete and on & drying.  One important lesson learned....assemble the tracks before gluing the upper & lower hulls together...Bang Head..it would have been a lot easier that way.  For this build, I attached the road wheels with rubber cement, assembled the magic tracks with Testors glue, let them dry for a bit and then managed to get them over the upper idler wheels and under the fender without too much trouble.  I used a few extra links (instructions called out for 97....I added three more when I couldn't get them to mate up....then after some adjusting, I may have a bit too much slack between the upper idler wheels.  However, I have the option of leaving the schurzen on so no one will notice.  Hope to get the right side done tonight...don't know how much time I'll get tomorrow-weather is supposed to be good and I have a lot of yard work to catch up on.

Bob


  • Member since
    March 2011
  • From: Ohio
Posted by Taps88 on Friday, April 29, 2011 3:03 PM

Bob, I really liked how the camo came out..it definitely looks tighter now with the weathering.


And...thanks for those tips Rob, They will really come in handy for my Emil. I appreciate the step-by-step pics too Yes

Eric / Formally known as Erock68

On the Bench:

Academy: 1/72 B17 Memphis Bell

Tamiya: 1/35 Panther G

Dragon: 1/35 Platformwagen SSy


  • Member since
    September 2009
  • From: Rugby, England
Posted by Hinksy on Friday, April 29, 2011 10:17 AM

Hey guys,

Ther's some really amazing work appearing on here now! Top notch stuff Yes

I wish I could have knocked that Marder III M out for this GB but I was getting nowhere fast with that. It's still very much on hold.

Everything on here is looking great - the Sturer is a big old beast ain't she! WOW!

The little 'original' Panzerjager is looking really good as is the paint job on the Lang Yes

In the meantime I've built my StuG III B (again) and that is going really well. Andy Deafpanzer and I are also looking into putting the feelers out for a Panzer III 'all variants' GB or something similar to be started soon.

Keep up all of the good work guys - this is excellent stuff! Yes

ATVB

Ben Toast

On the Bench - Dragon Pz. IV Ausf. G (L.A.H.) Yes

Your image is loading...


  • Member since
    November 2003
  • From: Nashville, TN area
Posted by bobbaily on Friday, April 29, 2011 6:11 AM

Rob-Great job on the weathering & the tutorial.  I'll be reviewing this one.

Thanks for the encouragement on the camo.  I'm happier with it this time.  I still plan on a light coat of buff to 'soften' it a bit.

The schurzen is removable so attaching the road wheels & tracks shouldn't be a problem...I'm sure there will be other 'challenges' though.....I will be using the kit supplied Magic Tracks...unless I get really frustrated and grab a set of rubber band tracks out of a Tamiya Panzer in my stash....it's always good to have options. Wink

Bob


  • Member since
    October 2009
Posted by PANZERWAFFE on Thursday, April 28, 2011 10:03 PM

BOB - Now that is some great looking camo, it doesnt get much better then that, the pattern is right on Yes  What tracks are you going to use?  Will you have any problems getting the tracks on behind the skirts?  Are the skirts still rmoveable?  Look forward to the weathering.

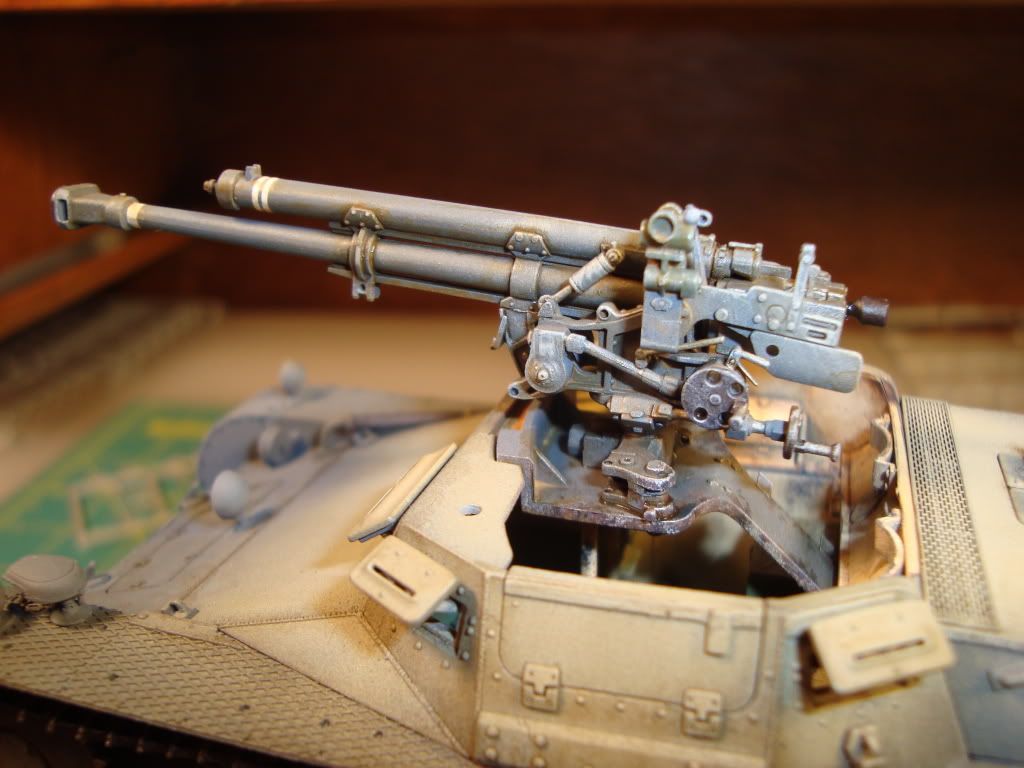
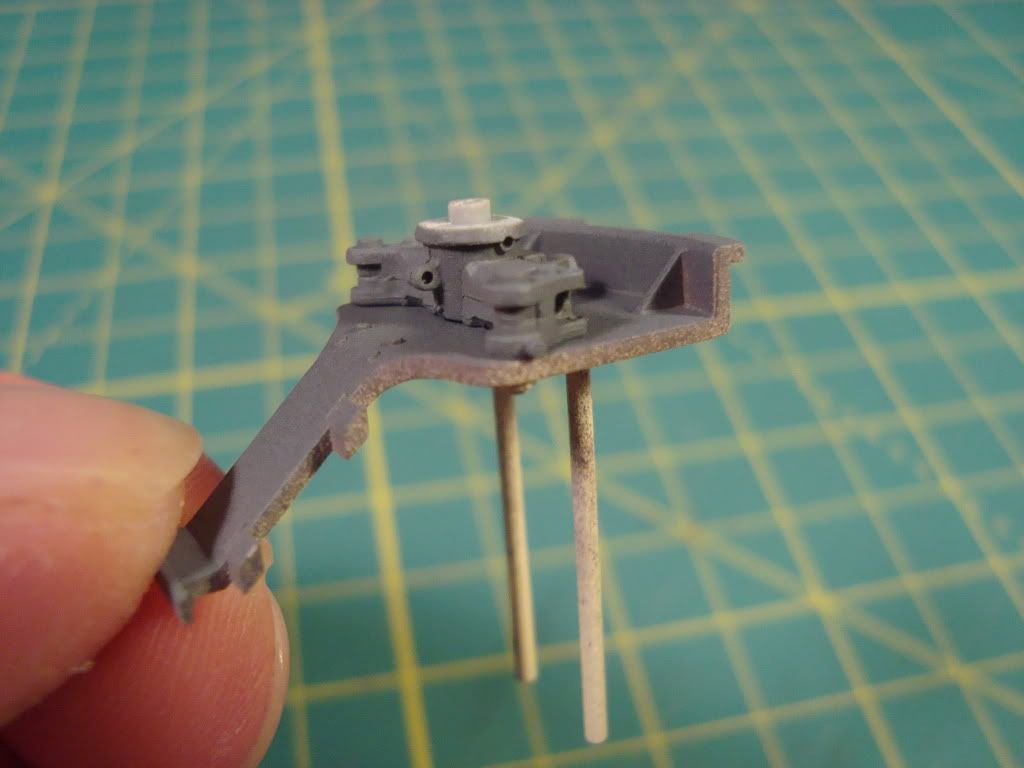
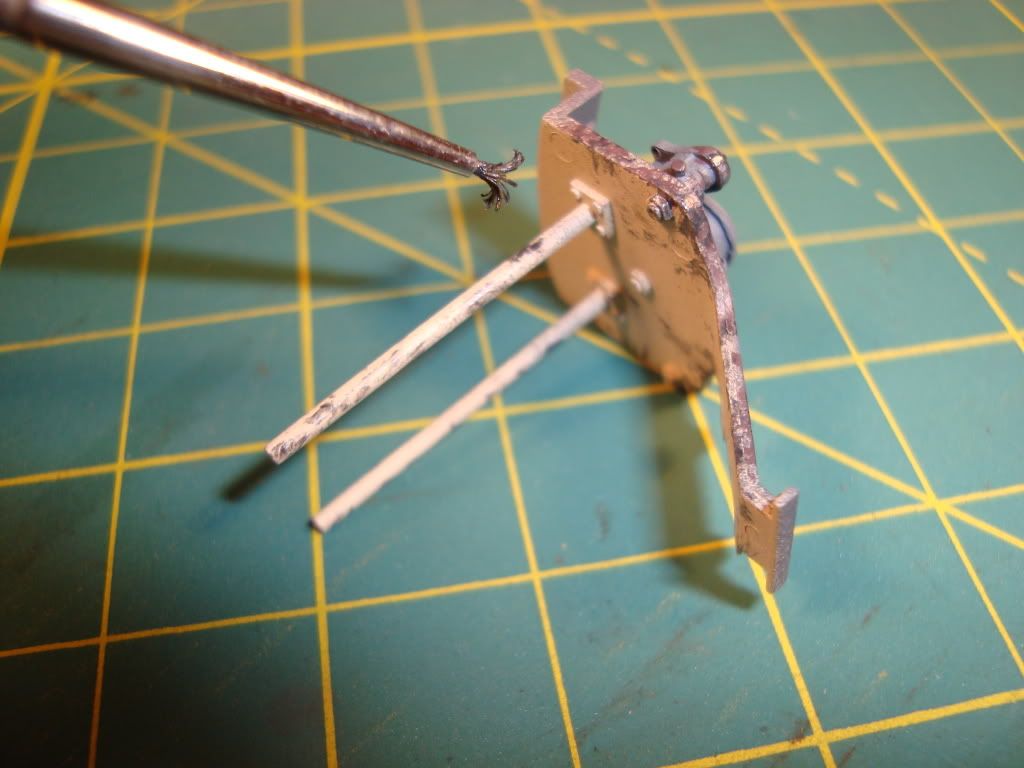
SHELLBACK, NATE - Thanks guys.  There is a lot of detail / parts for the interior of this kit, really that is what makes up this kit.  I've thought about leaveing the shield off or badly damaged in order to show the interior / gun but I may just get another of this kit to do that to.

TAPS88 - Your progress is awesome.  Still really liking how you did the gray!  This is how I did the chipping on this one:

Used these brushes to do this

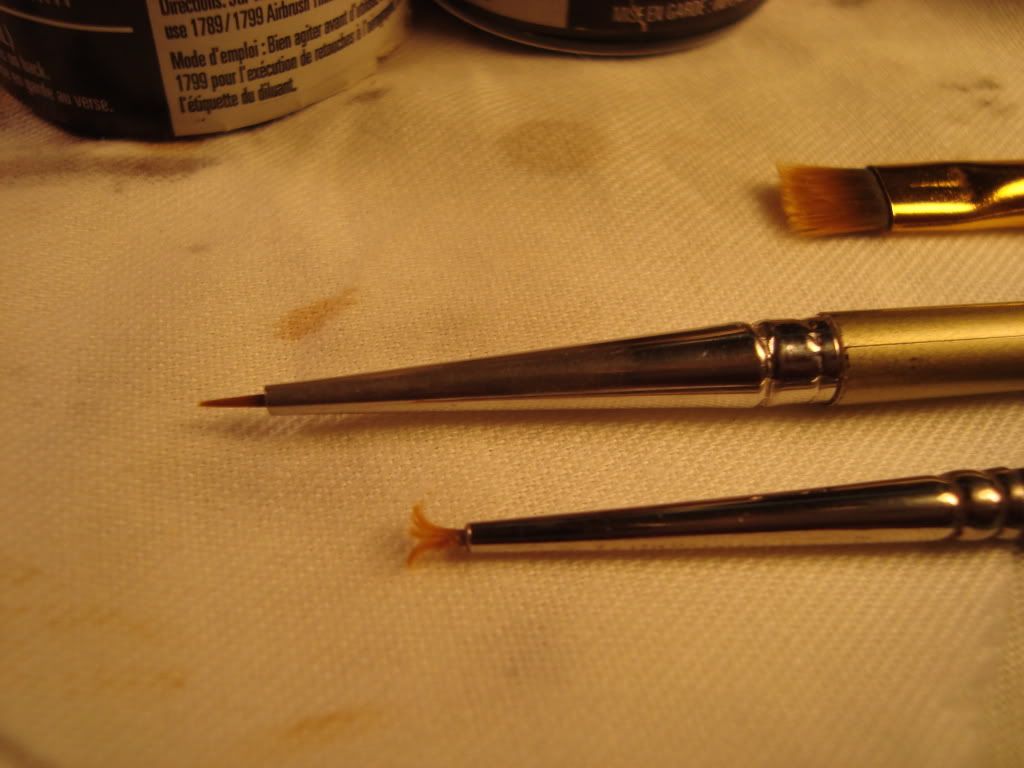
First one is an old frayed 10/0 - used to apply the chips, Next is a 18/0 to touch up more pronounced chips, last is a #2 chisel for dry brushing.

The most important one is the frayed 10/0

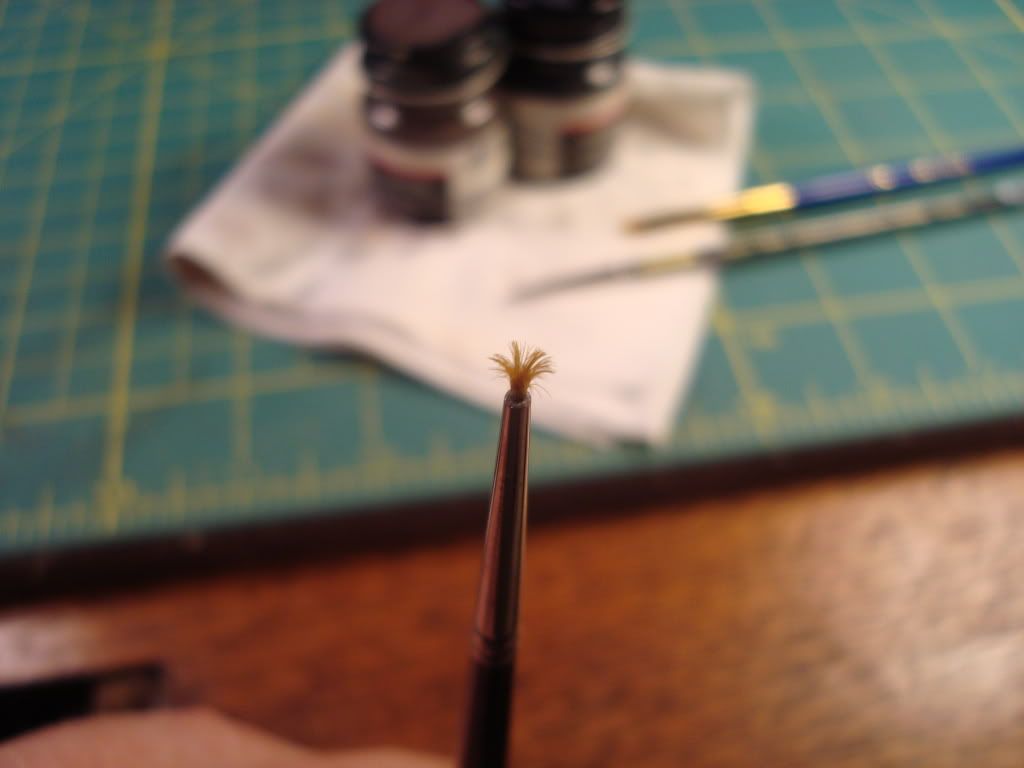
I first spray the base color then apply the chips randomly with the frayed brush by just dabing at the piece with different pressure, that will make different sizes and shades of the chipping.  You can also wipe most of the paint off, like you were going to dry brush, and just scrub it into the part your painting to get a light blended color.   Used MM Engine Gray and Chestut for my color.

Next comes the wash.  First in select spots were heavy is wanted, use W&N Raw Umber oil after dry go over the whole thing with Raw Umber Hue water color.  The water color is easy to push around were you want it using straight Wendex on your brush.

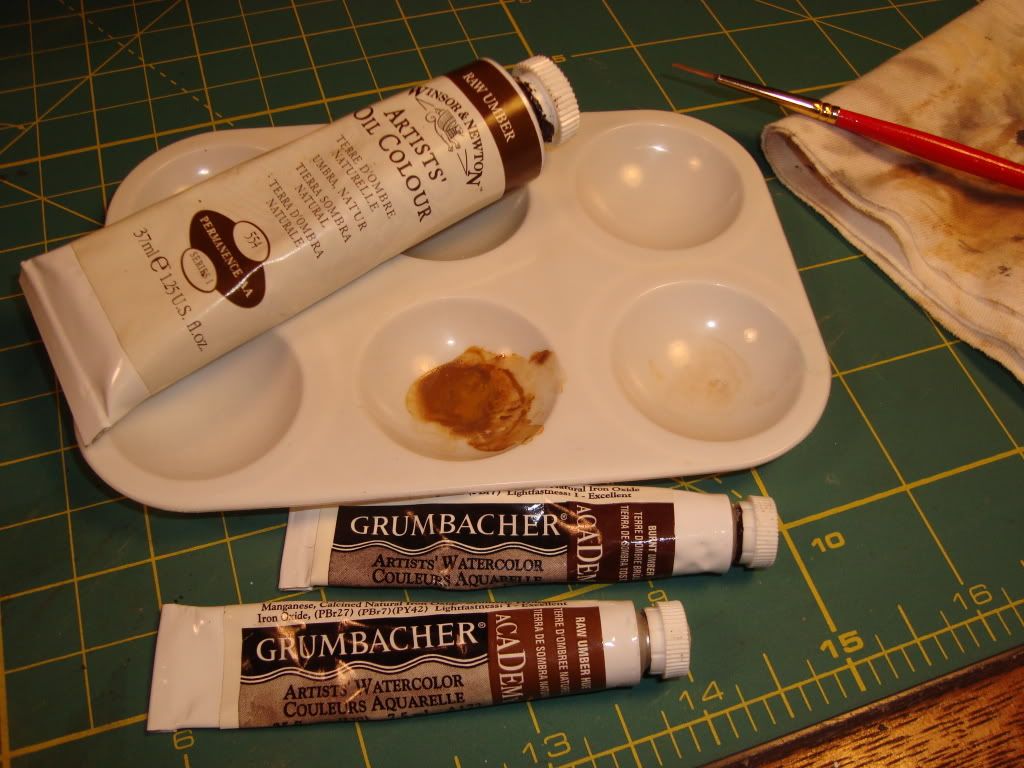
After all of that, drybrush were desired for highlights.  This was my end result.

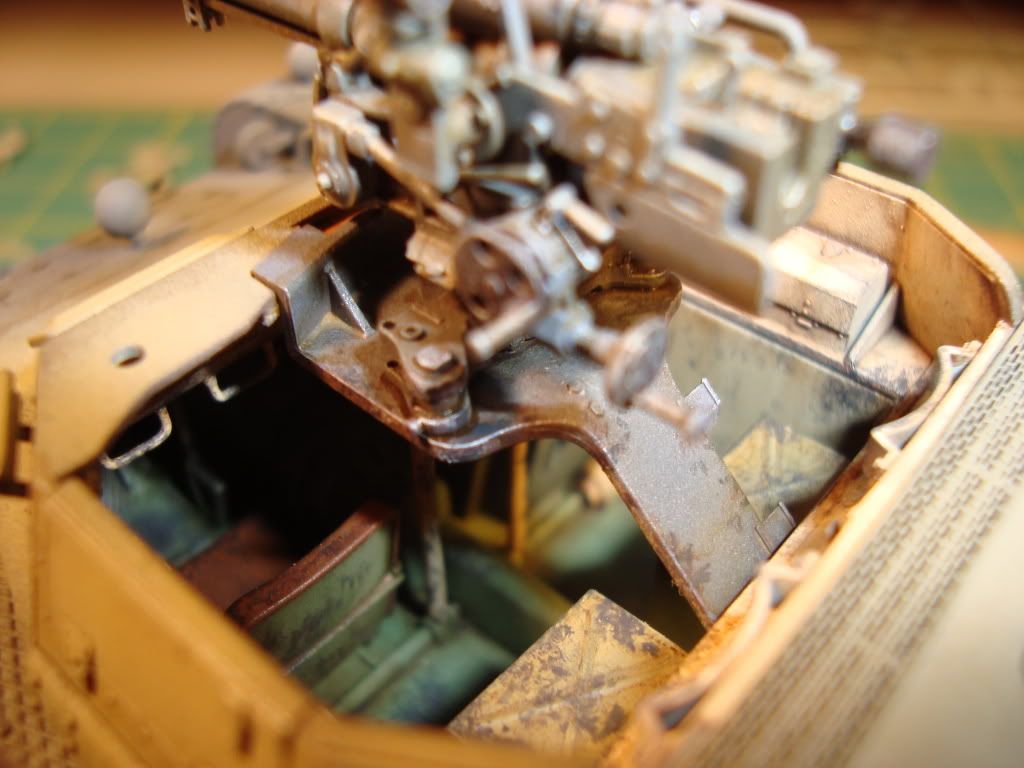
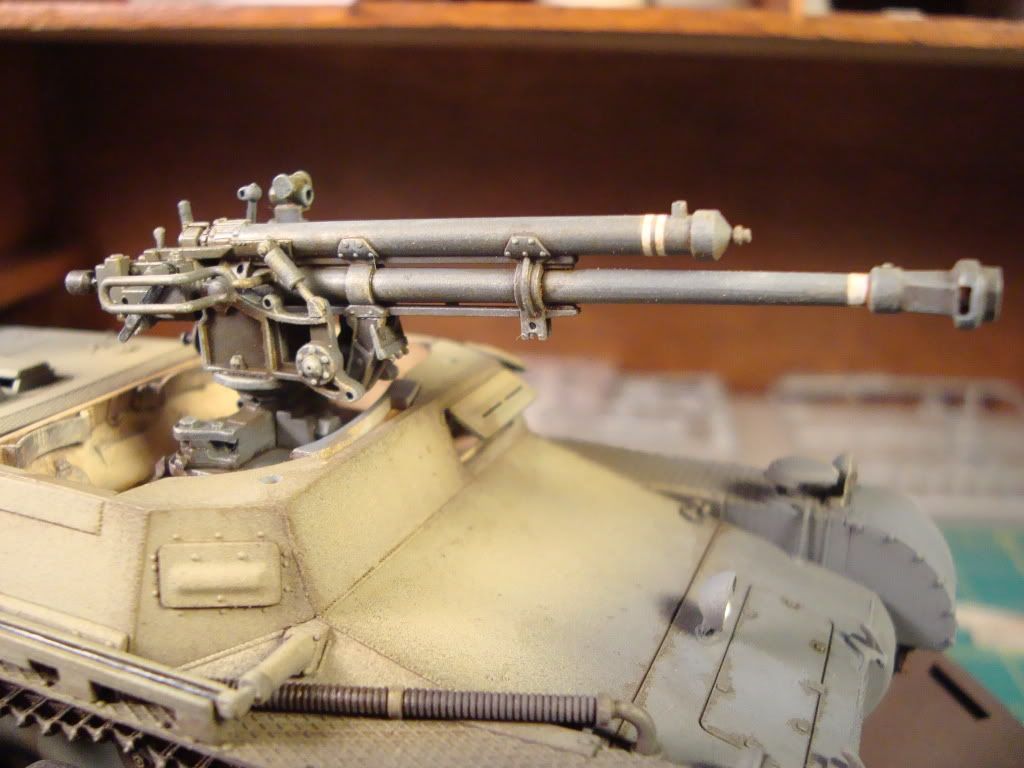
Still may put some chips on the gun itself but not sure yet, here she is for now

Rob

  • Member since
    November 2003
  • From: Nashville, TN area
Posted by bobbaily on Thursday, April 28, 2011 7:25 PM

Rob & Eric-you are both doing a great job.  Can't wait to see more progress pics.

My repaint is complete and decals applied.  My plan is to add a dab of Future to cover the decals tomorrow.  I hope to work on the road wheels (painting) and track assembly tomorrow night.  My plan is to start weathering early next week.....time will tell though..

Bob


  • Member since
    August 2003
  • From: Connecticut, USA
Posted by Nachtflieger on Wednesday, April 27, 2011 2:20 AM

Rob: for such a small vehicle, that sure is packed with detail. It looks great!

Taps88: I'm really liking how your Emil is turning out.

Nate


  • Member since
    March 2006
  • From: Right Side of a Left State
Posted by Shellback on Tuesday, April 26, 2011 3:51 PM

Crooked is good ................but they dont look crooked to me .

  • Member since
    March 2011
  • From: Ohio
Posted by Taps88 on Tuesday, April 26, 2011 3:26 PM

Haven't had a chance to get too much done...I did however apply a surface rust wash, just waiting for it to fully dry. The short track sections, on the upper armor, are just loosely hung there, I know they're crooked..just for show Embarrassed


Eric / Formally known as Erock68

On the Bench:

Academy: 1/72 B17 Memphis Bell

Tamiya: 1/35 Panther G

Dragon: 1/35 Platformwagen SSy


  • Member since
    March 2011
  • From: Ohio
Posted by Taps88 on Tuesday, April 26, 2011 2:45 PM

Now that's detailed, for the size Rob.

I really like your chipping technique, on the interior, how did you go about it?

Eric / Formally known as Erock68

On the Bench:

Academy: 1/72 B17 Memphis Bell

Tamiya: 1/35 Panther G

Dragon: 1/35 Platformwagen SSy


  • Member since
    March 2006
  • From: Right Side of a Left State
Posted by Shellback on Monday, April 25, 2011 8:20 PM

Looks great !

  • Member since
    October 2009
Posted by PANZERWAFFE on Monday, April 25, 2011 7:05 PM

NATE - Super job with the white wash!  Really looks NICE!!  Wouldhave to agree, would look good on a small frozen dio but I understand, I had also planned on putting al my Marders displayed togther.  Was going to use the Panzerjager I as the first one in tha display.  Not a true Marder but it is like the father of the Marders.

TERRY - Going to try your suggestion and see how it goes, but if I dont ike it will have to move some of the interior around.

Spent all day yesterday building the gun.  Talk about small fidley pieces!!  There was 50 pieces that went into the gun so far.  Still have some clean up to do on her but here she is.

This first pic is just to help show the small size of this thing.

Getting her painted is next, then the shield.  Half way to the completion.

Rob

  • Member since
    August 2003
  • From: Connecticut, USA
Posted by Nachtflieger on Monday, April 25, 2011 3:33 PM

Thanks Taps88.Big Smile

Because of the way my display case is set-up, there isn't a lot of room for a diorama. I also have been building my way through the entire Marder series tank destroyers, and had planned on displaying all seven (when I finish them!) as one.

However, I may just have to make a small base with snow on it for this one, as it would look pretty good crossing the frozen steppes of Russia!

Nate


  • Member since
    March 2011
  • From: Ohio
Posted by Taps88 on Monday, April 25, 2011 3:06 PM

Nate,

I really like the detailing and weathering on you Marder. Are you putting it in a dio or just as a stand alone? It really looks like it needs to be crossing a frozen field.


Awesome!!


Eric / Formally known as Erock68

On the Bench:

Academy: 1/72 B17 Memphis Bell

Tamiya: 1/35 Panther G

Dragon: 1/35 Platformwagen SSy


  • Member since
    May 2005
  • From: Dublin Rep Of Ireland
Posted by terry35 on Sunday, April 24, 2011 7:04 PM

Rob nasty thing with the mount, personally I'd go ahead and see how it looks with gun and all other bits in place.Taps the sturer is coming along grand looking forward to seeing how you progress.

Terry.

  • Member since
    November 2003
  • From: Nashville, TN area
Posted by bobbaily on Sunday, April 24, 2011 6:50 PM

Nate-Great job on the Marder.  The weathering and figures are first rate.  Bow Down

Bob


  • Member since
    August 2003
  • From: Connecticut, USA
Posted by Nachtflieger on Sunday, April 24, 2011 5:18 PM

Thanks Eric, I appreciate it.

Nate


  • Member since
    March 2003
  • From: Rain USA, Vancouver WA
Posted by tigerman on Sunday, April 24, 2011 11:18 AM

Nice effects on the Marder Nate. I Like the whitewash and the dirt on the lower half of the hull. The figures are quite appropriate for the vehicle.

   http://i7.photobucket.com/albums/y269/wing_nut_5o/PANZERJAGERGB.jpg

 Eric 

JOIN OUR COMMUNITY!

Our community is FREE to join. To participate you must either login or register for an account.

SEARCH FORUMS
FREE NEWSLETTER
By signing up you may also receive reader surveys and occasional special offers. We do not sell, rent or trade our email lists. View our Privacy Policy.