SEARCH FINESCALE.COM

Enter keywords or a search phrase below:

The OFFICIAL Panzer III and Its Variants GB

298266 views
2308 replies
1 rating 2 rating 3 rating 4 rating 5 rating
  • Member since
    March 2003
  • From: Western North Carolina
Posted by Tojo72 on Tuesday, July 26, 2011 3:04 PM

Ben,did you count the number of links needed for a III , if so how many ?

  • Member since
    March 2011
Posted by Mjolner on Tuesday, July 26, 2011 3:15 PM

I think I found the inspiration to the StuH boxart googling the net.
Did not make a proper note off the original but will post for discussion purpose:

Here you go;


Dragons 6454 boxart (slightly cropted);


Interestingly the vehicle in the picture has a 7,5cm gun and a forged gun mantlet...and no Zimmerit.

Jord

Thunder - Walk with Me

  • Member since
    March 2003
  • From: Rain USA, Vancouver WA
Posted by tigerman on Tuesday, July 26, 2011 3:23 PM

Mjolner

I think I found the inspiration to the StuH boxart googling the net.
Did not make a proper note off the original but will post for discussion purpose:

Here you go;

http://i1223.photobucket.com/albums/dd512/Einride/stugiii-gW43.jpg

Dragons 6454 boxart (slightly cropted);

http://i1223.photobucket.com/albums/dd512/Einride/Dragon_StuHIII6454_Paint.jpg

Interestingly the vehicle in the picture has a 7,5cm gun and a forged gun mantlet...and no Zimmerit.

Jord

The photo suggests a mid/late production because of the mantlet, but it doesn't have the remote control MG as that of a late version. Wonder when the picture was taken.

   http://i7.photobucket.com/albums/y269/wing_nut_5o/PANZERJAGERGB.jpg

 Eric 

  • Member since
    March 2006
  • From: Right Side of a Left State
Posted by Shellback on Tuesday, July 26, 2011 8:48 PM

Jord , cool finding that pic . Looks like a bit of artistic liscense .

  • Member since
    March 2006
  • From: Right Side of a Left State
Posted by Shellback on Tuesday, July 26, 2011 8:57 PM

Mjolner

Tigerman,

Here is a close up of some of the pre moulded Zimmerit in the StuH 10.5.
The kit includes all parts required to build the standard StuG with the 7.5 gun.
Also included is the added armour arround the commanders hatch.

http://i1223.photobucket.com/albums/dd512/Einride/IMG_2714.jpg

http://i1223.photobucket.com/albums/dd512/Einride/IMG_2715.jpg

http://i1223.photobucket.com/albums/dd512/Einride/IMG_2712.jpg

http://i1223.photobucket.com/albums/dd512/Einride/IMG_2713.jpg

http://i1223.photobucket.com/albums/dd512/Einride/IMG_27181.jpg

The real stuff on a Panther;

http://i1223.photobucket.com/albums/dd512/Einride/DSC00084.jpg

The issue I have at hand...

http://i1223.photobucket.com/albums/dd512/Einride/IMG_27191-1.jpg

The inside face of the gun-shroud needs to be filled and there is a very obvious seem that needs to be given the correct pattern without ruining the moulded on detail.
I am reaching out for help with the latter, I have no clue how to get this right?

I am sorry for the non value adding repeated pictures.

Jord 

Jord , the seem on the inside of the opening should be ok if  filled in , right ? I dont see the seem on the outside as looking very obviouse to me anyway . I think i would try a few light drops of C.A. applied from a hobby knife and pulled along the seem .

  • Member since
    May 2011
  • From: Bedford, Indiana
Posted by AceHawkDriver on Tuesday, July 26, 2011 9:12 PM

Jord:  I'm with Shellback on the seam inside.  I would fill it, sand it smooth and you should be good.  On the exterior seam it's hard to tell but would a little tamiya (or tenax etc.) flowed a little at a time into the join smooth it out?  If it's larger than that, what about using a little stretched sprue with the plastic weld?

I've pretty much completed the interior this evening.  There are a few things I'll wrap up on it, but those will have to wait.  Just a couple of pics below of the progress.  I'm not completely sold on the weathering etc but since it'll be closed up, mostly, anyway it shouldn't be that much of a concern.  Let me know what you guys think!

Comments and criticisms are always welcome!

Peace through superior firepower.

Brian


  • Member since
    March 2003
  • From: Rain USA, Vancouver WA
Posted by tigerman on Tuesday, July 26, 2011 9:12 PM

Mjolner

Tigerman,

Here is a close up of some of the pre moulded Zimmerit in the StuH 10.5.
The kit includes all parts required to build the standard StuG with the 7.5 gun.
Also included is the added armour arround the commanders hatch.

http://i1223.photobucket.com/albums/dd512/Einride/IMG_2714.jpg

http://i1223.photobucket.com/albums/dd512/Einride/IMG_2715.jpg

http://i1223.photobucket.com/albums/dd512/Einride/IMG_2712.jpg

http://i1223.photobucket.com/albums/dd512/Einride/IMG_2713.jpg

http://i1223.photobucket.com/albums/dd512/Einride/IMG_27181.jpg

The real stuff on a Panther;

http://i1223.photobucket.com/albums/dd512/Einride/DSC00084.jpg

The issue I have at hand...

http://i1223.photobucket.com/albums/dd512/Einride/IMG_27191-1.jpg

The inside face of the gun-shroud needs to be filled and there is a very obvious seem that needs to be given the correct pattern without ruining the moulded on detail.
I am reaching out for help with the latter, I have no clue how to get this right?

I am sorry for the non value adding repeated pictures.

Jord 

Thanks Jord. That zimmerit looks very cool. I just wish Dragon would release a Late model with the waffle. It doesn't seem like that much to change, except for the mg mount and saukopf mantlet.

   http://i7.photobucket.com/albums/y269/wing_nut_5o/PANZERJAGERGB.jpg

 Eric 

  • Member since
    March 2006
  • From: Right Side of a Left State
Posted by Shellback on Tuesday, July 26, 2011 9:59 PM

AceHawkDriver

Jord:  I'm with Shellback on the seam inside.  I would fill it, sand it smooth and you should be good.  On the exterior seam it's hard to tell but would a little tamiya (or tenax etc.) flowed a little at a time into the join smooth it out?  If it's larger than that, what about using a little stretched sprue with the plastic weld?

I've pretty much completed the interior this evening.  There are a few things I'll wrap up on it, but those will have to wait.  Just a couple of pics below of the progress.  I'm not completely sold on the weathering etc but since it'll be closed up, mostly, anyway it shouldn't be that much of a concern.  Let me know what you guys think!

http://i1097.photobucket.com/albums/g345/AceHawkDriver/Picture094.jpg

http://i1097.photobucket.com/albums/g345/AceHawkDriver/Picture097.jpg

http://i1097.photobucket.com/albums/g345/AceHawkDriver/Picture098.jpg

Comments and criticisms are always welcome!

I think its a shame it'll be covered up !

  • Member since
    April 2005
  • From: Monster Island-but vacationing in So. Fla
Posted by carsanab on Tuesday, July 26, 2011 10:44 PM

hey..great stuff I'm seeing so far.....for someone who spends most of the time on aircraft its real interesting to see and work on a different subject...

well eventhough its not a Panzer III.....the green is down on my Wirbelwind....that puts me one step closer to starting my III....you can see the outlines of where the red-brown will go...so far...its been a challenge....still....I have to fight the urge to stick a propeller on this thing..

Hopefully I will have it wrapped up over the weekend.

Comments of course welcomed...

Carlos

 Photobucket

  • Member since
    March 2006
  • From: Right Side of a Left State
Posted by Shellback on Tuesday, July 26, 2011 11:05 PM

LOL . Looks good Carlos .

  • Member since
    September 2009
  • From: Rugby, England
Posted by Hinksy on Wednesday, July 27, 2011 5:48 AM

anthony2779

Ben,did you count the number of links needed for a III , if so how many ?

Hi Anthony,

I've just had a count and it was 92 per side that I used. I fitted a Tamiya Vinyl track from my leftover from my StuG and made the total run a bit longer than the Tamiya track so I could get some sag imparted.

Unfortunately I reckon I should have used 94-96 links as although the sag was PERFECT while the tracks were still pliable when they dried the glue contracted and pulled any decent sag out of them. Without fenders in place yet I couldn't put packing in between the return rollers to keep them saggy. I knew they would contract a bit but not this much so lesson learnt - use at least 94 links and pack the sag so it stays there whilst the glue dries. They really do look fine but I'd have liked a bit more sag on them tbh.

Hope this help buddy,

Ben Toast

On the Bench - Dragon Pz. IV Ausf. G (L.A.H.) Yes

Your image is loading...


  • Member since
    March 2003
  • From: Western North Carolina
Posted by Tojo72 on Wednesday, July 27, 2011 7:25 AM

yes it is,thanks Ben.still got to finish up my Jagdpanther before starting my III

  • Member since
    July 2007
  • From: Ohio
Posted by Geist on Thursday, July 28, 2011 10:43 AM

Sorry I've not checked in in a few days. Thanks for the comments on the figs, I fixed that guys eye right after I noticed it in the pics. Not sure what happened there lol. What page is the badge on?


Awesome builds everyone! Keep up the good work.


Erik

On the bench: Italeri Leopard 1A2 correction build with Perfect Scale turret and Eduard PE

  • Member since
    May 2005
  • From: Eugene, Oregon
Posted by hughes2682 on Thursday, July 28, 2011 11:35 AM

Pvt Mutt

Just take your time Ben and check the fit.

I built the old Dragon kit and it turned out pretty good I think.

http://i93.photobucket.com/albums/l57/PvtMutt/100_0501.jpg

Good Luck

Tony leeSmile

Now there's a blast from the past.  That was a great build to follow.  That being said there is some mighty fine work going on in this GB.  Solid work gentlemen.

Dave

http://img.photobucket.com/albums/v317/Aaronw/Groupbuilds/ClassicAviationGB2010bomb.jpg

With enough thrust, pigs fly just fine.

  • Member since
    September 2009
  • From: Rugby, England
Posted by Hinksy on Friday, July 29, 2011 2:59 PM

Hi Guys,

It's been pretty quiet on this GB this week so I thought I'd make a quick post updating the small bit of progress I made today:

I have had a pretty nasty case of the trots (bad guts) and was certainly not going to be any use to anyone in the office today so I had the day off. I felt a bit better this afternoon so decided to do a bit on the old SIG which, by all acounts, is coming together nicely - and quickly!

So, the fenders are assembled with the mounting brackets fitted and both fenders are now on and in place. The rear deck is about complete, the PE screens over the intakes are on and I reckon she'll have a coat of primer on by tomorrow evening as all that's left to do is simple stuff that will be done in an hour or two which could leave Sunday free for the start of some ab work Cool

Re air brush work: I'm not going for any fancy German Grey mixtures with this one. I've got two full jars of Gunze H32 Acrylic Field Grey (the actual grey field grey and not the green field grey) and I'm yet to try it. Dragon list it as their colour to use for German Grey and it isn't too dark so I should be able to do something interesting with a pre-shade. It will also reflect nicely on a Panzer that has been trundling across Russia in the Summer Sun and has taken on a faded appearance - this will also help the odd scratch and dink stand out as well as the rust streaks.

Todays work:

The Casemate is dry-fitted for the photos and the red rubber-band is just there to help the cement on the fenders set in place. 


My research into this build suggests that the legs of the Perscope cover had two runs of wire round them like this - the idea being to stop leaves and other debris from being blown in to the large Periscope hole. I used 5amp fuse wire for mine.


The business end! Dont worry about the odd-looking muzzle with the two 'dinks' as the muzzle needs a cleanup with a round file - will be covered with a Muzzle Cap like Tony's SIG anyway.


Thanks for looking guys. I'd appreciate any comments and suggestions.

Tomorrow I'll be fitting the travel lock, hooks, the front MG, the bolted-on additional armour and general tidying up prior to painting.

WIP update tomorrow!

ATVB

Ben Toast

On the Bench - Dragon Pz. IV Ausf. G (L.A.H.) Yes

Your image is loading...


  • Member since
    September 2009
  • From: Spring Branch, TX
Posted by satch_ip on Friday, July 29, 2011 4:24 PM

For Facebook friends, the Dragon Pz III N is $24.95 this month.  Just sayin'.....


http://www.dragonusaonline.com/item_detail.aspx?ItemCode=DRA6474

  • Member since
    March 2006
  • From: Right Side of a Left State
Posted by Shellback on Friday, July 29, 2011 5:28 PM

Your Ausf N looks good Ben . Are those vinyle tracks ?

  • Member since
    March 2006
  • From: Right Side of a Left State
Posted by Shellback on Friday, July 29, 2011 7:47 PM

Got about 90% of the bits n pieces on the hull in place  . The mounting parts for the antenna holder were a complete joke so i scrathed my own .


  • Member since
    March 2003
  • From: Rain USA, Vancouver WA
Posted by tigerman on Friday, July 29, 2011 8:46 PM

Excellent work Carl.

   http://i7.photobucket.com/albums/y269/wing_nut_5o/PANZERJAGERGB.jpg

 Eric 

  • Member since
    September 2009
  • From: Rugby, England
Posted by Hinksy on Saturday, July 30, 2011 7:27 AM

Shellback

Your Ausf N looks good Ben . Are those vinyle tracks ?

Hey SB,

I'm entering an Ausf N but the build that is pictured in my last post is Cyber Hobby's SIG 33.

The tracks are Magic Tracks buddy - I'm hoping to have the basic assembly complete by the end of today.

Cheers matey,

Ben Yes

On the Bench - Dragon Pz. IV Ausf. G (L.A.H.) Yes

Your image is loading...


  • Member since
    June 2010
  • From: Spokane, WA
Posted by Hun Hunter on Saturday, July 30, 2011 3:09 PM

Finally had a chance to sit down and look at this thread, beautiful work so far I must say. I'm heading to Hobbytown today, hoping for a target of opportunity. School starts in three weeks, I've been a bit slammed... I desperately want to get my X-Acto out.

There are some that call me... Nash

  • Member since
    September 2009
  • From: Rugby, England
Posted by Hinksy on Saturday, July 30, 2011 3:32 PM

Hello guys,

As predicted I have managed to get the SIG fully assembled and primed by the end of today Cool

No fitment issues to report of, everything slotted together nicely and overall a cracking little build that could quite easily be a Tamiya kit!

I'll be getting the basecoat on tomorrow then setting it aside to fully cure. One of the figures has really caught my eye so I might have a go at painting him - I'm desperately in need of practice painting figures!

A photo update of todays work (the build has a layer of Tamiya Grey Primer on it):


Below you can see the added wire around the periscope hood legs and I've altered the ariel mount too. The kit part was moulded in one solid piece but on the photo of the real deal that sits in the museum in Kublinka (sic?) in Russia is is totally different and has a piece of wiring runing to the antennae base from inside the casemate that was visible so I've replicated that as best I could. I used thick foil from a wine bottle top to make the antennae base assembly.  


There we have her chaps - a lovely little build and something a little different for the shelf! I like my big, chunky slab-sided hulking German armour so this will be great fun to paint and weather. The bolts and rivets just cry out for some rust streaking and them big casemate walls wil look good with a bit of chipping on them.

I haven't painted a build with the wheels and tracks in place before but I think I should be okay.

WIP update tomorrow.

ATVB

Ben Toast

On the Bench - Dragon Pz. IV Ausf. G (L.A.H.) Yes

Your image is loading...


  • Member since
    October 2009
Posted by PANZERWAFFE on Saturday, July 30, 2011 6:41 PM

TIGERMAN, ANDY - Looks like Jord gave y'all some nice close ups of the waffel pattern.  He is also right, the kit gives you the parts for either thee 7.5 or the 10.5 version.  Yes, one could just change the barrels to build either variant.  The main gun was the big noticable difference on the real STUG / STUH.  Here's a look at the two barrels that come with the kit.

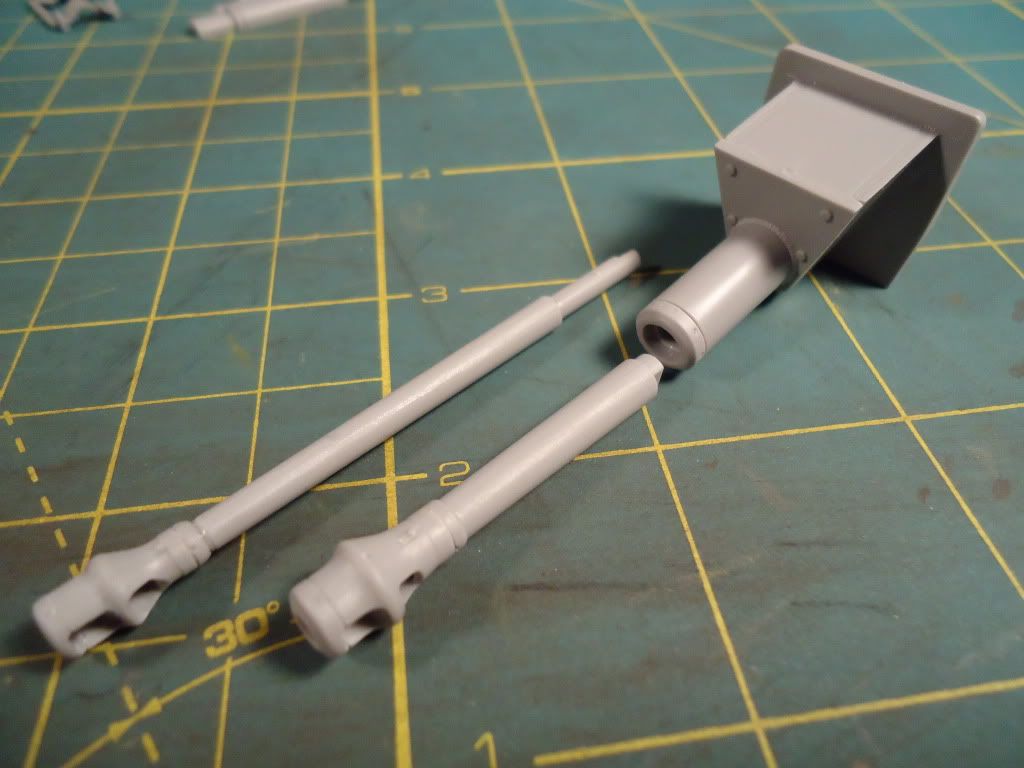
There was 1212 Sturmhaubitze mit 10.5cm 42 Ausf G's produced.  Early production vehicles were based on Stug F and F/8 chassis but from 1943 onwards they were all built on Ausf G chassis.  The primary role of the STUH 42 was to support STUG III's and infantry.

JORD - Looks as if I'm at about the same point as you for my build.  I too have and agree with Carl about how to fill those seams.  Inside should be rather easy with a bit of putty and sanding.  I think may try a little CA glue for the outside seams.  It will be trail and error possibly?  Look forward to more of your build.

BRIAN - Brave man with those PE fenders!  They are coming along beautifully!  Your interior looks really good to me.  I like the color used for the red primer, what paint did you use?  I will be using your same color layout for mine.  Hope to have my interior togther tonight.  Will be looking for some interior pictures for references as I plan on making a complete interior (wireing, ammo racks, etc., ?).  If all works out right, plan on making this build having a convertable top in order to be able to show the interior.

BEN - You sneaky little Devil!  Love this vehicle and had also purchased it to possibly put into the GB.  Very happy too see you build her and the progress is looking great so far!  Will be using the wire for the periscope for mine now.  Thanks for showing that!  You have made light work of this build and I am looking forward to the paint.  There were 12 of these vehicles produced and all were sent and lost at Stalingrad.  All the photoes I've seen they were all PZ Gray some being white washed.  Did see one picture of one with a gray base with some short squigley lines painted onto the gray.  It was a black and white photo so could not tell what color the lines were but they were a light color.  That one photo is the only variation in color that I have seen.  Will see if can find the picture again.

CARL - As always, very nice work!  The small scratch pieces will really make the end result outstanding.  I remember having many small problems when building my "K", you are making it look easy.  Look forward to more.  Believe my next build will be a "K" on a railway car.

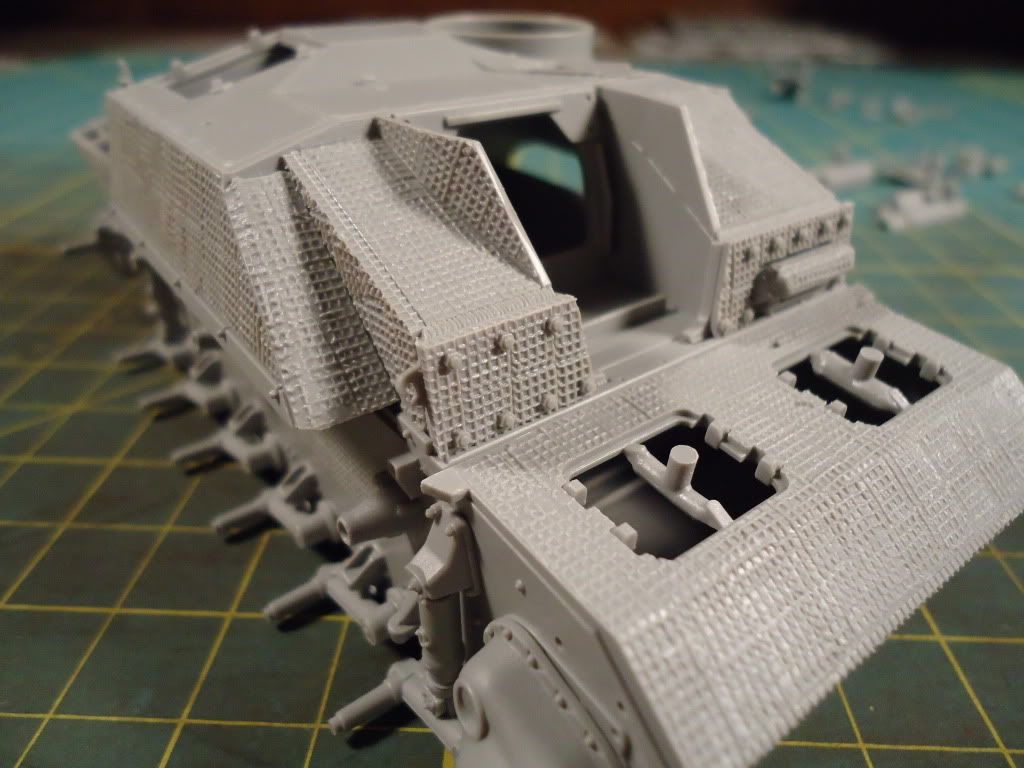
Spent last night and this morning putting my spraybooth back togther after my move.  Today finally had some real time to work on my build.  Skiped around a bit and started building the different assemblies.  Tonight plan on working on the interior.  After that will refocuse on the lower hull and paint the hull, wheels and then put on the tracks before attaching the rest of the pieces.  Then will fine tune the interior.  Thats the game plan.  Here is my progress so far.

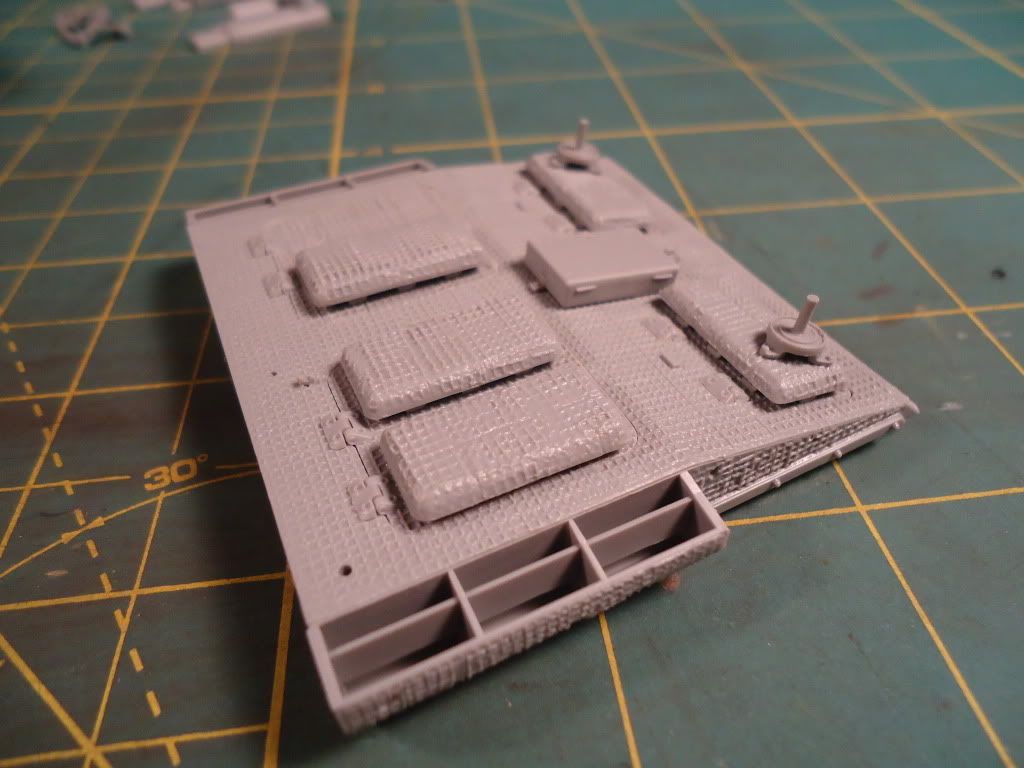
Happy with the zim but did have to shave some off to have the front struts glue down flat.

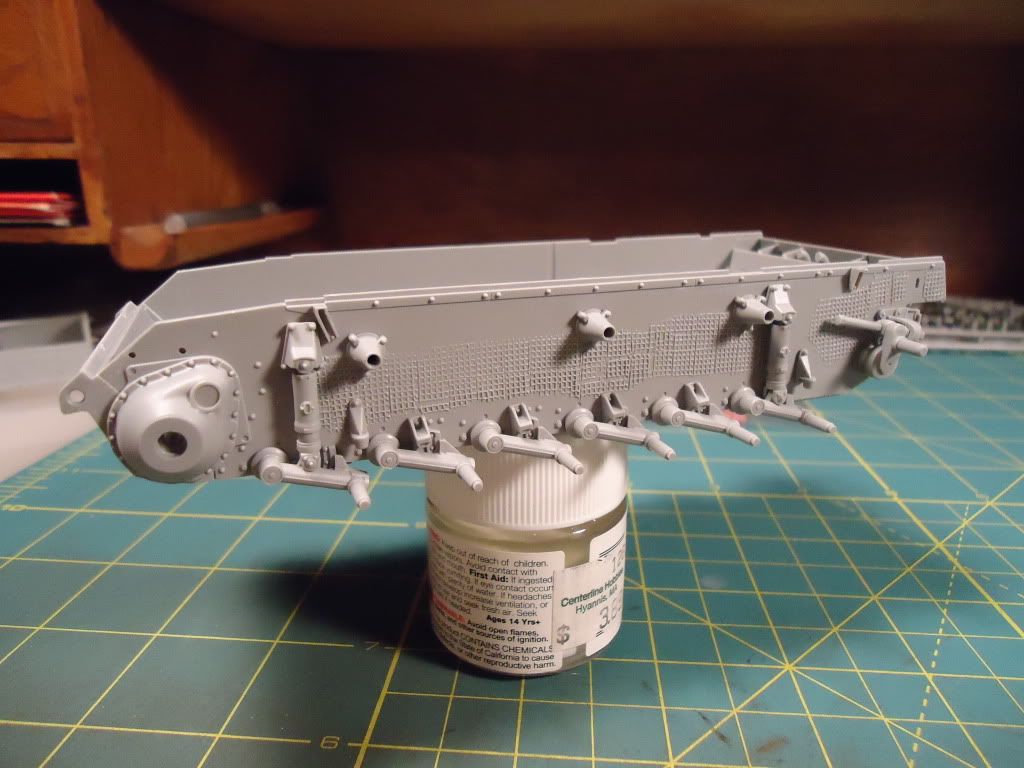
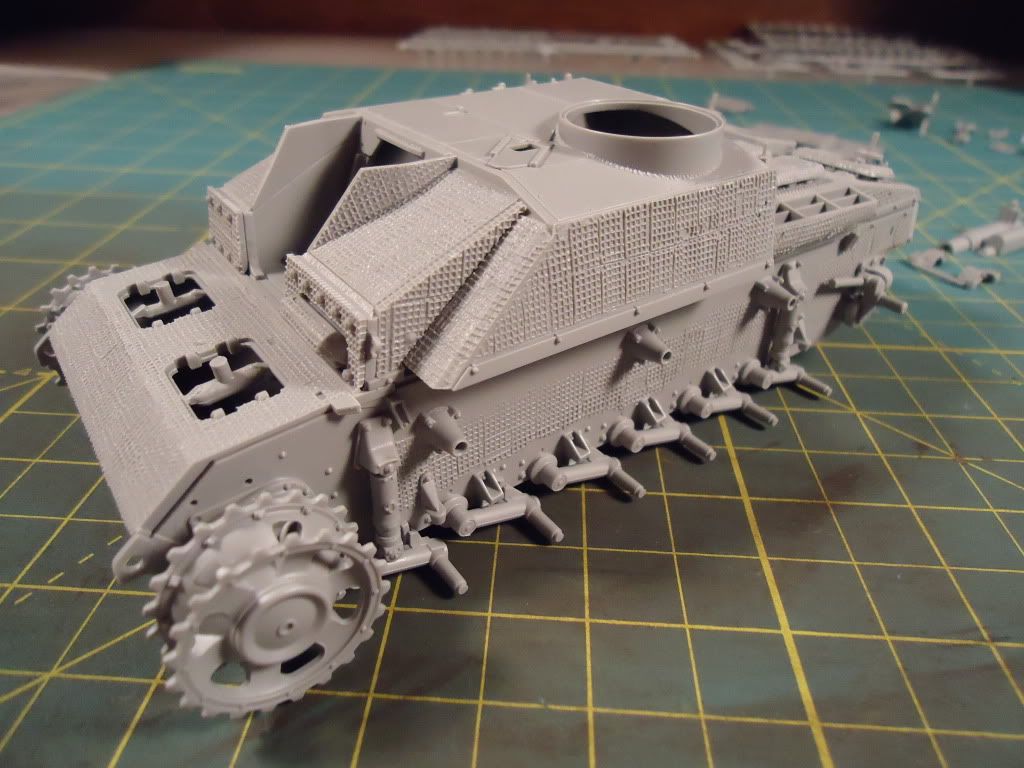
Torrsion bars were a little fidley but enjoyed building.

If you look closly, can see the seams that Jord was talking about.  Will fill them in.

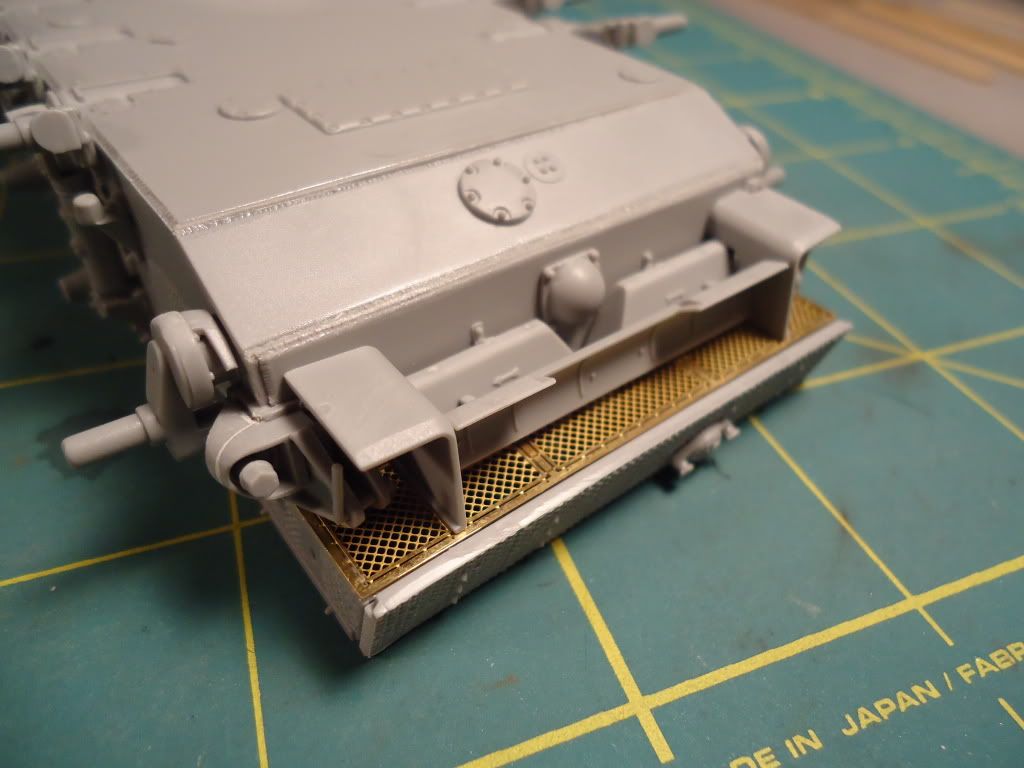
All parts on the rear fit well but there where two seams on the bottom armor plate.  Used streched sprue to fill and make welds

These are some dry fit pics.  The fit seems to be excellent.  Took all of y'alls advice and cut the 6 taps off the hull before trying to put the casemate and engine deck on.

Here you see all parts layed out and cleaned up and ready for assembly.  This is the parts provided in the kit for the interior.  Need to find some good pics so that the remainder of the interior can be scratched.

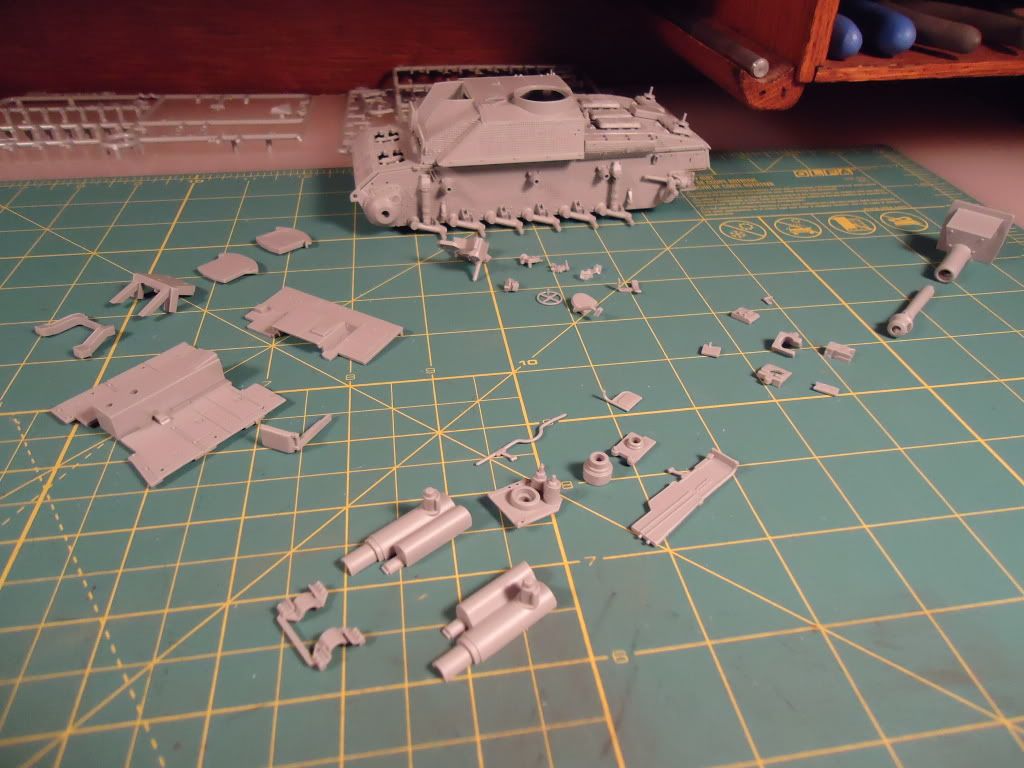
Hope to have a completed interior for my next post.

Rob

  • Member since
    May 2011
  • From: Illinois
Posted by armor86 on Saturday, July 30, 2011 9:54 PM

Panzer III GB - assembling on the initial production J has begun fitting the front upper hull plates and rear engine deck. Decided to build the MG thou its not going to be seen once the front and side plates are glued, too bad. Photos show the front upper hull dry fitted, managed to assemble the view ports and they still open and close. 

Front view of lower and upper hull. 

Rear engine deck ... of interest I found a b/w photo online of one of the kits depicted markings of the (2nd Panzer) number 632 that had been captured by Russian troops, grey, early J with no engine filters .... 

Dry fitting the fenders .... 

Under side of rear engine ... again depicting the early J initial production model ... 

Hope to finish gluing the upper hull sunday. 


Dan

  • Member since
    April 2009
  • From: Carmel, IN
Posted by deafpanzer on Saturday, July 30, 2011 10:45 PM

Hello boys, I'm back from my vacation!  It was great and relaxing at my parent's cottage by the lake in Canada.  Like I said I didn't have access to internet, but it was a nice break.  Here's the view from the cottage I had to put up with on daily basis...  Buffalo, USA is on the other side of the lake. 

It never ceases to amaze us when we visit Niagara Falls every year... that's my two boys in the center. 

Best news... I think I have enough Beer for everybody.  Of course they are Canadian beer I smuggled across the border... nah, it was declared.  Just come over and join me!

I need to catch up  as I see three pages of great WIPs... you guys rock! 

Andy

  • Member since
    April 2009
  • From: Carmel, IN
Posted by deafpanzer on Sunday, July 31, 2011 12:00 AM

Ben- Great pictures of your WIP! Yes  You made it sound too easy to assemble the magic tracks.  I really dig those bolts & rivets on the armor... looking forward to its base coat of paint next.  Hope trots were not caused by feeling the pressure to build your SIG better than Pvt Mutt.  Stick out tongue

Brian- Glad we now know your name so we don't have to type your lengthy profile name. LOL  Outstanding work on the fenders.  I liked the pictures where you had both plastic and brass fenders next to each other.  I wish I have enough courage to go that far.  And finally thanks for making me drool over your etchmate!

I have to agree with others... it would be shame to hide all of your work on the interior.  They look way too nice!  Hope we will be able to see with all hatches open...  

Jord- Thanks for posting pictures of the Zimm at closer range.  Impressive... I have couple of Dragon kits with Zimm but not in waffle pattern.  Thanks for posting great picture of StuH.   I would do what Bill suggested using thick slow drying CA like Zap-a-Gap if you have one. 

Carlos- Great looking Wirbelwind!  Nice camo especially on the wheels.  Please do not hesitate to post another picture when it is completed.  Bet you can not wait to finish so you can shoot down all of your wingy models with it. 

Erik- Thanks for the reminder about the GB badge.  I am going to upload a copy on the first or second page tonight.  I was at 'Michigan Toy Soldiers Company' in Detroit where we stopped by on our way home from Canada... the store was AWESOME!  Unfortunately they didn't have the figures set you are using. 

Satch ip- How evil of you for letting us know about the sale?  Everybody knows many of us especially our friend Eric are been struggling not to add another kit to our huge stash!  Nah, thanks for the tip!

Carl- Nice work on scratch built antenna holder!  I am going to save one of those Canadian Beer for you...

Rob- Welcome aboard!  I am happy that you are going to be with us for this GB.  Thanks for posting great picture showing different barrels for your StuH.  Looking forward to your finished interior next...

Armor86- Another great WIP filled with pictures.  Nice details on your Ausf J. 

Greg- Promise you I will not go on another vacation til Christmas or so.  Big Smile

Guys, because I worked very hard catching up with you guys I think I deserve to drink one of those Canadian beer now to help me relive the stress. Toast  Looking forward to more of this...

Andy

  • Member since
    September 2009
  • From: Rugby, England
Posted by Hinksy on Sunday, July 31, 2011 8:03 AM

Hi guys,

Great to have you back Andy! Sounds like you had a nice time buddy. The trots weren't caused by my fear of Tony's great SIG - I'll be getting a bit too ambitious if I expect to be knocking out builds that great after only two years but I have a feeling this could be a good 'un all the same.

Like I said I haven't painted a fully assembled build yet - normally I'd be using Friuls and paint the road wheels separately then assemble them after the main basecoat had been laid down but as I'm using Magic Tracks I decided to leave them in place as I had a NIGHTMARE getting them L&L tracks back onto my 1/48 StuG that I finished before this build. It shouldn't be too hard Whistling

PANZERWAFFE - Thanks for the Yes's! I can't believe how quickly this thing has fallen together. Coming from the Dragon stable I was expecting ropey instructions and fitment issues but it has literally been perfect. I mentioned on an an earlier post from the other weekend when I started this thing that I'd just bought one of my regular magazines which was just happened to be be nigh on totally dedicated to Panzer III variants! They had a total 6 page piece dedicated to this very kit which prompted me to look into the antennae base and the Periscope cover. They showed lots of photos from a preserved example at a museum in Russki land which was mega helpful.

The instructions cover3 vehicles and their markings/cammo:

  • Panzer Grey basecoat with 'chunky' Olivgrun squiggles (Ostfront, 23.Pz.Div., 1943)
  • Dunkelgemb basecoat with rotbraun and olivgrun squiggles (Eastern Front, 23.Pz.Div., 1943)
  • Panzer Grey (StuG. Abt. 177, Stalingrad 1942)

Obviously my build will be the last one mentioned - Stalingrad 1942. My research suggested, iirc, that there were 24 of these things built in total with the bulk seeing action in Stalingrad. Regardless of how many were actually built I haven't seen any photos of a SIG with a late war cammo scheme. The Olivgrun scheme could easily have been field applied I suppose and, imo, would add some interest to the build.

I personally like mixing up my own Panzer Greys so I'll be playing it safe Wink

I'll look forward to you starting your SIG, Panzerwaffe and hope you decide to do it for this GB. You won't be dissapointed!

I'm off to the workshop to paint mine now - update later! Cool

ATVB

Ben Toast

On the Bench - Dragon Pz. IV Ausf. G (L.A.H.) Yes

Your image is loading...


  • Member since
    September 2009
  • From: Rugby, England
Posted by Hinksy on Sunday, July 31, 2011 11:14 AM

Hi chaps,

A quick update as promised:

I'd set myself a target to have my SIG basecoat laid by the end of today - and painted it is! Toast

The colour is a real mixture - there's some German Grey, Dark Grey, Medium Blue and Flat Blue in there (all Tamiya). I reckon it's my best Panzer Grey yet! Cool

I'll be back at work tomorrow so I'll have a nice hard basecoat to start on next weekend. I've some SIN Blue Filter for Panzer Grey vehicles and some MIG Cold Grey Wash for Panzer Grey vehicles that combined work really well together.

Here's a few photos for you to look over:


Here's a close up of the correct antennae base with the visible wiring going to the base. You can also see the wiring on the Periscope cover legs.


Below are two of the three colour schemes listed in the instructions. The other one is the green striping over the Panzer Grey base. 


Thanks for looking guys. I'd appreciate any comments and suggestions.

ATVB

Ben Toast

On the Bench - Dragon Pz. IV Ausf. G (L.A.H.) Yes

Your image is loading...


  • Member since
    April 2009
  • From: Carmel, IN
Posted by deafpanzer on Sunday, July 31, 2011 3:37 PM

Erik-  I have uploaded our GB badge on first or second page. 

Ben- Your SIG is looking great! Yes  Don't be shy to add more thinner to your basecoat paint next time so your pre-shading work will show up more unless it is hard to see in your pictures at this moment.   I realize the crew don't have alot of visibility outside once they are inside.  Scary...


Andy

  • Member since
    September 2009
  • From: Rugby, England
Posted by Hinksy on Sunday, July 31, 2011 4:49 PM

deafpanzer

Erik-  I have uploaded our GB badge on first or second page. 

Ben- Your SIG is looking great! Yes  Don't be shy to add more thinner to your basecoat paint next time so your pre-shading work will show up more unless it is hard to see in your pictures at this moment.   I realize the crew don't have alot of visibility outside once they are inside.  Scary...


Hi Andy,

Yeah, I usually manage to do this. I'll get the pre shaded panel lines done and then I'll take the basecoat one step too far and end up killing it. It's still just barely visible but after weathering it won't be Sad

Gotta keep practicing. I got that StuG III Ausf B perfect but have struggled to get it right again after that.

More thinner eh? I'll try it!

Cheers buddy,

Ben Toast

On the Bench - Dragon Pz. IV Ausf. G (L.A.H.) Yes

Your image is loading...


JOIN OUR COMMUNITY!

Our community is FREE to join. To participate you must either login or register for an account.

SEARCH FORUMS
FREE NEWSLETTER
By signing up you may also receive reader surveys and occasional special offers. We do not sell, rent or trade our email lists. View our Privacy Policy.