SEARCH FINESCALE.COM

Enter keywords or a search phrase below:

The Official 1942 70th Anniversary Group Build

78947 views
567 replies
1 rating 2 rating 3 rating 4 rating 5 rating
  • Member since
    July 2004
  • From: Sonora Desert
Posted by stikpusher on Monday, October 1, 2012 9:28 PM

Thank you again for the kind words CMK.


F is for FIRE, That burns down the whole town!

U is for URANIUM... BOMBS!

N is for NO SURVIVORS...

       - Plankton

LSM


  • Member since
    March 2010
  • From: MN
Posted by Nathan T on Monday, October 1, 2012 11:39 PM

Nice TBD Stik! That old monogram kit sure has a lot of detail for its age. When I build mine I used eduards PE set and Archer raised rives. Made the build twice as challenging but still turned out great. Your kits on the road to being a real stunner. So, Canopy open or closed?


  • Member since
    July 2004
  • From: Sonora Desert
Posted by stikpusher on Monday, October 1, 2012 11:49 PM

Thank you Nathan. I was just out at the bench test fitting the canopy (among doing other things). I am not sure yet which way I will go there. After test fitting I am kind of leaning towrds closed over the gunner's station and open for the pilot's, but then I have to fill those two holes on the top deck where the gunners canopies go. This kit is still a beauty to my eyes, and I built a bunch when they were new back in the day. I still have another to do in my stash and want to go all out with the twin mount .30s,  Archer raised rivets and all. I know that I could dress up the cockpit a lot too on my own, or even get the Eduard set.


F is for FIRE, That burns down the whole town!

U is for URANIUM... BOMBS!

N is for NO SURVIVORS...

       - Plankton

LSM


  • Member since
    September 2009
  • From: Guam
Posted by sub revolution on Tuesday, October 2, 2012 5:47 AM

Looks good stik!!

NEW SIG

  • Member since
    May 2012
  • From: Milford, Ohio
Posted by Old Ordie on Tuesday, October 2, 2012 12:35 PM

sub revolution

Looks good stik!!

Ditto (aka ditto)

Flight deck:  Hasegawa 1:48 P-40E; Tamiya 1:48 A6M2 N Type 2 ('Rufe')

Elevators:  Airfix 1:72 Grumman Duck; AM 1:72 F-4J

  • Member since
    July 2004
  • From: Sonora Desert
Posted by stikpusher on Tuesday, October 2, 2012 5:03 PM

Thanks again guys. Here is today's first update. Something you an appreciate Ordie- The Mk.XIII Torpedo was modified shortly before WWII with an "orange crate" set of wood fins added around the original fins to help stabilize it during the aerial drop.The kit comes with the Mk.XIII in it's original form. Later during the war, a metal ring fin would be fitted at the factory to serve the same purpose as the wooden "crate". A simple scratch build. First some measuring, then cutting, and then I dragged a razor saw held width-wise along what would be the length of the outer surfaces to add a wood grain texture. The glue then together and fitted to the kit's Mk.XIII. I won't glue them on until the "Torp" is all painted.


F is for FIRE, That burns down the whole town!

U is for URANIUM... BOMBS!

N is for NO SURVIVORS...

       - Plankton

LSM


  • Member since
    May 2012
  • From: Milford, Ohio
Posted by Old Ordie on Tuesday, October 2, 2012 5:10 PM

Ah, yes, the infamous 'early version' Mk-13, not to be confused with the also infamous 'late version(s)', lol!  They were OK, when (if, actually) they detonated ... Nice job on the fins, btw - I can see the grain of the wood.

Flight deck:  Hasegawa 1:48 P-40E; Tamiya 1:48 A6M2 N Type 2 ('Rufe')

Elevators:  Airfix 1:72 Grumman Duck; AM 1:72 F-4J

  • Member since
    July 2004
  • From: Sonora Desert
Posted by stikpusher on Tuesday, October 2, 2012 5:17 PM

Yes indeed... When I finish this build and tell the story like you did for Swede Vestaja's SBD, I will recount the TBD and Mk.XIII's finest moment in 1942...

I have had fun improving the Mk.XIII here. I am still trying to figure out how to do the cables that hold the sucker in place in the cradle until release.


F is for FIRE, That burns down the whole town!

U is for URANIUM... BOMBS!

N is for NO SURVIVORS...

       - Plankton

LSM


  • Member since
    May 2012
  • From: Milford, Ohio
Posted by Old Ordie on Tuesday, October 2, 2012 5:21 PM

stikpusher

Yes indeed... When I finish this build and tell the story like you did for Swede Vestaja's SBD, I will recount the TBD and Mk.XIII's finest moment in 1942...

I can't wait ... you know how I love a good story ... Eats.

Flight deck:  Hasegawa 1:48 P-40E; Tamiya 1:48 A6M2 N Type 2 ('Rufe')

Elevators:  Airfix 1:72 Grumman Duck; AM 1:72 F-4J

  • Member since
    September 2009
  • From: Guam
Posted by sub revolution on Wednesday, October 3, 2012 4:55 AM

Yes, a good story is a must!

NEW SIG

  • Member since
    March 2010
  • From: MN
Posted by Nathan T on Wednesday, October 3, 2012 8:52 AM

stikpusher

I have had fun improving the Mk.XIII here. I am still trying to figure out how to do the cables that hold the sucker in place in the cradle until release.

Stik, I used stretched sprue superglued in place-seemed to wrap around the torpedo well enough. Nice job again!


  • Member since
    July 2004
  • From: Sonora Desert
Posted by stikpusher on Wednesday, October 3, 2012 1:01 PM

Nathan, I am trying to decide as to what degree of accuracy I am am going to try to replicate those cables... like you did with some stretched sprue?, a bit more precise and use thread with its braided texture looking more like the real thing in minaiture??, or do I get obsessive and spin some very fine wire to replicate the loop ends and duplicate the cable braiding???.... with whatever hooks goe thru the loop eyes????!!!  oh to be 10 years old again and not care...

Ordie and Sub,  I am already trying to figure out how to tell this great story just right... not too long winded, but full of great details.


F is for FIRE, That burns down the whole town!

U is for URANIUM... BOMBS!

N is for NO SURVIVORS...

       - Plankton

LSM


  • Member since
    July 2004
  • From: Sonora Desert
Posted by stikpusher on Wednesday, October 3, 2012 9:02 PM

Tonite's pic updates of progress:

First up, the instrument panel ready for installation

Then I glued the lower inner wing half to the fuselage. I added a small shim to one side of the leading edge to cure a slight gap on the lower forward fuselage by forcing it together.

Then I installed the IP. I don't ever recall that part being such a challenge any of the times I build this as a kid, but then again it was all built in a single session back then. The stick was in the way today so for the next time I build this kit I will either have to leave the stick out to ease the process and install that later on, of install the IP earlier when the fuselage is first closed up.


F is for FIRE, That burns down the whole town!

U is for URANIUM... BOMBS!

N is for NO SURVIVORS...

       - Plankton

LSM


  • Member since
    September 2003
  • From: AandF in the Badger State
Posted by checkmateking02 on Wednesday, October 3, 2012 9:26 PM

Nice!  I didn't realize the Devastator had a three-man crew.


  • Member since
    July 2004
  • From: Sonora Desert
Posted by stikpusher on Wednesday, October 3, 2012 11:51 PM

Yes, the middle position was for a bombardier when it was flown as a level bomber.


F is for FIRE, That burns down the whole town!

U is for URANIUM... BOMBS!

N is for NO SURVIVORS...

       - Plankton

LSM


  • Member since
    May 2012
  • From: Milford, Ohio
Posted by Old Ordie on Thursday, October 4, 2012 2:11 PM

Looking good, there, Stik.  Nice pits ... Big Smile

Flight deck:  Hasegawa 1:48 P-40E; Tamiya 1:48 A6M2 N Type 2 ('Rufe')

Elevators:  Airfix 1:72 Grumman Duck; AM 1:72 F-4J

  • Member since
    July 2004
  • From: Sonora Desert
Posted by stikpusher on Thursday, October 4, 2012 2:18 PM

Thank you sir. I am looking forward to seeing the pits on your 1/48 F-4Bs ;-)


F is for FIRE, That burns down the whole town!

U is for URANIUM... BOMBS!

N is for NO SURVIVORS...

       - Plankton

LSM


  • Member since
    May 2012
  • From: Milford, Ohio
Posted by Old Ordie on Thursday, October 4, 2012 2:30 PM

stikpusher

Thank you sir. I am looking forward to seeing the pits on your 1/48 F-4Bs ;-)

You shall, you shall ... Wink

Flight deck:  Hasegawa 1:48 P-40E; Tamiya 1:48 A6M2 N Type 2 ('Rufe')

Elevators:  Airfix 1:72 Grumman Duck; AM 1:72 F-4J

  • Member since
    July 2004
  • From: Sonora Desert
Posted by stikpusher on Monday, October 8, 2012 8:04 PM

Not much to update for today. My biggest progress was sanding down the shim that I have been working on for the upper right wing where it meets the fuselage.

I put it in place for this photo but am not quite yet ready to glue it together.

And the as yet un-shimmed left wing in place, but also not yet glued, showing the much thinner gap needing to be taken care of.


F is for FIRE, That burns down the whole town!

U is for URANIUM... BOMBS!

N is for NO SURVIVORS...

       - Plankton

LSM


  • Member since
    July 2004
  • From: Sonora Desert
Posted by stikpusher on Tuesday, October 9, 2012 6:47 PM

Left upper wing shim added- check

Putty applied to sink marks in both upper wings- check


F is for FIRE, That burns down the whole town!

U is for URANIUM... BOMBS!

N is for NO SURVIVORS...

       - Plankton

LSM


  • Member since
    July 2004
  • From: Sonora Desert
Posted by stikpusher on Wednesday, October 10, 2012 12:33 AM

Some final work on my TBD tonite, before calling it quits at the bench for the evening here.

First up, I sanded smooth the putty work from earlier

Then I did a bit of scratch build detailing on the outer wing portions. If you look at this photo, there are four triangular braces between the two hinges on the upper interior portion of the outer wing panel that are not molded in the kit

 Based off of some reference photos in books that I have here, I was able to guesstimate their size. Using some strip styrene, I court four triangular braces for each wing, drilled out a lightening hole in each with my pin vise, enlarged each hole a tad with a twirled x-acto knife tip, and using my book reference photos, glued each on in the proper position.

Then placed them on the build for a test fitting and these photos


F is for FIRE, That burns down the whole town!

U is for URANIUM... BOMBS!

N is for NO SURVIVORS...

       - Plankton

LSM


  • Member since
    September 2003
  • From: AandF in the Badger State
Posted by checkmateking02 on Wednesday, October 10, 2012 8:21 AM

Nice touch, Stik.  Coming along very well.


  • Member since
    October 2008
  • From: italy
Posted by bsyamato on Wednesday, October 10, 2012 8:40 AM

fine retouch!

  • Member since
    July 2004
  • From: Sonora Desert
Posted by stikpusher on Wednesday, October 10, 2012 1:09 PM

Thank you sirs! Well I now have the upper wings glued on and that trapped the outer folding portions in place. Once the glue dries and the seams are cleaned up I will post some photos.


F is for FIRE, That burns down the whole town!

U is for URANIUM... BOMBS!

N is for NO SURVIVORS...

       - Plankton

LSM


  • Member since
    July 2004
  • From: Sonora Desert
Posted by stikpusher on Wednesday, October 10, 2012 7:54 PM

Glue dry and seams cleaned up- check

Torpedo body painted Humbrol Brass and "orange crate" with Humbrol Oak

once the Brass dried overnite I can mask off an paint the warhead Light Gray


F is for FIRE, That burns down the whole town!

U is for URANIUM... BOMBS!

N is for NO SURVIVORS...

       - Plankton

LSM


  • Member since
    May 2012
  • From: Milford, Ohio
Posted by Old Ordie on Saturday, October 13, 2012 1:03 PM

Stik - Both the triangular braces and orange crate fins are great scratched "touches".  Can't wait to see the finished torpedo, all washed down and everthing (you know how I like things that go boom, lol!).

Flight deck:  Hasegawa 1:48 P-40E; Tamiya 1:48 A6M2 N Type 2 ('Rufe')

Elevators:  Airfix 1:72 Grumman Duck; AM 1:72 F-4J

  • Member since
    January 2012
  • From: Belgium, EU
Posted by Ninetalis on Sunday, October 14, 2012 2:19 PM

Hey all,

I've been working on and off on the Nate,
It's a pretty out of the box build on this one.
The hasegawa kit is actually a 40year old kit from another company called 'Mania'.

Though, it's detail level is quite high, keeping in mind the age of this kit.
Everything fits quite well except for the lower wing part into the fuselage, but it is doable and when given a bit of attention and painted it can be dealt with.

Anyway, Here are the pictures.
 the instrument panel, Detail was added using dry-brushing.

The cockpit walls were giving a bit more live using some different tones in color.

The cockpit assembled.

Fitting the rest of the plastic was no problem.
Only thing I would like to mention, the kit has no wall added between the engine and the interior. So I've scratchbuilded a small wall out of a sheet of styrene.
I did forget to take a picture of it… anyway, it's there!

The clear parts didn't line up that well, there are some gaps between the fuselage and the canopy but I used a bit more of my Formula '560' (special glue for clear parts) and filled 'em up.

As allways, I give my models a base coat.
I just find it easier to add paint on the model when there is a base coat on it.

Yesterday I've put on the IJA Grey, I was thinking about pre shading but decided not to do so yet. I never airbrushed grey yet and didn't know how it would react and how the taped off white parts would react because these wouldn't be pre-shaded.
Maybe next time.

with regards, Ninetalis.

  • Member since
    July 2004
  • From: Sonora Desert
Posted by stikpusher on Sunday, October 14, 2012 3:19 PM

Nine, I built that kit over 10 years ago. It is really beauty. The only place it really needs any help is in the cockpit, and True Details does make one for this kit. Although I see that you are well past that point.  What era/area of operations markings are you planning to put on this build?

Ordie, I should have the wood grain washed and and warhead painted on the Mk.XIII during my days off this week, if life co operates.

I have been nickle and diming little things on the TBD before work this week: cleaning up seams and sink marks at the wing root on the bottom side, prepping the flaps for installation, a bit of shimming to fill a gap on the rear portion of the wing fold. Removing corrugations from the wing bomb rack panels, because none should be there... Just a few more small details to hit and possibly major paint work on my days off. If not, it will be ready by next week.


F is for FIRE, That burns down the whole town!

U is for URANIUM... BOMBS!

N is for NO SURVIVORS...

       - Plankton

LSM


  • Member since
    January 2012
  • From: Belgium, EU
Posted by Ninetalis on Sunday, October 14, 2012 3:56 PM

stikpusher

Nine, I built that kit over 10 years ago. It is really beauty. The only place it really needs any help is in the cockpit, and True Details does make one for this kit. Although I see that you are well past that point.  What era/area of operations markings are you planning to put on this build?


Yes it is a real gem, I bought it at my LHS a little while back for a steal!
I agree the cockpit is really spartan but once it is closed up you can't see ANYTHING in there except for the seat.

The aircraft I'm making is a model based at Japan in 1942 (obviously) based at Kyushu flying in the 2nd chutai, 204th sentai (204th Air Combat Regiment, 2nd Company) as part of the Home island Defence.


With regards, Ninetalis. 

  • Member since
    August 2011
  • From: Variable
Posted by Lt. Smash on Sunday, October 14, 2012 7:39 PM

Sherman II at El Alamein: Painting

As I moved into the painting phase of my Sherman II at El Alamein build, I was very happy with my progress.  The kit went together well, my attempt at soldering went smoothly and I was finally ready to put paint to plastic.   Unfortunately, this positive trend was not going to continue.

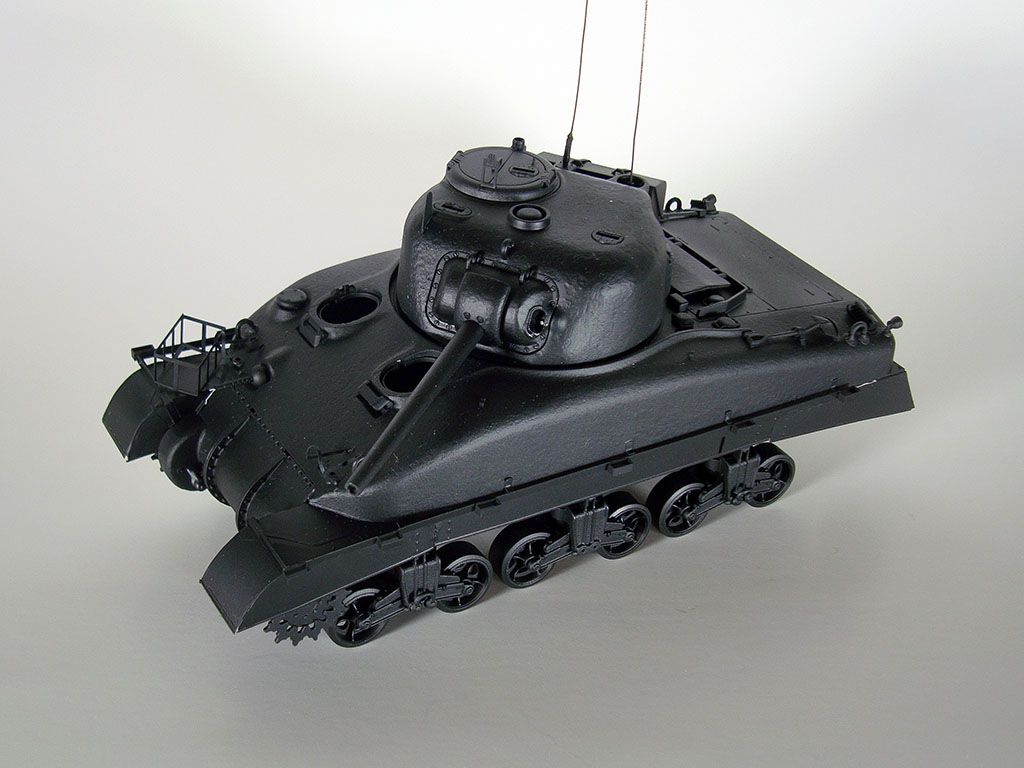
Things started off smoothly.  I started by applying black Vallejo Surface Primer. This was my first attempt at using it and I’m hooked. It comes easily out of my airbrush at 20 psi without thinning. The finish is smooth and coverage is consistent.  There is no comparison between this product and anything that comes out of a rattle can.

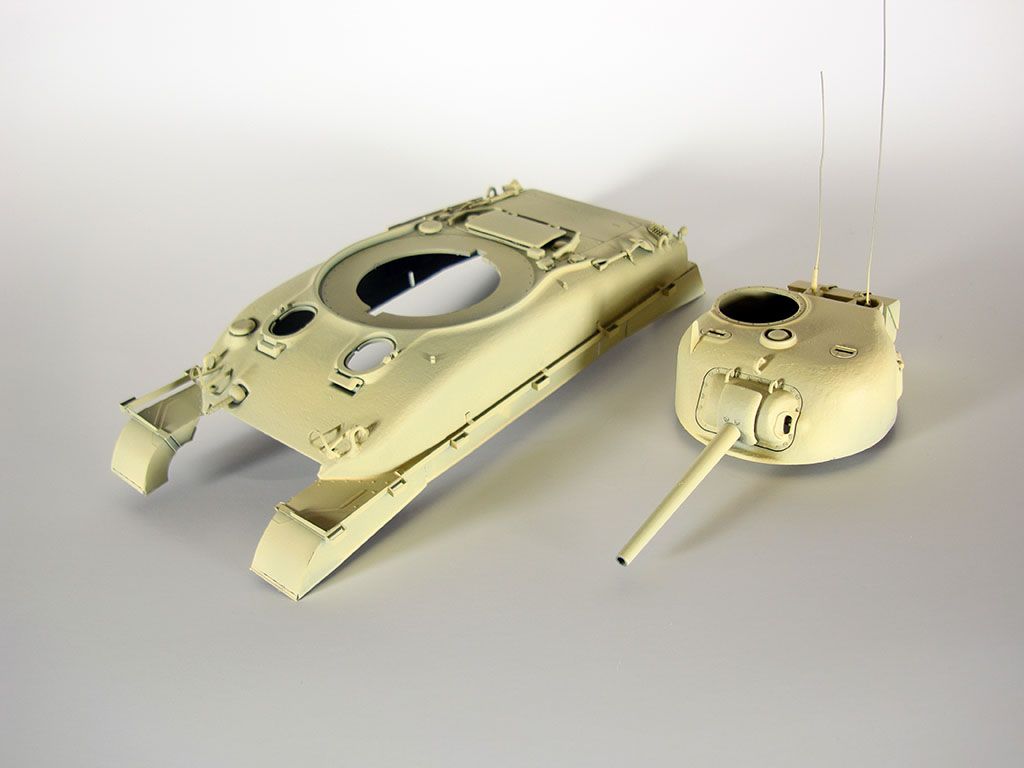
Next, I had to lay down the base coat and this is where I encountered my first challenge. What color is the base supposed to be? 

When I started this build, I knew exactly what tank I wanted to paint:

The good news is that the Dragon kit comes with marking for this very tank.  The bad news is that I quickly lost confidence in Dragon’s paint instructions which suggest using Middlestone for the top color and Dark Green for the bottom color.  Both seemed far too dark for this tank. 

After doing some more research, I found the top color is most likely British Standard Light Stone 61, and, after more research, I realized that this was going to be a tough color to match.  Mike Starmer and Mike Cooper are the experts in regards to British World War II Camouflage and colors.  In a post on Missing-Linx,  Mr. Starmer describes it as a strong, medium-toned, slightly brownish-yellow that fades to a beige-like shade in harsh sun, and Mr. Starmer and Mr. Cooper provide Humbrol and Revell mixes for Light Stone 61.  Unfortunately, I don’t have convenient access to either brand. 

In the Vallejo Model Color line which I wanted to use for this build, Light Stone 61 seems to fall somewhere Beige (917) and Iraqi Sand (819).  Keeping in mind that the color tends to fade, I decided to use Beige as my base color and then added Sunny Skintone (845) to brighten the beige at a 2:1 ratio.  The net result is a little lighter and perhaps a little more yellow than the reference but I liked the result.  It feels like it has been bleached by the sun and it will get darker when I whether it:

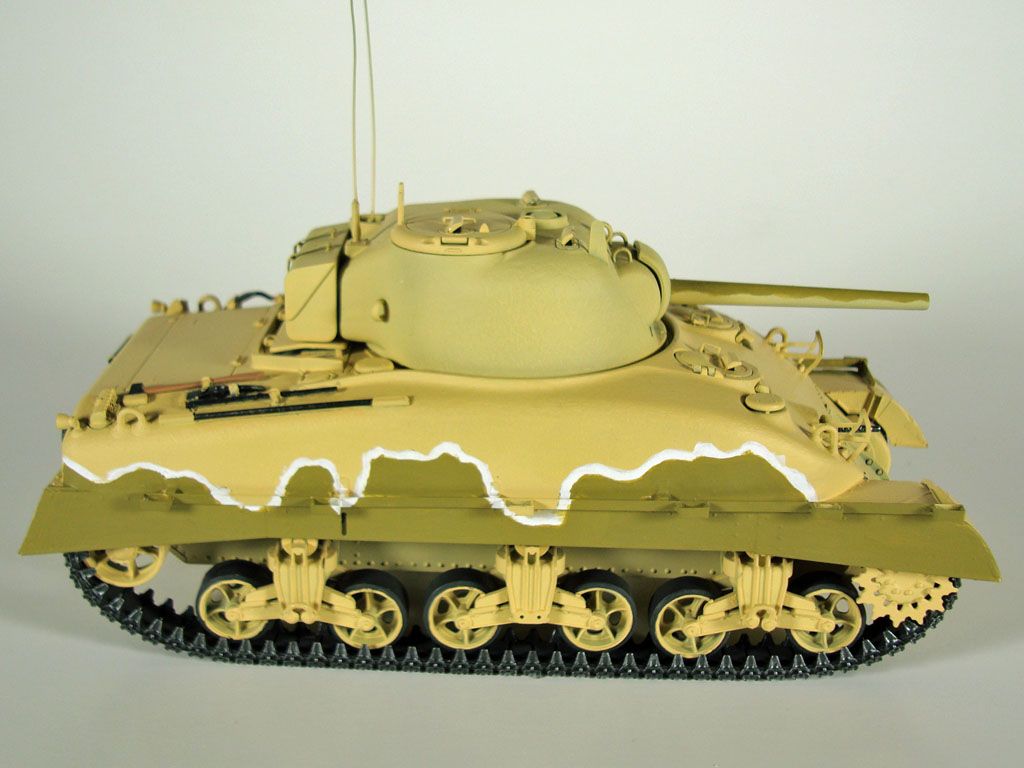
Now, with the base coat on, I moved on to paint the camouflage.  As you can see from the photo of the actual tank above there is a small light colored/white stripe that separates the base color from the darker camouflage color.  My plan was to paint this irregular white stripe next. 

To do that, I created a 1/35-scale mask for each side of the tank by enlarging the scanned painting instructions.  I transferred that mask onto wide painters tape, stuck the tape to the tank and sprayed the visible area with a light coat of white paint.  One side worked perfectly, but when I reloaded my airbrush to do the other side, I thinned my paint too much.  This caused my mask to bleed and paint to pool unevenly!  Drat! 

I wiped off as much of the wet paint as I could and then let the mess dry.  Afterwards, I applied another layer of base to cover what remained of the mistake, re-masked the area and tried again.  Problems persisted.  While not an exact repeat, I had a lot of bleeding and some running.  Double drat!

Again, I wiped off what I could, but at this point, I was starting to lose some detail.  So, I decided to strip the paint from the upper hull (the only part affected) and try again.  To strip the paint I used denatured alcohol, let the part soak in a foil pan for a few hours and then took a soft tooth brush to it. The paint and primer came off easily.

While I need to get better at masking, I exhausted my patience with this this time and needed to move on.  So, I re-primed the upper hull, and this time after laying down the base coat I hand painted the camouflage. 

I started by lightly outlining the 1/35-scale masks I recreated from the painting instructions with a pencil.  Next, I traced this outline with a No. 2 round brush and filled in the lower portion of the hull using Vallejo Model Color White (951) and a wide, flat brush.  It took 4-5 coats to get a solid, stroke-free white. 

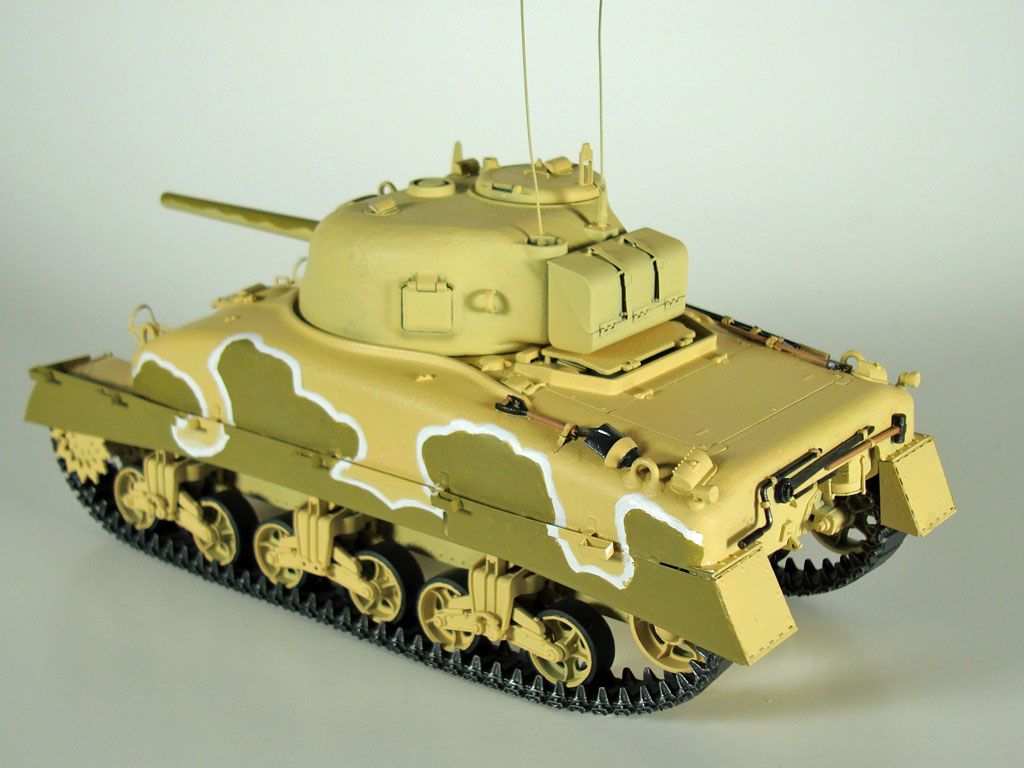
Now, I needed to determine what the darker camouflage color needed to be.  One interesting source was from Bison Decals which shows the tank I’m modeling with painting instructions. This helped confirm the top color as Light Stone but showed the bottom color as being “Unknown colour” and illustrated with a medium olive brown.  This gave me the inspiration to use Vallejo Model Color Middlestone (882). 

Using the white shape as a guide, I painted freehand the shape of the now-Middlestone camouflage with a No. 2 brush and filled in the lower portion with a wide, flat brush.  It took 2-3 coats to get a solid, stroke-free finish.

The road wheels and tracks were painted with Vallejo Model Color Black Grey (862) using my airbrush.  The track, except for the track pads, were dry brushed with Vallejo Model Color Oily Steel (865).

I hand painted the tools as well as the bow and coaxial machine guns black, dry brushing metal components with Vallejo Model Color Gunmetal Grey (863).  I layered Vallejo Model Color Cork Brown (843) over the black on all wood tools.

While it took me much longer than anticipated, I am pleased with the results…although after looking at the photos, I realize that I need to do a couple of small touch-ups.  Still, I’m calling this step done and moving on to decals and weathering.

I’m looking forward to making the tank look less factory-fresh and finishing this build.  Hopefully, my next post will come faster than the last took.

On the bench:  Tasca M4A1 Sherman (Direct Vision Type)

Build Log: www.ltsmashsmodels.com

JOIN OUR COMMUNITY!

Our community is FREE to join. To participate you must either login or register for an account.

SEARCH FORUMS
FREE NEWSLETTER
By signing up you may also receive reader surveys and occasional special offers. We do not sell, rent or trade our email lists. View our Privacy Policy.