SEARCH FINESCALE.COM

Enter keywords or a search phrase below:

The Official 1942 70th Anniversary Group Build

78947 views
567 replies
1 rating 2 rating 3 rating 4 rating 5 rating
  • Member since
    October 2008
  • From: italy
Posted by bsyamato on Thursday, November 8, 2012 5:13 AM

Fine work on the devastator Stik!!

I think will miss the end date with the he-111 Embarrassed

  • Member since
    September 2009
  • From: Guam
Posted by sub revolution on Thursday, November 8, 2012 2:42 PM

You can always throw it in the 1943 GB with me!

NEW SIG

  • Member since
    July 2004
  • From: Sonora Desert
Posted by stikpusher on Thursday, November 8, 2012 3:43 PM

Trouble, I am happy to hear about those kits surviving pretty well. And I sure would not want to wish that on anyone. I shudder to think of a flood hitting here (possible due to my location, but not too likely) and ravaging my stash like you had happen. As far as the builds that did not survive, just think of it as a way of the Man upstairs making some more shelf space for your next better completed builds. Having had my collection "thinned" out in a couple earthquakes out here in the past, and knowing that more will hit (not if but when) I do not look forward to the next one. To echo and amplify on Lt, good luck on a speedy recovery to you and your neighbors.

BSY, thanks for the compliments and more work to be seen here in the next few days on the TBD.


F is for FIRE, That burns down the whole town!

U is for URANIUM... BOMBS!

N is for NO SURVIVORS...

       - Plankton

LSM


  • Member since
    July 2004
  • From: Sonora Desert
Posted by stikpusher on Thursday, November 8, 2012 7:14 PM

Well it has been a rainy day here today and I did not want to airbrush in the high humidity. So I just did a bit of detail work on the guns pending better weather for airbrushing tomorrow.

both guns

nose gun 

flex mount gun


F is for FIRE, That burns down the whole town!

U is for URANIUM... BOMBS!

N is for NO SURVIVORS...

       - Plankton

LSM


  • Member since
    October 2008
  • From: italy
Posted by bsyamato on Friday, November 9, 2012 4:26 AM

sub revolution

You can always throw it in the 1943 GB with me!

with the same kit probably Smile not sure but he have optional decals for 1943

  • Member since
    July 2007
  • From: Southern New Jersey
Posted by troublemaker66 on Friday, November 9, 2012 9:31 PM

stikpusher

Trouble, I am happy to hear about those kits surviving pretty well. And I sure would not want to wish that on anyone. I shudder to think of a flood hitting here (possible due to my location, but not too likely) and ravaging my stash like you had happen. As far as the builds that did not survive, just think of it as a way of the Man upstairs making some more shelf space for your next better completed builds. Having had my collection "thinned" out in a couple earthquakes out here in the past, and knowing that more will hit (not if but when) I do not look forward to the next one. To echo and amplify on Lt, good luck on a speedy recovery to you and your neighbors.


Thanks Stik, the recovery won`t be fast enough for me...I want to build!! My Nephew is coming out Monday to start on the renovation...have a 20K advance heading my way to get it started. Prolly can`t even think about a model bench for another month or two. I`m starting work on replacing all my outlets and feeds that got dunked...copper and salt water don`t mix! Hopefully the advance will at least get us back in the house, living mostly on the 2nd floor. Just need a few things.. a fridge, a stove, a washing machine and the heating system for now...and the kitchen sink.....Big Smile

Len Pytlewski

  • Member since
    May 2012
  • From: Milford, Ohio
Posted by Old Ordie on Thursday, November 15, 2012 1:35 PM

Very sorry to read you were in Sandy's path, troublemaker.  I hope recovery goes well for you and yours.  You are in our prayers.  Peace.

Flight deck:  Hasegawa 1:48 P-40E; Tamiya 1:48 A6M2 N Type 2 ('Rufe')

Elevators:  Airfix 1:72 Grumman Duck; AM 1:72 F-4J

  • Member since
    September 2009
  • From: Guam
Posted by sub revolution on Friday, November 16, 2012 6:15 PM

Troublemaker- I updated the front page to say you are complete, photo pending. No hurrys! Just get done what you need to do.

Thanks, Budd

NEW SIG

  • Member since
    July 2007
  • From: Southern New Jersey
Posted by troublemaker66 on Saturday, November 17, 2012 12:59 AM

Old Ordie

Very sorry to read you were in Sandy's path, troublemaker.  I hope recovery goes well for you and yours.  You are in our prayers.  Peace.

Thanks Ordie. We hit a low point on Tuesday but things are coming around now...all those prayers are working!

Len Pytlewski

  • Member since
    July 2007
  • From: Southern New Jersey
Posted by troublemaker66 on Saturday, November 17, 2012 1:08 AM

Thanks Budd. I hope I can find the Buffalo...can`t rememder what I did with it but it was near my Betty bomber and I found it in 3 pieces so I`m not hopefull. I have to go to the house and pack the rest of my stash and supplies so I`ll look for it, if it`s still ok, I`ll post the pics, if not....Dead My Nephew went in there and totally gutted the first floor, don`t think he was too concerned about my models...kids these days....Big Smile

Len

Len Pytlewski

  • Member since
    July 2004
  • From: Sonora Desert
Posted by stikpusher on Tuesday, November 20, 2012 10:40 PM

Wow, I guess that I have been slacking here. No worries. This afternoon I applied a coat of Future on the TBD.

Tomorrow application of decals begins.


F is for FIRE, That burns down the whole town!

U is for URANIUM... BOMBS!

N is for NO SURVIVORS...

       - Plankton

LSM


  • Member since
    July 2007
  • From: Southern New Jersey
Posted by troublemaker66 on Wednesday, November 21, 2012 4:16 PM

Lookin` good Stik! I`m itching bad to get back to building. I did salvage alot of supplies and my stash survived mostly...lost some decals and kit boxes but plastic is pretty resilient. They have us working 12/7`s here at "Ma Bell" for the foreseable future but I`m taking off this weekend and grabbing my modeling gear...got a nice empty garage at the "winter home" (as my wife calls it)...just have to pick up a little heater. I lost some of my completed models but I`m taking the HvH approach...take some pics and scrap `em....Wink

Len Pytlewski

  • Member since
    July 2004
  • From: Sonora Desert
Posted by stikpusher on Wednesday, November 21, 2012 6:13 PM

For some reason, having photos of a completed build makes their loss a bit more bearable. I last of few last year in my move, but since they were already recorded for posterity, their loss was not as big to me as it could have been. Just wish that I had stripped out those MV lenses off the Hurricane.. I forgot to do thatDunce

Well I was able to get most of the decals applied today on to my TBD. But now I am waiting for the Micro Sol to work its magic on all the contours. Talk about some difficult decal surfaces... compound curves, corrugations, etc.

I even have some "Yellow Wings" decals for the tri color prop tips...


F is for FIRE, That burns down the whole town!

U is for URANIUM... BOMBS!

N is for NO SURVIVORS...

       - Plankton

LSM


  • Member since
    April 2005
  • From: Australia
Posted by taxtp on Monday, November 26, 2012 4:27 AM

Stik - how did the decals go n th corrugations ? I have enough trouble on a flat surface !

Trouble - I haven't been by this GB for a while. All the very best with your recovery mate. Those of us on the other side of the world are also thinking of you.

I'd like to change my build please. I'm down for a Hurricane, but I'm feeling a bit naval and would like to change to a 1942 Gato class sub, by AFV Club. it's 1/350. I hope to (have to) build it quickly !.

Cheers

Tony

I'm just taking it one GB at a time.

  • Member since
    July 2007
  • From: Southern New Jersey
Posted by troublemaker66 on Monday, November 26, 2012 4:44 AM

taxtp


Trouble - I haven't been by this GB for a while. All the very best with your recovery mate. Those of us on the other side of the world are also thinking of you.


Thanks Tony, your kind words are much appreciated!

Well, it`s official, my Buffalo is MIA, prolly in a landfill somewhere....Crying. I had to sift through the remaining rubble of my hobby room yesterday and also remove all my ceiling hangers...have a very sad pic to post of about 60 built A/C, all stacked in a huge tote. Now , if I could only figure out how to use my stupid smart phone......Bang Head

On the bright side, my salvaged model stuff is with me in our "Winter Home", just have to organize about 4-6 totes worth of supplies,etc...a hobby in itself!

Len

Len Pytlewski

  • Member since
    September 2009
  • From: Guam
Posted by sub revolution on Monday, November 26, 2012 5:03 AM

Stik- that bird is looking awesome!

Tax- I can't say no to someone building a sub! Stick out tongue You're updated!

Trouble- Shame about that. Hope for more good news!

Thanks, Budd

NEW SIG

  • Member since
    July 2004
  • From: Sonora Desert
Posted by stikpusher on Monday, November 26, 2012 4:16 PM

Tax, I am having to apply multiple coats of decal solvent to try to remove residual bubbles on the wing stars in the corrugations. Still have a few more to go in spite of all the pin pokes (cant say the correct verbege due to nannybot) and applications of Micro Sol and Solvaset. Due to the two part nature of the stars (main star first then add the red center), I was reluctant to blot out the decals as I normally do during the initial application because I did not want to mis-align the red dot centers. Curse those decal companies that leave it to the modeler to apply the red stripes or dots on US national insignia.

Thank you Sub,Wink


F is for FIRE, That burns down the whole town!

U is for URANIUM... BOMBS!

N is for NO SURVIVORS...

       - Plankton

LSM


  • Member since
    August 2011
  • From: Variable
Posted by Lt. Smash on Wednesday, November 28, 2012 1:04 PM

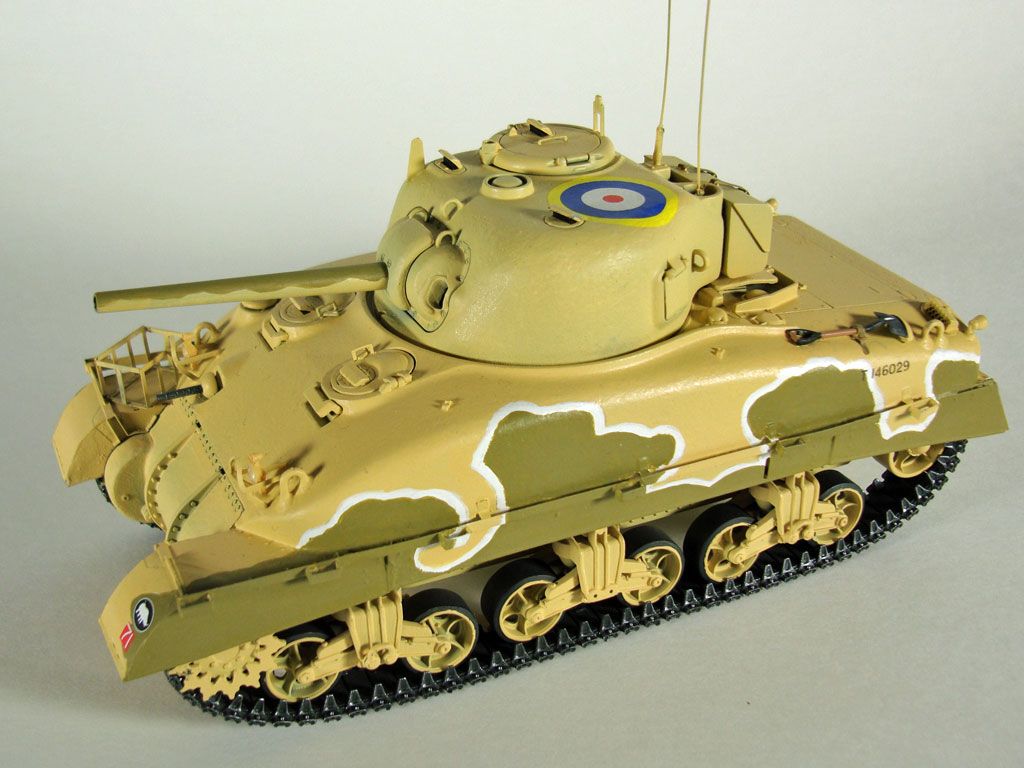
Sherman II at El Alamein: Weathering

I weathered my Sherman II in three steps: filters, wash and dust effects using AK Interactive’s weathering products for this work.  Since the British received their Shermans just prior to El Alamein, I did not chip the paint nor did I apply any fading or streaking (other than a little dust).

Before I got into the weathering, I first had to apply the decals to this tank.  There are only a few decals and they went on very easily with a little warm water, Micro Set and Micro Sol.
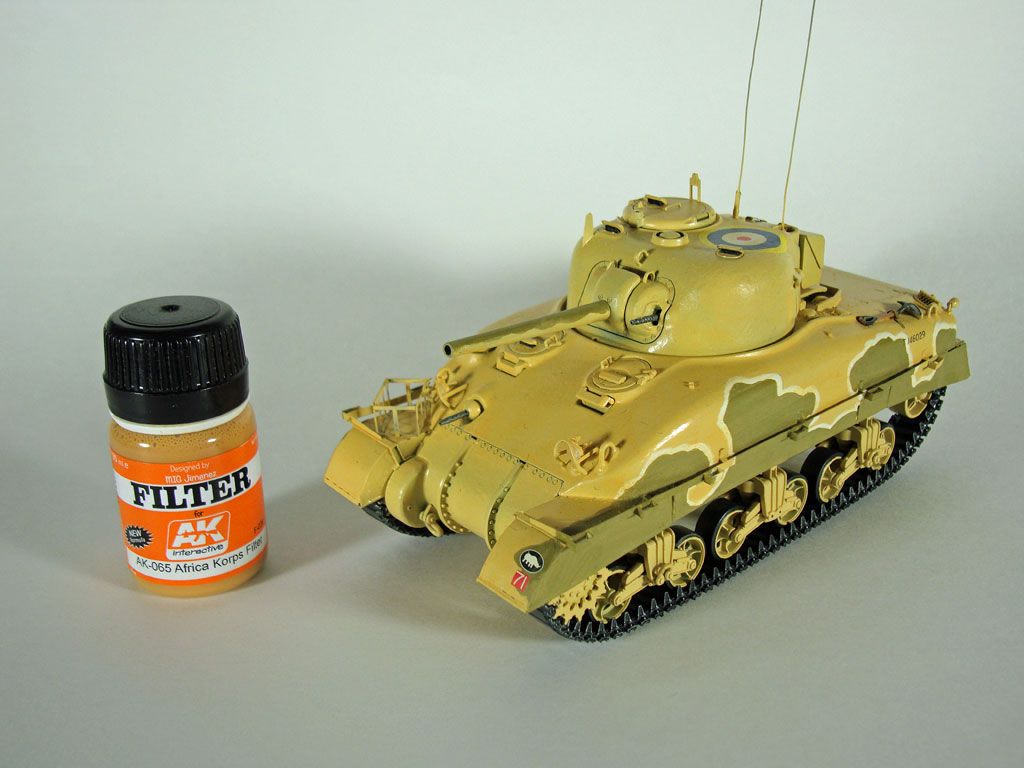
Filter

Weathering started in earnest with a filter.  If you’re not familiar with this technique, a filter is a very translucent layer of paint that is applied over a larger surface.  It tints the underlying paint and helps to unify the finish.

I used AK-065 Afrika Korps Filter for this phase. This filter is very orange and my tank has a green tint to it.  In fact, it is so orange that I almost decided not to use this filter and instead use a general wash after I opened the bottle.  However, I decided to use it and was glad I did.

Filters like to go over a satin finish (well, at least according to Mig Jiminez in his book FAQ 2).  So, I applied a couple of light coats of Acrylicos Vallejo’s Satin Varnish with my airbrush to prepare the tank’s surface.

I applied the filter evenly, over the entire model.  I used a number 6 round sable brush.  I tried to avoid letting the filter settle into any recesses.  Once coated, I set the tank aside to let it dry.

Wash

Next, I used AK-066 Afrika Korps Wash.  Since this was my first time using this product, I decided to experiment in a less-than-obvious place on the tank.

Starting underneath the Sherman, I applied a general wash to part of it’s belly.  After I let it dry, I used mineral spirits to manipulate the wash, creating streaking effects in some places,cleaning off certain areas, and leaving the wash in the recesses in other areas.

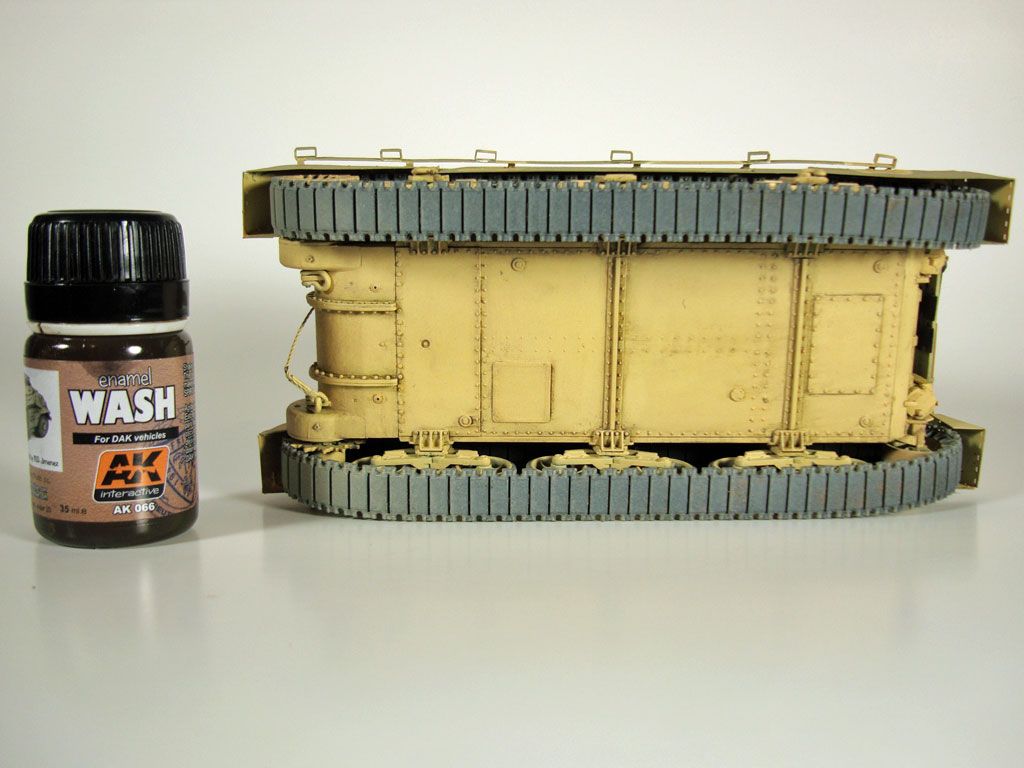
I followed this by trying pin washes.  I started using a number 2 round sable brush and I found that the wash did not flow as well as I had hoped it would.  However, I eventually used a number 0 brush, learned to load more of the wash onto my brush than I was used to, and regularly remix the wash in it’s bottle. That last part – regular remixing – is very important.  I found that if I let the wash sit for more than a few minutes, the material in the wash would separate and virtually disappear when applied to the model.

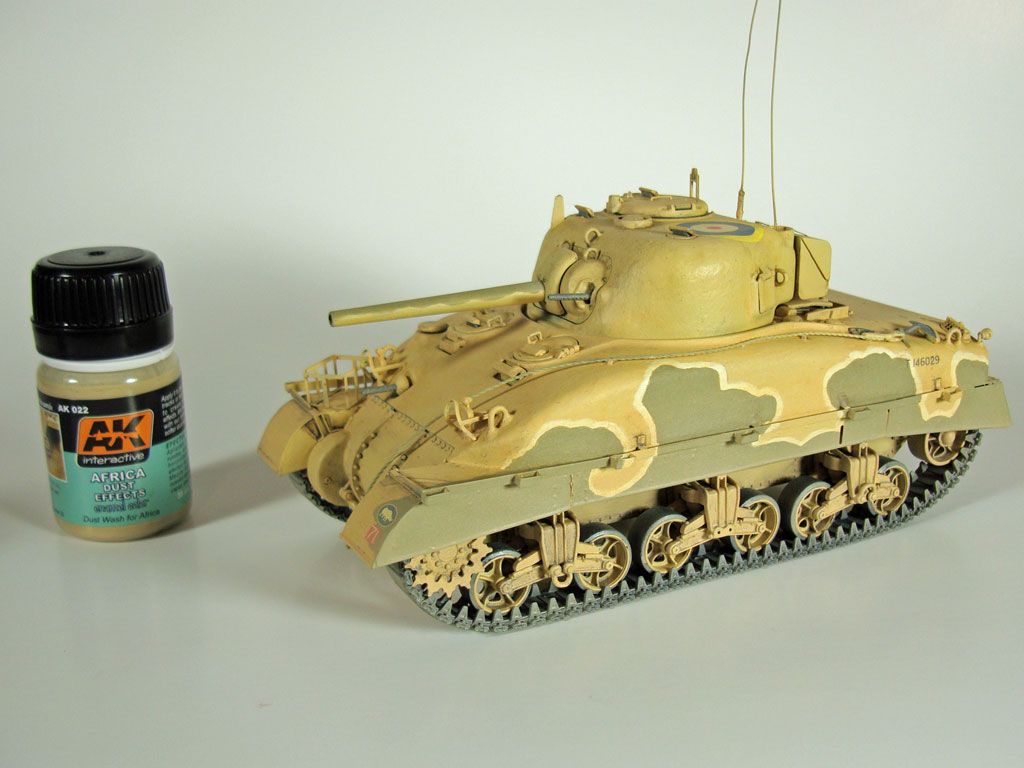
Once I was comfortable using the wash, I decided to apply it to the rest of the tank.  After letting the wash dry thoroughly, I applied two coats of Acrylicos Vallejo’s Matte Varnish to seal my work thus far and prepare for my last phase of weathering.  (Note that the picture above was taken after I applied dust effects as described in the next step.  Still, it highlights the wash.)

Dust Effects

Finally, I pulled out AK-022 Africa Dust Effects and applied a thin coat over the entire model with my airbrush.  I built up heavier layers of dust on the lower portions of the tank with successive, targeted coats of dust effects.

This product provided a wonderful finishing touch to the product and when I compare it my reference photo, I felt I captured just the right amount of North African dust.

And with the dust effects on, I think this build is done.  In my next post, I’ll provide a gallery that shows the completed build from several angles.  Look for it in the next day or two.

On the bench:  Tasca M4A1 Sherman (Direct Vision Type)

Build Log: www.ltsmashsmodels.com

  • Member since
    September 2003
  • From: AandF in the Badger State
Posted by checkmateking02 on Wednesday, November 28, 2012 3:00 PM

Exceptionally nice-looking tank.  Good work.


  • Member since
    July 2004
  • From: Sonora Desert
Posted by stikpusher on Wednesday, November 28, 2012 4:45 PM

Gorgeous work Lt. YesToastBow Down


F is for FIRE, That burns down the whole town!

U is for URANIUM... BOMBS!

N is for NO SURVIVORS...

       - Plankton

LSM


  • Member since
    April 2005
  • From: Australia
Posted by taxtp on Wednesday, November 28, 2012 5:13 PM

Really nice work on the Sherman Lt, and thank you for the informative description of the weathering process. I'm about to use AK Interactive products for the first time, and found it useful.

Cheers

Tony

I'm just taking it one GB at a time.

  • Member since
    August 2011
  • From: Variable
Posted by Lt. Smash on Friday, November 30, 2012 9:53 AM

Thanks for the kind words, guys. taxtp, I'm glad to hear that the description of the AK products was helpful.  I could have said a lot more but didn't want to get too long winded!  Here are a few pictures of the finished build.  My blog (ltsmashsmodels.wordpress.com) has several more pictures if you're interested:


On the bench:  Tasca M4A1 Sherman (Direct Vision Type)

Build Log: www.ltsmashsmodels.com

  • Member since
    April 2006
  • From: ON, Canada
Posted by jgeratic on Friday, November 30, 2012 10:59 AM

Lt. - great job on the Sherman.  It's quite a familiar camou scheme from that epic battle, but I don't think I see it all that too often in models - your's looks perfect.  Yes 

It seems the turret has a green hue when compared to the hull - is this a result  in the number of layers of the filter?

regards,

Jack

  • Member since
    August 2011
  • From: Variable
Posted by Lt. Smash on Friday, November 30, 2012 4:06 PM

Good eye, jgeratic1.  I can't blame the filter for the two-tone effect.  During the painting phase, I ran into a few problems which caused me to strip the upper hull.  While I thought I knew the exact ratio of paint used to mix my sandy-brown color (Light Stone 61), something got fouled up and one color ended up slightly different than the other.  This caused me to have a slightly different tone between the upper hull and the turret and lower hull (you can sort of see it in the bottom picture above if you look at the hull below/between the bogies).  I'm not sure if it is truly the tint or that the upper hull simply was applied more heavily than the lower and turret.  The filter and dust effects hide the mistake in normal room light but the bright daylight lights I use for photography seem to exaggerate the problem.  For me, the big lesson learned is when you need to repaint using a self-mixed color, strip and repaint the entire model, not just the offending part!

On the bench:  Tasca M4A1 Sherman (Direct Vision Type)

Build Log: www.ltsmashsmodels.com

  • Member since
    September 2003
  • From: AandF in the Badger State
Posted by checkmateking02 on Friday, November 30, 2012 7:29 PM

I think the paint variation lends the tank a charm of its own, Lt.  


  • Member since
    July 2007
  • From: Southern New Jersey
Posted by troublemaker66 on Saturday, December 1, 2012 12:35 PM

Lt. Smash

Thanks for the kind words, guys. taxtp, I'm glad to hear that the description of the AK products was helpful.  I could have said a lot more but didn't want to get too long winded!  Here are a few pictures of the finished build.  My blog (ltsmashsmodels.wordpress.com) has several more pictures if you're interested:


That roundal would make a heck of an aiming mark for a Stuka...hit the bull`s eye and win a prize....Stick out tongue  Really love the build...nice job.

Len

Len Pytlewski

  • Member since
    April 2006
  • From: ON, Canada
Posted by jgeratic on Monday, December 3, 2012 12:08 AM

Finally hunkered down and got a start on my entry here.  I'll do my best to make deadline but no promises.  This is Sword's 1/72 kit  of the tropical Spitfire Vc.

Being a short run injection type, there are no location pins/holes for joining the major parts.  To get the best possible fit at the wing roots, I've gone against the conventional rules and glued the upper wing halves to the fuselage sides first, with the one piece bottom wing to be added afterwards.

To help placement and strength, I took some tabs off the sprue trees and glued them to the wing edges. After glue had set, the rearmost tabs required some grinding from the dremel tool , test fitting showed they obstructed placement of the bottom wing section.

For it's scale, interior detail is quite adequate.  Though limitation in plastic creates thick pieces, like the control stick and seat assembly.  No pilot figure included, so I robbed one from a very old kit,  Frog brand Spitfire that I must of built sometime in the 70's.  Yes, the pilot needs repainting.

I prefer depicting my models in flight, so landing gear will be up.  This  is where I am most depointed so far with this kit.  The gear doors are too wide and sit atop the wing surface.  I procured an Eduard PE set intended for a Revell Spitfire.  It has the gear doors, but they too are slightly oversize, but at least they look flush with the surrounding surface.  Also added the screens for the starboard side.  On the plus side, the wheel wells were deep enough for tires to sit in properly.

From the kit's struts I fashioned the swivel section of the landing gear.  It is a tapered piece, with forward ends more larger in diameter.  The plastic here too had to be thinned for better scale placement of the arms.

regards,

Jack

  • Member since
    September 2003
  • From: AandF in the Badger State
Posted by checkmateking02 on Monday, December 3, 2012 5:19 PM

Good start, Jack.  I'll be following your build.


  • Member since
    April 2006
  • From: ON, Canada
Posted by jgeratic on Sunday, December 9, 2012 3:22 AM

Very close to closing up the main parts.  For now I've just glued the lower wing at the rear most end by the fuselage.  Will have to to do some clamping on the wings come glue time.  Just remembered too that some axles still need to be added to the wheels.

Also added a strip of  brass sheet (don't have much plastic sheet on hand) to the interior sides  where the exhausts will be .  This will come in handy later when fitting the exhausts, preventing them from falling into the fuselage.

regards,

Jack

  • Member since
    April 2006
  • From: ON, Canada
Posted by jgeratic on Friday, December 14, 2012 3:14 AM

Down to the last bits.  Haven't put the prob together yet,  but just the gunsight needs to be added before placing the canopy.  Likely will scratch build some of the visible pilot harness.  Exhausts will be put in after everything is painted.

The kit includes a full compliment of resin cannon, two for each wing plus a single plug for each side.  They have good detail and the ends are surprisingly cast hollow - a nice touch.  In my opinion they could have been a tad longer as the back ends hardly sit within the location holes in the wings.

I've also drilled out  the openings for the .303 guns, one for each wing.  Typical of Malta based Spitfires during the hey day before the siege was lifted, ammunition had to be conserved as much as possible.  So usually only two cannon were employed even though the Vc was delivered with all four.  The added weight in combination with the vokes air filter had quite a noticeable effect on  aircraft performance.

regards,

Jack

JOIN OUR COMMUNITY!

Our community is FREE to join. To participate you must either login or register for an account.

SEARCH FORUMS
FREE NEWSLETTER
By signing up you may also receive reader surveys and occasional special offers. We do not sell, rent or trade our email lists. View our Privacy Policy.