SEARCH FINESCALE.COM

Enter keywords or a search phrase below:

Flanker Frenzy 2012

74743 views
558 replies
1 rating 2 rating 3 rating 4 rating 5 rating
  • Member since
    February 2003
  • From: Rothesay, NB Canada
Posted by VanceCrozier on Monday, October 22, 2012 7:13 AM

Wow bsyamato, look at all the scratch work in there. I feel kind of embarrassed - all I did on my Flanker was spray a primer coat!! Sealed up & primed, top & bottom. Need to give it a quick buffing, then I should be able to start the camo colours this week.  Need to find some good colour mixes for Ukrainian Flankers.

Posted Image

Also note that I got rushing around & attached the afterburner cans already... probably should have waited until after major painting, but... Embarrassed

On the bench: Airfix 1/72 Wildcat; Airfix 1/72 Vampire T11; Airfix 1/72 Fouga Magister

  • Member since
    October 2008
  • From: italy
Posted by bsyamato on Thursday, October 25, 2012 5:59 AM

..But instead of me you're near to paint the giant Sad 

You'll glue vertical rudders after paint the fuselage?

  • Member since
    February 2003
  • From: Rothesay, NB Canada
Posted by VanceCrozier on Saturday, October 27, 2012 6:15 PM

Yes bsyamato, rudders will be painted seperately and attached afterwards. I've done my pale blue over the past two days, and painted the white nosecone and areas on the rudders + spine. Switching to my Morane this evening, but I plan on painted the gray areas of my Ukraine AF camouflage tomorrow.

On the bench: Airfix 1/72 Wildcat; Airfix 1/72 Vampire T11; Airfix 1/72 Fouga Magister

Dre
  • Member since
    June 2007
  • From: here, not over there
Posted by Dre on Sunday, October 28, 2012 12:47 PM

Vance, are you doing the splinter scheme?  

  • Member since
    October 2008
  • From: italy
Posted by bsyamato on Sunday, October 28, 2012 2:27 PM

It's a good solution Vance but i fear about the perfect junction of pieces after the paint .. waiting for your result Cool

So, my updates

Primed and added the original cloches refined and added three buttons on both
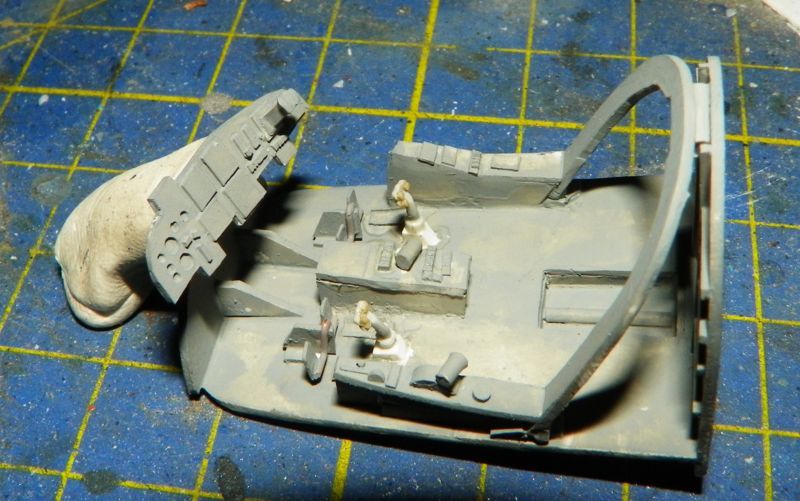
Macro picture are really usefull to find incorrections that is hard to see with eyes Embarrassed

now workin on the canopy to add inner structures, pictures to follow 

  • Member since
    October 2008
  • From: italy
Posted by bsyamato on Sunday, October 28, 2012 6:13 PM

Updates:

Draw ,sanded and added inner frames structures 

Dre
  • Member since
    June 2007
  • From: here, not over there
Posted by Dre on Monday, October 29, 2012 12:45 PM

That canopy framing looks fantastic, Bsyamato.   Outstanding work!  

  • Member since
    October 2008
  • From: italy
Posted by bsyamato on Monday, October 29, 2012 1:52 PM

Thanx Dre Toast

I just realized that the end of the GB is between two months.. i will try but not sure will finish the hunched sukhoi before the end Embarrassed

  • Member since
    February 2003
  • From: Rothesay, NB Canada
Posted by VanceCrozier on Monday, October 29, 2012 2:11 PM

Dre

Vance, are you doing the splinter scheme?  

YES!!! This is the machine I'm working towards, using an Authentic Decals sheet. It is described on the sheet as having green radome/antenna areas, but I've sen many pictures (as below) with those areas in white.

Brought my marking guide to the office & did the ol' scan & scale-up bit. I plan on using the same method as used on my Mirage F1, laying down a layer of masking tape on my working surface, laying the guide over top of that & cutting/labelling sections, then peeling them off to mask as I need them. There will be some adjustments to be made over curved surfaces of course, but it should work fine.

Overall pale blue (which never seems to photograph well) and main white areas taken care of. In good light, it is probably still a little pale, but is closer to the above image than it looks here. I probably should give them a clearcoat before I start adding layers of masking tape though.

Posted Image

Posted Image

On the bench: Airfix 1/72 Wildcat; Airfix 1/72 Vampire T11; Airfix 1/72 Fouga Magister

  • Member since
    February 2003
  • From: Rothesay, NB Canada
Posted by VanceCrozier on Monday, October 29, 2012 2:19 PM

bsyamato

It's a good solution Vance but i fear about the perfect junction of pieces after the paint .. waiting for your result Cool

So, my updates

Primed and added the original cloches refined and added three buttons on both

Macro picture are really usefull to find incorrections that is hard to see with eyes Embarrassed

now workin on the canopy to add inner structures, pictures to follow 

Oh I doubt it will be a perfect solution, but I think it will be easier to touch up the join areas afterwards, rather than try to mask the splinter pattern after the fins have been installed.  I think. Hmm Embarrassed

That cockpit work is beautuful! Bow Down

On the bench: Airfix 1/72 Wildcat; Airfix 1/72 Vampire T11; Airfix 1/72 Fouga Magister

Dre
  • Member since
    June 2007
  • From: here, not over there
Posted by Dre on Monday, October 29, 2012 3:33 PM

Don't worry about the end date as it is now extended until ??

Dre
  • Member since
    June 2007
  • From: here, not over there
Posted by Dre on Monday, October 29, 2012 3:39 PM

Vance, that's how I did the splinter camo on a Ju-87 some time back..  multiple layers of tape cut to order from a guide.   Don't use 3M Blue tape- it'll pull the paint right up.  I guess that you found the colors that you want to use?

Looking for Ukrainian Frogfoots the other day showed me that there's a lot of variation on the Flanker schemes now..  and the radome/antenna patches should be white as they're supposed to be later date builds.. but always check that reference pic.

  • Member since
    October 2008
  • From: italy
Posted by bsyamato on Tuesday, October 30, 2012 4:30 AM

You convinced me Vance.. effectiveli the correction areas il reaaly few, will glue only fuselage and wings and adding the vertical rudders before the glossy layer

  • Member since
    February 2003
  • From: Rothesay, NB Canada
Posted by VanceCrozier on Tuesday, October 30, 2012 8:06 AM

Dre - I usually use "Painters Mate green" tape that is available from a building supply store up here. I lay it out on my cutting mat to take some of the stickiness away & it's good to go. Still thinking about sealing up what I've got now with a coat of Future to make sure the paint doesn't pull up., but then I'd have areas that are more glossy than others wouldn't I?  I'm custom-mixing my colours to try & use up my store of Tamiya acrylics. Annd I've spotted all sorts of reference pics of my machine with the white panels rather than the green. Gotta love Google!!


Bsyamato - my dry-fit shows one rudder that drops in almost perfectly, one needs a little work on the tab, but not much. Again, I think a touchup will be easier than trying to mask after assembly.

I just wish I'd left the afterburner cans off until later!!! Bang Head

On the bench: Airfix 1/72 Wildcat; Airfix 1/72 Vampire T11; Airfix 1/72 Fouga Magister

Dre
  • Member since
    June 2007
  • From: here, not over there
Posted by Dre on Tuesday, October 30, 2012 11:33 AM

Vance, I don't know of a coat of Future will help prevent pull up or not...  I've gone back to enamels for the time being because they adhere better than acrylics, especially on camo jobs that require heavy masking.   I masked the entire fuselage of my MiG-21 with yellow Tamiya tape and had only a few places where it pulled up a tiny chip of paint.

Having some areas be glossier than others might make for an interesting effect- I was looking at a Ukrainian Frogfoot that had a dead-flat base color and glossy camo spots.   Ugly bugger, that one.

Dre
  • Member since
    June 2007
  • From: here, not over there
Posted by Dre on Thursday, November 1, 2012 12:32 PM

In shocking news, I spent about 6 hours working on my 1/32 Su-27UB C last night after nearly 6 months of inactivity.   Mostly it was grunt work- installing the already painted gear wells and sanding seams on the previously assembled main wing flaps and rear stabs.  I built up the main wings and both tail fins- each with 'working' flaps although I'm going to leave the leading edge flaps static.

I could have assembled the fuselage, but I might wait to attach the wings first- it looks like I can get a near-perfect join if I'm careful up top.

Also, since I stole the ejection seats from this for my Frogfoot, I need to cobble up some belts for the new resin seats from the Frogfoot.

  • Member since
    February 2003
  • From: Rothesay, NB Canada
Posted by VanceCrozier on Thursday, November 1, 2012 5:09 PM

It's.... ALIIIIIIIIIVE!!!!

Waiting until the weekend to resume work on my Flanker, I need some alone time to cut out & apply my masking patterns. If I do it right I may have time for both the grey and dark blue.

On the bench: Airfix 1/72 Wildcat; Airfix 1/72 Vampire T11; Airfix 1/72 Fouga Magister

  • Member since
    March 2004
  • From: Kincheloe Michigan
Posted by Mikeym_us on Thursday, November 1, 2012 9:39 PM

I'm suprised you didn't tackle the Zvezda SU-50 It is the Flanker Version of the US F/A-22 Raptor.

On the workbench: Dragon 1/350 scale Ticonderoga class USS BunkerHill 1/720 scale Italeri USS Harry S. Truman 1/72 scale Encore Yak-6

The 71st Tactical Fighter Squadron the only Squadron to get an Air to Air kill and an Air to Ground kill in the same week with only a F-15   http://photobucket.com/albums/v332/Mikeym_us/

Dre
  • Member since
    June 2007
  • From: here, not over there
Posted by Dre on Friday, November 2, 2012 3:13 PM

Vance- Oh yes, the zombies have risen and are taking over my bench...  and that's a good thing!

I'm thinking that the masking and painting is going to take the better part of two weeks if you allow adequate drying time in between each color....  got beer and a good, comfy chair?

  • Member since
    February 2003
  • From: Rothesay, NB Canada
Posted by VanceCrozier on Friday, November 2, 2012 5:52 PM

No beer needed, I'm running with the Tamiya acrylics on this one. Maybe 2 colours/1 weekend is too ambitious, but it's good to have goals! ;)

On the bench: Airfix 1/72 Wildcat; Airfix 1/72 Vampire T11; Airfix 1/72 Fouga Magister

Dre
  • Member since
    June 2007
  • From: here, not over there
Posted by Dre on Friday, November 2, 2012 8:07 PM

Goooooooaaaaaallllll!  (sorry, I was just shooting a high school football game..)

Beer should be a required element, at least to pad out the technical score.

  • Member since
    January 2010
  • From: Nebraska, USA
Posted by CallSignOWL on Saturday, November 3, 2012 3:45 PM

just got my mini-flanker and I must say it is toooo CUTE!!!

------------------------

Now that I'm here, where am I??

  • Member since
    October 2008
  • From: italy
Posted by bsyamato on Saturday, November 3, 2012 7:09 PM

CallSignOWL

just got my mini-flanker and I must say it is toooo CUTE!!!

A picture with the finished flanker is needed Stick out tongue

Nice work on the beasts Dre!! 

few updates on the 34.. i returned slow Dead

Added some roughness to the walls with cigarettes box inner paper 

Used one of xtracolor dedicate lanker colors for the cockpit ; the x603 blue gray, the picture have an unreal green tone , dunno why .. in reality no green tone is visible ,just a ligh blue grey

imperfection on the canopy will be removed before to close all Embarrassed

  • Member since
    January 2010
  • From: Nebraska, USA
Posted by CallSignOWL on Sunday, November 4, 2012 1:18 PM

bsyamato

CallSignOWL

just got my mini-flanker and I must say it is toooo CUTE!!!

A picture with the finished flanker is needed Stick out tongue

haha, Ill do that once I go home again. :)

------------------------

Now that I'm here, where am I??

Dre
  • Member since
    June 2007
  • From: here, not over there
Posted by Dre on Sunday, November 4, 2012 1:28 PM

Nothing like getting a new model in the mail.

  • Member since
    February 2003
  • From: Rothesay, NB Canada
Posted by VanceCrozier on Sunday, November 4, 2012 3:48 PM

Nice work bsyamato, I'm always amazed at what you are able to build at such small sizes. Well Dre, I was too ambitious with my weekend gggoooooaaaaaalllll! My wife was in charge of 2 separate fundraisers for her cheerleading team, leaving me to run around driving like a taxi every 2 hours, trying to squeeze meals & housework in between. Sad

Then.... awoke early this morning to a full-on migraine. Advil, extra sleep & a little shot of caffeine seems to have eventually shaken me free.  Late supper this evening will be followed by Flanker work unless something....UNEXPECTED! pops up. Most of my masking has been cut now, just need to mix my 2 final colours & start applying tape.

On the bench: Airfix 1/72 Wildcat; Airfix 1/72 Vampire T11; Airfix 1/72 Fouga Magister

  • Member since
    February 2003
  • From: Rothesay, NB Canada
Posted by VanceCrozier on Monday, November 5, 2012 7:01 AM

Alrighty, Saturday was exhausting & basically a washout. Sunday began with a migraine. Methinks I'll be making this coming long weekend extra long. I did get some tape work done...

This is the process. Marking guide scaled up to actual size. A bunch of tape set up on my cutting mat, guide taped down over top of the masking tape. Sharp Exacto knife cutting along the pattern, one section at a time, peel the paper away, park it with pen & trace the outline so I have a better idea of what's going where.
Posted Image

And Sunday night I marked my last spot & thought "DONE!"... then instantly remembered I haven't set up the tailfins yet!
Posted Image

Ahh well, getting there.

On the bench: Airfix 1/72 Wildcat; Airfix 1/72 Vampire T11; Airfix 1/72 Fouga Magister

Dre
  • Member since
    June 2007
  • From: here, not over there
Posted by Dre on Monday, November 5, 2012 11:12 AM

Vance, sorry to hear of such a weekend and to top it off with a migraine...  not fun.

Your masking plan looks clever- a paint-by-letters jigsaw puzzle.   Good luck keeping cat hair out of all that  tape Stick out tongue(ask me how I know).

Since this is Flanker Frenzy, may I present some eye candy too?

a family photo with Trumpeter 1/32 Su-27B, Italeri 1/72 Su-27B and Trumpeter 1/350 Su-27K

remember all those missiles I did months ago?   No?  This might help.....

In order to get this across the line, I've decided to go gear up.  I have a lot of gap filling and blending to do on the doors before happy paint times.

  • Member since
    February 2003
  • From: Rothesay, NB Canada
Posted by VanceCrozier on Monday, November 5, 2012 12:07 PM

Ahhh the migraines. Yep, I'm good for maybe 4-5 good ones per year. It sucks, but it is what it is.

I should be alright keeping cat hair out of the tape as it'll go right from cutting mat to model surface, and cats never jump on tables. Right???  

Hey, no 1/48 Flanker in that family photo!!!

And now that I'm actually looking at the pattern closely, I think, MAYBE, I'll be able to mask off the pale blue base colour with tape, then cover off the "2nd colours" with only post-its etc., I don't think there are many spots where colour #2 and #3 actually border each other. May not be tooo bad after all.

On the bench: Airfix 1/72 Wildcat; Airfix 1/72 Vampire T11; Airfix 1/72 Fouga Magister

  • Member since
    October 2008
  • From: italy
Posted by bsyamato on Monday, November 5, 2012 5:55 PM

Vance you triyng to put on the flanker the risiko scheme Big Smile insane masking work!

Dre ..so you missing only the 48 and 144 flankers?

JOIN OUR COMMUNITY!

Our community is FREE to join. To participate you must either login or register for an account.

SEARCH FORUMS
FREE NEWSLETTER
By signing up you may also receive reader surveys and occasional special offers. We do not sell, rent or trade our email lists. View our Privacy Policy.