SEARCH FINESCALE.COM

Enter keywords or a search phrase below:

MONOGRAM MAFIA II GB

102432 views
811 replies
1 rating 2 rating 3 rating 4 rating 5 rating
  • Member since
    July 2007
  • From: Southern New Jersey
Posted by troublemaker66 on Sunday, March 18, 2012 9:44 AM

CallSignOWL

If my camera was working, I'd be uploading pics of the blackbird. Bang Head

What`s your camera doing..or, not doing?  I have an older Kodak Easy Share that acts up on me once in awhile. Sometimes I have to yank the batteries and then put `em back in...like re-booting a computer...sometimes it needs a couple of moderate whacks against the table edge..lol.  They certainly don`t make things to last anymore.

Len Pytlewski

  • Member since
    January 2010
  • From: Nebraska, USA
Posted by CallSignOWL on Sunday, March 18, 2012 9:27 AM

If my camera was working, I'd be uploading pics of the blackbird. Bang Head

------------------------

Now that I'm here, where am I??

  • Member since
    December 2011
  • From: Alabama
Posted by Big_Dog on Sunday, March 18, 2012 12:30 AM

A few quick questions for the Don.

What thickness of plastic did you use for the IP facing?

About what sizes were the holes you drilled, and what method did you use to drill them?

I am in the process of scratching up a proper IP for the Hawk 81-A3 and am using similar methods. However the .010" styrene I am using is wanting to be a bit uncooperative. The majority of my gauges seem to be about right for a 5/64ths bit and even babying this with my battery drill is causing tears, so I am curious as to the approach you used. I may just have to step on up to redneck photo-etch and use an aluminum can.

  • Member since
    October 2010
Posted by ColGray on Thursday, March 15, 2012 11:40 PM

heres after the first and second coat of the base color MM metalizer alluminum

http://i1202.photobucket.com/albums/bb362/jacob_gray5/DSCF0467.jpg


http://i1202.photobucket.com/albums/bb362/jacob_gray5/DSCF0470.jpg


http://i1202.photobucket.com/albums/bb362/jacob_gray5/DSCF0468.jpg


http://i1202.photobucket.com/albums/bb362/jacob_gray5/DSCF0471.jpg


http://i1202.photobucket.com/albums/bb362/jacob_gray5/DSCF0473.jpg


http://i1202.photobucket.com/albums/bb362/jacob_gray5/DSCF0474.jpg


http://i1202.photobucket.com/albums/bb362/jacob_gray5/DSCF0475.jpg


http://i1202.photobucket.com/albums/bb362/jacob_gray5/DSCF0477.jpg


http://i1202.photobucket.com/albums/bb362/jacob_gray5/DSCF0478.jpg


http://i1202.photobucket.com/albums/bb362/jacob_gray5/DSCF0479.jpg


hope you liked it

http://i1202.photobucket.com/albums/bb362/jacob_gray5/DSCF0480.jpg


http://i712.photobucket.com/albums/ww122/randysmodels/NMF%20Group%20Build%20III/Group%20Badge/NMFIIIP-51Badge.jpg

  • Member since
    October 2010
Posted by ColGray on Tuesday, March 13, 2012 11:25 AM

i think its time for a big update. although i havent posted ive been very busy.. there are seams galore and i doubt ive ever sanded so much in my life, but i think I'm getting close to first coat of paint just one more sand session to clean up the scratches. I also had to rescribe all the panel lines for i could not stop sanding them down to nothing well anyways here it is

getting set up

just basic paint on the essentials

cockpit in place i dont know why i didnt take pictures of the finished cockpit

wing and forward fusalage ready

after a full day of sanding and using stretched sprue to fill in seams along the wing, not perfect but bearable for the time

after the rear fusalage and a new color you can see the lack of panel lines

after more sanding

and that brings me up to speed with panels rescribed and the thought of an actual paint coat being applied

hope you guys like it so far


http://i712.photobucket.com/albums/ww122/randysmodels/NMF%20Group%20Build%20III/Group%20Badge/NMFIIIP-51Badge.jpg

  • Member since
    June 2008
  • From: Iowa
Posted by Hans von Hammer on Monday, March 12, 2012 11:10 PM

Got a few more pics of the Kaydet.. At this Time, I haven't decided if it's going t remain an Army PT-17 Kaydet or become a Navy "Yellow Peril"..

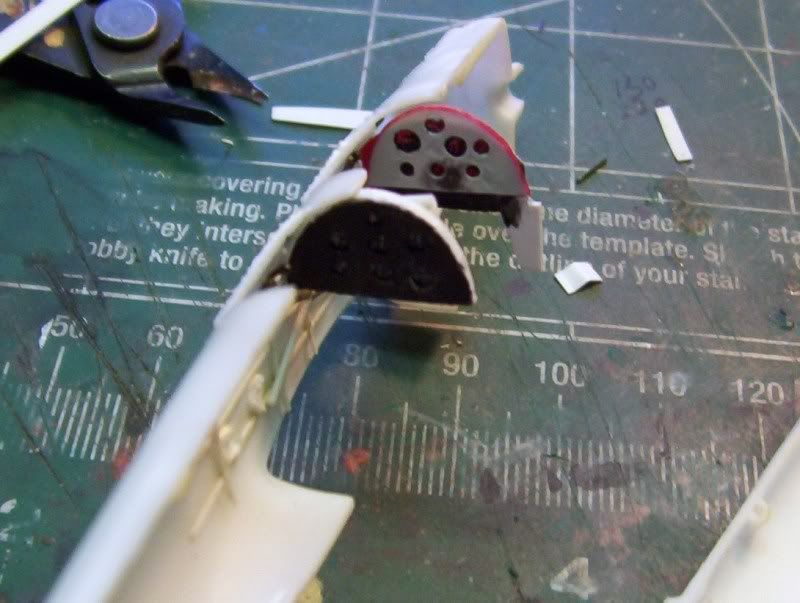
At any rate, here's the fuselage interior.  I added structural framing using round stock from Evergreen and some stretched sprue (ran outta Evergreen).  The throttle quadrants are strip and sprue, and the instrument panels are sheet styrene that was cut to shape (more or less.I used the Mark I Eyeball)..
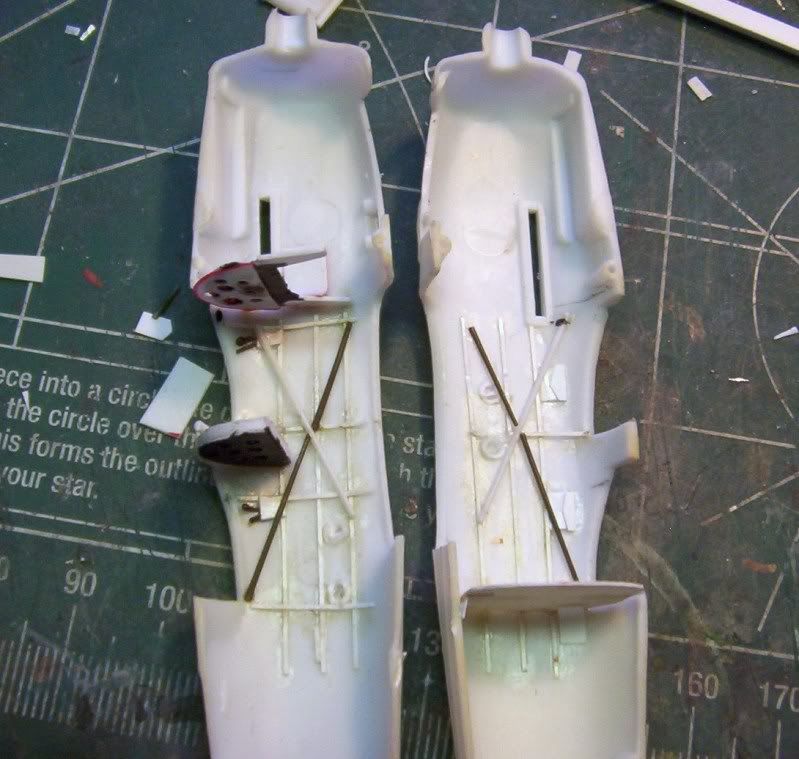
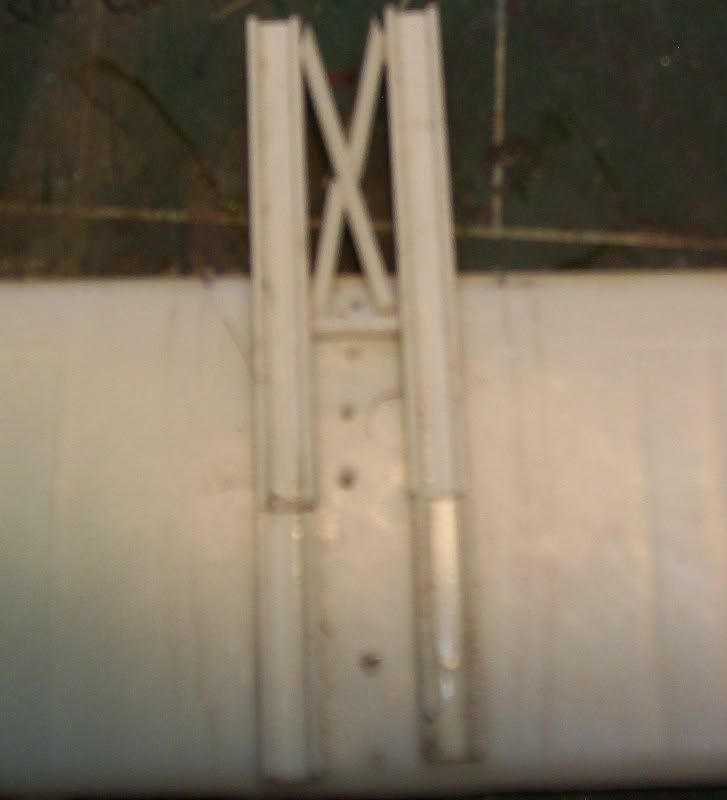
 I added foot-channels here, using Evergren channel and rod.  Rudder pedals were later added, made from strip styrene and rod, as are the control sticks, although they're made from stretched sprue.  The real ones were wood and had a handle like a baseball bat, so there was a baseball bat-shape to them.. I used a light tan sprue I had from a Dragon Panzer kit in order to skip painting them.
 A shot of the instrument panels, one painted, one not, to show where I drilled out the instruments.  The back of the panel sheet was painted black, then the drilled-out panel half glued in place.. I then used a pin in a pin-vise to scratch the gauge-markings. Since the plastic was white, the marks showed right up, although the photo doesn't show it well at all..
The seats are also done.  I used the kit seats, but I added sprue to each seat back along the side, and used strip to make a seat pan.. Pilots wore a seat-pack parachute, so the pan was required.. I finished them with flattened solder harnesses...

  • Member since
    January 2012
  • From: Barrie, Ontario
Posted by Cdn Colin on Monday, March 12, 2012 10:10 PM

I did a 1/72 Space Shuttle for a science project in grade 6.

I build 1/48 scale WW2 fighters.

Have fun.

  • Member since
    June 2008
  • From: Iowa
Posted by Hans von Hammer on Monday, March 12, 2012 9:48 PM

Yupper, a 1/4" red sable flat and a whole 1/4 oz. bottle of Testor's Silver, lol..  The paint was .29 cents a bottle in 1977, and the price was printed right on the cap.. The B-29 kit cost me about eight  bucks..

'Course, I couldn't afford airbrushes or that kinda stuff.. I was a Private in the US Army and takng home 463.60 bucks a month back then...  An airbrush, one that was wortha damn, wouda cost me almost two weeks pay...


  • Member since
    July 2007
  • From: Southern New Jersey
Posted by troublemaker66 on Monday, March 12, 2012 7:30 PM

Hans von Hammer

I brush-painted for 20 years... Got pretty good at it.. Even did two with a Testor's paint marker, used Gloss Black on the Monogram A-26 Invader and a P-38M..  (They turned out beautifully, to my surprise) The trick was to make long, slow passes with the paint going the same direction as the airflow would.. Then I hit the little, tight areas with a daubbing motion...  One coat was good..

Haven't tried painting an entire plane with another color of marker though.. I stopped while I was ahead, lol.. You ain't lived until you've brush-painted a 1/48 B-29 though...


Yikes!! Brush paintin` a `29??  I don`t even like airbrushing a B-29!!  I think the biggest model I brush painted was a p-61 and remember it being a job-and-a-half....

Len Pytlewski

  • Member since
    June 2008
  • From: Iowa
Posted by Hans von Hammer on Monday, March 12, 2012 3:24 PM

I brush-painted for 20 years... Got pretty good at it.. Even did two with a Testor's paint marker, used Gloss Black on the Monogram A-26 Invader and a P-38M..  (They turned out beautifully, to my surprise) The trick was to make long, slow passes with the paint going the same direction as the airflow would.. Then I hit the little, tight areas with a daubbing motion...  One coat was good..

Haven't tried painting an entire plane with another color of marker though.. I stopped while I was ahead, lol.. You ain't lived until you've brush-painted a 1/48 B-29 though...


  • Member since
    January 2012
  • From: Barrie, Ontario
Posted by Cdn Colin on Monday, March 12, 2012 10:11 AM

Yeah, I saw it.

This is my fourth build since returning, and I'm building my skills slowly.  The paint is actually hand brushed with a #1 Floquil brush; two thin coats.  This is pretty tedious, so I"m painting is sections. This does make it easier to touch up where needed, though. 

The dry fit looked pretty tight, anyways.  You're right about the radiators.  That's going to be interesting.  I'll post my results when I"m done.


I build 1/48 scale WW2 fighters.

Have fun.

  • Member since
    February 2010
  • From: New Jersey
Posted by 68GT on Sunday, March 11, 2012 6:19 PM

Been workings on the cockpits and building ordnance.

On Ed's bench, ???


  • Member since
    June 2008
  • From: Iowa
Posted by Hans von Hammer on Sunday, March 11, 2012 11:25 AM

Finally got the fuselage closed up on the PT-17, pics will be coming later tonight or in the morning.. Meanwhile, it's time to crack open the Monogram P-51B... Need to walk away from the Kaydet for a bit, and since it's closed up, the rest of it should be ready for paint in the next day or so.. Scratch-building the cockit was rather... Tedious..

  • Member since
    June 2008
  • From: Iowa
Posted by Hans von Hammer on Sunday, March 11, 2012 11:15 AM

Did you see what I wrote you regarding weights in the Aircraft Hooch?

P-38 is taking shape, but I'm a little concerned that you painted it before you added the booms... You're going to have to do some cutting, filling, and sanding in the front of the nacelle/wing joint on it... Also, there's going to be some work on the radiator intakes that'll ruin any paint in that area if it's applied too soon..

  • Member since
    January 2012
  • From: Barrie, Ontario
Posted by Cdn Colin on Saturday, March 10, 2012 7:24 PM

Main fuselage almost ready.

Superchargers.

How much weight I tried shoving into the nacelle before giving up and deciding on a diorama to glue the front wheel down.

Posting pictures has encouraged me to put more effort into what I'm doing on this one.


I build 1/48 scale WW2 fighters.

Have fun.

  • Member since
    June 2008
  • From: Iowa
Posted by Hans von Hammer on Wednesday, March 7, 2012 10:52 AM

... I do not want to let La Familia down.

No.. You don't..

And you didn't... Well done on the Do 335.. I always preferred the two-place version, dunno why though...  Never understood why tamiya never did add the parts to do the same thing with theirs..  Monogram had really outshown them in this respect..

  • Member since
    June 2008
  • From: Iowa
Posted by Hans von Hammer on Wednesday, March 7, 2012 10:42 AM

halfpint33

Is it ok tho scratchbuild parts and use tires/wheels from a newer non monogram kit ?If not that is fine as I have several other monogram kits I can use.

Sure it's ok to scratch-build, rob other kits, and kitbash.... That's Gizmology 101..

  • Member since
    June 2008
  • From: Iowa
Posted by Hans von Hammer on Wednesday, March 7, 2012 10:40 AM

AT6

Hans,

Count me in. I've chosen to enter with two Monogram P-39s. One is circa 1973 [Mattel era], the other is from 1983. This will be my first group build ever.

Kewl.... First Group Build too...

Looks like ya get made AND pop yer GB Cherry..

  • Member since
    June 2008
  • From: Iowa
Posted by Hans von Hammer on Wednesday, March 7, 2012 10:37 AM

WVP51guy

Mind if i join in? My entry would be a Monogram P-40 dated in 1964.

Good call on the kit... Yeah, C'mon in...

  • Member since
    June 2008
  • From: Iowa
Posted by Hans von Hammer on Wednesday, March 7, 2012 10:36 AM

The kit quick change housing is a work of art but needed a good axle to go with it. Does this count as gizmology ?? 

Betcher Azzz, it does! Way to go...

  • Member since
    November 2003
Posted by halfpint33 on Tuesday, March 6, 2012 9:50 PM

Got a question.My Desert Rat 4x4 van is a rebuilder.Some parts are missing including the tires and wheels.Is it ok tho scratchbuild parts and use tires/wheels from a newer non monogram kit ?If not that is fine as I have several other monogram kits I can use.

  • Member since
    November 2006
  • From: Coastal Maine
Posted by dupes on Tuesday, March 6, 2012 8:58 AM

Wow, builds galore! Lot of good looking stuff in here.

  • Member since
    January 2003
  • From: Hancock, Me USA
Posted by p38jl on Tuesday, March 6, 2012 8:38 AM

Looks good to me.. ! nice job .Yes

[Photobucket]

  • Member since
    December 2011
  • From: Alabama
Posted by Big_Dog on Monday, March 5, 2012 3:49 PM

As stated I drug the Dornier outside today in the sun for some better pics. These show some of the flaws,such as a touch over-sanded leading edge on parts of the wings, some of the access panels that did not fit to great and the framing I accidentally masked over on the pilots windscreen. So without further ado, the "walk around" pics.

Well hopefully it turned out acceptable, considering the limited stuff I used on this build. I do hope to do a bit better in the future as I do not want to let La Familia down.

AT6
  • Member since
    December 2005
  • From: Fresno
Posted by AT6 on Monday, March 5, 2012 2:31 PM

Hans,

Count me in. I've chosen to enter with two Monogram P-39s. One is circa 1973 [Mattel era], the other is from 1983. This will be my first group build ever.

  • Member since
    December 2011
  • From: Alabama
Posted by Big_Dog on Monday, March 5, 2012 2:19 AM

Greetings to the Don

May I humbly present to you for your pleasure the Do335 Night Fighter prototype done old school. Minus the paints which were Testors Square Bottles mixed to need the below pic has all the tools and what not I used on this build.

Some finished product pics, sorry for them being dark, but it is a Nachtjager after all.

I think over all I did a better job of assembly than I did way back when. The painting is another matter though. I did not thin the paint near enough and did leave some pretty nasty brush strokes here and there. I also had a reaction from my enamel gloss coat that I have no idea what is the cause of. To add insult to injury my somewhat semi-gloss looking dull coat I used has turned out to be lacquer based and that reacted with the gloss coat some. Which is weird because I have used it over that exact gloss coat, although that was over acrylics without a problem. I noticed today when I final coated it to seal the decals and kill the gloss that by the smell it is lacquer. Interestingly the Testors Lacquer Dull-Cote I used did not react with the enamel where I used it on the cockpit and the wheels. I have about enough of the light colored RLM 80 (called RLM 83 by paint companies) and RLM 81 to do one more model. I might pick up a Revellogram Bf109-G10 to use this up. The P-40 is definitely next since I have had that build in mind since about November of last year and am ready to get going on it.

I reckon I do need to also haul this thing outside in the daylight and shoot a pic so all its warts can be exposed.

  • Member since
    September 2008
  • From: World Champions! Not anymore..
Posted by swingr1121 on Sunday, March 4, 2012 5:40 PM

F-5 progress as promised.

This kit has fallen together so far.  Everything has progressed quickly.  Unfortunately I spent quite a bit of time fixing the warped upper fuselage half.  That was fun.  Anyway, pics as promised.


Cockpit/IP:

That's pretty much it for the pit there.  Like I said, I started going and forgot to take pics.  Then there's the fuse:

Some filling and sanding.  Nothing too bad.

Color:


That's where we're at right now.  Enjoy!


Mike

  • Member since
    September 2008
  • From: World Champions! Not anymore..
Posted by swingr1121 on Sunday, March 4, 2012 5:34 PM

Lookin good so far everyone!

As for me, after getting the OK from the boss to include my Arii P-47 I figure I'll show some pics.  Unfortunately life has gotten in the way and kept me from jumping on here, but I'll catch everyone up.

In the beginning:


Instructions:

No clue what they say!

Makin details:


Tamiya tape belts and other fiddly bits:


All closed up:


Getting there!


Lookin like a jug:


Glossy:


Shine on:


That's pretty much how she's sittin right now.  I'll update when there's more to show.  F-5 progress coming shortly.


Hey boss, feel better.


Mike

  • Member since
    January 2012
  • From: Barrie, Ontario
Posted by Cdn Colin on Sunday, March 4, 2012 12:41 PM

P-38 cockpit ready to go in.

P-61, technically, still 100% in box.  Whistling


I build 1/48 scale WW2 fighters.

Have fun.

  • Member since
    February 2012
  • From: Romney WV
Posted by WVP51guy on Sunday, March 4, 2012 9:00 AM

Mind if i join in? My entry would be a Monogram P-40 dated in 1964.

JOIN OUR COMMUNITY!

Our community is FREE to join. To participate you must either login or register for an account.

SEARCH FORUMS
FREE NEWSLETTER
By signing up you may also receive reader surveys and occasional special offers. We do not sell, rent or trade our email lists. View our Privacy Policy.