SEARCH FINESCALE.COM

Enter keywords or a search phrase below:

Fw 190 Butcher Bird 2013 (extended to June 2014) Group Build

564939 views
5865 replies
1 rating 2 rating 3 rating 4 rating 5 rating
  • Member since
    May 2013
  • From: Indiana, USA
Posted by Greg on Wednesday, November 13, 2013 7:15 PM

Hmm. I'd wondered about where to terminate the brake lines too. Thanks PJ, and thanks for asking the question, BD.

  • Member since
    November 2008
  • From: Central Florida
Posted by plasticjunkie on Wednesday, November 13, 2013 6:24 PM

Dog

Run the line along the front of the strut close to the wheel doors and curb them once you near the telescoping part. Bury that end at the bottom of the gear leg and the top line part into the well, you really can't see where it ends into the wing. For the belts I suggest using metal foil. When I scratch out belts I use foil from wine bottles that we use. The buckles I make from discarded thin electrical wire. Mustang did a fabulous job on those belts which are very easy to manipulate and pose.  

 GIFMaker.org_jy_Ayj_O


Too many models to build, not enough time in a lifetime!!

  • Member since
    September 2013
Posted by blackdog62 on Wednesday, November 13, 2013 5:23 PM

I know  the sky is the limit when it comes to detailing and the pics of the brake lines are great help but I cant seem to find where they tie into under the wing. or do we just run them to the top of the stut and call it good. just a thought.

plastickjunkie....nice work with the drill im going try that if the option is on mine.

  • Member since
    September 2013
Posted by blackdog62 on Wednesday, November 13, 2013 4:54 PM

ok thanks

  • Member since
    March 2010
  • From: MN
Posted by Nathan T on Wednesday, November 13, 2013 4:14 PM

You need rich formatting for quoting, smilies, and pics/vids.


  • Member since
    September 2013
Posted by blackdog62 on Wednesday, November 13, 2013 4:04 PM

wow I think I got my badge right. now for more than 1 pic. per post.  :)

can anybody tell me do I use rich formatting for all post  or can I use the reply tab for just chatting (no pics)

thanks in advance.

  • Member since
    September 2013
Posted by blackdog62 on Wednesday, November 13, 2013 3:57 PM

great job on the sbd. I think on my next build im going to try scratch building the harness. im thinking of trying milliput and wire.

  • Member since
    May 2013
  • From: Indiana, USA
Posted by Greg on Wednesday, November 13, 2013 11:21 AM

Hey Joe, great job customizing that 2 piece tub! Looks really good,  So does the gun and mount.

  • Member since
    November 2008
  • From: Central Florida
Posted by plasticjunkie on Tuesday, November 12, 2013 9:02 PM

Bunch of thanks guys for your nice comments.

Mustang

That is one cool looking SBD. I have the old Devastator and plan to do a lot of scratch building to both offices. Your 3 tone scheme and scratch belts look fanbloodytastic! Who needs stinking pe belts anyway! will you have a display base for it like a piece of a carrier deck? Great work on the twin mount. Yes


 GIFMaker.org_jy_Ayj_O


Too many models to build, not enough time in a lifetime!!

  • Member since
    March 2012
  • From: Corpus Christi, Tx
Posted by mustang1989 on Tuesday, November 12, 2013 8:12 PM

There is some great work going on in here thus far!

Blackdog:Good work on the machine gun barrels and the spacing for no gaps. I wished I'd thought of the spacer.

PJ:The attention to detail out of you is always astonishing!

Everybody: Will be rejoining in the build as a participant at the end of December due to my D-9 coinciding with another one that starts on Jan 1st. As far as what I'm doing right now? I'm putting the final touches on a Monogram SBD that I have been working on for the last couple of months. I'm kit bashing a Hasegawa SBD-4 kit to get all the interior detail stuff out of it. I started with the box Monogram stuff. This is it here:

Thats right , TWO parts to the cockpit tub!!!
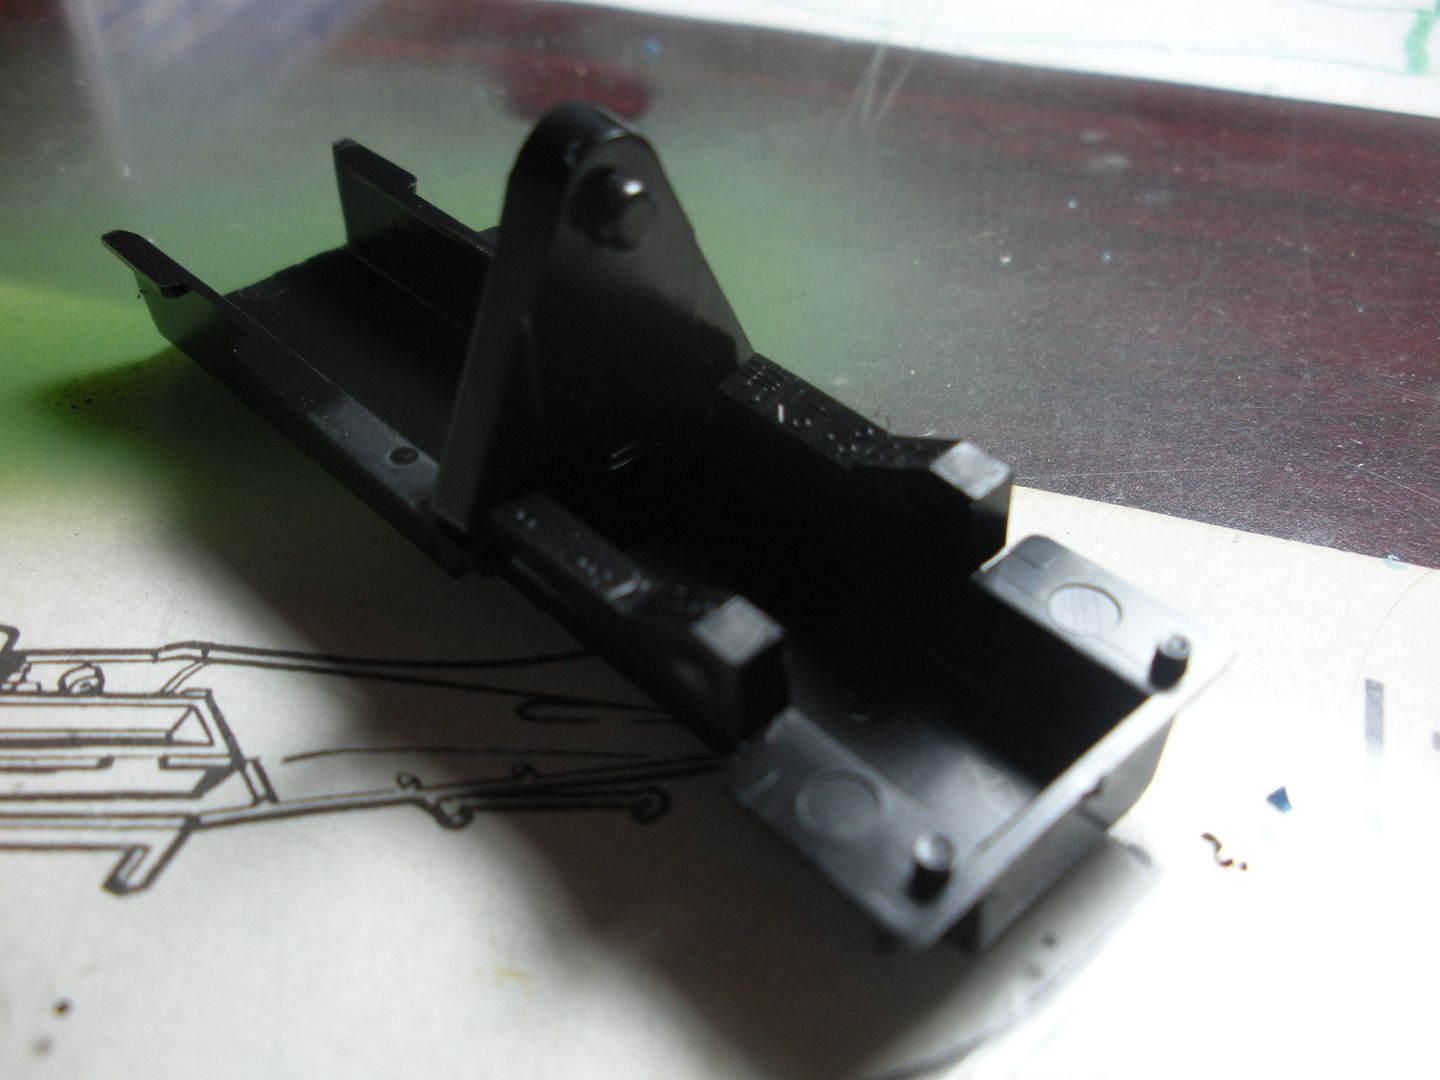
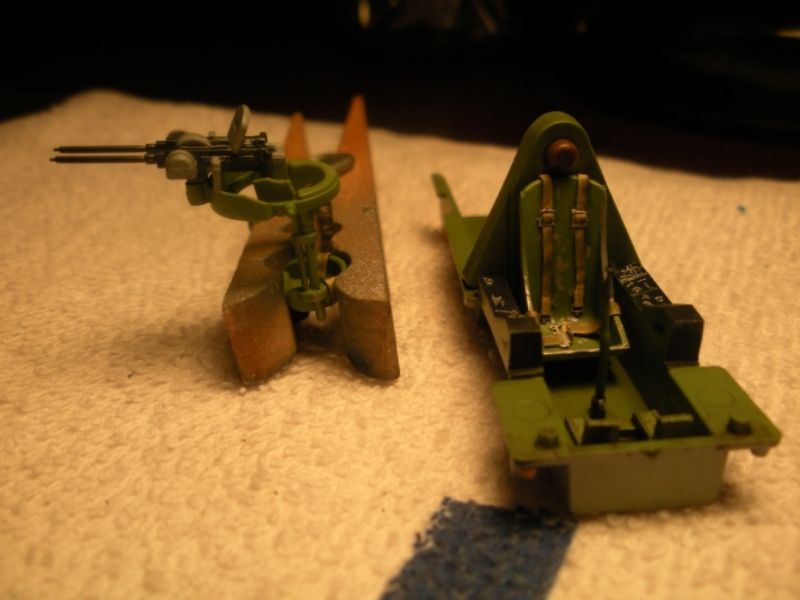
Moving along to the upgrades: The pilots seat, pilots control stick, rudder pedal slides and pedals for the front and the gunners turret and twin .30's for the back. I had to shorten the turret struts so the seat wouldn't rest on the tub floor. All seat belts were made out of lead foil with individual buckles and latches.
and this is where it is right now to move things along: Paint is applied, gloss is on , MOST  of the decals are applied and waiting on squadron letters, numbers decals from Hannants. Everything is done pretty much except for that. Here's before decals:
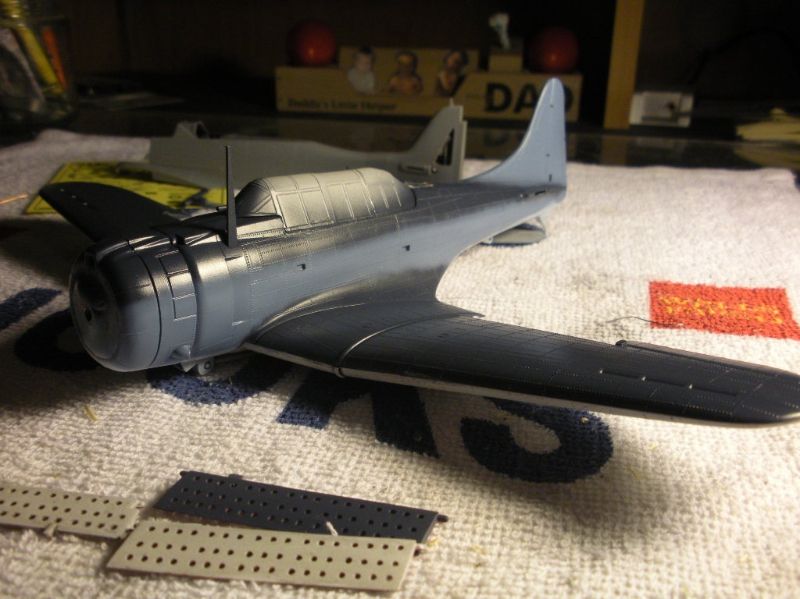
and where its at now:
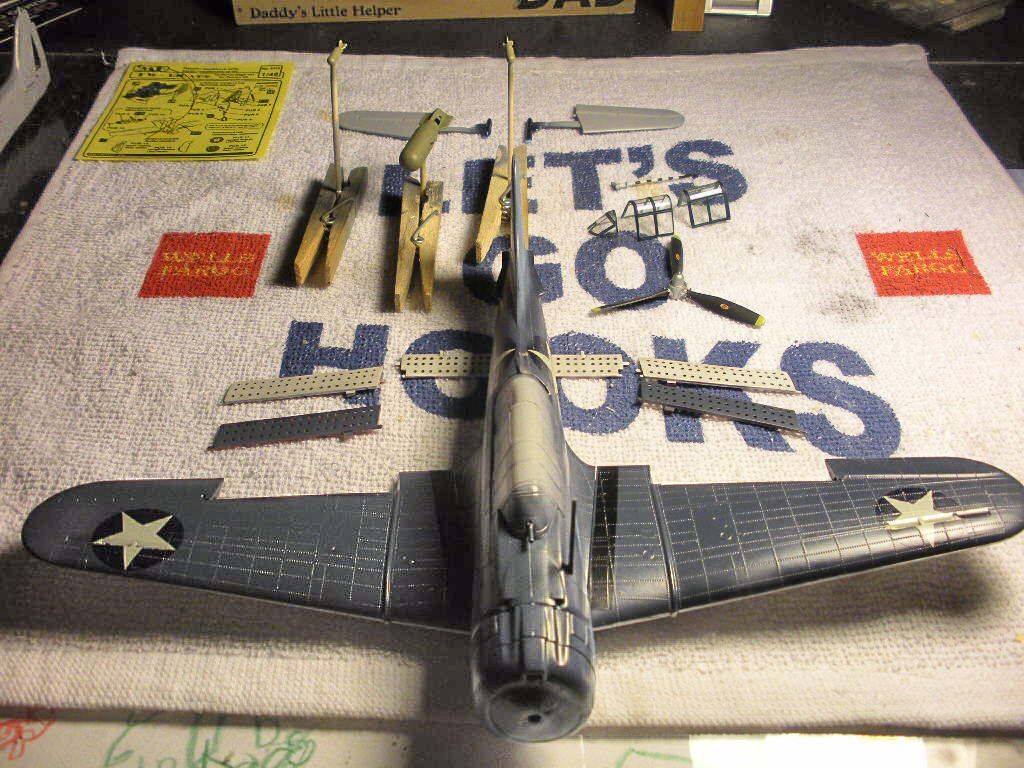
I know this is a 190 GB but wanted to show you guys what I've been up to and why I haven't been continuing with the 190 these days.


 Forum | Modelers Social Club Forum (proboards.com) 

  • Member since
    September 2013
Posted by blackdog62 on Tuesday, November 12, 2013 6:11 PM

bish... thanks I just need more build time.

Nathan....thank you. im using photo bucket and I can only get 1 pic. at a time posted. greg sent me some info on it awhile back. this cut/past is all new to me. ill keep trying pluss the way im doing it takes fooooorever.

pj...thanks for info and pics. I often wonder about mismatched parts in some of my 109 books it shows wings with completely different   paint  from the other wing.

  • Member since
    December 2002
  • From: Bury St Edmunds, Suffolk, England
Posted by Bish on Tuesday, November 12, 2013 12:50 PM

Nice work there Blackdog.

And some nice detail additions there PJ. And a nice bit of info on the tires. I wouldn't be surprised if this wasn't uncommon. If one tire goes and the ones you have in stock are not the same as what's fitted, then I don't think your going to worry if they don't match.

I am a Norfolk man and i glory in being so


On the bench: Airfix 1/72nd Harrier GR.3/Fujimi 1/72nd Ju 87D-3

  • Member since
    May 2013
  • From: Indiana, USA
Posted by Greg on Tuesday, November 12, 2013 12:41 PM

Blackdog, looking good. I can't imagine what happened to that front pane on your windscreen. What floor wax are you using? If Future, which one? A week should be more than enough dry time before masking.

Thanks for showing your bracing work. I haven't run into this yet and these will be helpful to help me learn how to do it.

PJ, shaping up nicely. As usual, very much like your gear and gear door work.

Both of you guys, nerves of steel to drill those tiny holes. Yes

  • Member since
    November 2008
  • From: Central Florida
Posted by plasticjunkie on Tuesday, November 12, 2013 12:29 PM

Nathan

I couldn't remember where I read it but finally found it in a very nice build article on Hyperscale citing the port tire as smooth and starboard as ribbed. The builder was using Crandall's info :

hsfeatures.com/.../fw190d1332ir_1.htm

On another article I read where this aircraft was possibly assembled under slave labor conditions. If only yellow 10 could talk!

 GIFMaker.org_jy_Ayj_O


Too many models to build, not enough time in a lifetime!!

  • Member since
    March 2010
  • From: MN
Posted by Nathan T on Tuesday, November 12, 2013 11:16 AM

Interesting fact about the tires on your bird, PJ.


  • Member since
    November 2008
  • From: Central Florida
Posted by plasticjunkie on Tuesday, November 12, 2013 9:23 AM

Thanks for the nice compliments guys!

Blackdog

Nice touch drilling out the guns. It's little details like this that make a big difference. The Badger AB I used for the mottling is a Renegade with an x-tra fine tip. I can get hair thin lines with it. Great piece of equipment and affordable.

And speaking of drilling, I drilled out the lightening holes on both gear scissors with a  .020 drill bit

Painted the telescoping part Alclad aluminum, added the doors and brake lines made from discarded electrical wire.


The real yellow 10 has a smooth and a ribbed tire so I mismatched them as the prototype. The rims were painted Testors flat black and polished with a cotton rag and a tiny bit of silver Rubb'n Buff to accentuate the rim details. The tires were painted Testors rubber color enamel.


 GIFMaker.org_jy_Ayj_O


Too many models to build, not enough time in a lifetime!!

  • Member since
    March 2010
  • From: MN
Posted by Nathan T on Tuesday, November 12, 2013 12:07 AM

Nicework blackdog. Your squadron book will work fine. Same gear legs and doors as the dora basically. Next time, try putting your pics all in one post. Everything should fit fine, unless you have like 10 or more pics...


  • Member since
    September 2013
Posted by blackdog62 on Monday, November 11, 2013 9:03 PM

o its for a 190d and I can pose my flaps not sure how they look. so ill be hitting the net for pics. I just pickd up my first reference book for the fw-190 in action by squadron but it dosent cover the 190d or the ta 152

  • Member since
    September 2013
Posted by blackdog62 on Monday, November 11, 2013 8:57 PM

so my next step is going to be my landing gear im going to try my first brake lines. so if anybody has some close ups that would help. I would be most grateful.

  • Member since
    September 2013
Posted by blackdog62 on Monday, November 11, 2013 8:46 PM

  • Member since
    September 2013
Posted by blackdog62 on Monday, November 11, 2013 8:41 PM

  • Member since
    May 2013
  • From: Indiana, USA
Posted by Greg on Monday, November 11, 2013 1:57 PM

Clemens, that cockpit is coming along nicely. Really like your scratched throttle assy, and those rudder pedals are really something. As somebody mentioned a few pages back, shame they will be all but invisible. :(

Joe, thanks for the pics and for sharing your thoughts. I'm sure all your cussing will pay off and it will be just fine. I appreciate the heads-up on the Eduard. Ready or not, I'll be trying to tackle one in the near future. :)

PJ, that's looking great. Your camo/paint job looked great to begin with, the decals make it look even better!

  • Member since
    September 2013
Posted by blackdog62 on Monday, November 11, 2013 3:17 AM

Well I finally got some bench time in. To much work to get to. Everbody wants  jobs done before winter hits. Ill post pics in the next day or so.

Lawdog

I have a. Few Edward 190 kits not sure if I'm ready for somthing like that yet. That's wy I picked the hobby boss. Looks like yours is turning out fine.

Plasticjunkie

your kit looks really nice. I really like that soft mottling on the paint. Wich airbrush are you using?

  • Member since
    February 2012
  • From: Olmsted Township, Ohio
Posted by lawdog114 on Monday, November 11, 2013 3:12 AM

Nathan T

Soo this means Mustang can put you down for another 190?...Hasegawa? Looks good btw

Thanks guys.  You are waaaaaaaaay too kind.  May I direct thee to the port side cannon cover.  El crapo fit.....it looks like someone forgot to shut it!  Yes Nathan, I have butcher bird fever once again and need to drag out my Hasegawa A-4 in the stash as a therapy build.  I intend to start it next if Mustang will have me once again...... 

And PJ...that Dora looks absolutely fantastic....

Joe

 "Can you fly this plane and land it?...Surely you can't be serious....I am serious, and don't call me Shirley"


  • Member since
    March 2012
  • From: Corpus Christi, Tx
Posted by mustang1989 on Sunday, November 10, 2013 8:18 PM

Nathan T

Soo this means Mustang can put you down for another 190?...Hasegawa? Looks good btw

Yeah!! What he said!! Big Smile


 Forum | Modelers Social Club Forum (proboards.com) 

  • Member since
    March 2010
  • From: MN
Posted by Nathan T on Sunday, November 10, 2013 7:48 PM

Thanks for the compliments PJ. Love the look of yellow 10. I hear you on those dumb landing gear. If you put them in place like Eduard intended, they are not as far forward as the should be, and look tippy toed. Sounds like you got them right, though.

Clemens, can't you just tell everyone that you got 10 stinkin Eduard 190s to build up and you need some free time!!??


  • Member since
    November 2008
  • From: Central Florida
Posted by plasticjunkie on Sunday, November 10, 2013 7:39 PM

Nathan

I completely missed your painting post. Don't know how that happened but your camo came out very good. Great job on the mottling and feathering. Beer

.

Lawdog

You took care of all the issues and it looks like a great recovery. Would have never known about the problems if not mentioned. Toast

Schattenspartan

Great progress on the office details. Yes

The wife entered a craft venture and enlisted my help  Geeked so we have been quite busy this weekend with her project which is a gift for our daughter who's away studying at USC.

Not much progress to post but I was up to 2am last night trying to glue the darn landing gear in the correct angle. I wish Eduard would have made it easier by being able to plug in the struts into a mount with the pre set angle which would have been a lot stronger and simpler attachment method. Thank God for Plast I Weld and the Touch n Flow applicator which made things a bit less complicated. I applied the included Eduard decals a couple of days back, they went on without any problems. I don't believe yellow 10 had the dotted line markings on the top wings but they looked cool so I added them anyway. I may shoot some clear flat tomorrow to kill the Future shine and tone things down a bit. 

I also made my own black oil wash and applied it with a 18/0 brush to all the panel lines. The gear wells also got a wash to pop out the frame work detail as well as the underside of the hood.  I suspect this aircraft was flown only a few times and was relatively clean so I kept the washes on the very light side.

I used black artists oil paint to simulate the underside stains


 GIFMaker.org_jy_Ayj_O


Too many models to build, not enough time in a lifetime!!

  • Member since
    April 2013
Posted by SchattenSpartan on Sunday, November 10, 2013 3:26 PM

Sorry for the lack of updates on my side. I wanted to get all the cockpits done and paint the last details, but that annoying thing called "life" kept interruptin and I actually got only 1 hour at the bench the entire week...

The only thing I managed to to is tinker around with the D-13 cockpit a bit more:

I added a throttle lever I scratchbuilt out of plastic sheet cut to shape and a piece of brass rod. Nothing special, but my scratchbuilding skills are not good enough to tackle anything more complicated atm. The Eduard PE set for the D-13 include everything except that lever and i think it just has to be there considering it's size and importance on the real aircraft. You ain't goin' nowhere without a throttle lever Wink

In case you wonder why it's not glued onto the "rail" the real thing is mounted to: That's because the lid of the PE sidewall detail covers that rail, so I had to attach it further away from the side wall...

I added such simplified levers to every 190 that didn't have one (the Hasegawa A-5 and both of the Eduard weekend kits).

I hope I get some bench time next week, but it's looking bad. Lots of stuff going on atm...

JOIN OUR COMMUNITY!

Our community is FREE to join. To participate you must either login or register for an account.

SEARCH FORUMS
FREE NEWSLETTER
By signing up you may also receive reader surveys and occasional special offers. We do not sell, rent or trade our email lists. View our Privacy Policy.