SEARCH FINESCALE.COM

Enter keywords or a search phrase below:

Gift GB

73678 views
605 replies
1 rating 2 rating 3 rating 4 rating 5 rating
  • Member since
    December 2002
  • From: Bury St Edmunds, Suffolk, England
Posted by Bish on Wednesday, April 10, 2013 2:11 PM

Greg, all in all its not to bad. It needed a little bit of filler on the top of the lower wing join. The fuselage comes in 4 pieces, top, bottom and tow sides. Getting the top and bottom on needed a bit of sanding on the frame work running along the sides. With a little bit of extra detailing it can be a great kit. I am useing a review on Military Modelling as a guide. He added some cockpit details such as rudder pedals, and he also sanded down the wing ribs which he says are to prominate. But i guess it depends o how accurate you want to be.

From what i can gather, it was first released in 1986 and apart from the box has not been changed.

I am a Norfolk man and i glory in being so


On the bench: Airfix 1/72nd Harrier GR.3/Fujimi 1/72nd Ju 87D-3

  • Member since
    September 2003
  • From: AandF in the Badger State
Posted by checkmateking02 on Wednesday, April 10, 2013 8:30 PM

How did you handle all those struts, Bish?  Did you work up some kind of jig to hold things in place?


  • Member since
    December 2002
  • From: Bury St Edmunds, Suffolk, England
Posted by Bish on Thursday, April 11, 2013 12:37 AM

No, i glued the bottoms in, trying to make sure they were as straight as possable. Then when i put the top wings on i turned it upside down and just had to tease them into place. I was expecting it to be a bit of a nightmare, but it wasn't to bad.

I am a Norfolk man and i glory in being so


On the bench: Airfix 1/72nd Harrier GR.3/Fujimi 1/72nd Ju 87D-3

  • Member since
    September 2003
  • From: AandF in the Badger State
Posted by checkmateking02 on Thursday, April 11, 2013 1:06 PM

Thanks, Bish.  I've only done one biplane recently, but it seems using a jig of some sort is the current conventional wisdom.  


  • Member since
    December 2002
  • From: Bury St Edmunds, Suffolk, England
Posted by Bish on Thursday, April 11, 2013 1:40 PM

I just thought i would wing it (excuse the pun) and it seemed to work. Maybe if i was doing a 32nd kit i might try a jig.

I am a Norfolk man and i glory in being so


On the bench: Airfix 1/72nd Harrier GR.3/Fujimi 1/72nd Ju 87D-3

  • Member since
    September 2003
  • From: AandF in the Badger State
Posted by checkmateking02 on Thursday, April 11, 2013 9:46 PM

I haven't tried the jig method.  I suppose I was too lazy to attempt building one, but now I've got to build a Pfalz for the Hollywood GB, so I'm considering methods and techniques.  

What did you use for glue?  I'm thinking that superglue sets up too fast to give enough time to adjust the struts and wing.


  • Member since
    December 2012
Posted by Z Square 8 on Friday, April 12, 2013 7:45 AM

29 build is done...will try to get pics later this afternoon and posted up...the GB has been great!

Took Bish advice on Tamiya weathering pastels...used Soot and Rust

--Rich

Site builder of CooksonTributeB29.com 


  • Member since
    December 2002
  • From: Bury St Edmunds, Suffolk, England
Posted by Bish on Saturday, April 13, 2013 12:38 AM

Check, i just used my normal plastic weld. The tabs that went into the wing are not that thick, but they were a snug fit. I guess there was just enough flex to bend the struts into the right place.

Z, so looking forward to seeing that. How did the Tamiya work out.

I am a Norfolk man and i glory in being so


On the bench: Airfix 1/72nd Harrier GR.3/Fujimi 1/72nd Ju 87D-3

  • Member since
    December 2012
Posted by Z Square 8 on Saturday, April 13, 2013 9:14 PM

Bish

Z,  How did the Tamiya work out.

Bish- worked great! More prominent on dull surfaces and less on the higher shine areas. Very satisfied! Thank you!!
29 Build:  calling her *FINISHED* ...bear with me on the number of pics...but she is big!

**Customization from OOB- Added custom made nose art; added mission credit bombs of 7 since "Mission to Albuquerque" was lost on Mission #8 over Kobe, Japan on 17 March 1945. No Credit was issued for this last mission; added black band on tail to indicate "lead ship" of the formation; added S/N 4849 to rudder.
**Paint: (3)  Alclad- Airframe Aluminum, Dull Aluminum, Magnesium; Testors- Steel Plate Buffing Metalizer (rattle can); Tamiya pastels of Rust (on engine exhaust pipes) and Soot (for the exhaust realism).

Here we go...


Beer...Beer...GULP GULP...AHHHH!

A special thank you to to BISH for doing a fantastic job hosting the Gift GB. This was my first GB and I really enjoyed it. Additionally, I would like to thank the many accomplished builders on this GB and the FSM site for sharing their knowledge/experience. Without it, my Z Square 8 rendition would not have turned out ANYWHERE near as well as she did...Thank you guys!

Thanks for looking!

--Rich

Site builder of CooksonTributeB29.com 


  • Member since
    May 2005
Posted by pyrman64 on Sunday, April 14, 2013 12:11 AM

Rich: nice job, she's a beauty!


GMC Pickup update: Seems Testors has discontinued the "Primer Grey" color in their "Custom lacquer system" line - now the GMC and the Blazer are on hold until I find suitable replecements. Sad  First they killed the fabric red and fabric black, now primer grey - how the heck am I supposed to finish a model?!

Greg H

"There is many a boy here today who looks on war as all glory, but, boys, it is all hell." Gen. Wm T. Sherman (11 April 1880, Columbus, Ohio)

  • Member since
    September 2003
  • From: AandF in the Badger State
Posted by checkmateking02 on Sunday, April 14, 2013 12:36 PM

Rich, that is an outstanding B-29.  You've really done justice to the NMF!  It's truly a model you can be proud of!  Excellent work!


  • Member since
    December 2002
  • From: Bury St Edmunds, Suffolk, England
Posted by Bish on Sunday, April 14, 2013 12:41 PM

Rich, what can i say. That is a real stunner. Really impressed with your decals and the NMF is first class. Front page has been update. And thank you very much for bringing this great build to the GB.

Greg, bummer. Are they slowly killing off the range completely.

I am a Norfolk man and i glory in being so


On the bench: Airfix 1/72nd Harrier GR.3/Fujimi 1/72nd Ju 87D-3

  • Member since
    April 2011
  • From: Silver Spring, MD
Posted by badlanguage on Sunday, April 14, 2013 5:33 PM

Z, the 29 looks fantastic. You did a great job with the NMF and the detailing is really nice! Nice touch building it with the bomb doors open!

More work on the Gundam.

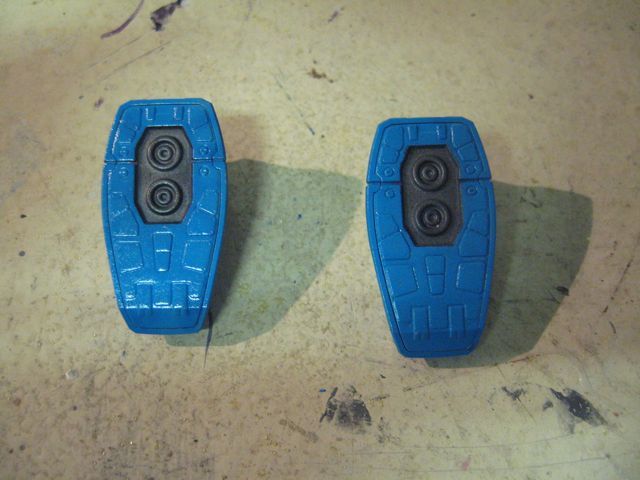
Painted the thrusters on the bottoms of the feet:

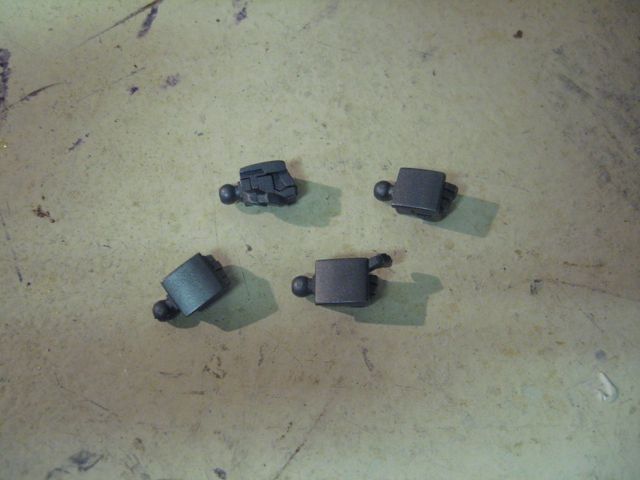
Painted hands. There are hands for every purpose!

And now for one of the more hysterical, '70ish giant robot ideas: The Gundam Hammer!

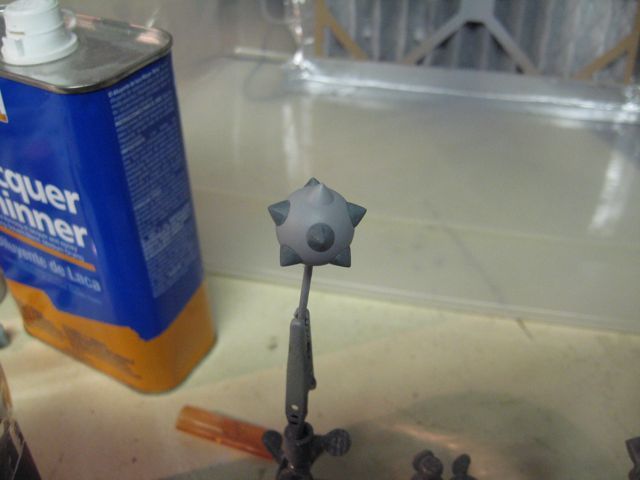
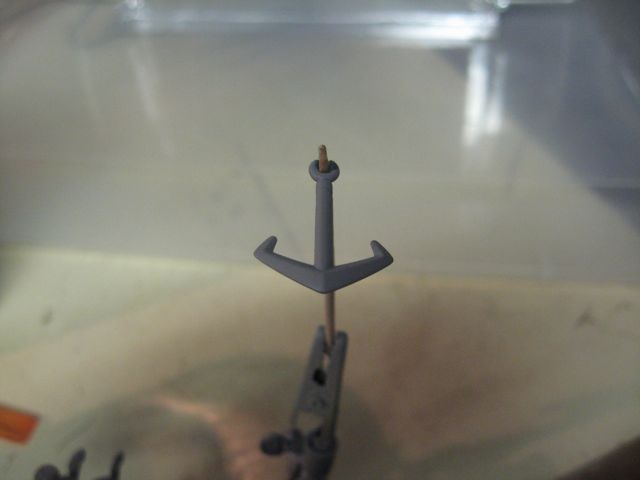
Because even if you have access to a beam saber, beam rifle, and a hyper bazooka you may still choose to bash something with a big mace-like object! The kit came with a metal chain to link the ball and the hook together, which is kind of cool. I dipped the chain in thinned metalizer, and I'm hoping the paint won't chip off too badly.

And here's my decal sheet:

I tried a lighter grey and darker grey decal out to see how the color looked. The light grey one pretty much disappears.

I learned a LOT about making decals doing this. First, let your ink dry after printing before spraying with the decal bonder, or your ink will bleed. Second, I wanted to make white decals - can't do it without a special printer. Inkjets don't print white. Makes sense, but I didn't think about it beforehand. I'm happy with the color of the dark grey, though.

  • Member since
    September 2003
  • From: AandF in the Badger State
Posted by checkmateking02 on Sunday, April 14, 2013 10:04 PM

Good results on the decals.  And those weapons are mean looking!


  • Member since
    December 2012
Posted by Z Square 8 on Sunday, April 14, 2013 10:09 PM

I am pleased with results, after several failures...from "earthy" tires originally to wing paint issues and let's not forget the "polka dot" engine fiasco...lol

the gundham is looking great...I wouldn't want to be on the receiving end of that ball and chain!

--Rich

Site builder of CooksonTributeB29.com 


  • Member since
    April 2006
  • From: Denver, Colorado
Posted by waynec on Monday, April 15, 2013 9:50 PM

rich the B-29 is stunning. i REALLY like the 3 pics on the mirror with the black background. looks like a predawn prep with external lighting on the flight line.

Никто не Забыт    (No one is Forgotten)
Ничто не Забыто  (Nothing is Forgotten)


  • Member since
    April 2006
  • From: Denver, Colorado
Posted by waynec on Monday, April 15, 2013 9:54 PM

hey bish

i'd like to join. WTH what's another GB anyway. i have a big boat and a big locomotive and the new airbrush is doing great. just finished an M-1078 4x4 truck.

sic semper ducks

Никто не Забыт    (No one is Forgotten)
Ничто не Забыто  (Nothing is Forgotten)


  • Member since
    September 2003
  • From: Australia
Posted by Helo H-34 on Tuesday, April 16, 2013 12:01 AM

Rich , your B-29 turned out amazingly . I really like the metal finish and 10 out of 10 from me for your perseverance with the build and overcoming all those little hiccups along the way ...Toast

John .

  • Member since
    December 2002
  • From: Bury St Edmunds, Suffolk, England
Posted by Bish on Tuesday, April 16, 2013 12:33 AM

wayne, glad to have you on board. Send me the details and i will add you to the roster.

I am a Norfolk man and i glory in being so


On the bench: Airfix 1/72nd Harrier GR.3/Fujimi 1/72nd Ju 87D-3

  • Member since
    December 2012
Posted by Z Square 8 on Friday, April 19, 2013 9:00 AM

Wow...thanks for the kind words all.

Here is a close up of the custom nose art and tail I failed to include...

Complete set of build: https://picasaweb.google.com/desilucysplace/FSMWIP?authuser=0&authkey=Gv1sRgCKGLkvHknc7pxwE&feat=directlink

--Rich

Site builder of CooksonTributeB29.com 


  • Member since
    September 2003
  • From: AandF in the Badger State
Posted by checkmateking02 on Friday, April 19, 2013 9:11 AM

Excellent work, Rich.  The decals and the workmanship are superb.


  • Member since
    April 2010
Posted by Theuns on Monday, April 22, 2013 5:06 AM

Hi lads, I managed to westle the fuselarge of the 1/32 Hasagawa F-6f together with the cockpit tub.

Only after removing from the plastic did I see it has raised detail, so I will have to be extra carefull when sanding it!

 photo models198_zpsf4eaac27.jpg

1/32 Hasa F-6f5 photo models199_zps7bcff2b5.jpg

Out the box build, nothing special.

Theuns

  • Member since
    December 2012
Posted by Z Square 8 on Monday, April 22, 2013 7:28 AM

Looking good Theuns. What color did you use for the fuselage? Really like the detail of the pit...the belt detail for OOB is really good.

--Rich

Site builder of CooksonTributeB29.com 


  • Member since
    April 2010
Posted by Theuns on Monday, April 22, 2013 8:14 AM

Thanx Z

The bucles for the straps are from the spares box (PE) the belts are paper masking tape, The interior color was my own "eyeball grade" interior green from what I had lying around. The blue however is actually the plastic the kit is made from.

Initially I was going to go with the 3 tone early USN sceeme, but decided to retehr do the British FAA colors.

I have done a little sanding on the fuse seam lines and am relatively happy with it, some minor filling to do still.

This is one rather big models, I have no idea where to store it when I am done!

Theuns

  • Member since
    December 2012
Posted by Z Square 8 on Monday, April 22, 2013 8:30 AM

Excellent! She is looking good.

Sounds like she may have to be a "ceiling hung" project.

--Rich

Site builder of CooksonTributeB29.com 


  • Member since
    April 2010
Posted by Theuns on Monday, April 22, 2013 10:44 AM

I am hoping that a new job opertunity will open soon and then we will move to a larger place with hopefully more "model space"  LOL

Otherwize I have to make a plan with the 1/32 WNW SE5, 1/32 Trump P-40 and my crown jewel the 1/32 Tam P-51d aswell.

Theuns

  • Member since
    December 2002
  • From: Bury St Edmunds, Suffolk, England
Posted by Bish on Tuesday, April 23, 2013 2:11 PM

Nice work so far Theuns. Extra model display space is always nice to have. I'm in need of some of that myself.

I am a Norfolk man and i glory in being so


On the bench: Airfix 1/72nd Harrier GR.3/Fujimi 1/72nd Ju 87D-3

  • Member since
    September 2003
  • From: AandF in the Badger State
Posted by checkmateking02 on Tuesday, April 23, 2013 5:43 PM

Nice progress, Theuns.  I always admire all the detail that "larger-scale" modelers pack into a project.


  • Member since
    April 2011
  • From: Silver Spring, MD
Posted by badlanguage on Wednesday, April 24, 2013 10:05 PM

Lots of Gundam progress for me. I'm getting close to done. Here are some pics of parts with the decals on.

Shoulders:

Shield:

Body:

Other bits:

All of the main body parts after drybrushing and a wash in Citadel Shade Nuln Oil (Citadel Shades used to be called Citadel Washes):

All in one piece:

Rear view:

This was the first time I've seen it almost in one piece. The joints slide together pretty easily so it was easier to finish each component by itself. I beat him up pretty good with the weathering, which was my intention, though if I did it again I might go easier on it. The big question is how would a giant robot look after fighting in a huge battle in space where shrapnel and blown-up vehicle parts are flying around at high speed? This was my best guess. Next on the list is finishing up the weapons!

  • Member since
    September 2003
  • From: AandF in the Badger State
Posted by checkmateking02 on Wednesday, April 24, 2013 11:03 PM

Nice progress.  Good looking paint work.  It's an intimidating mech.


JOIN OUR COMMUNITY!

Our community is FREE to join. To participate you must either login or register for an account.

SEARCH FORUMS
FREE NEWSLETTER
By signing up you may also receive reader surveys and occasional special offers. We do not sell, rent or trade our email lists. View our Privacy Policy.