SEARCH FINESCALE.COM

Enter keywords or a search phrase below:

Gift GB

73676 views
605 replies
1 rating 2 rating 3 rating 4 rating 5 rating
  • Member since
    April 2011
  • From: Silver Spring, MD
Posted by badlanguage on Monday, March 4, 2013 8:35 AM

Z Square 8

BL- does your kit have all the white lettering for all those pieces as decals?...wow, that build is awesome. I can see why you are referencing it.

Z, I'm going to have to try my hand at making some decals for this one. My kit came with some stick on decals - Bandai includes either stickers or dry transfer decals, and I prefer water slides. They really design these kits to be easy for novice builders, even though there's a lot of detail in them. Most modern Gundam kits are actually all snap together that would produce a decent model without paint. Anyway, the decal making is venturing into new territory for me, so we'll see how it goes! By the way, good progress on the 29!

  • Member since
    May 2005
Posted by pyrman64 on Monday, March 4, 2013 10:25 AM

BL:  as alternative to aplying the dry transfers is putting in them onto clear decal paper, spray with a clear decal setter (Testors has a decal set) and apply as a wet decal.

Greg H

"There is many a boy here today who looks on war as all glory, but, boys, it is all hell." Gen. Wm T. Sherman (11 April 1880, Columbus, Ohio)

  • Member since
    October 2008
Posted by eatthis on Monday, March 4, 2013 12:21 PM

how have i missed this?

cab i enter with a part started kit?


snow + 4wd + escessive hp = :)  http://www.youtube.com/watch?v=x7egUIS70YM

  • Member since
    December 2002
  • From: Bury St Edmunds, Suffolk, England
Posted by Bish on Monday, March 4, 2013 1:40 PM

You did post a message back on page 10 about entering your TSR2 build. I guess you missed my reply. Is that the kiot you want to enter, if so i'll add you. If not, let me know and i will still add you.

I am a Norfolk man and i glory in being so


On the bench: Airfix 1/72nd Harrier GR.3/Fujimi 1/72nd Ju 87D-3

  • Member since
    October 2008
Posted by eatthis on Monday, March 4, 2013 1:54 PM

my memory is shocking lol

i forgot this gb even existed let alone id already posted in it!

that tsr2 is almost complete and its a swingwing tsr2

this kit is a 72 lightning that iv also chopped up and put a delta wing on it heres where its at atm

i46.tinypic.com/2ia3bxw.jpg


snow + 4wd + escessive hp = :)  http://www.youtube.com/watch?v=x7egUIS70YM

  • Member since
    October 2008
Posted by eatthis on Monday, March 4, 2013 1:54 PM


snow + 4wd + escessive hp = :)  http://www.youtube.com/watch?v=x7egUIS70YM

  • Member since
    December 2002
  • From: Bury St Edmunds, Suffolk, England
Posted by Bish on Monday, March 4, 2013 2:03 PM

I was just looking at that build. I am assuming this is a mix of kits. I will just put it down as a 72nd Lighting Delta.

I am a Norfolk man and i glory in being so


On the bench: Airfix 1/72nd Harrier GR.3/Fujimi 1/72nd Ju 87D-3

  • Member since
    October 2008
Posted by eatthis on Monday, March 4, 2013 2:08 PM

the nosecone and rocket motor (going at the base of the rudder) is from a tsr2 ms the wings are scratchbuilt


snow + 4wd + escessive hp = :)  http://www.youtube.com/watch?v=x7egUIS70YM

  • Member since
    December 2012
Posted by Z Square 8 on Monday, March 4, 2013 2:15 PM

Z Square 8

Question: Since the bird has had some sanding work, what would you guys recommend...cover her with future before gloss black base heading toward Alclad II? Not use future at all? Future afterward? Use micro fill or spend time with some really fine grit sanding efforts?

After I'm satisfied with my sanding and re-priming of the sanded areas...any thoughts/advice on the if/when to future process above?

eatthis- that's lookin' pretty sharp so far!

--Rich

Site builder of CooksonTributeB29.com 


  • Member since
    April 2011
  • From: Silver Spring, MD
Posted by badlanguage on Monday, March 4, 2013 2:16 PM

I like it, it kinda reminds me of a Saab Draken a bit.

  • Member since
    October 2008
Posted by eatthis on Monday, March 4, 2013 2:24 PM

its a twin build for a whif theme (ww2 went from 44-55) the saab engineers buggered off to blighty and got to work on the lightning and made a very similer delta wing for it

the other build is germany got the draken plans and made it a twin engined beasty lol

sorry for the off topic post


snow + 4wd + escessive hp = :)  http://www.youtube.com/watch?v=x7egUIS70YM

  • Member since
    April 2011
  • From: Silver Spring, MD
Posted by badlanguage on Monday, March 4, 2013 9:20 PM

pyrman64

BL:  as alternative to aplying the dry transfers is putting in them onto clear decal paper, spray with a clear decal setter (Testors has a decal set) and apply as a wet decal.

Thanks for the tip, pyrman, I hadn't heard that one before! Unfortunately my kit has honest-to-goodness stickers and not that many of them. Bandai usually saves the dry transfers for the 1/100 kits. I'm actually looking forward to decal making, I like to try something new and different every build if I can.

  • Member since
    October 2008
Posted by eatthis on Tuesday, March 5, 2013 2:28 AM

should i round the back of the fin off or not?


snow + 4wd + escessive hp = :)  http://www.youtube.com/watch?v=x7egUIS70YM

  • Member since
    December 2002
  • From: Bury St Edmunds, Suffolk, England
Posted by Bish on Tuesday, March 5, 2013 4:38 AM

Z, i would just go with the Black. If there are still rough parts on the surface, i am not sure Future would sort that out, though i might be wrong.

eatthis, i think i would leave the fin as it is.

I am a Norfolk man and i glory in being so


On the bench: Airfix 1/72nd Harrier GR.3/Fujimi 1/72nd Ju 87D-3

  • Member since
    December 2002
  • From: Bury St Edmunds, Suffolk, England
Posted by Bish on Tuesday, March 5, 2013 4:42 AM

CMK, i seem to recall similar issues with Airfix kits in the past. But i think those light things are a bit much in this scale. On my Stuka, i just put a piece of sheet styrene at the back, painted that silver then put the cover on. Sounds like your way is just as effective.

I am a Norfolk man and i glory in being so


On the bench: Airfix 1/72nd Harrier GR.3/Fujimi 1/72nd Ju 87D-3

  • Member since
    December 2002
  • From: Bury St Edmunds, Suffolk, England
Posted by Bish on Tuesday, March 5, 2013 4:43 AM

badlanguage, nice work on that. Looking foreard to see how your decals come along. making my own is something i have thought about, but thats as far as i have goit so far.

I am a Norfolk man and i glory in being so


On the bench: Airfix 1/72nd Harrier GR.3/Fujimi 1/72nd Ju 87D-3

  • Member since
    December 2012
Posted by Z Square 8 on Tuesday, March 5, 2013 7:21 AM

Bish

Z, i would just go with the Black. If there are still rough parts on the surface, i am not sure Future would sort that out, though i might be wrong.

eatthis, i think i would leave the fin as it is.

Thanks for the input Bish. Prior to being inspired by CMK to sand and polish more, my thought was trending toward the future's "self leveling" properties. Did not know about normal steps you guys take regarding future coating especially when heading toward Alclad. Do you guys typically use future to protect decaling before a topcoat spray as a final? 

I am trying to grasp the best way/steps to do the finish of the surface and how future might fit into that process. Prior to starting the build, obviously I had not ever heard about future due to time away from the hobby. I was very impressed with results of the pit glass and blister dipping...so I am in uncharted waters with my skill level already.

I am re-reading/studying ruddats wash usage, and BL's pre-shading exchanges to try to pick up tips and understanding. The 29 build and this GB format is like the old saying "it takes a community to raise a child". So in effect, I'm a new parent of the 29 build, and the GB is the community helping me raise her to new levels of detail. 

Toast Thanks for all the ideas and feedback.

I did pick up some "dull aluminum" by Alclad,(to go along with the "airframe aluminum" I already had purchased),  sanding and polishing supplies, white decal sheets and liquid decal "strengthener" at HobbyLand yesterday while out and about, so I am ready with materials for next steps...

Eatthis- I tend to agree with Bish on the fin. Just my opinion, I think the body lines favor it as is. If you were to round it off and follow more of the underbelly curvature lines, the nose cone point would be to prominent...again, just my opinion. I find this scratchbuild stuff intriguing...very cool. I'll have to do some reading and see what this is all about. I am certain with my current skill level I am quite a bit away from trying any though...but not bashful about attempting down the line!

--Rich

Site builder of CooksonTributeB29.com 


  • Member since
    December 2002
  • From: Bury St Edmunds, Suffolk, England
Posted by Bish on Tuesday, March 5, 2013 7:41 AM

I can't say i have ever used future to level things out. But when i think about it, it might work. Might be worth asking in the painting section.

Future is usually used to add a gloss coat before decalling. Also, for those who use enamels and oil washes, it also protects the enamel paint. As i mainly use gloss enamel paints, i don't have to bother adding a gloss coat for decals. So i only use it to protect the enamel paint, and then only on armour, as i add oil washe's before the flat coat.

I have used Alclad 3 times so far and have found a coat of gloss black enamel sufficent before laying down the Alclad.

I am a Norfolk man and i glory in being so


On the bench: Airfix 1/72nd Harrier GR.3/Fujimi 1/72nd Ju 87D-3

  • Member since
    October 2008
Posted by eatthis on Tuesday, March 5, 2013 8:32 AM


snow + 4wd + escessive hp = :)  http://www.youtube.com/watch?v=x7egUIS70YM

  • Member since
    December 2012
Posted by Z Square 8 on Tuesday, March 5, 2013 9:10 AM

Thanks Bish...appreciate the info

--Rich

Site builder of CooksonTributeB29.com 


  • Member since
    September 2003
  • From: AandF in the Badger State
Posted by checkmateking02 on Tuesday, March 5, 2013 10:37 AM

Bish

CMK, i seem to recall similar issues with Airfix kits in the past. But i think those light things are a bit much in this scale. On my Stuka, i just put a piece of sheet styrene at the back, painted that silver then put the cover on. Sounds like your way is just as effective.

 
That's a good idea about a piece of styrene to back the lights, Bish.  I never thought of that.  Hasegawa's B-17's just have a hole the light cover goes into, so for years I've just painted the backs of the clear pieces silver. 
 
One drawback for the method I used is that it doesn't give much depth to the appearance.
 
Actually, the clear parts on the Battle are probably the weakest points of the kit.  The main canopy is pretty gnarled and scarred on the inside, and the front windscreen is not big enough, tall enough to fully close the pilot's sliding hood, hence my decision to leave the canopy open.
 
But to do that, I had to sand and file the canopy to fit over the "greenhouse" behind the pilot, because the plastic was again too thick to let the canopy settle down where it should, in the open position.
 
It has been a little "fiddle-some."
 
Nevertheless, progress continues.  Here is the assembled fuselage.  I masked the prop and the pits, then painted around them, so they wouldn't become an issue when I was ready to paint the whole assembly.  Overspray onto the prop was a great concern, but it worked out fine.
 
 
I also painted the ailerons separately before installing them and closing up the wing, to make sure no bare plastic escaped the final paint coats.


Thanks for looking


  • Member since
    December 2002
  • From: Bury St Edmunds, Suffolk, England
Posted by Bish on Tuesday, March 5, 2013 10:48 AM

It was actually a last minute thing with the Stuka. It was only the second kit i have done in the last few years with this type of light. The other was a B-17 where the back of it was blanked off when you put the wings together. With the Stuka, i had just about finished it and was going to add the clear piece when i realised there would be a big black hole behind it. So i had to trim a small piece of styrene and try and fit it in with out it falling in. Luckyly it worked first time. And ye, it does add a bit of depth to the light, this is how it looks close up.

You might be haveing a struggle with the kit, but its looking good.

I am a Norfolk man and i glory in being so


On the bench: Airfix 1/72nd Harrier GR.3/Fujimi 1/72nd Ju 87D-3

  • Member since
    September 2003
  • From: AandF in the Badger State
Posted by checkmateking02 on Tuesday, March 5, 2013 11:53 AM

Oh, yeah, Bish, the light on the Stuka looks good.

As for the Battle, it goes together pretty well, and looks good, even with its issues.


  • Member since
    December 2012
Posted by Z Square 8 on Tuesday, March 5, 2013 12:34 PM

CMK- as envisioned it would be...clean and sweet. Looking great.

Finally broke down and broke out my "good" camera to test on close up shots. While generally speaking the lens is too strong for the application, I could use a tri pod...here are a couple of handheld WIP shots:

...almost shows too much detail...will have to play with lighting as nec. 

--Rich

Site builder of CooksonTributeB29.com 


  • Member since
    September 2003
  • From: AandF in the Badger State
Posted by checkmateking02 on Thursday, March 7, 2013 2:00 PM

The Battle is now awaiting masking for the Dark Green splotches.  I see I left some of the masking components for the pits in situ.

One of the goofs in the kit is obvious in this view. Propeller The gunner's seat is far too far forward, and should be relocated much closer too the rear--probably nearly the width of the seat itself.  If I were to do another Battle, I would correct this, but. . .Confused

It appears 1968 was a good year for rivets.Toast


  • Member since
    December 2012
Posted by Z Square 8 on Thursday, March 7, 2013 8:52 PM

29 build update...brief


Black gloss base applied...much body work to polish before alclad. Received some tips and info from the fine folks over in painting forum.

...at least I don't have to build a home paint booth! Wink

The 29 is so big that a good sized piece of heavy mil protected the walls and floor 

--Rich

Site builder of CooksonTributeB29.com 


  • Member since
    September 2003
  • From: AandF in the Badger State
Posted by checkmateking02 on Thursday, March 7, 2013 9:19 PM

That is an awesome bird, Z!


  • Member since
    December 2012
Posted by Z Square 8 on Thursday, March 7, 2013 10:23 PM

thanks CMK.

I'm enjoying watching the progress on the battle. You do such clean and precise work, and that appeals to me. looking forward to the green application pics.

--Rich

Site builder of CooksonTributeB29.com 


  • Member since
    December 2002
  • From: Bury St Edmunds, Suffolk, England
Posted by Bish on Friday, March 8, 2013 10:04 AM

Glad you were able to get the info you wanted Z. That looks awasome. Did you use future, or just go straight with the black.

CMK, ye, hard to imagine how the gunner would reach his weapons sitting that far forward. Your not wrong about the rivets, maybe a post war surplus.

I am a Norfolk man and i glory in being so


On the bench: Airfix 1/72nd Harrier GR.3/Fujimi 1/72nd Ju 87D-3

  • Member since
    September 2003
  • From: AandF in the Badger State
Posted by checkmateking02 on Friday, March 8, 2013 10:41 AM

Thanks, Z.  I appreciate your kind comments.

The rivets have created a kind of dilemma, Bish.  I'd like to do something to break up the monotone black undersurfaces, but I don't want to use even a pin wash that will flow around all those rivets and make them more prominent than they are.  I'm thinking of just dry-brushing some dark gray at strategic locations, and letting it go at that.

I'm not sure what I'll do with the topsides, other than a dark wash in the hinge lines of the control surfaces.

Anyway, some more progess photos.

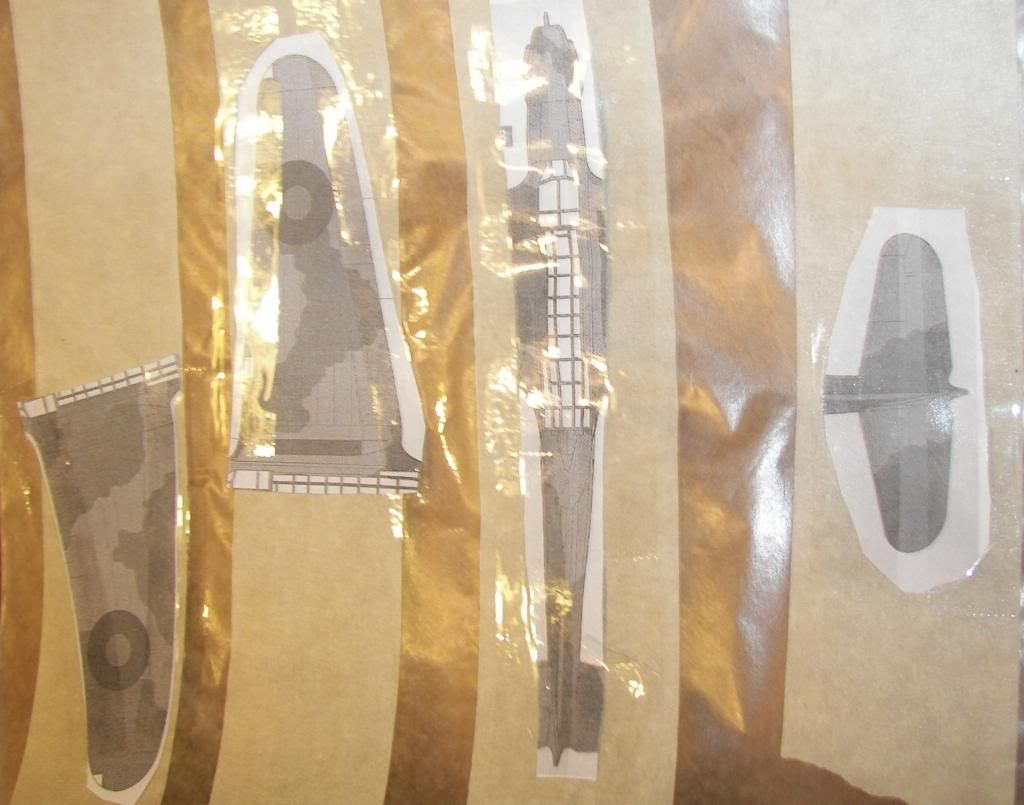
To make masks for the Dark Green, I scanned the painting instructions from the kit, then resized them in the Publisher program and printed them on a photocopier.  I took some wax paper, applied some wide (and cheap) masking tape, then taped the printed diagrams on top of that.  All you have to do then is cut the whole thing to shape with scissors, peel the masking tape off the wax paper and apply the tape-mask to the kit. 

Using the kit instructions, though, means you have to sort of fiddle around to get the pieces all lined up, but I was surprised to find it wasn't awfully difficult.

And here is the Masked Battle, ready to receive her green.  Visible at the top is part of Airfix's painting diagram.

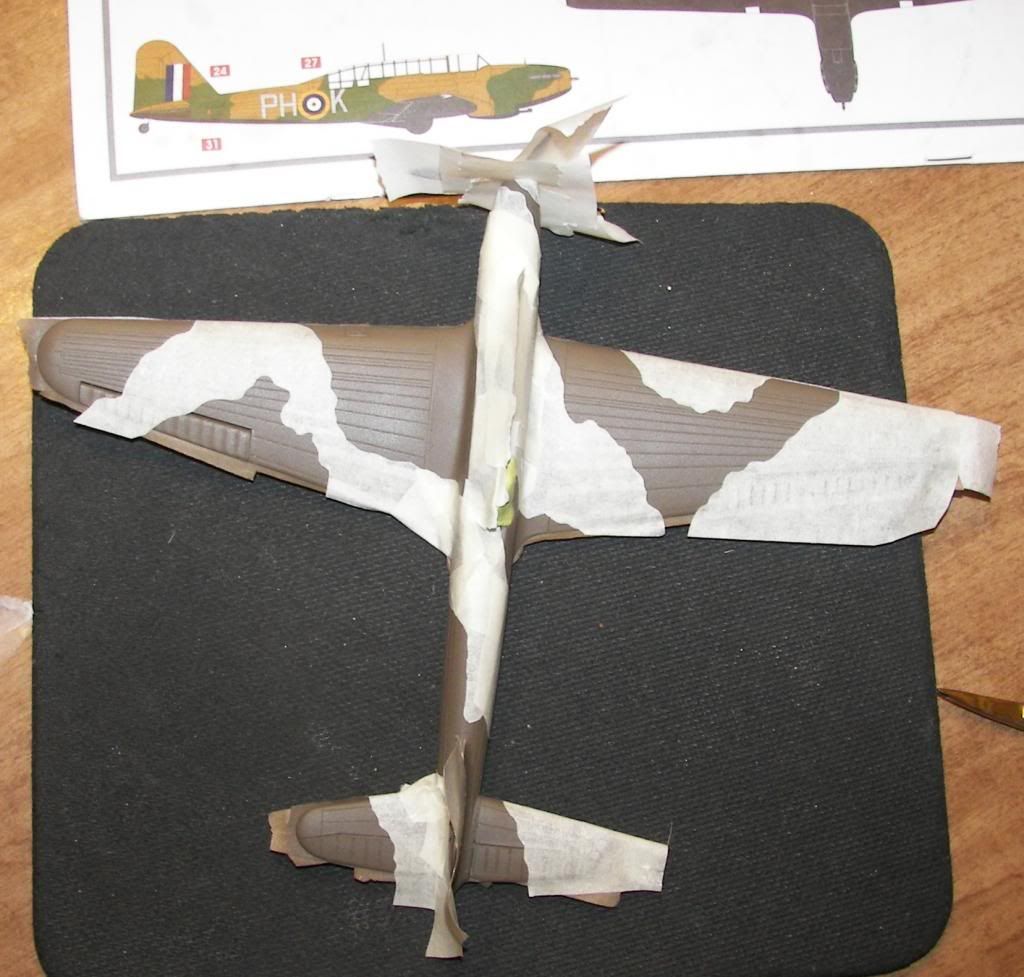
I also used some poster ticky-tak to protect the pesky rear pit.

Thanks for looking.


JOIN OUR COMMUNITY!

Our community is FREE to join. To participate you must either login or register for an account.

SEARCH FORUMS
FREE NEWSLETTER
By signing up you may also receive reader surveys and occasional special offers. We do not sell, rent or trade our email lists. View our Privacy Policy.