SEARCH FINESCALE.COM

Enter keywords or a search phrase below:

Fourth Annual Berny Memorial Group Build

35072 views
489 replies
1 rating 2 rating 3 rating 4 rating 5 rating
  • Member since
    November 2009
  • From: SW Virginia
Posted by Gamera on Tuesday, May 12, 2015 7:16 AM

So she's just a Cobra eh? Nice save there with the nose weight - gee that's annoying to find out you've got a tail-sitter after everything is closed up.

"I dream in fire but work in clay." -Arthur Machen


  • Member since
    November 2010
  • From: Lafayette, Indiana
Posted by Son Of Medicine Man on Wednesday, May 13, 2015 5:53 AM

jimbot58

Hey gang!

Well the weather here has been a major PITA with nearly 2 weeks of non-stop rain! The ground is saturated and the result is that we have had a lot of street flooding, and homes affected! The creek near my house overflowed Friday night, forcing the both the streets leading to the south of my house to close forcing me to drive several miles just to visit the Walmart that I can see from my house! (The creek is between me and Wally-world). This was followed last night by several inches of wet snow falling overnight causing downed trees and power outages!

The rains have stopped for now, but they are still waiting for the rivers to crest, and many places down stream are a concern as they wait for the surge to reach them.

After getting my washer fixed and getting my flat tire repaired I was finally able to sit down and make some progress at the bench!

Mostly worked on the Cobra. It's finally starting to take shape!

Sadly, I haven't had time to work on all the other projects on my platr!

Jim

Hi Jim,

Your Cobra is looking very nice!  (As always!)  Yes  Yes 

Ken

  • Member since
    November 2010
  • From: Lafayette, Indiana
Posted by Son Of Medicine Man on Wednesday, May 13, 2015 5:58 AM

mikeymize

  Hey Jim, good to see you're making progress in spite of all the annoying things you have to do on your week-end. I did the same kind of stuff on my days off as well; laundry, yard work, etc. I do have some pics of my new build though so at least I'm making some progress. LoL!

Hi Mike,

I always liked the Bf-109, even as a kid.  I wish I knew how many I built.  Interesting paint scheme with the "eyeball".

Ken

  • Member since
    November 2010
  • From: Lafayette, Indiana
Posted by Son Of Medicine Man on Wednesday, May 13, 2015 6:00 AM

modelcrazy

A little more done this weekend. I painted the Hull (I still need the black boot top stripe) and sat the sub-assemblies on the deck to see how everything fits. I am' very pleased with the results. I'll take everything back off and do some more deck and hull painting, install AA guns, the catapult , rigging and railings, but I just wanted to give an update.

Steve

Hi Steve,

It looks great so far!  Your hard work shows.  Yes  Yes 

Ken

  • Member since
    November 2010
  • From: Lafayette, Indiana
Posted by Son Of Medicine Man on Wednesday, May 13, 2015 6:03 AM

jimbot58

Well, tonight I sat and did research to learn more about just what I was building!

First, I had no idea what these panels were that get cemented to the left side of the aircraft:

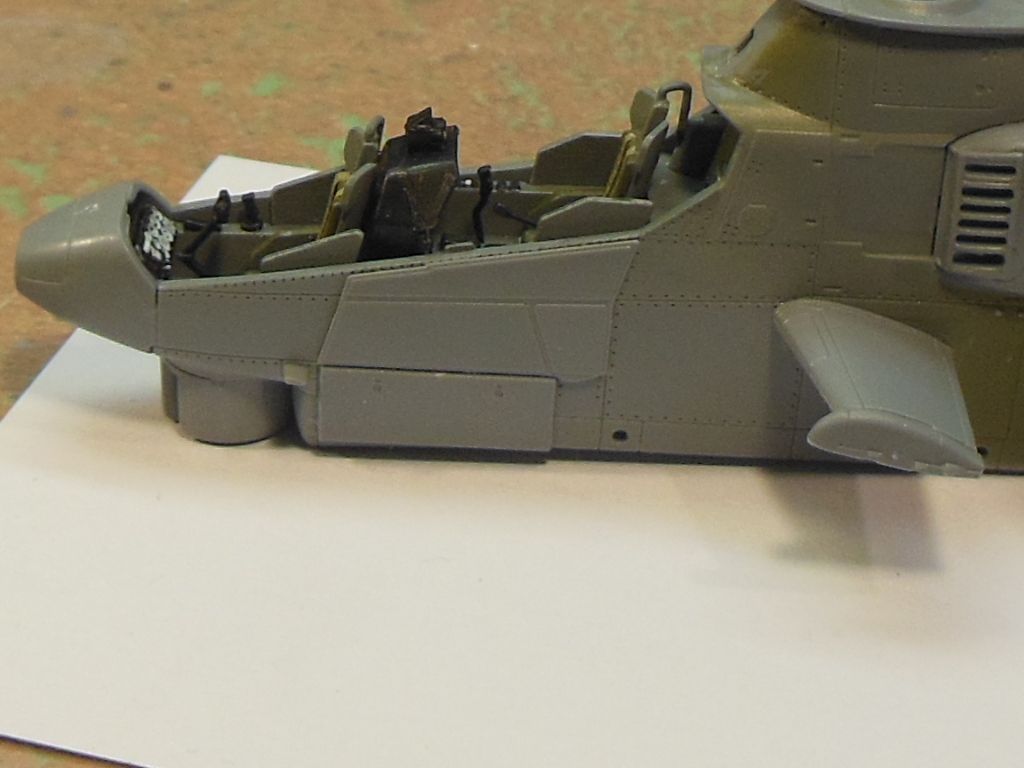
I thought they were armor plates or something.

Seems they are actually part of the XM35 gun system. The panels cover the added wiring for the operation of the gun, which consists of a 20mm canon mounted under the left stub wing and 900 rounds of ammunition carried in the pod fairings mounted over the skids.

The gun:

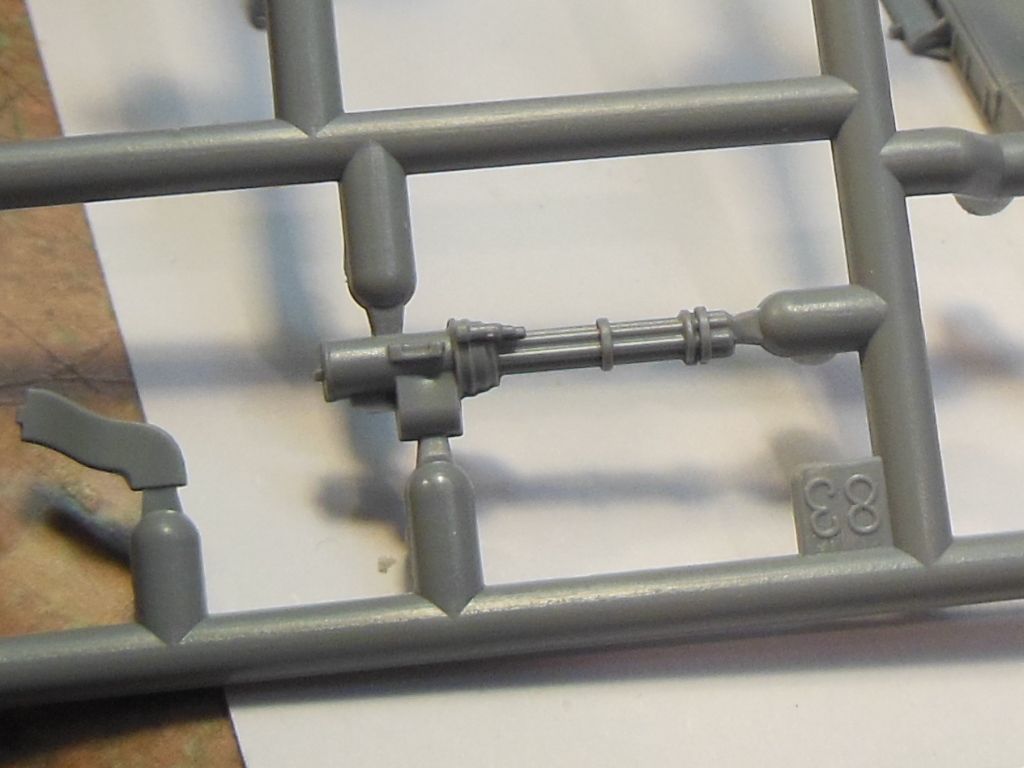
Seems that this machine is armed to the teeth! Along with the cannon, it also carried a 7.62 mini-gun in the chin turret with 4000 rounds of ammo, and a 40mm grenade launcher with 300 rounds. Not to mention the rocket pods carried at the end of the stub pylons!

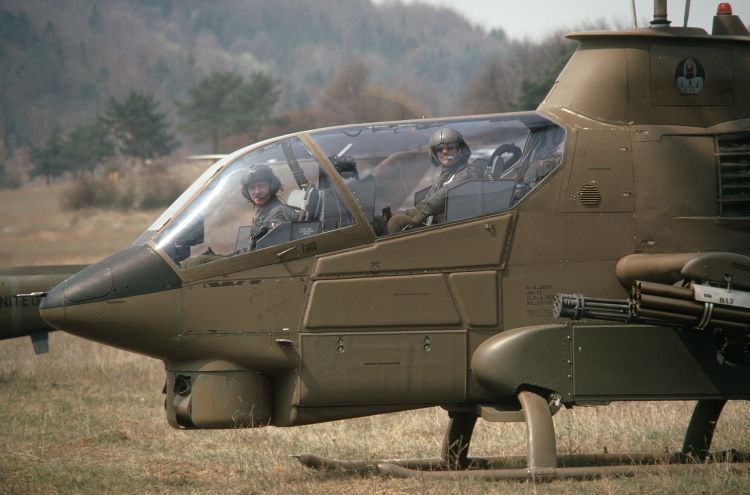
The only thing I can't identify is the pod carried opposite of the 20mm on the inside station, starboard side:

I'm going to pop over to the helicopter forum and post a query there. I don't think it's a weapon.

Jim

Hi Jim,

Thank you for sharing your research with us.  I have said this before, I think the research is just as much fun as building the model.

Ken

  • Member since
    November 2010
  • From: Lafayette, Indiana
Posted by Son Of Medicine Man on Wednesday, May 13, 2015 6:05 AM

Gamera

Mike: It's good to have you back! Neat looking scheme on that 109.

Jim: Very cool, ok the Supercobra isn't quite an Apache but yeah she's armed to the teeth!

Steve: Yow man! She's coming along great. I've got a couple ships in my stash but so far haven't had the guts to tackle them- you're making it look easy though.

Ok, I did get a little done over the weekend, painted the props for both the Wildcat and Hellcat. So all the yellow on the kits is out of the way, which makes me very happy!!!

Congratulations Cliff on getting past the milestone!  Smile 

Ken

  • Member since
    November 2010
  • From: Lafayette, Indiana
Posted by Son Of Medicine Man on Wednesday, May 13, 2015 6:08 AM

jimbot58

Duke Maddog

Wow, guys, tremendous progress here. I like it.

Steve, that ship is looking great. I think tarps would have been on the guns if she was underway in rough seas to a home port out of a combat zone. I believe the tarps would have remained off if they were patrolling in an area where enemy activity was expected, despite the heavy seas. Hope that helps.

Jim, the Supercobra is probably hauling an ECM pod on the side. That is what that looks like.

Way to go guys! Keep it coming!

The unit I'm building is not actually a Super Cobra, just one of the early units used in SEA. The Super's were twin engine. I had the pod Identified as s SUU-11/A gun pod with yet another 7.62 minigun! More fire power!

I trial fitted the skids tonight, and uh oh! This isn't good!

I was fortunate that I hadn't cemented in the nose piece yet! I cut up some little pieces of a fishing weight, dropped them into the nose, and held them in place with a drop of CA! Much better now! Whew!

I'm glad I averted building a tail sitter! That would have sucked!

Jim

Hi Jim,

Once again thank you for sharing the info you found during your research.  And good save on saving your Cobra from being a tail sitter! 

Ken

  • Member since
    June 2009
Posted by jimbot58 on Wednesday, May 13, 2015 1:32 PM
Son Of Medicine Man

jimbot58

Duke Maddog

Wow, guys, tremendous progress here. I like it.

Steve, that ship is looking great. I think tarps would have been on the guns if she was underway in rough seas to a home port out of a combat zone. I believe the tarps would have remained off if they were patrolling in an area where enemy activity was expected, despite the heavy seas. Hope that helps.

Jim, the Supercobra is probably hauling an ECM pod on the side. That is what that looks like.

Way to go guys! Keep it coming!

The unit I'm building is not actually a Super Cobra, just one of the early units used in SEA. The Super's were twin engine. I had the pod Identified as s SUU-11/A gun pod with yet another 7.62 minigun! More fire power!

I trial fitted the skids tonight, and uh oh! This isn't good!

I was fortunate that I hadn't cemented in the nose piece yet! I cut up some little pieces of a fishing weight, dropped them into the nose, and held them in place with a drop of CA! Much better now! Whew!

I'm glad I averted building a tail sitter! That would have sucked!

Jim

Hi Jim,

Once again thank you for sharing the info you found during your research.  And good save on saving your Cobra from being a tail sitter! 

Ken

A bit more information - I read on another website that those plates on the left are actually to protect the side from the muzzle blast of the 20mm cannon, which could actually rip holes in the skin! Don't know which version is correct, but I think this seems more plausible than covering up wires - Jim

*******

On my workbench now:


Fujimi F-4K Phantom "Yellow Bird" and Zvezda Su-27SM Flanker


  • Member since
    June 2009
Posted by jimbot58 on Friday, May 15, 2015 2:29 AM

I am very saddened by the passing of B.B. King at the age of 89.

R.I.P. B.B.!

*******

On my workbench now:


Fujimi F-4K Phantom "Yellow Bird" and Zvezda Su-27SM Flanker


  • Member since
    November 2010
  • From: Lafayette, Indiana
Posted by Son Of Medicine Man on Friday, May 15, 2015 5:41 AM

jimbot58
Son Of Medicine Man

jimbot58

Duke Maddog

Wow, guys, tremendous progress here. I like it.

Steve, that ship is looking great. I think tarps would have been on the guns if she was underway in rough seas to a home port out of a combat zone. I believe the tarps would have remained off if they were patrolling in an area where enemy activity was expected, despite the heavy seas. Hope that helps.

Jim, the Supercobra is probably hauling an ECM pod on the side. That is what that looks like.

Way to go guys! Keep it coming!

The unit I'm building is not actually a Super Cobra, just one of the early units used in SEA. The Super's were twin engine. I had the pod Identified as s SUU-11/A gun pod with yet another 7.62 minigun! More fire power!

I trial fitted the skids tonight, and uh oh! This isn't good!

I was fortunate that I hadn't cemented in the nose piece yet! I cut up some little pieces of a fishing weight, dropped them into the nose, and held them in place with a drop of CA! Much better now! Whew!

I'm glad I averted building a tail sitter! That would have sucked!

Jim

Hi Jim,

Once again thank you for sharing the info you found during your research.  And good save on saving your Cobra from being a tail sitter! 

Ken

A bit more information - I read on another website that those plates on the left are actually to protect the side from the muzzle blast of the 20mm cannon, which could actually rip holes in the skin! Don't know which version is correct, but I think this seems more plausible than covering up wires - Jim

HI Jim,

I agree with you, protection from the muzzle blast seems more accurate.  Thank you for the info!

Ken

  • Member since
    November 2010
  • From: Lafayette, Indiana
Posted by Son Of Medicine Man on Friday, May 15, 2015 5:42 AM

jimbot58

I am very saddened by the passing of B.B. King at the age of 89.

R.I.P. B.B.!

It is sad indeed.  Another legend has moved on.

Ken

  • Member since
    July 2014
Posted by modelcrazy on Saturday, May 16, 2015 8:19 PM

Hi gents,

Here's the latest on the Indy. I will be able to get  a bit done this weekend, but I just wanted to post an update. I will install the superstructures, rigging and railing next.

Steve

Steve

Building a kit from your stash is like cutting a head off a Hydra, two more take it's place.


http://www.spamodeler.com/forum/

  • Member since
    July 2014
Posted by modelcrazy on Sunday, May 17, 2015 7:55 PM

I have completed a considerable amount of work to The Indy this weekend.  I added the superstructures, railings,  small boats and weathering.  I still need to add the Low Frequency long wire antennas and HF whip antennas. After, I will start on the base.

I have to say, I am really pleased with it.

I will hold off on pictures of her until I'm finished so I don't ruin the final reveal.

Steve

Steve

Building a kit from your stash is like cutting a head off a Hydra, two more take it's place.


http://www.spamodeler.com/forum/

  • Member since
    September 2010
  • From: California
Posted by mikeymize on Sunday, May 17, 2015 11:57 PM

Quick update; managed to start on the cockpit, RLM 66 painted and much PE work accomplished. The detail on this one is impressive and will post pics once I get the seat belts in. I'm using Squadron Singnal's "Bf-109G Walk Around" for a reference and it's very well done. The rest of my weekend was laundry and cleaning the house along with some yard work; so much for relaxing!

BTW, Jim, as you mentioned it was sad to hear about BB. The guy was a great guitarist and influenced so many; he'll be missed.

"Time you enjoy wasting is not wasted time".


  • Member since
    November 2010
  • From: Lafayette, Indiana
Posted by Son Of Medicine Man on Monday, May 18, 2015 5:58 AM

modelcrazy

Hi gents,

Here's the latest on the Indy. I will be able to get  a bit done this weekend, but I just wanted to post an update. I will install the superstructures, rigging and railing next.

Steve

Great work there Steve once again!  You are really moving on this project!  Yes  Yes 

Ken

  • Member since
    November 2010
  • From: Lafayette, Indiana
Posted by Son Of Medicine Man on Monday, May 18, 2015 5:59 AM

mikeymize

Quick update; managed to start on the cockpit, RLM 66 painted and much PE work accomplished. The detail on this one is impressive and will post pics once I get the seat belts in. I'm using Squadron Singnal's "Bf-109G Walk Around" for a reference and it's very well done. The rest of my weekend was laundry and cleaning the house along with some yard work; so much for relaxing!

BTW, Jim, as you mentioned it was sad to hear about BB. The guy was a great guitarist and influenced so many; he'll be missed.

Sounds like a full weekend to me Mike! 

Ken

  • Member since
    November 2009
  • From: SW Virginia
Posted by Gamera on Monday, May 18, 2015 7:37 AM

Steve & Mike: Sounds like you guys are making some significant progress. Wish I could say the same!

"I dream in fire but work in clay." -Arthur Machen


  • Member since
    July 2014
Posted by modelcrazy on Monday, May 18, 2015 9:21 AM

Thanks Gamera and Ken,

Ken,

I know you're getting tied of commenting on what looks like the same thing. but I am at the building the base stage.

I'll show the making of the base and water and some close-ups of the ship, but it may diminish the impact of the whole thing to show the finished ship out if it's base. It does look good though, and I'm never impressed with my work. I was putting some final touches to the weathering last night with my optivisor on, you know how you don't see the whole picture with those on, I took them off to look at the whole thing and Bamm! I was thinking to myself, I did that? Too bad some of it will be hidden by the water and spray.

It won't be long now, the hard part is finished, Yea!

Steve

Building a kit from your stash is like cutting a head off a Hydra, two more take it's place.


http://www.spamodeler.com/forum/

  • Member since
    January 2014
  • From: Toronto
Posted by Rob S. on Monday, May 18, 2015 1:26 PM

Well folks, I'm finally caught up with my GB's and I've come to this GB and I am ready to start the EH-101. I'm going to jump in feet first and get this big yellow bird off and running! Glad to be finally on board!

______________________________________________________________________________


On the Bench: Nothing on the go ATM

  • Member since
    June 2009
Posted by jimbot58 on Monday, May 18, 2015 1:33 PM
modelcrazy

Thanks Gamera and Ken,

Ken,

I know you're getting tied of commenting on what looks like the same thing. but I am at the building the base stage.

I'll show the making of the base and water and some close-ups of the ship, but it may diminish the impact of the whole thing to show the finished ship out if it's base. It does look good though, and I'm never impressed with my work. I was putting some final touches to the weathering last night with my optivisor on, you know how you don't see the whole picture with those on, I took them off to look at the whole thing and Bamm! I was thinking to myself, I did that? Too bad some of it will be hidden by the water and spray.

It won't be long now, the hard part is finished, Yea!

It all looks good to me, glad you are making great progress! No progress for me this weekend as part of my tasks included replacing a seal on my rear axle! I got an unintended bike run in as I had everything apart and discovered I needed one minor tool and rather than reassemble it all, I made a run on the bike! Got my exercise in anyway! The rest of it was household chores. Did take a small break Sunday and went to spend a little time to wet some worms in a little nearby pond! Jim

*******

On my workbench now:


Fujimi F-4K Phantom "Yellow Bird" and Zvezda Su-27SM Flanker


  • Member since
    January 2014
  • From: Toronto
Posted by Rob S. on Monday, May 18, 2015 7:45 PM

A bit of progress. The cockpit is done. NO detail to speak of, so, it went ok. The more I work with and handle this kit, the more I realize it is of pretty poor quality, detail and fit. She's gonna be a challenge to seal up. Oh, well, it's the only version of a RCAF Cormorant, so, I'll muscle through it.

______________________________________________________________________________


On the Bench: Nothing on the go ATM

  • Member since
    November 2009
  • From: SW Virginia
Posted by Gamera on Monday, May 18, 2015 8:10 PM

Very cool Rob- that's some bright yellow plastic there though!

"I dream in fire but work in clay." -Arthur Machen


  • Member since
    January 2014
  • From: Toronto
Posted by Rob S. on Monday, May 18, 2015 9:04 PM

Ain't that something, eh!! It does cover well though....Smile

______________________________________________________________________________


On the Bench: Nothing on the go ATM

  • Member since
    November 2010
  • From: Lafayette, Indiana
Posted by Son Of Medicine Man on Tuesday, May 19, 2015 6:03 AM

modelcrazy

Thanks Gamera and Ken,

Ken,

I know you're getting tied of commenting on what looks like the same thing. but I am at the building the base stage.

I'll show the making of the base and water and some close-ups of the ship, but it may diminish the impact of the whole thing to show the finished ship out if it's base. It does look good though, and I'm never impressed with my work. I was putting some final touches to the weathering last night with my optivisor on, you know how you don't see the whole picture with those on, I took them off to look at the whole thing and Bamm! I was thinking to myself, I did that? Too bad some of it will be hidden by the water and spray.

It won't be long now, the hard part is finished, Yea!

Hi Steve,

Trust me, I am not getting tired of seeing your work.  It is outstanding!  Please keep the pics coming!


Ken

  • Member since
    November 2010
  • From: Lafayette, Indiana
Posted by Son Of Medicine Man on Tuesday, May 19, 2015 6:04 AM

Rob S.

A bit of progress. The cockpit is done. NO detail to speak of, so, it went ok. The more I work with and handle this kit, the more I realize it is of pretty poor quality, detail and fit. She's gonna be a challenge to seal up. Oh, well, it's the only version of a RCAF Cormorant, so, I'll muscle through it.

Nice work Rob!  Very clean detail!  Yes  Yes 

Ken

  • Member since
    November 2010
  • From: Lafayette, Indiana
Posted by Son Of Medicine Man on Tuesday, May 19, 2015 6:06 AM

jimbot58
modelcrazy

Thanks Gamera and Ken,

Ken,

I know you're getting tied of commenting on what looks like the same thing. but I am at the building the base stage.

I'll show the making of the base and water and some close-ups of the ship, but it may diminish the impact of the whole thing to show the finished ship out if it's base. It does look good though, and I'm never impressed with my work. I was putting some final touches to the weathering last night with my optivisor on, you know how you don't see the whole picture with those on, I took them off to look at the whole thing and Bamm! I was thinking to myself, I did that? Too bad some of it will be hidden by the water and spray.

It won't be long now, the hard part is finished, Yea!

It all looks good to me, glad you are making great progress! No progress for me this weekend as part of my tasks included replacing a seal on my rear axle! I got an unintended bike run in as I had everything apart and discovered I needed one minor tool and rather than reassemble it all, I made a run on the bike! Got my exercise in anyway! The rest of it was household chores. Did take a small break Sunday and went to spend a little time to wet some worms in a little nearby pond! Jim

Hi Jim,

Glad to hear you got some relaxing time in!  You deserve it!

Ken

  • Member since
    January 2014
  • From: Toronto
Posted by Rob S. on Tuesday, May 19, 2015 3:32 PM

Thanks Ken, more to follow tonight.

______________________________________________________________________________


On the Bench: Nothing on the go ATM

  • Member since
    January 2014
  • From: Toronto
Posted by Rob S. on Tuesday, May 19, 2015 8:24 PM

So, this kit has such a spartan interior, I'm not unhappy that she's gonna bit pinned up tight. Nothing to see but a few rows of seats. This just means that the exterior has to be the main focus. Anyway, for a lower quality kit, I was quite pleased with how well the fuselage went together. Well sealed. The clear canopy went on perfectly too. That I didn't expect..

I 'smoked' the glass inside the top of the canopy cover prior to installing. There's an instrumentation decal on the interior cockpit roof too, but, it'll never be seen again!! Too bad. More tomorrow.

______________________________________________________________________________


On the Bench: Nothing on the go ATM

  • Member since
    July 2014
Posted by modelcrazy on Tuesday, May 19, 2015 11:22 PM

That looks wicked cool Rob  Yes

OK, here I go with the base, this will be the first time I try this method.

First I made the base out of an old piece of house siding and made poster board walls and used hot glue to attach them to the sides. I also stiffened the walls with some cardboard backing.

Then I placed the ship inside the box and laid in sawdust, and formed some crests and troughs. I then squirted some thin CA onto the sawdust to stabilize it. That worked remarkably well but use an enormous amount of glue. 

Once dried, I applied Mod Podge for a base for the acrylic gel.

I will use the acrylic gel to form the wave peaks and smooth the texture. After the gel will be applied, I'll paint dark blue mixed with turquoise at the foam. After the paint will come the cotton, but I'll show that when I get there.

That's all for now.

Steve

Steve

Building a kit from your stash is like cutting a head off a Hydra, two more take it's place.


http://www.spamodeler.com/forum/

  • Member since
    September 2010
  • From: California
Posted by mikeymize on Wednesday, May 20, 2015 12:31 AM

Looks like a fair amount of progress Rob; you're doing very well on a kit that sounds to be not too great. One good thing about the color I realized; makes it easier not to lose unpainted parts off the tree!

"Time you enjoy wasting is not wasted time".


JOIN OUR COMMUNITY!

Our community is FREE to join. To participate you must either login or register for an account.

SEARCH FORUMS
FREE NEWSLETTER
By signing up you may also receive reader surveys and occasional special offers. We do not sell, rent or trade our email lists. View our Privacy Policy.