SEARCH FINESCALE.COM

Enter keywords or a search phrase below:

The 2017/ 2018 Too Little Too Late Group Build

41911 views
1197 replies
1 rating 2 rating 3 rating 4 rating 5 rating
  • Member since
    September 2013
Posted by blackdog62 on Saturday, June 10, 2017 3:29 PM

thats on cool build and 1 crazy wepon.

i think they tried to drop one on the bridge the allys got to  before it colapsed over the rine.

it droped but missed the american anti aircraft fire was just to intence.

  • Member since
    June 2010
  • From: Rochester, New York USA
Posted by rocker286 on Saturday, June 10, 2017 10:00 AM

Rooster - Great job on that 262 so far! And as far as smokers go, someday I want to do what your brother did and make my own! Luckily one of the guys I work with is good with welding so if I ever cough up the cash to make one I've got someone who can help.

Doug- Excellent work sir! The attention to detail on that thing is incredible. I can't even imagine what something like that would look like in the air!

Blackdog- I really like the scheme you've chosen for your bird! I feel like one of the biggest draws to Luftwaffe aircraft is their paint jobs! And yes, apple juice or cider vinegar in the foil is the way to go when you're smoking ribs! Glad to see I'm not alone in that regard!

Jack- The work you're doing is awesome, it's like watching an auto mechanic turn a stock muscle car into a hot rod! Can't wait to see the finished product.

MM-   Great work on the Horten so far!

First off, I'm sorry if I made anyone try to bite their computer screens with my last post - your comments on the ribs were most appreciated! I went out last weekend and bought a new can of primer, and this week I got going on painting my 262. I started with the fuselage, putting on two coats of Lichtblau RLM 76. After those coats were dry, i masked off the tops of the wings and rear stabilizers last night and started applying Dunkelgrun RLM 82. I'll put on another coat today, and then I'll start applying the Braunviolett RLM 81. As soon as I'm done with the paint job, I'll glue on the landing gear, fuel tanks and any other little bits that I'd otherwise snap off during the painting process.

2017-06-10_10-33-34

4badges

  • Member since
    April 2006
  • From: ON, Canada
Posted by jgeratic on Saturday, June 10, 2017 9:53 AM

MM, taking shape and I like the level of detail in that pit.

Mustang - thanks!

Doug, yeah bad wording on my part.  I meant the belly tank and it's accompanying rack. I found this diagram, though it is for the Emil:

It does show that it was offset by about 40mm.  In 72nd scale, that measures out to only 0.55mm.   Apparently the reason has to do with the strength points of the underlying structure beneath the aircraft's skin.

Also found this posting of Revell's 1/32 Gustav:

Of further interest, the poster also states the location points on the rack where the tank attaches are offset in the opposite direction, so that the drop tank ends up sitting centered on the fuselage.

regards,

Jack

  • Member since
    March 2012
  • From: Corpus Christi, Tx
Posted by mustang1989 on Saturday, June 10, 2017 8:11 AM

blackdog: Very nice trio of Luftwaffe birdies!!! And with a Hartmann 109 in the mix too!! Is that his K-4? Nice progress on the back of that Jumo!

Doug: Dude you have done it yet once again!!!!!! I've always wanted a Mistel in my line up of display models and you've managed to turn out a VERY inspiring build here with this masterpiece!!! Wow!!!

MM: Good start on that Horten good buddy!! I've got one of these in 1/32nd but I'm thinking about either trading it or selling it and getting a 1/48 ZM 229. I love these birds and it looks like you're doing it justice all the way pal.

Jack: Very nice detailing on that 109!!!


 Forum | Modelers Social Club Forum (proboards.com) 

  • Member since
    October 2008
  • From: Georgia
Posted by Rigidrider on Saturday, June 10, 2017 7:22 AM

Jack... Morning! I've never seen drop tanks wing mounted on a "G". The ones I've seen in kits and books always mounted centerline on the fuselage. There were various gun pods and even a bomb rack on each wing, but unless I'm misunderstanding, Drop tanks always mounted on the fuselage.

MM, I have this kit stashed and am watching with great interest! Shes looking good!

Take care...

Doug

When Life Hands You A Bucket Of Lemons...

Make Lemonade!

Then Sell It Back At $2 Bucks A Glass...

  • Member since
    April 2015
Posted by Mopar Madness on Friday, June 9, 2017 2:12 PM

Thank you friends.  Here are a few updates from the past couple days.  The cockpit is finished, the fuselage is sealed, and the wings are glued.  However, after some dryfitting, I think the sub-assemblies are going to produce some significant gaps.  A problem I've heard time and time again with this kit.  Oh well, it doesnt steal any of my joy in building this bird.


Chad

God, Family, Models...

At the plate: 1/48 Airfix Bf109 & 1/35 Tamiya Famo

On deck: Who knows!

  • Member since
    September 2014
Posted by rooster513 on Friday, June 9, 2017 9:33 AM

Very nice scratch work Jack! Great start MM!

-Andy

  • Member since
    April 2006
  • From: ON, Canada
Posted by jgeratic on Thursday, June 8, 2017 11:29 PM

Thank you Doug, Bob, and MM - nice progress there on the flying wing.

-------------

I've another question on the Gustav.  Working on the drop tank and it's rack.  Now the pin holes on the underside wing have it attached off center, is this correct?

regards,

Jack


  • Member since
    April 2015
Posted by Mopar Madness on Wednesday, June 7, 2017 7:05 PM

Nice details Jack!

A quick update on my flying wing.  Cockpit and gear bays are painted but need details.  I'll get the jet intake and exhaust painted some sort of burnt aluminum color then get the fuselage sealed up.

Chad

God, Family, Models...

At the plate: 1/48 Airfix Bf109 & 1/35 Tamiya Famo

On deck: Who knows!

  • Member since
    February 2014
  • From: Michigan
Posted by silentbob33 on Wednesday, June 7, 2017 6:53 PM
Jack, all the details you're adding in are looking really good. I can't wait to see more

On my bench: Academy 1/35 UH-60L Black Hawk

  • Member since
    October 2008
  • From: Georgia
Posted by Rigidrider on Wednesday, June 7, 2017 6:17 PM

Looks good Jack! I agree on the spent shell chutes... I cant stand seeing the indents where they locate... if your going to machine em into the moulding, open em up! they look loads better the way you've done them. Great detailing! 

Doug

When Life Hands You A Bucket Of Lemons...

Make Lemonade!

Then Sell It Back At $2 Bucks A Glass...

  • Member since
    April 2006
  • From: ON, Canada
Posted by jgeratic on Wednesday, June 7, 2017 6:06 PM

Oil cooler intake rebuilt:

Compared to line drawings, I noticed the air control flap at the rear was shorter than that of the G-10, so that piece was completley cut out.  Some plastic card was used to make up the difference for the shorter flap, and also acts as the rear filter detail (second half of above photo).

Also added some plastic card to act as a false bottom to block in some of the surrounding that can be seen through the open ends of the oil cooler.  Steel wire in place for bracing detail at the front.

For the spent ammo chutes, the plastic holes was hollowed out to make way for some thin sections of brass sheet. 

regards,

Jack

  • Member since
    October 2008
  • From: Georgia
Posted by Rigidrider on Wednesday, June 7, 2017 7:58 AM

Bob, Nick, Andy... Thanks guys! Nick, B&W picture... not a bad thought... I'll try to photo shop one, but at present, photo editing on flickr (photo storage I use) is not working. They claim to be replacing it but its been awhile now, and they still show same message... 

When Life Hands You A Bucket Of Lemons...

Make Lemonade!

Then Sell It Back At $2 Bucks A Glass...

  • Member since
    September 2014
Posted by rooster513 on Wednesday, June 7, 2017 6:38 AM

Very well executed Doug! Love how it came out! I'll get you on the front page shortly.

-Andy

  • Member since
    August 2015
  • From: the redlands Fl
Posted by crown r n7 on Tuesday, June 6, 2017 7:28 PM

Very cool build you should add a black and white pic .


 Nick.

  • Member since
    February 2014
  • From: Michigan
Posted by silentbob33 on Tuesday, June 6, 2017 7:14 PM
That is a really cool combination Doug! Well done!

On my bench: Academy 1/35 UH-60L Black Hawk

  • Member since
    October 2008
  • From: Georgia
Posted by Rigidrider on Tuesday, June 6, 2017 1:34 PM

MM, Jack, TJ, Bish... Thank you all for the kind words... thats what I like about this site... good folks to build with, and great support and valuable information! I've got something else rolling around in my head that I'll have to do some research on that I think would fit in for this topic build. I'll check with Joe and Andy in a bit to be sure. Keep up the great work! Back in a bit...

Doug

When Life Hands You A Bucket Of Lemons...

Make Lemonade!

Then Sell It Back At $2 Bucks A Glass...

  • Member since
    December 2002
  • From: Bury St Edmunds, Suffolk, England
Posted by Bish on Tuesday, June 6, 2017 7:35 AM

I missed that this morning blackdog. Looks nice, i like the finish on the engine.

I am a Norfolk man and i glory in being so


On the bench: Airfix 1/72nd Harrier GR.3/Fujimi 1/72nd Ju 87D-3

  • Member since
    November 2003
  • From: Naples, FL
Posted by tempestjohnny on Tuesday, June 6, 2017 7:01 AM
Blackdog great looking set there. Doug that looks fantastic


  • Member since
    December 2002
  • From: Bury St Edmunds, Suffolk, England
Posted by Bish on Tuesday, June 6, 2017 12:43 AM

Great looking build Doug. Really wel done.

I am a Norfolk man and i glory in being so


On the bench: Airfix 1/72nd Harrier GR.3/Fujimi 1/72nd Ju 87D-3

  • Member since
    April 2006
  • From: ON, Canada
Posted by jgeratic on Monday, June 5, 2017 9:23 PM

Hi Doug, now isn't that grand when a neat idea comes to life. Yes

Really good scratch building to complete the concept, and both aircraft have been done up quite nicely.

regards,

Jack

  • Member since
    April 2015
Posted by Mopar Madness on Monday, June 5, 2017 8:16 PM

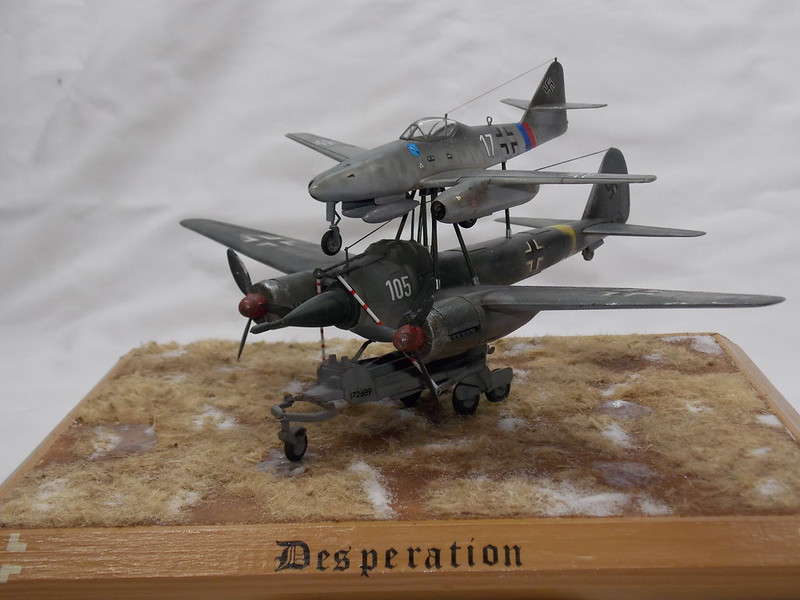
Desperation indeed.  That's a really nice Mistel!  Fabulous details and great paint.

Chad

God, Family, Models...

At the plate: 1/48 Airfix Bf109 & 1/35 Tamiya Famo

On deck: Who knows!

  • Member since
    October 2008
  • From: Georgia
Posted by Rigidrider on Monday, June 5, 2017 6:54 PM

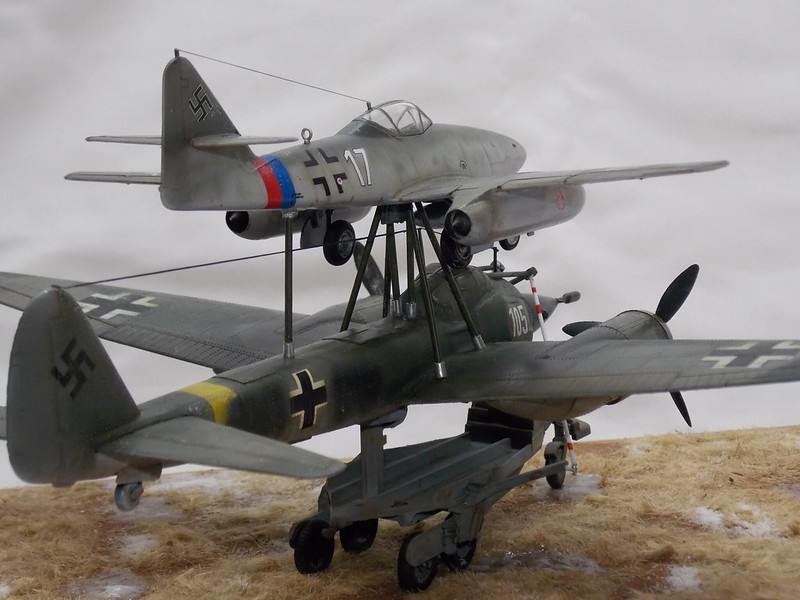
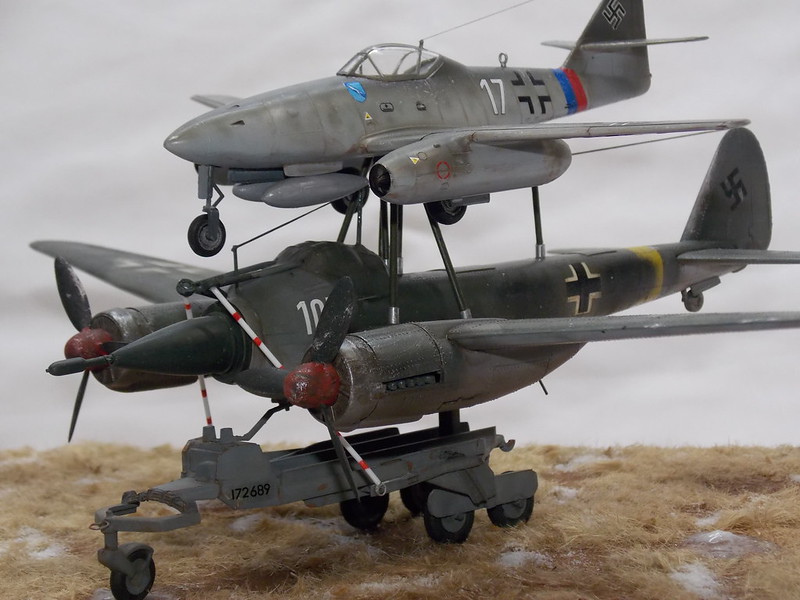
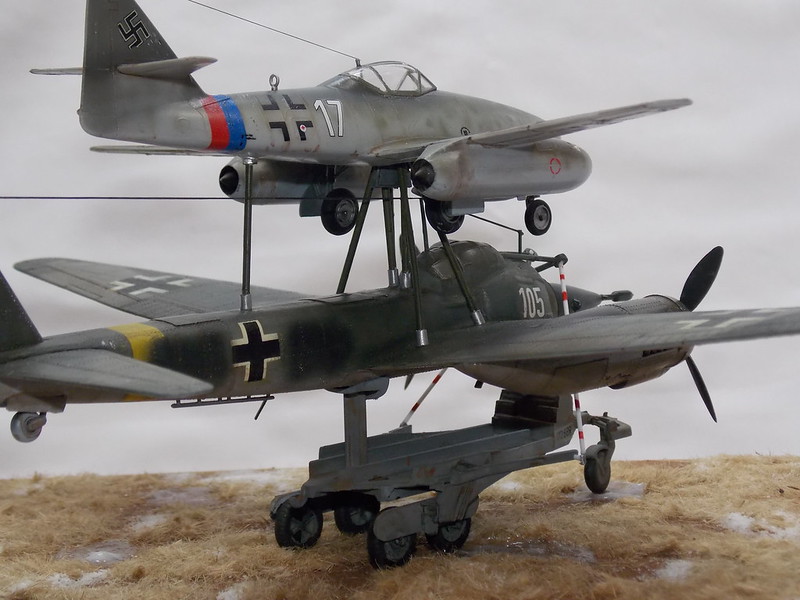
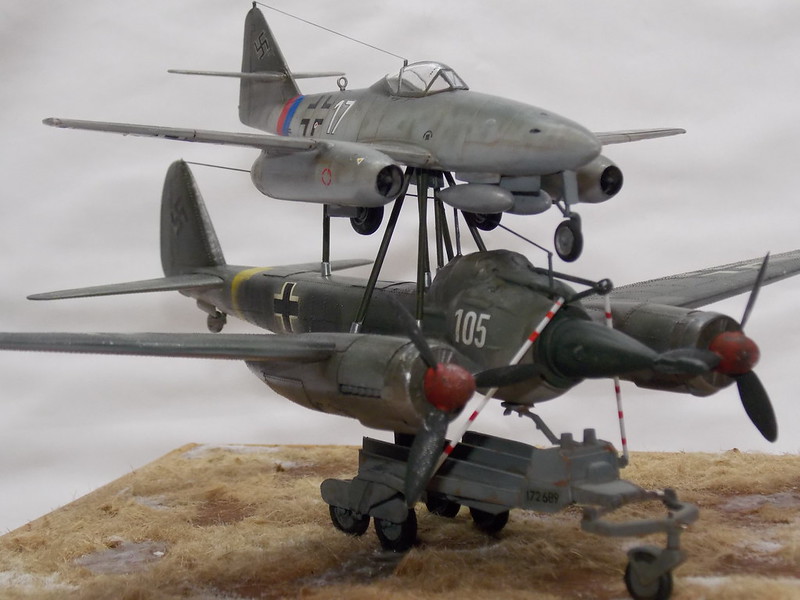
Afternoon all! Well I kinda jumped ahead of myself again, and before I knew it I was done. Any way, here are the pics I have ...
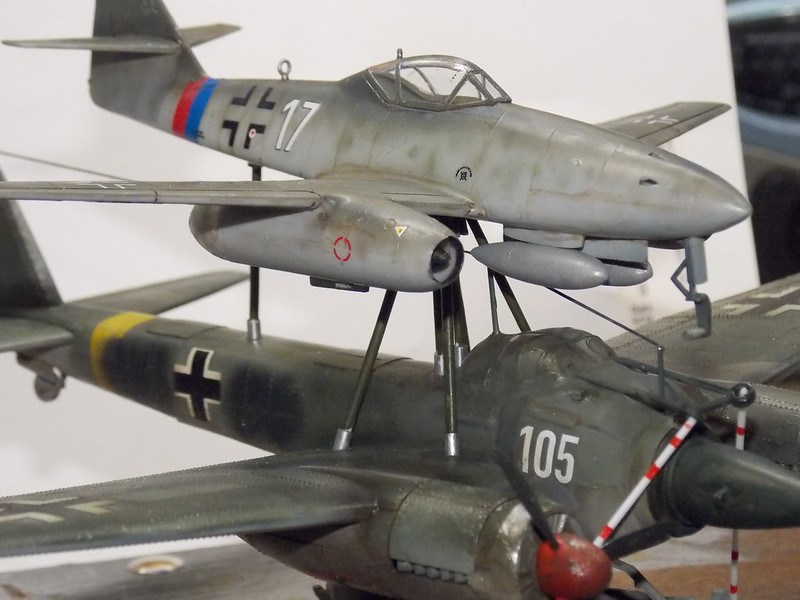
Heres about where I caught myself, Its nearing compleation now, I had tried to locate some more info on the mounting, but I was only able to find a few odd pictures with little info , They showed both round and flat bar stock used in mounts, but no info on the material, I chose round mounting hardware for this one. It looks pretty close to the pictures I found. 
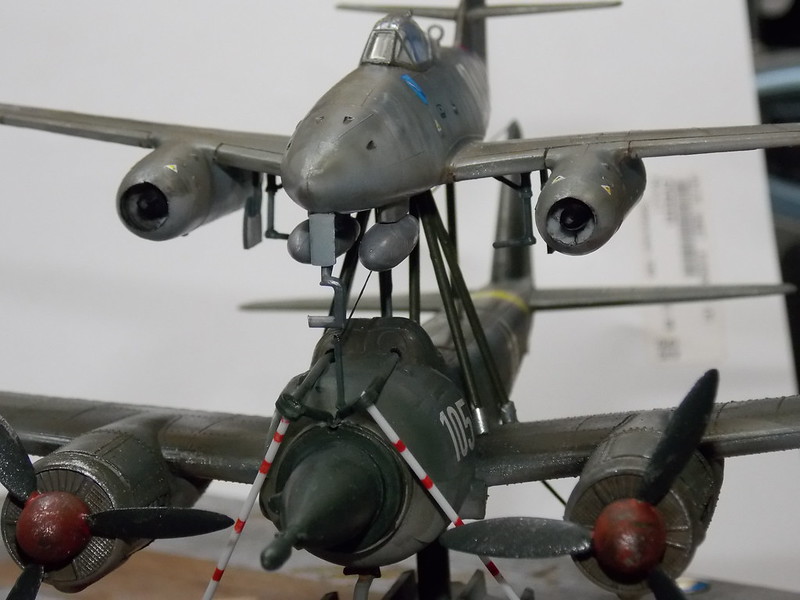
And here she is completed...
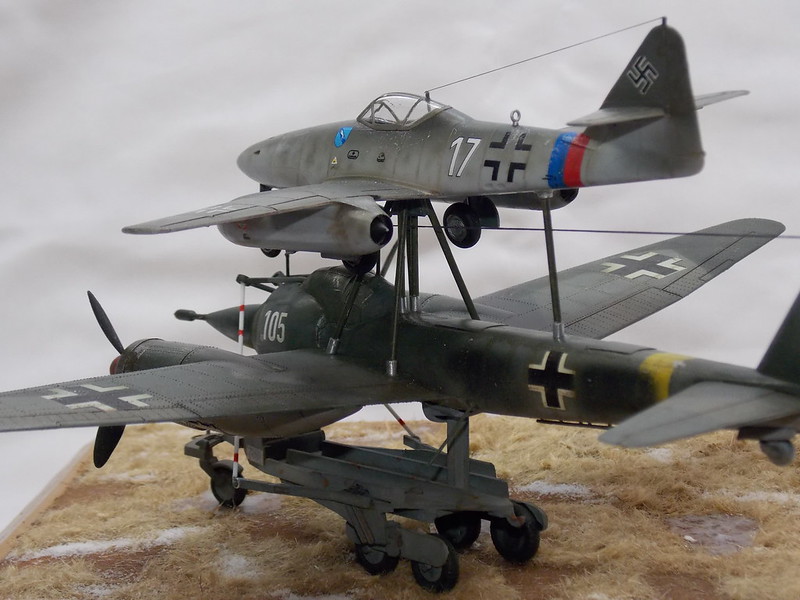
Well thats it, Thanks for a bit of "artistic freedom" and of course finished page picture is as always is your choise. Oh, by the way... I had asked someone familiar with flying a plane, and while not familiar with the mistel set up, he said that there were likely no 262 to Ju88 setups, due to the props, disrupting the air flow into the jet intakes. DUH... But anyway, ... Bish, I'm going to start the Commerative build shortly, Looking forward to that! I had in researching, found another pair, a Spit and an F/A 18,, also done in period colors for the 75th anniversary. Very cool looking. Take care all!

Doug

When Life Hands You A Bucket Of Lemons...

Make Lemonade!

Then Sell It Back At $2 Bucks A Glass...

  • Member since
    September 2013
Posted by blackdog62 on Sunday, June 4, 2017 8:31 PM

lol i managed 2 pics but no text. just what i have done the motor and the pit i still need to add the belts and some wash.

  • Member since
    September 2013
Posted by blackdog62 on Sunday, June 4, 2017 8:26 PM

  • Member since
    April 2006
  • From: ON, Canada
Posted by jgeratic on Sunday, June 4, 2017 6:14 PM

Nice Luftwaffe trio there, blackdog62Beer

---------------------------------

Thanks again, everyone.

So those square openings are indeed ammo ejection chutes.  The book I have from MPP on the 109 G Yellow Series *2nd Edition, did not include this detail for neither of their drawings of the G-6 and G-10.  In the print though, it does state the introduction of the MG 131 to G-5,G-6, and later models, would have those chutes installed.

regards,

Jack

edit, no open cowl display on my build, it will be inflight.

  • Member since
    September 2013
Posted by blackdog62 on Sunday, June 4, 2017 5:14 PM

another view the other one is FW-190 D9  and the 109 is academy

  • Member since
    September 2013
Posted by blackdog62 on Sunday, June 4, 2017 5:08 PM

johnnytempest heres my TA-152 C-1 from earlyr yhis year its hobby boss 1/48 kit its the onw with the light green camo.  VH  EY

  • Member since
    September 2013
Posted by blackdog62 on Sunday, June 4, 2017 4:35 PM

Is it posible this kit has mounts to suports to hold a plane full of explosives  underneath ?

but They are in right place for casing ejecting. 

  • Member since
    September 2013
Posted by blackdog62 on Sunday, June 4, 2017 4:31 PM

Lol once again i have posted before reading thr rest of the post.

It all looks fine to me. I resolve often to stretched sprue or even q-tips if it needs to be hollow so I can slide smaller sprue in the end. Like for those little fragile wind speed tubs that stick off the wings.

JOIN OUR COMMUNITY!

Our community is FREE to join. To participate you must either login or register for an account.

SEARCH FORUMS
FREE NEWSLETTER
By signing up you may also receive reader surveys and occasional special offers. We do not sell, rent or trade our email lists. View our Privacy Policy.