SEARCH FINESCALE.COM

Enter keywords or a search phrase below:

British Army Group Build 2020

61482 views
1206 replies
1 rating 2 rating 3 rating 4 rating 5 rating
  • Member since
    December 2002
  • From: Bury St Edmunds, Suffolk, England
Posted by Bish on Tuesday, June 23, 2020 2:17 PM

Looks nice there PJ, be good to see some paint on that.

I am a Norfolk man and i glory in being so


On the bench: Airfix 1/72nd Harrier GR.3/Fujimi 1/72nd Ju 87D-3

  • Member since
    November 2008
  • From: Central Florida
Posted by plasticjunkie on Tuesday, June 23, 2020 1:58 PM

Hey GS good to hear you are ok. Was wondering why you didn't post for a bit. I have talked to several persons who never knew they had Covid19 but only after the fact or suspect they had it back in January. I'm glad you blew past that sucker!!

I have been very busy tiling the kitchen and painting several rooms so by the end of the day I just wanna sit and do nothing. 

The Firefly is about ready for paint along with a Jagdtger I have been working on. Funny you mentioned AM decals as I just got in some with markings I like better. 
I got these

I'm almost ready for the paint stage. Just need to add some small parts.


 GIFMaker.org_jy_Ayj_O


Too many models to build, not enough time in a lifetime!!

  • Member since
    December 2002
  • From: Bury St Edmunds, Suffolk, England
Posted by Bish on Tuesday, June 23, 2020 1:34 PM

Thanks Greysnake. Thats coming on really well, nice work.

I am a Norfolk man and i glory in being so


On the bench: Airfix 1/72nd Harrier GR.3/Fujimi 1/72nd Ju 87D-3

  • Member since
    December 2002
  • From: Bury St Edmunds, Suffolk, England
Posted by Bish on Tuesday, June 23, 2020 1:31 PM

Gamera


Bish

Thanks G, ye, you might be right about that.

The Comet is looking very nice, and a good selection of figures. But a pity you didn't fancy doing the guy in the kilt Big Smile


Well, since you mentioned it I'll give the guy with the kilt and Tam O'Shanter a go as well. Wink


I'm sure Hannants does tarten paint Wink

I am a Norfolk man and i glory in being so


On the bench: Airfix 1/72nd Harrier GR.3/Fujimi 1/72nd Ju 87D-3

  • Member since
    November 2009
  • From: SW Virginia
Posted by Gamera on Tuesday, June 23, 2020 11:44 AM

Greysnake: Oh gee friggin' whiz! Thankfully no one I've known personally has picked up the Covid 19 bug but you're the third person here on this forum! It's great to hear you blew it out of your system- can't hurt to be immune to it from here on out. 

You're making great progress there! I've wondered about the new MiniArt kits- I've built the ancient Tamiya one. Looks good, I really like the tracks! 

And thanks. I've wanted a 1/35th Comet since I saw photos in a book on AFVs back in high school in the '80s. Really nice looking tank. Not the biggest fan of the Bronco kit but I think (and hope) the worst of it is behind me. And gotta love those MiniArt figures, I've picked up probably about a dozen boxes all put together of different nationalities so far. 

"I dream in fire but work in clay." -Arthur Machen


  • Member since
    February 2011
Posted by GreySnake on Tuesday, June 23, 2020 10:33 AM
AA, the second LRDG truck came out really well great work!
 
Gamera, I’m pretty jealous you have a Comet. I’ve been trying to find one for a couple years now. Hopefully I’ll be getting one soon. I’m really liking how it’s turning out. Those Miniart figures are great the same TC you are using is also in my Firefly. Maybe they are twins?
 
Jgeratic, nice work on the little Humber.
 
 
PJ, glad my WIP can be of some help. I can already tell yours is going to turn out much better. If you haven’t already I’d consider tossing the decals and getting some other ones as the kit ones are junk or at least mine were. The Firefly I built is going to be replaced by the Asuka one pretty soon as I’m really not happy with it.  
 
Bish, I’m really liking the Warrior and will be following with great interest.  
 
I finally have an update! The past couple weeks have been pretty rough for me. Ended up getting tested for Covid and came back that I was positive for antibodies and then had to wait a few days to find out if I had the life virus. Finally got the results and came back negative. So I’ve already had the virus at some point.
 
 
The lower hull was painted desert pink with a mix of Tamiya paints.  Had to go back over and paint it a second time with a different mixture as my first mix was too light. Also got the rubber on the road wheels painted.
 
Started back work on the Miniart tracks and after getting into a rhythm they aren’t bad at all. This run took about two hours of work and is halfway done. A couple weeks ago I used Modelkasten tracks for a Tristar Panzer I and the Miniart tracks are a breeze compared to those.
 
Here’s what they look like fitted so far. They fit really well just a little snug around the sprocket which is not a problem.

  • Member since
    May 2011
  • From: Honolulu, Hawaii
Posted by Real G on Monday, June 22, 2020 6:26 PM

I think the incorrect torsion arm direction was just sloppy research.  Sometimes kit makers just mirror left/right details.

I was also surprised to learn that several AFVs had torsion arms that swing forward.  Was this to keep the road wheels more or less parallel, or maybe it was just for better packaging/spacing of the torsion bars?

“Ya ya ya, unicorn papoi!”

  • Member since
    November 2009
  • From: SW Virginia
Posted by Gamera on Monday, June 22, 2020 4:41 PM

Bish

Thanks G, ye, you might be right about that.

The Comet is looking very nice, and a good selection of figures. But a pity you didn't fancy doing the guy in the kilt Big Smile


Well, since you mentioned it I'll give the guy with the kilt and Tam O'Shanter a go as well. Wink

"I dream in fire but work in clay." -Arthur Machen


  • Member since
    December 2002
  • From: Bury St Edmunds, Suffolk, England
Posted by Bish on Monday, June 22, 2020 2:29 PM

Thanks G, ye, you might be right about that.

The Comet is looking very nice, and a good selection of figures. But a pity you didn't fancy doing the guy in the kilt Big Smile

I am a Norfolk man and i glory in being so


On the bench: Airfix 1/72nd Harrier GR.3/Fujimi 1/72nd Ju 87D-3

  • Member since
    November 2009
  • From: SW Virginia
Posted by Gamera on Monday, June 22, 2020 11:15 AM

Wow! That looks great Bish!!! 

Weird how they reversed the suspension arms though. I'm wondering if it were easier to mold that way. 

Looking forward to seeing how she looks with all the AA parts added. 


Oddly enough I've been making pretty good time on the Comet. I added the road wheels yesterday and the pin washes are close to being done. I'm going to try adding the tracks soon. Wish me luck. Because of how the mud shields attach to the fenders I went and attached them for painting- figuring I can thread the 'rubber band' type tracks though there. If they don't work out and I have to add aftermarket treads I'll have to pull them off and repaint the area. I'm really hoping it doesn't come to that. 


Anyway I found the figures I bought (they've vanished twice!) and pulled out and assembled figures for the TC (centre) and the gunner (SE corner).

And I wanted a standing figure, so I pulled out the second to left guy. I'll see about getting some more photos up when there's more to show... 


"I dream in fire but work in clay." -Arthur Machen


  • Member since
    December 2002
  • From: Bury St Edmunds, Suffolk, England
Posted by Bish on Sunday, June 21, 2020 10:33 AM

Thanks Jack.

I am guessing its something many people would not notice. I have not seen it mentioned anywhere. It was just by fortune i noticed that the wheel stations didn't seem right, the fact that they seemed to be to lined up just stood out. It was the Prime Portal site that showed me the error.

I'll be interested to see if anyone on Brit Modeller has any comments as i know there's a few British vets on there many of who have worked around armour.

Thanks for that link, thats a stunning conversion, more so that its scratch built.

I am a Norfolk man and i glory in being so


On the bench: Airfix 1/72nd Harrier GR.3/Fujimi 1/72nd Ju 87D-3

  • Member since
    April 2006
  • From: ON, Canada
Posted by jgeratic on Sunday, June 21, 2020 9:29 AM

Hello Bish, much respect to your knowledge and improvements of the base kit. 

That is a shame about the incorrect facing of the hull details on the one side.  Out of curiosity, went over to the modern section of missing-lynx to see if anyone bothered correcting that.  Usually the membership would be all over such a blunder, but I did not find any mention of said error.  Even a build article on the Academy kit does not address it:

http://www.missing-lynx.com/articles/modern/gdwar/gdwar.htm


regards,

Jack

  • Member since
    December 2002
  • From: Bury St Edmunds, Suffolk, England
Posted by Bish on Sunday, June 21, 2020 5:18 AM

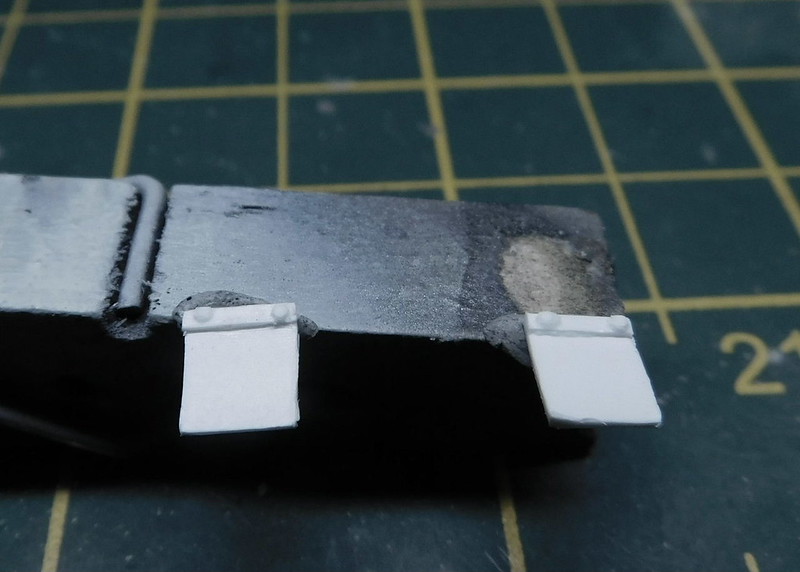
Work has been progressing nicely on the Warrior. In addition to all the AM, i am also doing some scratch building, partly down to an issue with the AA conversion set that doesn't convert the from right of the hull, and also some other minor changes to the kit. And i decided to deal with one of these later changes first, the handles and covers for the fire engine compartment suppression system. There is one located on each side of the hull.

As you can see they are molded on and so very flat and un-natural looking. The real flaps are often curled up through regular lifting as part of the monthly inspections and other check. So the first thing i did is make some new ones with styrene sheet and strip useing the molded parts as a guide.
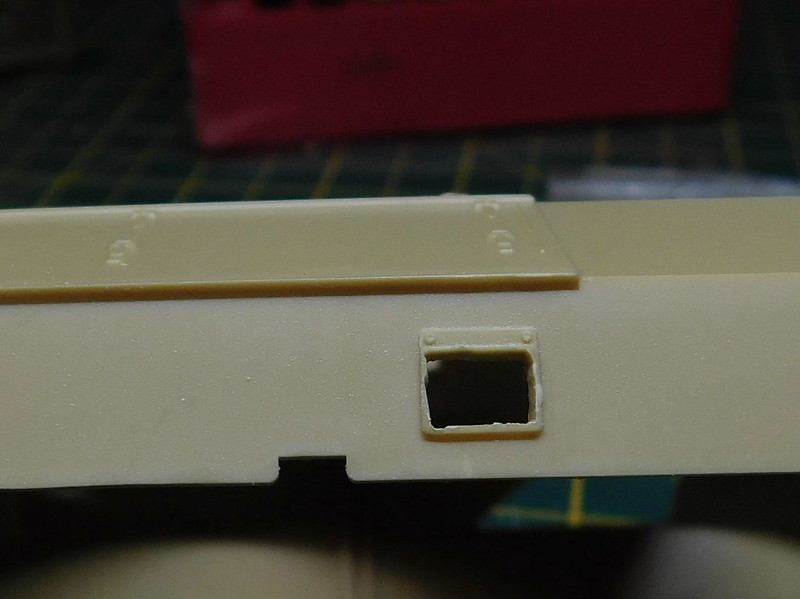
I then cut out the centre of the molded part leaving the securing strip and a bit around the edge.
This was then sanded flat and the hole boxed in.
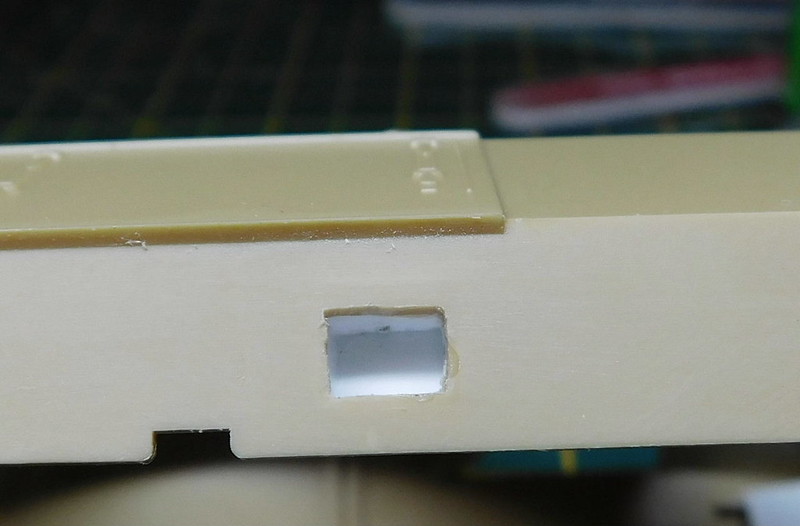
I then took a large piece of styrene rod, drilled it out, fitted into the hole. The space around was filled and then sanded flush. Now i just need to add the handle which i will probably have to scratch build.

I then decided to fit the running gear, a nice easy job, just attach the axle arms. But straight away i realised something didn't look right, and i realised that the opposing wheel stations didn't line up correctly. After a few moments and checking with a ruler, i noticed that the securing points for the torsion bars don't line up with there respective axle arm postions on the other side. This means that the torsion bars would run an angles across the hull and would have to cross over each other. makeing them un-workable.

Then i realised where the issue was. The wheel stations on the right side are the wrong way round. Both sides have the torsion bar securing points to the front of each wheel station, but on the right, they should be at the rear. This image shows the right side and i have indicated one of the securing points.

This photo from Prime Portal is also of the right side, this time a real warrior of course, and again, i have marked the torsion bar securing point.

I am really annoyed about this. I wanted this bild to be as accurate as possable, more so than with any other build. And this is such a silly mistake. Its clear the makers of this kit have no idea how a torsion bar suspensipon works.

I spent a while considering my options. I thought about slicing off each wheel station and turning them around. But they are so thin i would be sure to destroy at least one, and its not a simple case of just turning some of them. But, i do have one thing in my favour. After 2 weeks on salisbury plain, this area is covered in mud and dust that sets like concrete. So, i'll just have to cover it up. But i am still bloody annoyed.

I also got the final drive housing fitted to the front. These are AA resin parts with weld seams around them and nice texture. You have top fill in the large hole for the kit part.
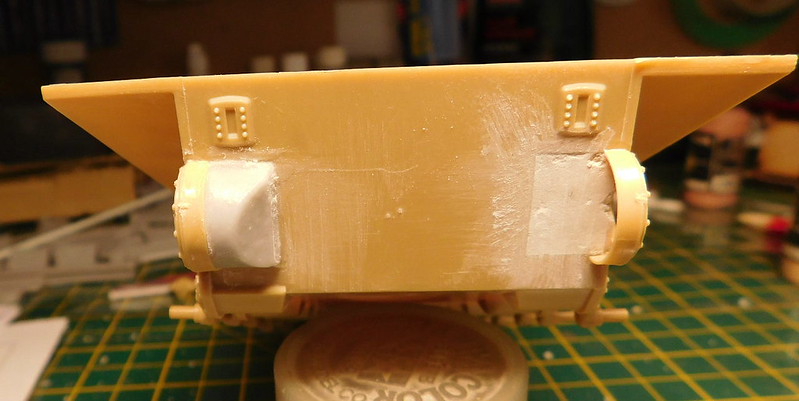
Next up i wanted to tackle the part of the conversion that the AA set leaves out, the front right corner. I think this is understandable given the shortage of close up photo's of that area of the Command and Artillery variants.

This pic shows the front of the upper hul The bit in blue and the bases for the lifting eyes which have to be removed, AA does tell you to do that. The large hole in the middle is where the main engine deck goes, and this is spot on for a 510. This would be removed along with the panels on top when lifting out the power pack. But on a 511, this piece of decking extends right to the edge, as indicated by the red line. Also, the molded piece to the bottom, which is the tool rack for the picks and sledge hammer need to be moved slight to the left side, right in the pic.

This is the main engine deck with the radiator covers. The parts indicated and the securing clamps and will have to be sliced off and moved to the new outer edge of the panel.

And this is the side panel. The liurve, whcih i had started to remove before i thought about getting a pic, need to come off. Thats fitted to the 510, 514 and 515 but not the 511. I also need to fit hinges to the bottom as this has to be opened to lift the main deck and reposion the handles.

And finally the light guards. On a 510, these are the same left and right. But on a 511, but the left one is the same as the 510, the right one does not extend so far back, otherwise it would extend onto the main engine deck.

And this is the result of the work need to correct this. The engine deck was fitted after the 2 clamps had been removed, and the seamed was filled in. The front of the engine deck has a slightly raised edge, so i carried this on with some styrene strip. The rear arms of the light guard were cut off, shortened and re-attached. I made a new tool rack useing the kit one as a guide, and after sanding the kit part smooth, i fited the new piece, 3mm further from the light that the kit part.

The side panel was smoothed out, the kit handles placed in the new positions. I thought i might have to scratch build the hinges, but after fitting the resin exhaust louvre, i realised the kit part had the same hinges, so this were sliced off and used here.
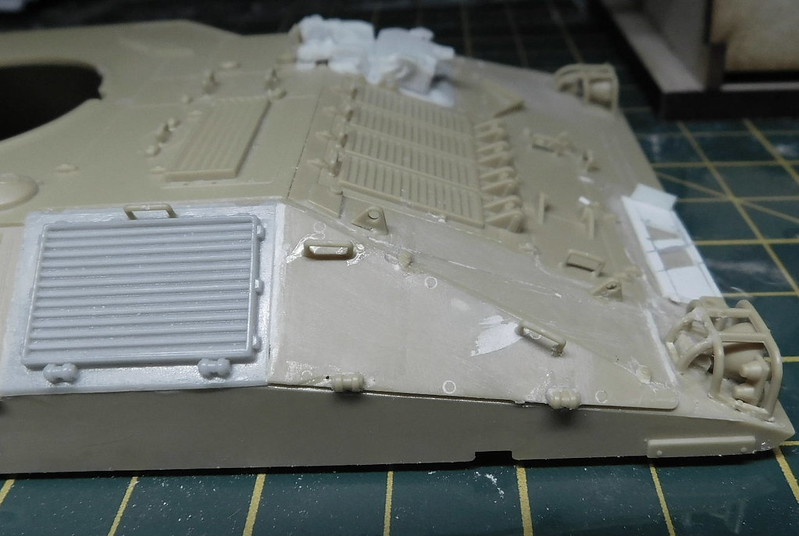
And you can see here that other parts have been fitted, all the handles, the new drivers hatch, lights etc. The lights are a vert tight fit as the edges of the light guards were to thick and i cut them down, but it meant the fit of the lights was slightly out. Also, the lights have solid lenses. But i will be covering these with sandbags anyway, so thats not a problem. You can just see a small object just between the light guard and the new tool rack. I don't kow anyone who ever figured out what that is for, but its on the vehciles. I thouhgt i mght have to scratch that, but after fitting the new drivers hatch, i noticed that the hinges for the kit hatch were exactly the same, and so i used one of those.

Also made a start on the rear deck, removing the periscope bases and fitted the top hatch. The domed piece on the edge of the hull with the 4 bolt heads on top is part of the NBC filter system. AA says not to fit this, but thats not correct.

And finally the right side with the resin exhaust part. The molded on straps to the rear will have to be removed and i will make a cover for the side stowage bin.

There a a few photo's on line of 511's, but most are not close up or very clear. One of the best is on Wikipedia, the main photo is labeled as a 510, but its nit, its a 511. As my memory is having to stretch back 13 years, all these pics have been useful in confirming certain items and the location of some thing. But i am guessing many of these did not come out until after AA did there conversion set. So they just used what info they had at the time.

More soon.

I am a Norfolk man and i glory in being so


On the bench: Airfix 1/72nd Harrier GR.3/Fujimi 1/72nd Ju 87D-3

  • Member since
    November 2008
  • From: Central Florida
Posted by plasticjunkie on Wednesday, June 17, 2020 1:47 PM

Thanks guys. I have never had fit issues with the many Dragon kits I have built, mainly German armor but this one is quite a rascal in the parts fit department.

It's slowly coming around and wonder if the Dragon Firefly Ic in my stash has the same issues?

 GIFMaker.org_jy_Ayj_O


Too many models to build, not enough time in a lifetime!!

  • Member since
    December 2002
  • From: Bury St Edmunds, Suffolk, England
Posted by Bish on Wednesday, June 17, 2020 12:21 PM

Nice work fizxing thos gaps PJ. Not somthing i have had to deal with on Dragon armour kits.

I am a Norfolk man and i glory in being so


On the bench: Airfix 1/72nd Harrier GR.3/Fujimi 1/72nd Ju 87D-3

  • Member since
    November 2009
  • From: SW Virginia
Posted by Gamera on Wednesday, June 17, 2020 11:23 AM

PJ: That does look good! I've never had a problem that big on a Dragon M4 so far- cross your fingers. Looks perfect now though! 

Jack: Looking forward to more of your armoured car. 

"I dream in fire but work in clay." -Arthur Machen


  • Member since
    April 2006
  • From: ON, Canada
Posted by jgeratic on Wednesday, June 17, 2020 10:42 AM

PJ, great job of wrestling those parts to fit.  I have one of those Dragon Shermans stitting as a shelf queen.  One of these days will get back to it with the resin replacements parts.


regards,

Jack

  • Member since
    November 2008
  • From: Central Florida
Posted by plasticjunkie on Wednesday, June 17, 2020 8:38 AM

So I put on the transmissiong housing to see the fit and was horrified at the lousy fit and large gaps. Thank God for my small DeWalt clamps that somehow forced everything in place leaving a perfectjoin ALL around requiring no filler at all.

I should have taken a picture of the gaps but forgot, believe me they were there. The  clamps and Plast-I-Weld worked like magic! Just a light sanding across the bottom join.

gaps are gone even here!

The turret is beginning to look like a Firefly's

I would have been done with this turkey long ago but I'm in the process of tiling the kitchen backsplash. Will grout in a few and the wife wants the kitchen re painted so that takes most of my time. By nightitme I feel like vegging.

 GIFMaker.org_jy_Ayj_O


Too many models to build, not enough time in a lifetime!!

  • Member since
    November 2009
  • From: SW Virginia
Posted by Gamera on Tuesday, June 16, 2020 7:49 AM

Thanks Jack! 

I figured it was more like 'So what happened to Iron Duke I-III'?

'Well, One was brewed up by the Germans, Two was brewed up by the Germans, and Three was brewed up by the Germans...'

Indifferent

'Um, could I get a safer job??? Like clearing minefields???'


Yeah, it does make sense that the tank was probably replaced due to upgrades and lesser damage as well. I'd guess that the Comet being a very late war tank Iron Duke I-III might have been Cromwells or M4s?  


"I dream in fire but work in clay." -Arthur Machen


  • Member since
    April 2006
  • From: ON, Canada
Posted by jgeratic on Monday, June 15, 2020 3:59 PM

Hi Cliff, good progress on the Comet. I like the lines of that tank, very modern looking, though it did enter the closing stages of WWII.

My guess about the name is the crew continuously used the same one, adding chronologically a Roman numeral each time they were issued a new vehicle, whether it be due to battle damage replacement or upgrade.

regards,

Jack

  • Member since
    December 2002
  • From: Bury St Edmunds, Suffolk, England
Posted by Bish on Monday, June 15, 2020 1:22 PM

Nice work there PJ, Dragon do like their high parts count.

I am a Norfolk man and i glory in being so


On the bench: Airfix 1/72nd Harrier GR.3/Fujimi 1/72nd Ju 87D-3

  • Member since
    December 2002
  • From: Bury St Edmunds, Suffolk, England
Posted by Bish on Monday, June 15, 2020 1:20 PM

Thats looking very nice G. One does wounder what happened to I to III.

I am a Norfolk man and i glory in being so


On the bench: Airfix 1/72nd Harrier GR.3/Fujimi 1/72nd Ju 87D-3

  • Member since
    November 2009
  • From: SW Virginia
Posted by Gamera on Monday, June 15, 2020 11:22 AM

Thanks guys, actually the Comet was sorta an interm model between the Cromwell and the Centurion. 

If I were assigned to this tank the first thing I'd wonder is 'what happened to Iron Duke I-III'?!? 


I know what you mean PJ, the Tasca/Asuka M4s are just as bad with the overly complex bogies. The drive sprockets are something else again- I think only Dragon makes 'em that way. I've built a few of their tanks and it's enough to make you scream. 

"I dream in fire but work in clay." -Arthur Machen


  • Member since
    November 2008
  • From: Central Florida
Posted by plasticjunkie on Monday, June 15, 2020 7:38 AM

Bish, that looks like tons or extra work with all that pe but will look outstanding once done.

Gamera, that looks very good. That is a good looking tank, i thought it was a Centurion when i first looked at it.

I have been plugging away at the Dragon OVER engineered drive train and man what a PITA to assemble multiple parts when it can be simplified to just a couple of parts. 

Each bogie is made out of 10 parts! This could have been reduced down to at least 6.

The lower hull has parts that are not even listed in the instructions  and other parts for different versions that can be mistaken for the ones correct on this version.

The front drive sprokets are also multi part that could have been cut down to just 2.

 GIFMaker.org_jy_Ayj_O


Too many models to build, not enough time in a lifetime!!

  • Member since
    December 2002
  • From: Bury St Edmunds, Suffolk, England
Posted by Bish on Monday, June 15, 2020 6:44 AM

Thanks G. I will check yours out tonight as i can't see your pics at the minute.

I am a Norfolk man and i glory in being so


On the bench: Airfix 1/72nd Harrier GR.3/Fujimi 1/72nd Ju 87D-3

  • Member since
    November 2009
  • From: SW Virginia
Posted by Gamera on Sunday, June 14, 2020 8:56 PM

Bish: That looks cool! Looking forward to seeing how all the extra detail parts fit in there!


I got a bit more done on the Comet this weekend. Primed in the British OD Green Jack suggested.

I did some colour modulation and pre-shading- sorry I didn't take a photo of that. I already had the airbrush out so I went ahead and hit her with a gloss coat this morning and started decaling this evening.

"I dream in fire but work in clay." -Arthur Machen


  • Member since
    December 2002
  • From: Bury St Edmunds, Suffolk, England
Posted by Bish on Sunday, June 14, 2020 10:46 AM

Starting fully on my next entry tonight, Academy's 1/35th warrior converted to a 511 Command vehicle.

I am building the vehicle as it looked in the summer of 2006. This is after the clansman radio's had been replaced with Bowman sets and the old style drivers hatch with 1 vision block was replaced with a new one with 3. But before she was fitted with Chobham armour and other extras for deployment to Iraq in Op Telic 9 during the winter of 06/07.

I am useing an Accurate Armour 511 conversion set as well as the drivers hatch.

I have a set of Fruil tracks and some resin wheels from Panzer art which have a couple of minor features the kit ones miss.

Also from Accurate Armour, the Bowman antenna bases and from RB Models a metal barrel for the 30mm Rarden.

I say making a proper start as for the past week or so i have been getting the tracks together. A bit different from my normal Fruil sets as these mave small metal track bolts heds to close off the end where the wire goes in. Fiddly but a nice touch. 82 links in each track.

More to follow.


I am a Norfolk man and i glory in being so


On the bench: Airfix 1/72nd Harrier GR.3/Fujimi 1/72nd Ju 87D-3

  • Member since
    November 2008
  • From: Central Florida
Posted by plasticjunkie on Wednesday, June 10, 2020 1:47 PM

Thanks guys. I'm sure more surprises are ahed on this one.

 GIFMaker.org_jy_Ayj_O


Too many models to build, not enough time in a lifetime!!

  • Member since
    December 2002
  • From: Bury St Edmunds, Suffolk, England
Posted by Bish on Wednesday, June 10, 2020 1:33 PM

Thats some lovely work there PJ, turret looks amazing and nice job removing those bolt heads.

I am a Norfolk man and i glory in being so


On the bench: Airfix 1/72nd Harrier GR.3/Fujimi 1/72nd Ju 87D-3

  • Member since
    May 2011
  • From: Honolulu, Hawaii
Posted by Real G on Wednesday, June 10, 2020 1:08 PM

PJ,

That DML Firefly is a box full of... stuff to do.  Tongue Tied  Great work on the turret seams.  You'll find the front hull and final drives look like they came from two unrelated kits.  But I know you'll tackle them fine.  Love the Firefly.  One of my favorite Sherman variants, along with the Israeli M51.

“Ya ya ya, unicorn papoi!”

JOIN OUR COMMUNITY!

Our community is FREE to join. To participate you must either login or register for an account.

SEARCH FORUMS
FREE NEWSLETTER
By signing up you may also receive reader surveys and occasional special offers. We do not sell, rent or trade our email lists. View our Privacy Policy.