SEARCH FINESCALE.COM

Enter keywords or a search phrase below:

Messerschmitt/MBB GB

54704 views
749 replies
1 rating 2 rating 3 rating 4 rating 5 rating
  • Member since
    March 2017
Posted by Armor_Aficionado on Tuesday, May 25, 2021 2:27 AM

Continuing building up the engine and cockpit on the Bf-109 F2:


  • Member since
    November 2009
  • From: SW Virginia
Posted by Gamera on Monday, May 24, 2021 7:45 PM

Nick: That's a beautiful job on the F-104G. Lovely work!!! Nice work on the base too! Heart

Zvezda: Great job there too! Love the yellow nose and mottling! Heart

Bish: She looks good! Nice going! 


"I dream in fire but work in clay." -Arthur Machen


  • Member since
    August 2015
  • From: the redlands Fl
Posted by crown r n7 on Monday, May 24, 2021 4:59 PM

Zvezda. fanstastic Me 109E !


 Nick.

  • Member since
    January 2013
  • From: Athens, Greece
Posted by Zvezda1980 on Sunday, May 23, 2021 6:12 PM

The works in this GB are phenomenal.

The precious  little time available for modelling was devoted to building, thus:

Below a summary of the progress during the last few weeks.

Gloss coat and decals

Flat coat, assembly of landing gear, canopy, IP & gunsight, cannons, etc.

Kit placed in a generic scenery, used for photo shooting


  • Member since
    April 2020
  • From: West Texas
Posted by JBRaider on Sunday, May 23, 2021 4:57 PM

Awesome job on those 104s Nick!

the finish on the 262 came out great Bish, I have been wanting to try some of the Flory washes but haven't gotten a chance to order any. Everytime I check with the supplier here in the States they don't have any of the Black/Grime available.

  • Member since
    July 2014
Posted by modelcrazy on Sunday, May 23, 2021 2:08 PM

I never heard of that movie so I just found it on YouTube. Sounds like a good watch for a Sunday of working on kits.

Steve

Building a kit from your stash is like cutting a head off a Hydra, two more take it's place.


http://www.spamodeler.com/forum/

  • Member since
    November 2008
  • From: Central Florida
Posted by plasticjunkie on Sunday, May 23, 2021 11:28 AM

Great movie indeed. It's amazing all he went thru to make it back to Germany only to get killed shortly after he arrived back.

 GIFMaker.org_jy_Ayj_O


Too many models to build, not enough time in a lifetime!!

  • Member since
    December 2002
  • From: Bury St Edmunds, Suffolk, England
Posted by Bish on Sunday, May 23, 2021 8:30 AM

Roster updated. I haven't seen that movie in years.

I am a Norfolk man and i glory in being so


On the bench: Airfix 1/72nd Harrier GR.3/Fujimi 1/72nd Ju 87D-3

  • Member since
    August 2015
  • From: the redlands Fl
Posted by crown r n7 on Sunday, May 23, 2021 7:41 AM

The one that got away..pretty good movie.

thanks Steve.


 Nick.

  • Member since
    July 2014
Posted by modelcrazy on Saturday, May 22, 2021 9:10 PM

Nice build Nick. Love the camo.

Here is the box art Bish. It's a 109E-4 not E-2.


Flown by Oberleutnant Franz Xaver Baron Von Werra. On Sep 5th 1940 he was shot down over Kent and was sent to a Canadian POW camp. He escaped (he was the only POW that ever escaped a Canadian POW camp) He returned to Germany and was awarded the Knights Cross of the Iron Cross. He was instrumental in improving German treatment of Allied prisoners in German POW camps after reporting to the High Command how he was treated as a POW. Werra was presumably killed in a 109F-4 during a practice flight, crashing in the sea after an engine failure. His body was never recovered.

Steve

Building a kit from your stash is like cutting a head off a Hydra, two more take it's place.


http://www.spamodeler.com/forum/

  • Member since
    December 2002
  • From: Bury St Edmunds, Suffolk, England
Posted by Bish on Saturday, May 22, 2021 2:28 PM

That is a lovely looking build Nick. Great paint job and i love the finish. Thanks for building that here, i had not expected to see one of these. I'l get you on the front page.

I am a Norfolk man and i glory in being so


On the bench: Airfix 1/72nd Harrier GR.3/Fujimi 1/72nd Ju 87D-3

  • Member since
    August 2015
  • From: the redlands Fl
Posted by crown r n7 on Saturday, May 22, 2021 1:56 PM

Gamera and Bish thank you for your comments much appreciated.

Bish. another great build, stunning Me 262. very unique camo.

The F-104G is done. Hasegawa 1/48 the decals are from the kit.

Paint. A/K interactive Luetwaffe 1960/70 colors with tamiya clear gloss and flat.

weathering. I used watered down Gamblin pigments.

Thank you for watching and your comments.


 Nick.

  • Member since
    December 2002
  • From: Bury St Edmunds, Suffolk, England
Posted by Bish on Saturday, May 22, 2021 12:04 PM

Thanks Steve, and yep, thats fine. i will make the change.

I am a Norfolk man and i glory in being so


On the bench: Airfix 1/72nd Harrier GR.3/Fujimi 1/72nd Ju 87D-3

  • Member since
    July 2014
Posted by modelcrazy on Saturday, May 22, 2021 10:49 AM

Cracking Swallow Bish Yes

I'm going to start my build but if you don't mind, I want to switch from the 410 to the 72 Airfix 109E-2. It'll be a much faster build and believe it or not, I don't have a single 109 on my shelf although I have 3 in the stash Embarrassed

Plus, it'll go with the Mk.1 Spit I'm working on. I'm thinking of showing them both in a case as a nemesis display.

Steve

Building a kit from your stash is like cutting a head off a Hydra, two more take it's place.


http://www.spamodeler.com/forum/

  • Member since
    December 2002
  • From: Bury St Edmunds, Suffolk, England
Posted by Bish on Saturday, May 22, 2021 2:02 AM

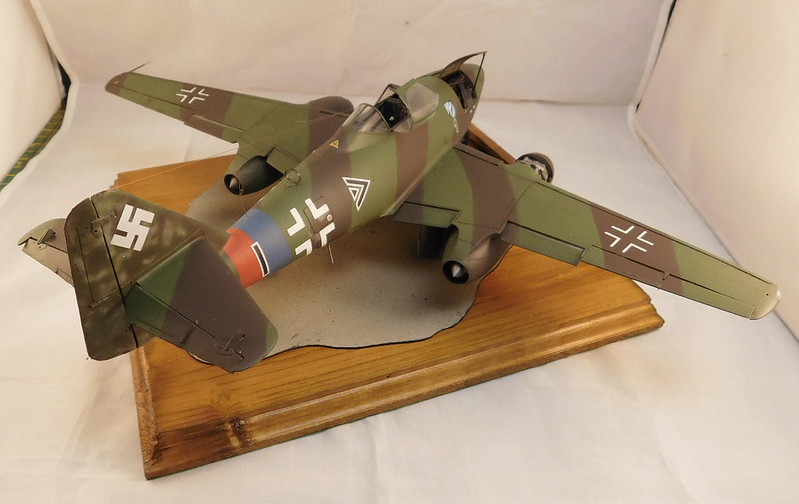
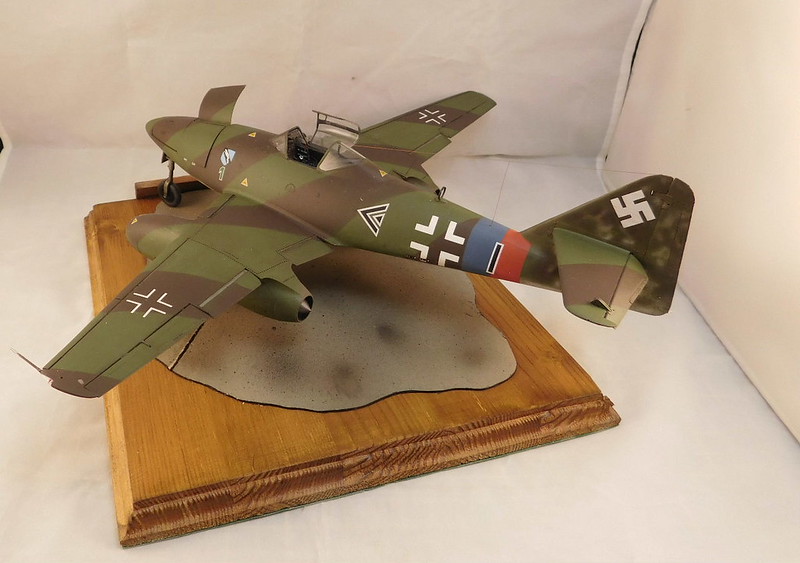
Got the 262 completed a couple of night ago. I changed my mind for the weathering and just went with a Flory wash, but i didn't use my usualy mix of greys but followed PJ's lead and use grime and it had a nice effect.
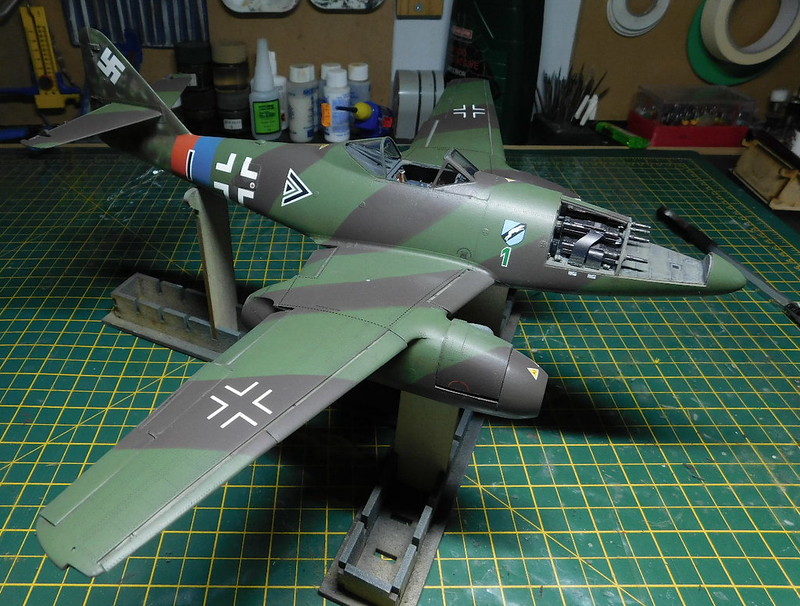
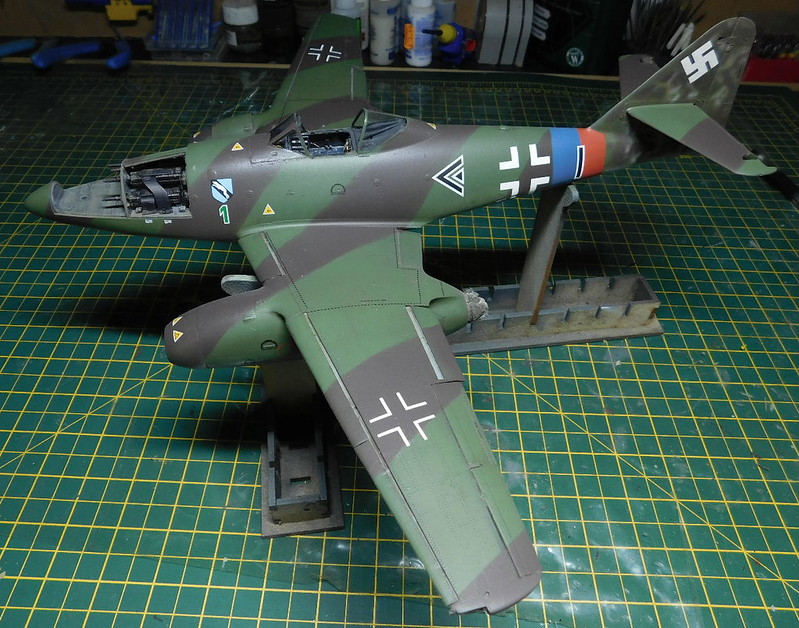
All the final bit were adde and it was secured to the base. I was surprised that it was a tail sitter, early on i didn't think it would be. I used some of the Eduard PE wire but also used my own wire in some places such as the brake lines. I didn't wire up the engine, preffering just to leave as is.
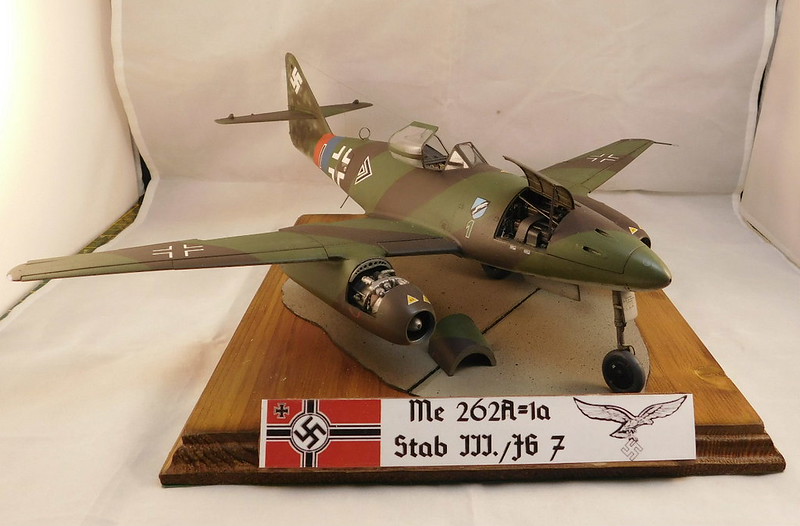
The panel on the right side of the fuselage is not held in place, so that can be remove.
The forward panel over the guns and the one for the left side of the gun bay are removable. I figured after geting metal barrels, it would be a shame to have them covered up.
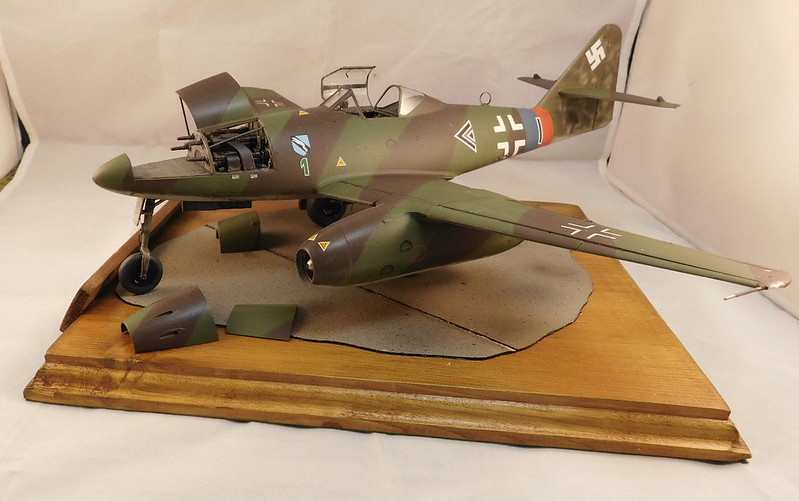
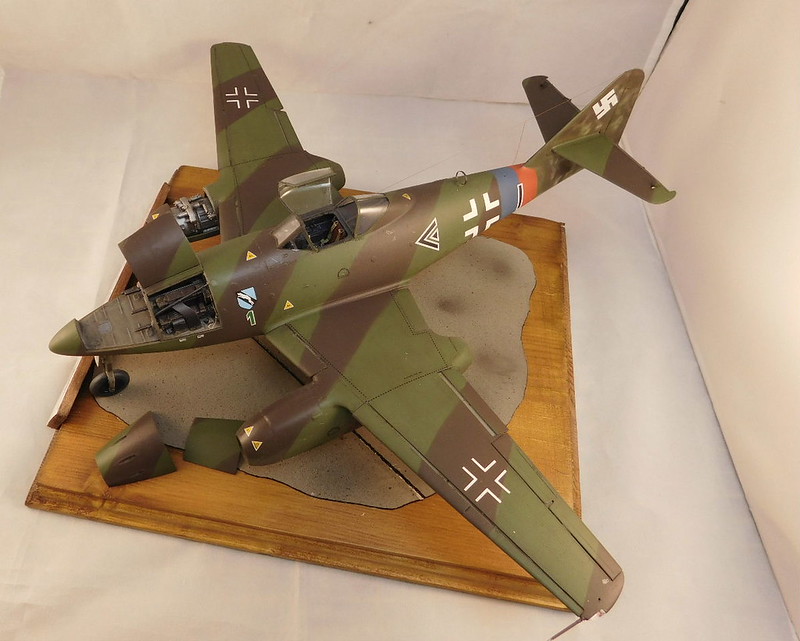
I have not aded chocks to any of my 32nd builds as they have all been on grass or sand till now. But i figure this could do with some so going to order a set from Hannants next week. This was a nice bild with some great detail, though some of the fit could have been better, but nothing that could not be solve.

My next build for this GB will take me from the world first operational jet to one of the worlds most advance modern jets, the Eurofighter Typhoon later in the year.


I am a Norfolk man and i glory in being so
 

On the bench: Airfix 1/72nd Harrier GR.3/Fujimi 1/72nd Ju 87D-3

  • Member since
    November 2009
  • From: SW Virginia
Posted by Gamera on Friday, May 21, 2021 7:59 PM

Superb job Nick!!! Just beautiful!!! Heart

Looking forward to seeing the G finished up. 

"I dream in fire but work in clay." -Arthur Machen


  • Member since
    December 2002
  • From: Bury St Edmunds, Suffolk, England
Posted by Bish on Friday, May 21, 2021 2:44 PM

That loks amazing, awsome job on the metal finish. I will add a pic of that on the front when the G is done.

I am a Norfolk man and i glory in being so

 

On the bench: Airfix 1/72nd Harrier GR.3/Fujimi 1/72nd Ju 87D-3

  • Member since
    August 2015
  • From: the redlands Fl
Posted by crown r n7 on Friday, May 21, 2021 10:50 AM

F.M. and Gamera. many thanks .The F-104C is done with some quick pics its not the Me.built one but, it gets honorable mention..

Hasegawa. F-104C in 1/48.The decals are from the kit but w/o the flashly colors.

painted with Vallejo metal color sets and tamiya gloss and flat clear.

Weathering was done with Gamblin black pigment.

The F-104G pics soon to follow. 


 Nick.

  • Member since
    November 2009
  • From: SW Virginia
Posted by Gamera on Friday, May 21, 2021 10:37 AM

They look fantastic!

I too love the look of the Day-Glo orange on the wing tanks, it really stands out against the camo. And the white wings on the NM F-104.

"I dream in fire but work in clay." -Arthur Machen


  • Member since
    August 2015
  • From: the redlands Fl
Posted by crown r n7 on Thursday, May 20, 2021 3:21 PM

I sprayed the hi-viz section with light gray and pannel shaded with dark gray. I used AK-2171 luminous orange air series,(i thinned out about 1 to 3) sprayed about 3 light coats . then I sealed it with tamiya clear gloss over all for a semi gloss finish.


 Nick.

  • Member since
    September 2011
  • From: Milaca, Minnesota
Posted by falconmod on Thursday, May 20, 2021 12:45 PM

How did you get the variation on the tip tank hi-viz paint?

On the Bench: 1/72 Ki-67, 1/48 T-38

1/144 AC-130, 1/72 AV-8A Harrier

  • Member since
    August 2015
  • From: the redlands Fl
Posted by crown r n7 on Thursday, May 20, 2021 12:36 PM

my latest pics.

final pics to come soon. I still dont like tip tanks.


 Nick.

  • Member since
    November 2009
  • From: SW Virginia
Posted by Gamera on Wednesday, May 19, 2021 11:15 AM

crown r n7

No the paint needs to be thinner. This is common when you paint car bodies . As for me I thin gloss paints more then flats so the thinner doesn't evaporate, gloss is some sticky stuff. 


I think you nailed it. I used a bottle that was about a third full and the paint had started to thicken up. Next time I'll thin it more.

Thanks!!!

"I dream in fire but work in clay." -Arthur Machen


  • Member since
    August 2015
  • From: the redlands Fl
Posted by crown r n7 on Tuesday, May 18, 2021 12:00 PM

No the paint needs to be thinner. This is common when you paint car bodies . As for me I thin gloss paints more then flats so the thinner doesn't evaporate, gloss is some sticky stuff. 


 Nick.

  • Member since
    November 2009
  • From: SW Virginia
Posted by Gamera on Tuesday, May 18, 2021 11:48 AM

Nick: Those look so good! And sooooo close to the finish line!


Thanks, and it's just Model Master acrylic gloss clear. I've been using it for years. Maybe I put it down too heavy?

"I dream in fire but work in clay." -Arthur Machen


  • Member since
    August 2015
  • From: the redlands Fl
Posted by crown r n7 on Tuesday, May 18, 2021 8:24 AM

gamera. wow an Me 109 w/ meat balls. The flat clear should help even out the orange peal. Let me ask what type of gloss clear did you use?

Both 104's at the same point, some small things to do.


 Nick.

  • Member since
    November 2009
  • From: SW Virginia
Posted by Gamera on Sunday, May 16, 2021 7:22 PM

Joe: She looks fine to me. I've heard of but never used Peddinghaus decals. Thanks for the warning, I'll consider that if I ever look at any. 

Finally I got photos up of my Bf-109. I took these Friday, I've got about half of the panel lines washed yesterday. 

The biggest of the weird spots in the gloss overcoat. Under examination there are a few more just smaller. I'm hoping they go away with the matte overcoat. Looks like I need to trim the decal a little more too. 

"I dream in fire but work in clay." -Arthur Machen


  • Member since
    December 2002
  • From: Bury St Edmunds, Suffolk, England
Posted by Bish on Sunday, May 16, 2021 11:51 AM

Looks good with the markings on Joe.

I have had a couple of sets from Peddinghaus. The Bismarck set i have not used but they look ok, but for my S boat i had to get 2 sets as one had the panther but only had one of the boat insignias and they didn't responed when i e-mailed asking if that was an error. And they are not cheap either.

I am a Norfolk man and i glory in being so


On the bench: Airfix 1/72nd Harrier GR.3/Fujimi 1/72nd Ju 87D-3

  • Member since
    August 2015
  • From: the redlands Fl
Posted by crown r n7 on Sunday, May 16, 2021 10:54 AM

Joe. You got to love decals so much fun... but the 262 is real pretty nice and shieny . looks like the clear coat setteled down.


 Nick.

  • Member since
    March 2012
  • From: Corpus Christi, Tx
Posted by mustang1989 on Sunday, May 16, 2021 9:53 AM

Thanks Nick, Cliff and Martin.

Martin.....mostly yes...read on bud...

Been going on with the decals for the last few days. Those #3's were giving me a little static but other than that everything else worked out well. NOTE......Do NOT EVER purchase decals from Peddinghaus. OMG they're bad. I only used the big 3's and the tail number out of the whole set. Just terrible in termos fo out of scale stencil lettering and walkway red dashed lines. It was like there was little to no research on them at all. For the rest of the stenciling decals and markings I used everything from the EagleCals set that I started out with on this one before I decided to build "White 3". 

Image


 Forum | Modelers Social Club Forum (proboards.com) 

JOIN OUR COMMUNITY!

Our community is FREE to join. To participate you must either login or register for an account.

SEARCH FORUMS
FREE NEWSLETTER
By signing up you may also receive reader surveys and occasional special offers. We do not sell, rent or trade our email lists. View our Privacy Policy.