SEARCH FINESCALE.COM

Enter keywords or a search phrase below:

Messerschmitt/MBB GB

54703 views
749 replies
1 rating 2 rating 3 rating 4 rating 5 rating
  • Member since
    December 2002
  • From: Bury St Edmunds, Suffolk, England
Posted by Bish on Thursday, May 13, 2021 2:51 PM

Nice and shiney there Joe, you useing Eagle Cal decals also.

I am a Norfolk man and i glory in being so


On the bench: Airfix 1/72nd Harrier GR.3/Fujimi 1/72nd Ju 87D-3

  • Member since
    December 2002
  • From: Bury St Edmunds, Suffolk, England
Posted by Bish on Thursday, May 13, 2021 2:50 PM

Thats very impressive work there Nick, must be close to the finish now.

I am a Norfolk man and i glory in being so


On the bench: Airfix 1/72nd Harrier GR.3/Fujimi 1/72nd Ju 87D-3

  • Member since
    November 2009
  • From: SW Virginia
Posted by Gamera on Thursday, May 13, 2021 11:50 AM

Nick: Just coming along beautifully!

Joe:Ohhhhhhhh, that looks awesome!

I finished the decals and put a coat of gloss on my 109 last night. I had a small issue too of an odd spot on one of the wings using MM acrylic gloss. I hope it goes away when I finish the panel line detailing and spray the final matte coat. 

"I dream in fire but work in clay." -Arthur Machen


  • Member since
    August 2015
  • From: the redlands Fl
Posted by crown r n7 on Wednesday, May 12, 2021 8:48 AM

Joe. many thanks, I feel your pain on vallejo gloss, thier paint is pretty good. I use tamiya clear gloss on planes but I get a better coat with m/m gloss clear on car bodies maybe too many years painting cars lol . Looking forward to decals. The shark is looking good.


 Nick.

  • Member since
    March 2012
  • From: Corpus Christi, Tx
Posted by mustang1989 on Wednesday, May 12, 2021 8:15 AM

That right there is some impressive stuff Nick. Dang that's lookin' good.

I applied the gloss coat on the top side yesterday using Vallejo's Acrylic Gloss. Dunno what it is about acrylic glosses but it was fairly difficult for me to apply (probably because I thinned to down too much) and it puddled in a few areas on the starboard wing. Gimme some lacquer based clear and I can work wonders with it but this stuff is like me trying to speak a foreign language!

Anyhow.....I sanded the irregularities out of the gloss , touched up some paint where I burned through in the sanding process and re-applied the gloss this morning. Cals are coming up next......

Image


 Forum | Modelers Social Club Forum (proboards.com) 

  • Member since
    August 2015
  • From: the redlands Fl
Posted by crown r n7 on Tuesday, May 11, 2021 3:03 PM

many thanks Gamera and Bish.

updated pics with canopy fitting.


landing gear and doors in place for the F-104C.


 Nick.

  • Member since
    December 2002
  • From: Bury St Edmunds, Suffolk, England
Posted by Bish on Friday, May 7, 2021 1:16 PM

Some great work there guys, looking good.

I am a Norfolk man and i glory in being so


On the bench: Airfix 1/72nd Harrier GR.3/Fujimi 1/72nd Ju 87D-3

  • Member since
    November 2009
  • From: SW Virginia
Posted by Gamera on Friday, May 7, 2021 8:36 AM

Nick: WOW! Fantastic job there on both of them! They're going to look amazing finished!

Joe: She looked good before but in the new photo she looks even better!

"I dream in fire but work in clay." -Arthur Machen


  • Member since
    August 2015
  • From: the redlands Fl
Posted by crown r n7 on Wednesday, May 5, 2021 10:03 PM

Thank you keavdog and john.

Joe nice redo.


 Nick.

  • Member since
    December 2002
  • From: Northern California
Posted by jeaton01 on Wednesday, May 5, 2021 9:55 PM

The Messerschmitt factory is running full blast!  Nice!

John

To see build logs for my models:  http://goldeneramodel.com/mymodels/mymodels.html


  • Member since
    April 2003
  • From: USA
Posted by keavdog on Wednesday, May 5, 2021 9:18 PM

Those 104s are nice! And the 262 looks great. 

Thanks,

John

  • Member since
    March 2012
  • From: Corpus Christi, Tx
Posted by mustang1989 on Wednesday, May 5, 2021 8:04 PM

Dang you guys have some good paint and caling going on in here. Looks like a few of these'll be crossing the finish line pretty soon.

I managed to re-work the sides of the aircraft and am pretty pleased at how it came out the second time.

To recap. Before....

Image

aaaand after....

Image


 Forum | Modelers Social Club Forum (proboards.com) 

  • Member since
    August 2015
  • From: the redlands Fl
Posted by crown r n7 on Tuesday, May 4, 2021 3:38 PM

latest F-104's pic.


 Nick.

  • Member since
    November 2009
  • From: SW Virginia
Posted by Gamera on Tuesday, May 4, 2021 11:57 AM

Nick: Nope it's all in German. As far as I can tell they're just standard Bf-109E7s except that the factory painted Japanese insignia instead of German on them.

And to be frank I guess it's not that much stenciling. It's just that it's tiny, some about .25mm or so and my eyesight isn't what it used to be. So I guess I see it as more.

"I dream in fire but work in clay." -Arthur Machen


  • Member since
    August 2015
  • From: the redlands Fl
Posted by crown r n7 on Tuesday, May 4, 2021 6:34 AM

Bish. thankyou. You have a good eye for details.The 262 camo is unique and with the decals Yes, waiting for weathering.

Gamera. thanks again. a lot of stenciling here too x2, I wonder if yours are in japanese?

Both 104's are at the same stage of building the canopies and small stuff. 

pics to follow.


 Nick.

  • Member since
    December 2002
  • From: Bury St Edmunds, Suffolk, England
Posted by Bish on Monday, May 3, 2021 12:28 PM

Thanks Gamera. Good luck with those stencils.

I am a Norfolk man and i glory in being so


On the bench: Airfix 1/72nd Harrier GR.3/Fujimi 1/72nd Ju 87D-3

  • Member since
    November 2009
  • From: SW Virginia
Posted by Gamera on Monday, May 3, 2021 11:31 AM

Oh wow great work guys!

Nick: Love the F-104 with the decals- they really make her come alive!

AA: Fine work there on the engine!

Bish: Super nice work on the 262. And good catch there on the gun bay bumps. I hate to have to go back and redo stuff once it's painted.

Joe: Great job on your 262 too! Love the mottling, it came out perfectly!


Still working on my 109. Seems that even though the Messerchmitt plant left off the German insignia they did put all the stenciling on the aircraft. So I'm currently adding a jillion tiny little decals.

"I dream in fire but work in clay." -Arthur Machen


  • Member since
    December 2002
  • From: Bury St Edmunds, Suffolk, England
Posted by Bish on Monday, May 3, 2021 8:59 AM

Finally got the 262 painted up. The Eagle Cal sheets give 2 options for the colours of this aircraft. The underside is RLM 76 and the lighter top colour 82. But the darker colour is either 82 or 83. There are of course 2 versions of 83, the original brown option or the later green one. Most colour profiles of this show the brown version and i like that combination with the 82 so thats what i went with. Xtracolor's 83 switched from the brown to the green variant a few years ago, so i used colorcoats for that, all other colours including the Reich Defense band are Xtracolor.

The photo's of this aircraft don't show the tail. Some profiles show mottling while others, including the decal instructions, are solid. While other aircraft in the unit were solid coours, i went for mottling. After painting i gave the top a coat of Aqua Gloss as the colorcoats is matt unlike the gloss xtracolor.

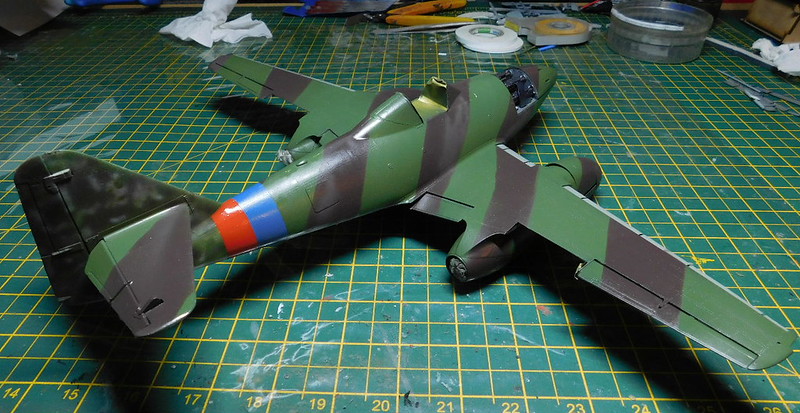
As i was checking the referance pic prior to adding the decals i spotted somthing i should have seen before. They show my subject does not have the bulge on the gun bay doors. These were added to the late versions when the cartridge ejection chutes were changed from the standard curved type to an L shape. My kit has the curved chutes but the late style bulges. I am just glad my subject is not a late type as it was easier to remove the bulges than change the chutes, especially at this stage. When i checked further, i noticed my subject did not have the late type pilots head armour which the kit includes. So the kit is a bt of a mix and its easier to turn it into a standard version than it is a late version.

So i sanded off the bulges and then just brushed a light coat of flat black before re-painting.

Then the decals. The stencils are from the kit, everything else eagle Call. I did have a couple of these break up, one of the underwing crosses and one of the chevrons. The cross i manage to pul together but i had to patch the chevron with black paint.

I have since given it anotehr gloss coat, so next some weathering. Going to try oils instea of flory.

I am a Norfolk man and i glory in being so
 

On the bench: Airfix 1/72nd Harrier GR.3/Fujimi 1/72nd Ju 87D-3

  • Member since
    December 2002
  • From: Bury St Edmunds, Suffolk, England
Posted by Bish on Monday, May 3, 2021 8:37 AM

Going to post an update now Nick.

The 104 looks stunning with the dcals on. Its looking amazing.

I am a Norfolk man and i glory in being so
 

On the bench: Airfix 1/72nd Harrier GR.3/Fujimi 1/72nd Ju 87D-3

  • Member since
    August 2015
  • From: the redlands Fl
Posted by crown r n7 on Sunday, May 2, 2021 3:12 PM

Bish. What type of camo you going with?

Gamera. again many thanks my friend.

Joe. it's looking very good. That german camo can get abit fussy on the sides, Ive been there very time I paint FW's and ME's.

A_A. clean engine.

The decals are on ready for another clear coat.


 Nick.

  • Member since
    December 2002
  • From: Bury St Edmunds, Suffolk, England
Posted by Bish on Sunday, May 2, 2021 11:40 AM

That looks a nice engine AA, look forward to seeing more of this.

I am a Norfolk man and i glory in being so


On the bench: Airfix 1/72nd Harrier GR.3/Fujimi 1/72nd Ju 87D-3

  • Member since
    March 2017
Posted by Armor_Aficionado on Sunday, May 2, 2021 8:55 AM

Finally underway on the Bf-109 F2.  Just got the DB601 engine built:

  • Member since
    December 2002
  • From: Bury St Edmunds, Suffolk, England
Posted by Bish on Saturday, May 1, 2021 8:58 AM

Very similar scheme. I have the decals for Red 13 on my 32nd sheet and was torn between that and the one i setteled on. I will do it in 72nd at some point.

I often do the same thing with mottling, did it on the tail of my 262. I usually go back over with some blue and then a thin coat of the darker colors to tone it down a bit.

I am a Norfolk man and i glory in being so


On the bench: Airfix 1/72nd Harrier GR.3/Fujimi 1/72nd Ju 87D-3

  • Member since
    March 2012
  • From: Corpus Christi, Tx
Posted by mustang1989 on Friday, April 30, 2021 5:22 PM

I was going to Red 13 and thanks for the comments Martin. After thinking about it, however, I decided to go with Franz Stigler's "White 3". 

Image

The more I look at my paint job and then compare it to the painting....the more dissatisfied I am with my efforts. I spent too much time applying color to the sides of the fuselage where the horizontal demarcation line for the upper camo borders were and applied too much color down the sides of the aircraft. I feel like I can do better than this so I'll get started on the correction this weekend.


 Forum | Modelers Social Club Forum (proboards.com) 

  • Member since
    December 2002
  • From: Bury St Edmunds, Suffolk, England
Posted by Bish on Friday, April 30, 2021 1:48 PM

That loks nice Joe, great mottling. I like those colours. You are doing Red 13 are you not.

I am a Norfolk man and i glory in being so


On the bench: Airfix 1/72nd Harrier GR.3/Fujimi 1/72nd Ju 87D-3

  • Member since
    March 2012
  • From: Corpus Christi, Tx
Posted by mustang1989 on Friday, April 30, 2021 12:40 PM

Got the topside colors on and was hoping for a little better definition on the mottle pattern. I might come back over it with some more over the weekend. Disregard the hard demarcation line between the upper and lower colors on the gun bay doors as that one piece panel is temporarily in place while the paint work is going on. I'll be going with the opened up panel piece after all that's done. Here we are as of now.

Image


 Forum | Modelers Social Club Forum (proboards.com) 

  • Member since
    November 2008
  • From: Central Florida
Posted by plasticjunkie on Thursday, April 29, 2021 4:38 PM

Thanks Gamera.

 GIFMaker.org_jy_Ayj_O


Too many models to build, not enough time in a lifetime!!

  • Member since
    November 2009
  • From: SW Virginia
Posted by Gamera on Thursday, April 29, 2021 11:24 AM

Oh WOW PJ! That's beautiful work!!! Heart Friggin' amazing!


And Nick & Joe: Those aint' too shabby either! Great jobs guys!

"I dream in fire but work in clay." -Arthur Machen


  • Member since
    November 2008
  • From: Central Florida
Posted by plasticjunkie on Thursday, April 29, 2021 6:22 AM

Thanks Joe.

 GIFMaker.org_jy_Ayj_O


Too many models to build, not enough time in a lifetime!!

  • Member since
    March 2012
  • From: Corpus Christi, Tx
Posted by mustang1989 on Thursday, April 29, 2021 4:40 AM

Ernie: WOW!!! Beautifully done with the paint, details and weathering. Man that looks good.

Zvezda: Great progress so far. 

Nick: Camo turned out great man. Bringin' it together very nicely.

Now working top side....

Image


 Forum | Modelers Social Club Forum (proboards.com) 

JOIN OUR COMMUNITY!

Our community is FREE to join. To participate you must either login or register for an account.

SEARCH FORUMS
FREE NEWSLETTER
By signing up you may also receive reader surveys and occasional special offers. We do not sell, rent or trade our email lists. View our Privacy Policy.