- Member since
November 2005
|
Posted by Anonymous
on Tuesday, August 16, 2005 8:58 AM
Originally posted by the_nitethyme
[
When you say drilling rigging holes, is that for the wing supports, or the actual rigging? Why are you drilling holes?
Well, Kaz, I've been drilling the small 0,3mm holes on which i'will place the monofilament for the rigging (all the wires). The method I use implies using 0,1mm monofilament which I pass through the small holes I open next to the struts. Perhaps with the pics I will be able to explain a little better. As soon as I find some time I will download the pics (I'm affraid they are mixed with some 300 other I took during the holidays).
|
- Member since
March 2005
- From: Australia
|
![Wow!! [wow]](/FSM/CS/emoticons/icon_smile_wow.gif) ![Wow!! [wow]](/FSM/CS/emoticons/icon_smile_wow.gif) ![Wow!! [wow]](/FSM/CS/emoticons/icon_smile_wow.gif) Duke Maddog Duke Maddog
Great builds, and great pics !
You have me in awe!!! As I said before, I couldn't imagine constructing wheel supports before combining both wings.
The more I learn to model, the more useless the instructions become!
Jabbe sounds like you have made great progess as well! I am keen to see your colour scheme...
Rafael Pelote thanks for sharing that info with me. I have not put rigging on any of my builds yet, but am experimenting with a 'best-option' at the moment.
I must get some of those pin drill bits!
Havent had a chance to do my decaling yet, but might hold off until I work all this rigging polare out !
Cheers ![Thumbs Up [tup]](/FSM/CS/emoticons/icon_smile_thumbsup.gif)
Kaz
|
- Member since
March 2005
- From: Australia
|
http://www.finescale.com/fsm/community/forum/topic.asp?TOPIC_ID=46547
This link has one of the funniest posts re: modelling, I have ever read! It is worth a read.
Kaz
|
- Member since
June 2003
- From: Rowland Heights, California
|
Posted by Duke Maddog
on Wednesday, August 17, 2005 5:46 AM
Thanks Kaz! Even though you feel that the more you know, the more you don't need the instructions, keep them anyway. I still use mine occasionally! ![Wink [;)]](/FSM/CS/emoticons/icon_smile_wink.gif) ![Clown [:o)]](/FSM/CS/emoticons/icon_smile_clown.gif)
I got some more work done, but haven't taken pics yet. I got the silver painted on most of the Seagull. Now I got to turn it over to paint the underside. I also got wrapped up in another build, so I didn't do anything on the Falco yet. Once I get a bit more done, I'll post pics.
|
- Member since
November 2005
|
Posted by Anonymous
on Wednesday, August 17, 2005 6:27 AM
So, here comes:
The Martinsyde Buzzard is a late development of the WW1. In fact, so late that it never got into effective combat. Should the war had continued, and this a/c would have been one of the main fighters within the RFC/RAF, due to very good performance. Being developed in 1918, it served in foreign countries such as Portugal, Spain, Greece, Finland or Russia. Naturaly, I'm planning to do the Portuguese version...
The kit itself is fully in resin and is a little below the standard quality of brands such as Ardpol or Chorozsy. In fact this is quit an old mould, I suppose it dates from the early 90's. However it is much much better than the alternative offering from Dekno.
These first pics show the kit itself. The profile you can see in the bag is the of the Portuguese version i will be making.
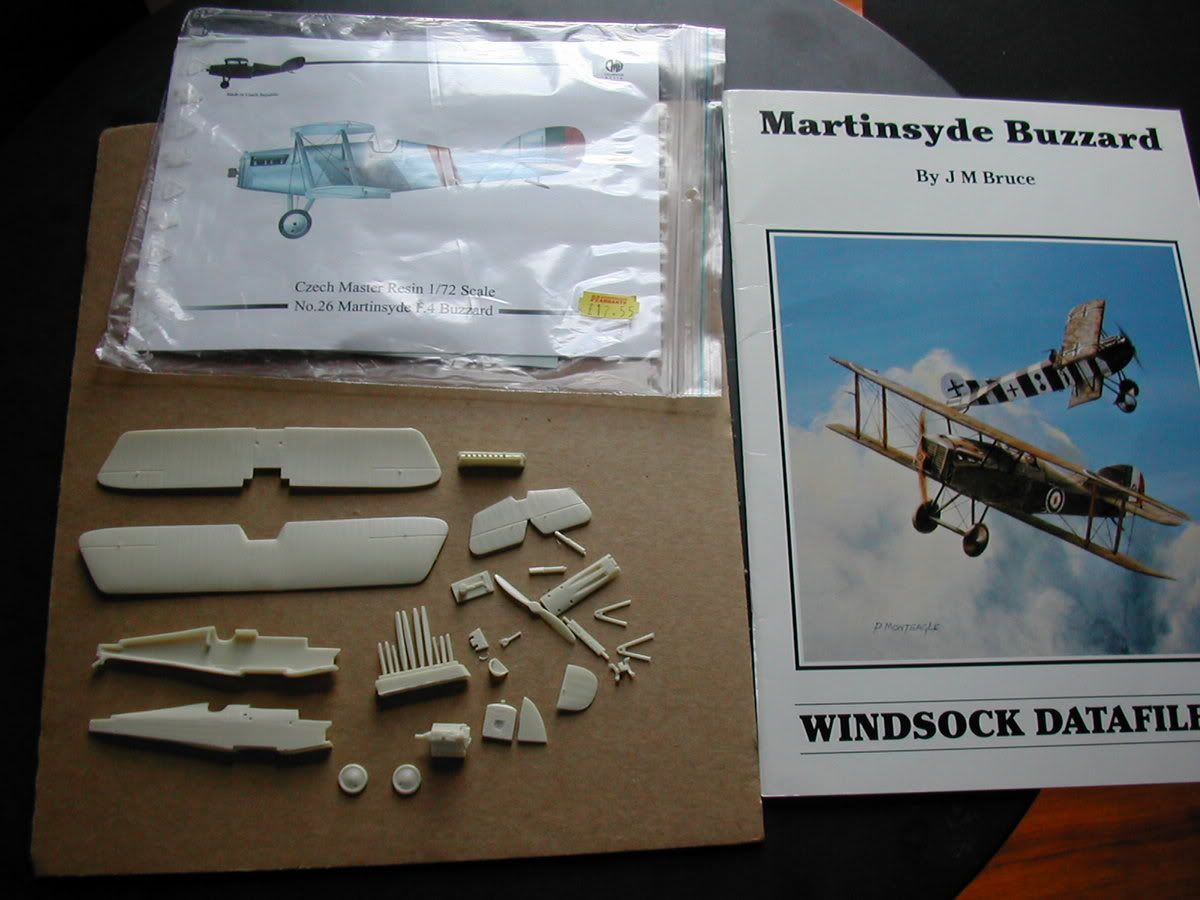
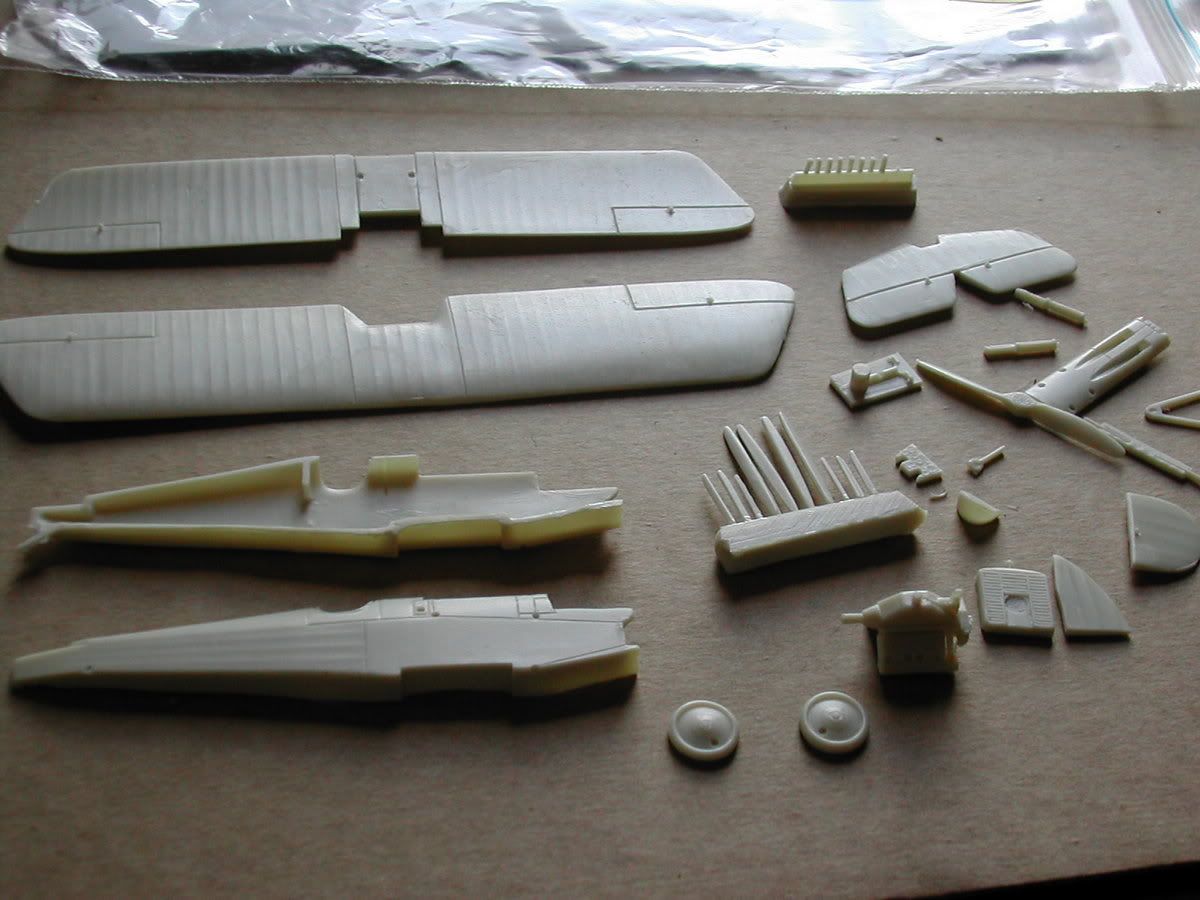
The following pics show the basic scratchbuilded interior detail, which was done according to pictures on the datafile, but not into an extensive degree. once the fuselage is closed, little can be seen... I´'ve used Evergreen, steel wire and copper wire (this, because I've runned out of steel wire...)
For the engine I've substituted the resin exaust pipes by Minimeca tubbing.
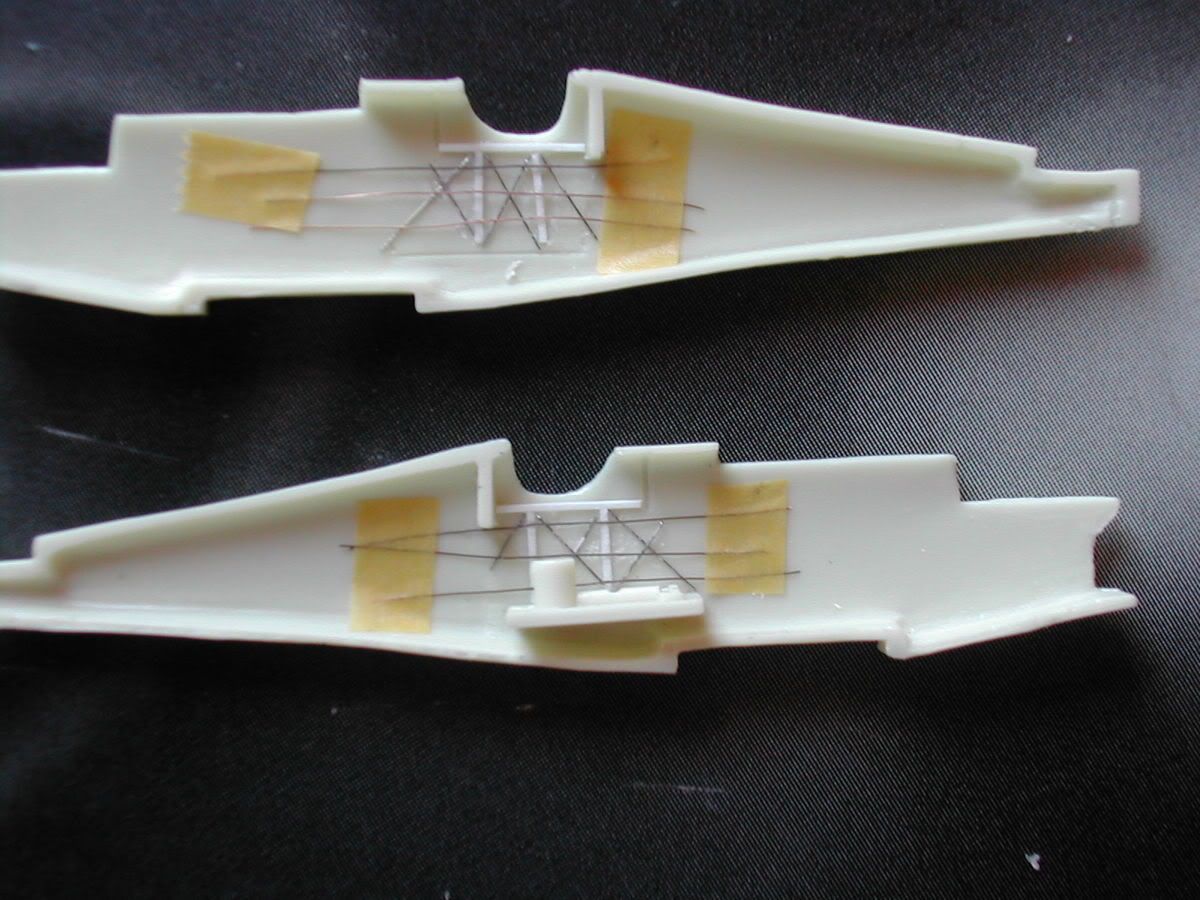
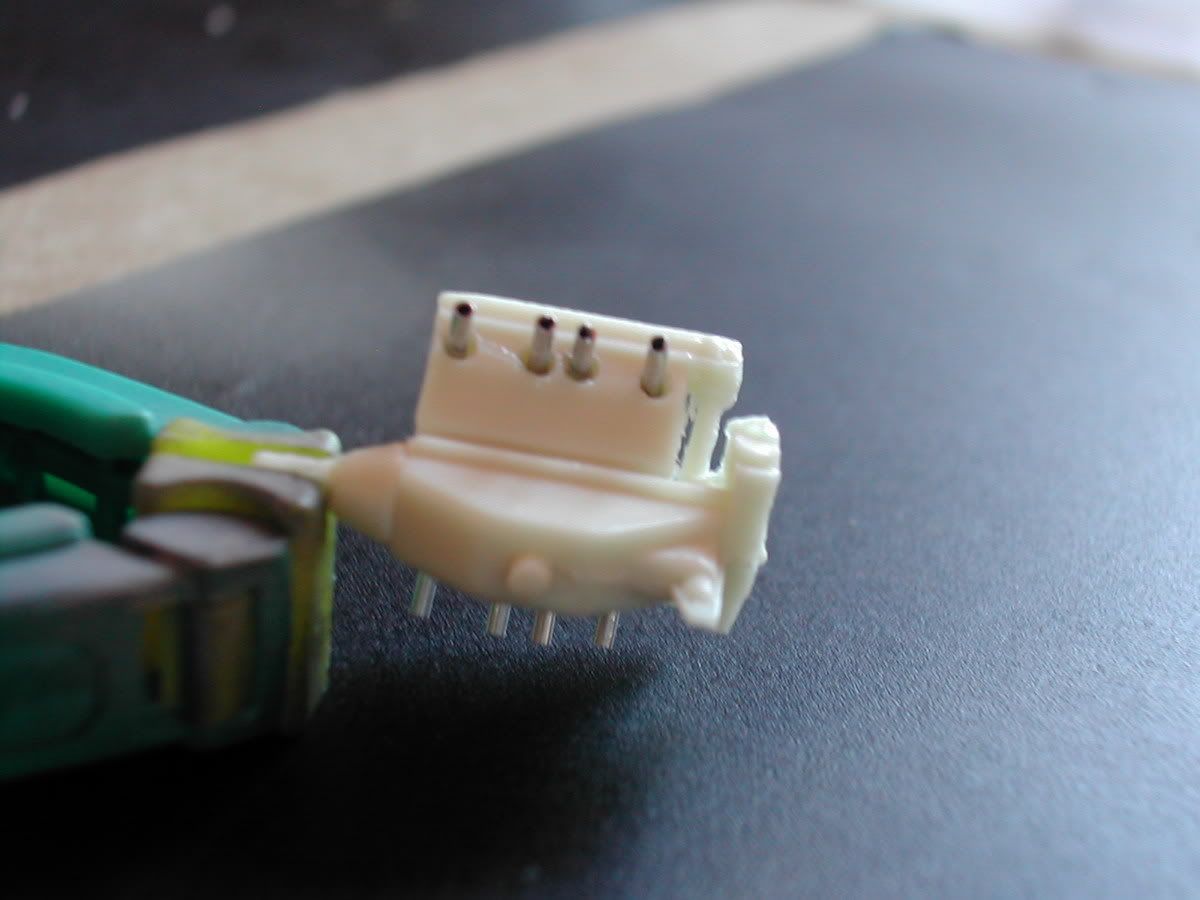
At this point, the engine is painted and the interior is conclued. I've closed the fuselage and glued the lower wing and the stabilizors. I've cutted off and reposicioned ailerons. Plus the holes for the rigging are 95% opened. I prefer to do this before priming, because it requires a lot of manipulation, and therefore the model will most probably get a lot of finger dirt. It is easy to quickly "re-open" the holes with a broken drill bit, once the primer dries.
I'll take more pics latter on.
|
- Member since
December 2003
- From: Olympia, WA
|
Posted by wooverstone8
on Wednesday, August 17, 2005 1:57 PM
Duke: From the pictures it looks like it’s coming a long great!
Jabbe: looks like you got a lot done there, can’t wait to see the finish model. From the description it looks good!
Rafael: looks like your going have fun with that resign kit. I like the scratch built detail in the cockpit!
As for me, I haven’t started yet, but I got some research done on the Hansa Brandenburg and looks like I’ll have build a new rudder for her, because it’s inaccurate.
|
- Member since
November 2005
|
Posted by Anonymous
on Wednesday, August 17, 2005 2:31 PM
Rafael :
looks great so far, nice work on the pit !
Duke:
wow, looks almost done.... yellow wings, eh ?
i'm still recovering from doing the prewar scheme on the texan, LOL !
wooverstone:
good luck w/ the scratchbuilt rudder...
Kaz:
i have used both stretched sprue & stainless steel wire 4 rigging...
use a pin vise 2 drill the holes in the fuse & wings b4 assembly,
go all the way thru the fuse but only halfway thru the wings
just 2 give the wire a small dimple 2 sit in & 2 hold a bit of superglue.
i think it works ok in 1/72, but then i haven't done any a/c w/ a lot of
wing bracing wires like a SPAD or Camel yet !
HTH,
frosty ![Smile [:)]](/FSM/CS/emoticons/icon_smile.gif)
|
- Member since
March 2005
- From: Australia
|
FrostyGirl you are an ![Angel [angel]](/FSM/CS/emoticons/icon_smile_angel.gif) ! ![Bow [bow]](/FSM/CS/emoticons/icon_smile_bow.gif)
Thanks for explaining that a little more.
I must, I must, I must get into rigging !
Kaz
|
- Member since
March 2005
- From: Australia
|
Funny, I forgot to mention I have both a Camel and a Spad to rig !
Kaz
|
- Member since
June 2003
- From: Rowland Heights, California
|
Posted by Duke Maddog
on Wednesday, August 17, 2005 11:46 PM
Rafael: good luck on that resin kit. It's gonna look awesome when you're done.
Jabbe: I agree with everyone else. You are doing excellent work! Keep going!
Frosty: yeah, yellow wings. That's what the bird wore while serving aboard Pennsylvania. Fortunately, it is only the top of the top wing.
Speaking of the Seagull, she's wearing her coat of silver paint now:

Found out some bad news too: There's no propeller! There's also no propeller cover for the hub if the Falco's propeller either. I guess that's what I get for buying second hand kits!
While the Seagull was drying, I went ahead and detailed the engine for the Falco and then finished assembling her.
Here is the Engine detail:

And here it is all ready for paint:

Sorry to just post and run, but I have to get up early tomorrow for work again. Enjoy the latest progress!
|
- Member since
November 2005
|
Posted by Anonymous
on Thursday, August 18, 2005 4:24 AM
Thanks all for the kind words.
Frosty and Kaz: I use a sligthly different rigging method that I think it works quite well in 1/72. I think the real secret of it is the planning ahead. Take your time to realy understand where all the wires are suppose to be before starting construction. This is specially necessary if the subject is a pusher like the DH-2 or if it has external control wires like a lot English subjects from WW1.
What I do is:
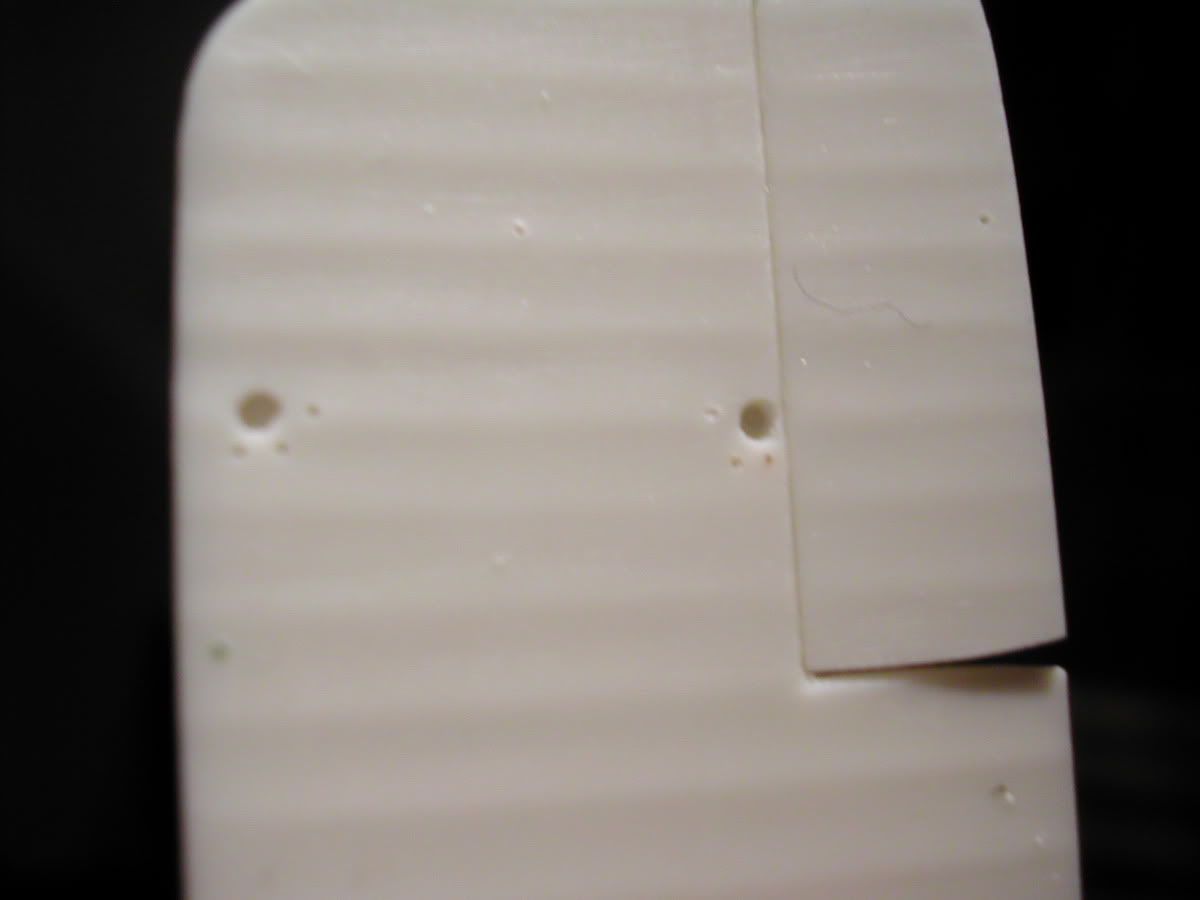
1. Drill the holes using a 0,3mm drill on a pin vise. In some a/c you don't need to go all the way through on the upper wing.The photo below shows some of the holes allready on the wing of this Buzzard:
2. I cut pieces of sewing monofilament ("invisible" thread), which I start by gluying on the upper wing using CA. I place a drop of CA on a clean surface and insert the tip of the thread on it, placing it immediatly after in the hole drilled on the upper wing.
3. Once the upper wing is placed (I glue the wires before installing the upper wing. If they bother your, just use a piece of masking tape to tack them to the upper side of the wing), I insert the other end of the "wire" through the correspondent hole in the lower wing.
4. using the "eye measure" and the proverbial toothpick, I place a tiny drop of CA on the wire, more or less on the place where this will get into the hole, and I pull the wire. To keep the wire streched, I use one of those plastic things... (can't remember the name in english. please look at the pics above: it is the thing holding the engine...), and just lay it there hanging until the CA is fully cured.
5. The next day, using a new blade, I trim the excess of the wires and if necessary use a tiny drop of mr.Surfacer and some fine grit sandpaper to smoth everything.
6. I finally paint the outboard of lower wing.
The procedure is the same for the wires linking to the fuselage, but in this case I atache them first to the fuselage and finally the wings.
The "invisible"thread is not really invisible, but a soft metalic grey, so you do not really need to paint it, at least in 1/72!!
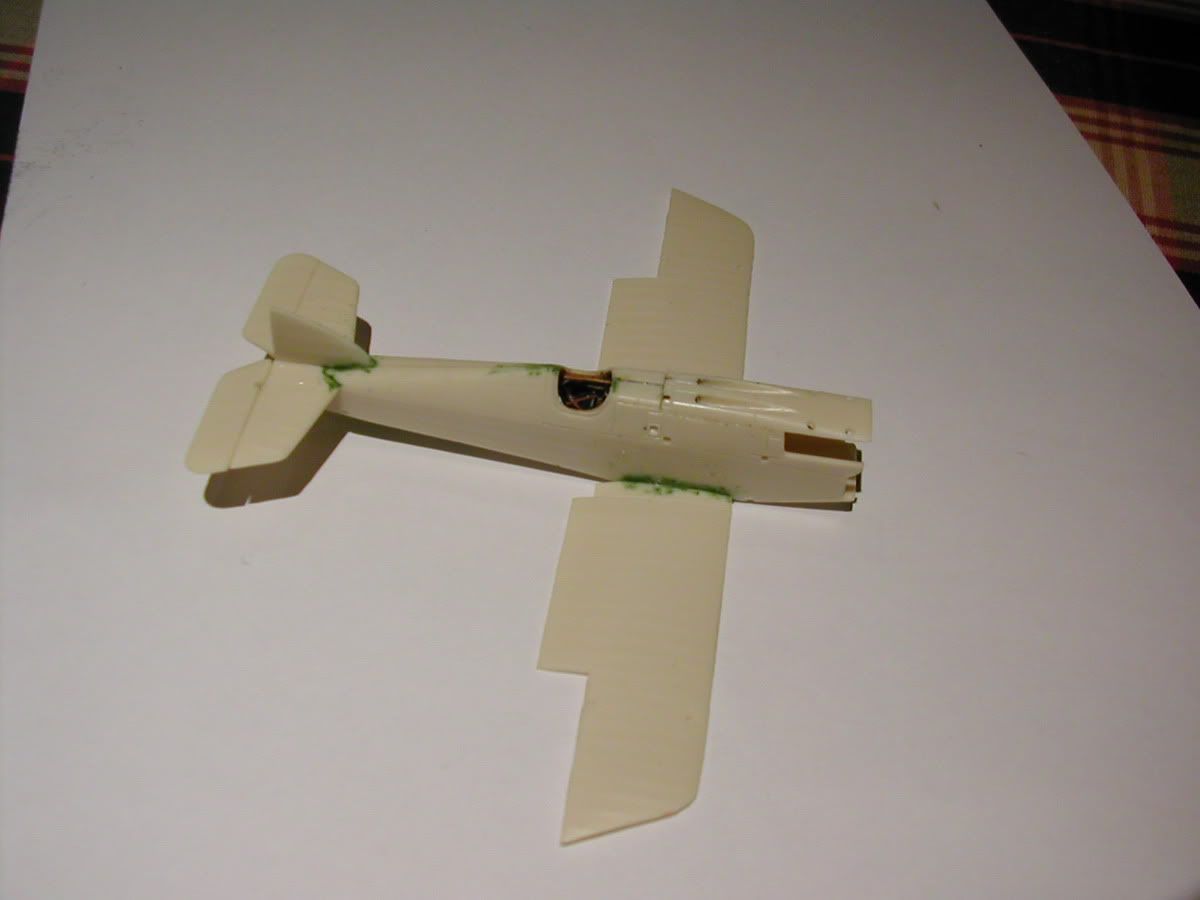
I finally primed the Buzzard. The pic below refers to yesterday before sanding the putty and priming. today I hope to correct small surface flaws.
|
- Member since
June 2003
- From: Rowland Heights, California
|
Posted by Duke Maddog
on Thursday, August 18, 2005 5:58 AM
Excellent tutorial Rafael! This will be a good thing to have to refer to now and then. I may try it onmy Seagull as well, if I can find out how it was rigged.
|
- Member since
November 2005
|
Posted by Anonymous
on Thursday, August 18, 2005 1:43 PM
QUOTE: Originally posted by the_nitethyme
Funny, I forgot to mention I have both a Camel and a Spad to rig !
Kaz
|
|
ouch... u will b starting at the more difficult end of things if u
go w/ either of those as ur first rigged a/c, control wires & bracing wires
all over the place & since many of them pass thru each other, having a
solid rigging plan(as in which wire connects 2 which parts first) is essential
so u don't paint urself in2 a corner, so 2 speak...
if u start w/ a l8 fokker, like the Dr.I, D.Vii or D.vi just 2 get a feel 4 things, u may
experience less frustration in the long run....
4 a bit more of a challenge, u mite try a nieuport 11 Bebe... Toko makes a nice version in 1/72 & there r a few bracing wires between the wings but nowhere
near as many on the SPAD or Camel !
& stay away from the DH-2 pusher 4 now, there r more wires than airframe
on that a/c (one of my personal faves, btw...i'm still a long way off from being ready 2 rig something like that, tho' !)
if u do choose 2 rig the SPAD or Camel, Rafael's method will probably work
better... some folks drill holes all the way thru the wings, then 'sew' the rigging
thru the holes w/ invisible (monofilament) thread, using rolled-up bits of paper
2 keep the thread taut, there's a great tutorial on the IPMS Stockholm website
on rigging a/c w/ this method IIRC...
whichever method & a/c u choose, best of luck !
frosty ![Smile [:)]](/FSM/CS/emoticons/icon_smile.gif)
|
- Member since
February 2005
- From: Raleigh (NCSU)
|
Posted by Jabbe
on Thursday, August 18, 2005 1:59 PM
allright guys, here's a few in progress pics of the Fokker DVII, along with my Tbolt and A-1.


|
- Member since
November 2005
|
Posted by Anonymous
on Thursday, August 18, 2005 3:45 PM
Nice D.VII, Jabbe! Are you going for August Raben's a/c?
Regards
|
More great sites from Kalmbach Media
|
|