SEARCH FINESCALE.COM

Enter keywords or a search phrase below:

F-15 Eagle Group Build 6/01/06 - 1/17/07

32680 views
245 replies
1 rating 2 rating 3 rating 4 rating 5 rating
  • Member since
    August 2006
  • From: In the Middle of a Corn Field
Posted by mr.chex on Tuesday, November 21, 2006 7:26 AM

Looks real enough to fly.  Now since i'm a glutten for punishment i'll throw my hat in to the ring with a 1/48 Revel F-15C Eagle. Now if i get really enthused i'l try to get toconvert it into a F-15K, maybe so don't cross your fingers.


GO HUSKERS!!!! Projects 1/72 VF-102 F-14B "Diamond Backs" 1/72 German Mig-29 1/72 German RF-4 1/48 What If German F-16
  • Member since
    June 2006
  • From: Calgary
Posted by MaxPower on Monday, November 20, 2006 8:08 PM

Any feedback at all? I need validation!! lol

Tongue [:P]

  • Member since
    June 2006
  • From: Calgary
Posted by MaxPower on Tuesday, November 14, 2006 11:02 PM

Ok here's my latest. I made a lot of progress this weekend, but the end still seems impossibly far...

Sorry this one is a little blurry, macro mode with no flash I held the camera as still as I could. Also it's interesting how the black seems to reflect brow in that one spot.

Here we can see a slight variation in colour going in the direction I sprayed my paint. This is because I'm still new with the airbrush and learning the feel. (going to do a few cheap models after this) but I think it actualy looks cool and will look good when it's weathered *crosses fingers* If anybody can tell me what I did wrong? I suspect too light on the paint and a little far from the model. Perhaps I went back over it too early on the second pass? I thinned the MM enamel with mineral spirits. Could that be a problem? Ahhh so much to learn. On the bright side the seams on the wings (and everywhere else) are totaly gone. Enough yacking.... here's the pic...


  • Member since
    June 2004
  • From: Oklahoma City
Posted by Zone V Afterburner on Sunday, November 12, 2006 8:37 PM

Here is another quick update....

I was about to glue the wings to the fuselage when I read about the problems that Maxpower was having with his Mudhen.So I did some experimenting and came up with a solution.

    The blue marking indicates where the trouble area is before mounting the wings.

    See pic:  (Please disregard the shadows caused by the blinds in the window)


   This next picture shows how much of a step is caused by the assembly of the wing to the A/C

 and how much of problem it becomes trying to eliminate the 'step' in the plastic without losing the surrounding detail.

See pic:

The solution to the problem I found was adding a strip of plastic as a spacer to spread the center of the wing apart to eliminate the step.

This next pic shows how it is pretty much eliminated:


 Till next weekend,you guys take care.....

Only two defining forces have ever offered to die for you........ Jesus Christ......and the American soldier..... One died for your soul......... The other....for your Freedom!!
  • Member since
    June 2006
  • From: Calgary
Posted by MaxPower on Saturday, November 11, 2006 8:38 PM

Albert scale is 1/32. The panel lines allways look good after some primer. They'll hide some when I spray the MM Gunship Grey I'm using.


ZoneV for the blue part of the exhaust I followed the mixing instructions from the book. I'm not that happy with it, I don't think it looks that realistic but frankly it's not like I'm entering a contest and my skill level is still low with the airbrush so I'm ok with it. It's the second model I've done in years so I'll learn better techniques as I go. 

I'm overall happy with it. I'm going to paint soon so there will be more pics. 

  • Member since
    June 2004
  • From: Oklahoma City
Posted by Zone V Afterburner on Saturday, November 11, 2006 11:46 AM

Welcome to the build Ish! I added your name to the GB tally......

Maxpower: In reference to your question about the exhaust nozzle collar ring (for lack of a better term).... How did you paint it? I am planning on shooting mine Alclad pale burnt metal with clear blue highlights around the edges of the rings.Maybe this pic will give you an idea of what I'm talking about:

Here are some other pics...... albeit of an F-15C that I took a couple of years ago at an airshow:

http://www.ipmsslc.com/gallery2/v/Airshows/TinkerAFB2004

Here are some more progress pics of my Mudhen:

 This is a shot of the fuselage with the exhaust cans installed along with the Cutting Edge seemless intakes:

A shot of the Vulcan cannon bay:

And the business end of the cannon:

Thats all for now folks... Take care!

Only two defining forces have ever offered to die for you........ Jesus Christ......and the American soldier..... One died for your soul......... The other....for your Freedom!!
  • Member since
    June 2004
  • From: Oklahoma City
Posted by Zone V Afterburner on Saturday, November 11, 2006 11:26 AM

 rudy_102 wrote:
Wait a sec, I just noticed something: my name's not on the opening message! To recap, I'm doing an F-15C and E, both 1/48 Revell.

Sorry 'bout that......it's fixed! 

Sorry for being gone so long folks! 

There is some really outstanding work going on in here. The White Dragon is really nice for being brush painted! I'm still puttering along. I keep running into problems that take loads of time to solve.

I'll be posting progress pics soon

Maxpower: I know what your talking about on the wings.I havn't actually glued the wings to the fuselage yet,but I'm close.I apologize for not getting back to you in a timely manner. But from looking at your last posting it looks like you solved the problem.I think I read somewhere about adding some scrap plasting in between the wing halves to spread them apart a little to soak up the 'step' that your talking about.But I have not tried myself yet.I have spent the last 4 or 5 build sessions just trying to figure out how to eliminate the seam in the exhaust cans.....

Here are a few pics if my progress so far:

I'll post more pics very soon.... Later on guys,Take care!

Only two defining forces have ever offered to die for you........ Jesus Christ......and the American soldier..... One died for your soul......... The other....for your Freedom!!
  • Member since
    May 2004
  • From: Singapore
Posted by albert_sy2 on Friday, November 10, 2006 11:39 AM
MaxPower >> What scale is that? The panel lines look great! I wish my model's panel lines were as deep as yours....
Groovy baby
  • Member since
    November 2005
Posted by Ishthe47guy on Thursday, November 9, 2006 9:11 AM

Most recent progress pics:

Here is a pic of the sprue brace I installed to widen the aft portion of the fuselage so the nozzles match up better.

A shot of the ALQ-138 antenna I added from a piece of sprue.

This weekend is a 4 -day affair for me because of the Veterans Day Holiday.  I foresee plenty of bench time over the next 4 days.

More pics Tuesday.

Ish Out

Native New Yorker, like the F-14
  • Member since
    June 2006
  • From: Calgary
Posted by MaxPower on Wednesday, November 8, 2006 11:18 PM

Good to have you on board Ishthe47guy! Better late than never.


Ok I've been working on this for a few days. It's not perfect but I think I can live with the fixes with just a little more tweaking.

First I masked,

then putty...

and then a whole bunch of very carefull sanding, more putty, sanding blah blah and a shot of primer

you can still see putty a little in places I wasn't willing to sand a lot, but if you look up a few posts at the before pics you might agree it's a whole lot better?


and here's the leading edge of the wing down at the root that had the really big crack.


Like I said I have a little tweaking to do, the primer made some things stand out. But I'm ok with the results. This is the second model I've built as an adult, and the first one I've used putty on and hid the seams, so it's ok. I can finally continue on.


Oh I built the radar but the picture didn't turn out... next time.  

  • Member since
    November 2005
Posted by Ishthe47guy on Wednesday, November 8, 2006 3:17 PM

Well fellas, better later than not at all.  I recognize a few of you guys (especially Dragonfly & 2LT CobraHistoryMan :>) & your work from the ARC forums, & since this GB is still ongoing, I'd thought I'd chime in with my own F-15 build.


Primarily, I'm a gull grey, naval aircraft (F-8, F-4, early F-14) type of model builder, but this past summer, I got to photograph some F-15s at a couple of airshows, & now I'm kind of hooked.    


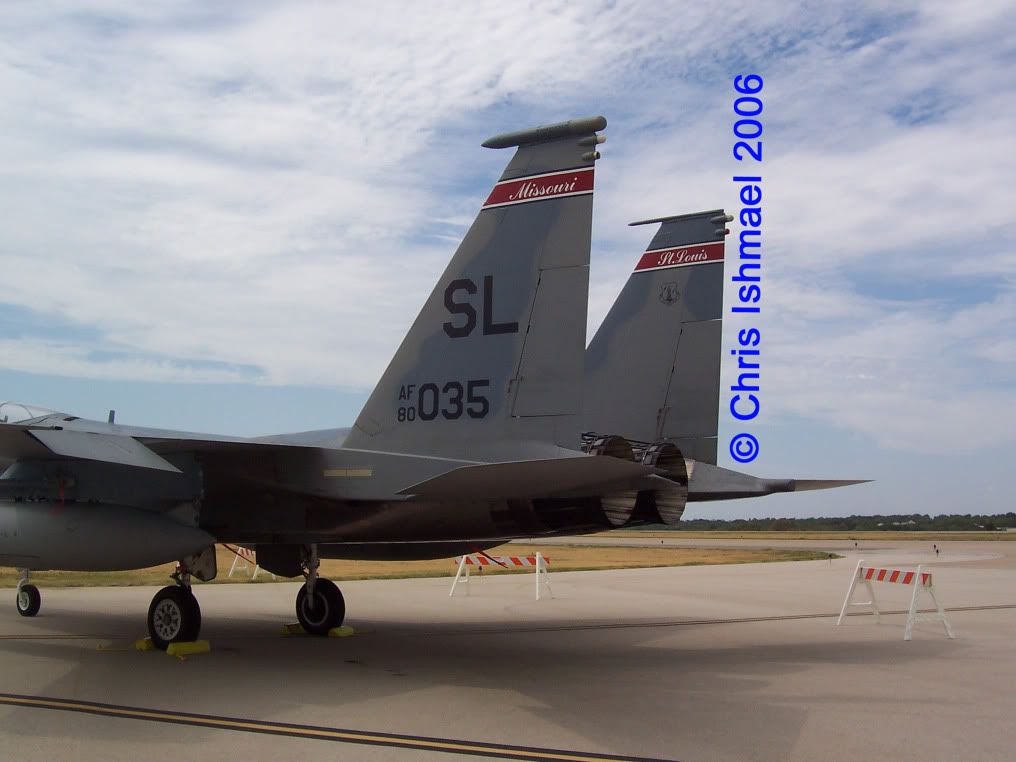
I will say, that compared to the 1/48th Hasegawa & Revellogram F-14 kits, the F-15 is a welcome relief in simplicity in modeling.  I picked this Monogram 1/48th F-15C up at Wally-World about 18 months ago, & its just been sitting in the stash while I slogged away at some F-14 kits.  Well, no longer.  I have not made any serious attempt to build any USAF models in the last few years, apart from a Monogram F-105D from the 4th FW (sound familiar?).   This is the actual aircraft I'm going to be modeling.
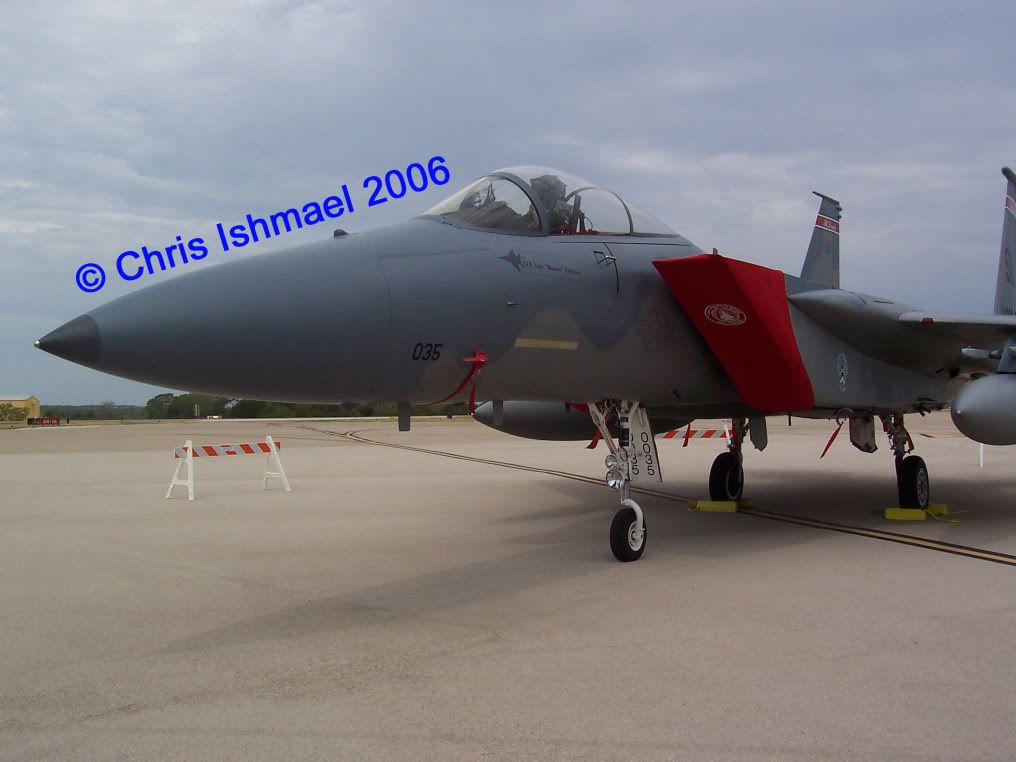
 

  Right now, my pans is to create a diorama based on the photos I took.  I'm planning on scratch building the sawhorses, adding the taxiway lines to the base, adding O scale model RR figures, & having another modeling buddy print out the gray squadron & wing badges, along with the red intake covers with the white badges.  The only resin I'm planning on adding is some True Details wheels I picked up at a local model show years ago, since the Monogram kit has A model wheels. Keeping it simple, folks.


Never having done a modern AF scheme, I practiced on a few tails I cut from sheet styrene.  The closest tail is in the Compass gray scheme, since I have PLENTY of both light & dark ghost grey.  The further one is in MOD eagle colors.  I use MM Acryl paint, but I think the dark MOD Eagle (FS16176, I think) looks too dark & too purple.  Adding white to it made it look a lighter shade of being too purple.


I painted the pitot tubes red to simulate ground covers.  I'll add the RBF tags later.


This is a dry-fit, with nothing glued in place.


The kit is not without its fit issues.  I cut a piece of thicker sprue to serve as a brace to widen the fuselage reduce the step between the nose section & the main fuselage.


I had to do the same thing with the area between the nozzles to widen the fuselage so that the diameter of the opening matched the diameter of the nozzles.  I'm going to be using the kits nozzles because 1. I need to keep it simple to finish it, & 2. I can't find any Airies nozzles right now.  Lastly, I fashioned a wedge shaped AN-138 (I think that's the right number) ECM antenna for the end tip of the right boom from sprue because this particular aircraft has it.  The decals will come form the 2Bobs Show Me State Eagles sheet, which is very close, but not exact, to this aircraft.  I can live with a few discrepancies. 

Native New Yorker, like the F-14
  • Member since
    July 2005
  • From: Texas
Posted by painklr on Wednesday, November 8, 2006 9:16 AM

Here are my pics for my finished F-15.  This is my second model that I finished since being out of the hobby for several years.  She is straight out of the box.  I was not sure on how to accent the panels or to use weathing since it is all new to me, so I will try it on the next model I do.  She went to gether well and was hand painted.  Any comments would be appriciated.

Thanks


  • Member since
    May 2015
Posted by willuride on Tuesday, October 31, 2006 8:12 AM
You could try some plastic card layered till you get it flush under the wing and maybe some gap filling superglue with accelator and sand right away for the front of the wing gap.  Just some syggestions.

On the bench Knoxville, TN:

1/48 Monogram F-4 Phantom "Black Bunny"  I wanted to relive the past....Never again

On the Bench Manchester, TN:

1/48 Revell F-18E 


  • Member since
    June 2006
  • From: Calgary
Posted by MaxPower on Monday, October 30, 2006 10:12 PM

Ok...

Here's the step,


and this will have to get fixed...


Here's the nozzle with the metalic blue that looks like it would be right at home on a car...

I'm finished the front, but wasn't willing to pull my making off..


  • Member since
    June 2006
  • From: Calgary
Posted by MaxPower on Monday, October 30, 2006 9:12 PM

Need a little help/advice here from anybody working on the 1/32 Tamiya kit.


I just put my wings on and I have a rather large step along the seam on the top of the fuselage. There are so many panel lines there and I'm still really new to modeling (I suck at rescribing) I'm not sure what to do about this. the step is big enough to easily catch your nail on. To feather it out I think I'd have go back a ways.

 I'm tempted to just leave it because I'm not sure what will look worse, the step and gap or my hackjob of rescribing. 


Another issue. I carefully mixed my paints for the exhaust nozzle, and the front portion of it looks funny. It's a metalic mixed with clear blue and it just looks off to me.  


Thanks far any advice (ZoneV I'm looking at you!!)

Maybe I should run through and take some pics, plus a few of what I've done... 

  • Member since
    August 2006
  • From: In the Middle of a Corn Field
Posted by mr.chex on Monday, October 30, 2006 5:55 PM
Not bad for brush painting.
GO HUSKERS!!!! Projects 1/72 VF-102 F-14B "Diamond Backs" 1/72 German Mig-29 1/72 German RF-4 1/48 What If German F-16
  • Member since
    December 2005
  • From: Ontario, Canada
Posted by rudy_102 on Sunday, October 29, 2006 1:29 PM
A problem with the E- the canopy got damaged so bad that I gotta order a new one from Revell.
  • Member since
    July 2005
  • From: Texas
Posted by painklr on Tuesday, October 24, 2006 10:31 AM
Nice birds.  Thanks for sharing.
  • Member since
    December 2005
  • From: Ontario, Canada
Posted by rudy_102 on Monday, October 23, 2006 7:46 PM

Lotsa pics of the C and E:


  • Member since
    December 2005
  • From: Ontario, Canada
Posted by rudy_102 on Friday, October 13, 2006 8:32 PM

Has my new avatar scared anyone yet?

  • Member since
    May 2004
  • From: Singapore
Posted by albert_sy2 on Friday, October 13, 2006 8:01 PM

 rudy_102 wrote:
Beautiful paint job, but the forward gear doors on all the gear supposed to be closed on the ground? Just some nitpicking on my part. My my, I'm becomimg a rivet couter. Shock [:O]


Artistic license! Haha!! I actually know about this. There are more things that I know that are "wrong", but I put them in there anyway.... because the thing will look better (at least, to me).

 -- Vertical stabilizer counterweight is not there on the J.

-- The J does not have the RWR at the rear (near the nozzles).

Thanks for all the comments!

Groovy baby
  • Member since
    December 2005
  • From: Ontario, Canada
Posted by rudy_102 on Friday, October 13, 2006 5:00 PM
Wait a sec, I just noticed something: my name's not on the opening message! To recap, I'm doing an F-15C and E, both 1/48 Revell.
  • Member since
    December 2005
  • From: Ontario, Canada
Posted by rudy_102 on Friday, October 13, 2006 4:54 PM
Progress rep: The exploding stuff from minihasek arrived today, I'm looking around the web for pics of what he sent me on the web 'cuz he forgot the paint chart.Sign - Oops [#oops] O well, nothing to worry about, thank God for the web!
  • Member since
    December 2005
  • From: Ontario, Canada
Posted by rudy_102 on Friday, October 13, 2006 4:49 PM
Beautiful paint job, but the forward gear doors on all the gear supposed to be closed on the ground? Just some nitpicking on my part. My my, I'm becomimg a rivet couter. Shock [:O]
  • Member since
    May 2004
  • From: Singapore
Posted by albert_sy2 on Friday, October 13, 2006 9:09 AM

Hope this works!

Groovy baby
  • Member since
    May 2004
  • From: Singapore
Posted by albert_sy2 on Friday, October 13, 2006 8:56 AM
^Sorry about the red X's everyone, seems Yahoo has come up with yet another way to force people like me to pay for their webhosting. I'll try to find another photo site....
Groovy baby
  • Member since
    May 2015
Posted by willuride on Thursday, October 12, 2006 7:51 PM

Albert,

That thing is awesome, especially being brush painted.  Good Job

On the bench Knoxville, TN:

1/48 Monogram F-4 Phantom "Black Bunny"  I wanted to relive the past....Never again

On the Bench Manchester, TN:

1/48 Revell F-18E 


  • Member since
    September 2003
  • From: N.E. Ohio
Posted by dragonfly on Thursday, October 12, 2006 5:58 PM

Great job Albert! Excellent work with the brush. sweet looking Eagle.

Jerry

  • Member since
    July 2005
  • From: Texas
Posted by painklr on Thursday, October 12, 2006 2:49 PM
Wheres the pics???
  • Member since
    May 2004
  • From: Singapore
Posted by albert_sy2 on Thursday, October 12, 2006 8:57 AM

Hello! Here's my 1:48 Tamiya F-15J. It's completely brushpainted. Hope you like it!


Groovy baby
JOIN OUR COMMUNITY!

Our community is FREE to join. To participate you must either login or register for an account.

SEARCH FORUMS
FREE NEWSLETTER
By signing up you may also receive reader surveys and occasional special offers. We do not sell, rent or trade our email lists. View our Privacy Policy.