SEARCH FINESCALE.COM

Enter keywords or a search phrase below:

The P-51"mustang" Group Build. 2008

90755 views
760 replies
1 rating 2 rating 3 rating 4 rating 5 rating
  • Member since
    September 2006
  • From: From Vernal UT OH YEA!!
Posted by raptordriver on Thursday, March 27, 2008 10:06 PM
Looks good so far. Don't want to point out anything obvious, but to make you pictures more clear you could step back or adjust it to a upclose setting. Cause it looks very clear past the stang.

Andrew


  • Member since
    February 2004
  • From: Second City
Posted by arki30 on Thursday, March 27, 2008 10:03 PM

Oops, sorry. Taped Shut [XX] It wasn't my intent to freak you out, just to warn you. 

Well, from the pics it doesn't appear that you are having any bleed through.  Like I say, it's a hit or miss technique that has worked...sometimes. 

Good luck, 'cause what you have so far looks pretty good. Thumbs Up [tup]

Building Now:

1/48 Academy Bf-109G6 - 100%

1/48 Tamiya F4U-1A - 5%

Upcoming:

1/48 Revell F-14D

  • Member since
    September 2007
  • From: Crystal Lake, IL
Posted by firesmacker on Thursday, March 27, 2008 9:55 PM

Ok,

Arki, has had me totally freaked out about using a Sharpie for panel lines. here are a few pics. From all that I have read from the links you posted, I need to be careful with using Future and dull-coat. I really like my results so far, hope it doesn't bite me in the ***.


  • Member since
    February 2004
  • From: Second City
Posted by arki30 on Wednesday, March 26, 2008 12:58 AM

Refer to these links:

/forums/656206/ShowPost.aspx

/forums/799154/ShowPost.aspx

/forums/700107/ShowPost.aspx

/forums/889764/ShowPost.aspx

http://www.arcforums.com/forums/air/index.php?showtopic=142598&hl=

http://www.arcforums.com/forums/air/index.php?showtopic=133018&hl=

I'm sure there are more threads, but it's late and I'm tired.  It's a real hit or miss technique with mostly misses. 

Once you read through those threads, you'll see the main difference is paint compatibility.  You might get lucky though.  Your picture is too blurry so it's too hard to tell if you have any bleed through.  

Building Now:

1/48 Academy Bf-109G6 - 100%

1/48 Tamiya F4U-1A - 5%

Upcoming:

1/48 Revell F-14D

  • Member since
    September 2007
  • From: Crystal Lake, IL
Posted by firesmacker on Tuesday, March 25, 2008 8:45 PM

I'm not trying to be contentious, but how is using a black sharpie different from painting the panel lines with an AB? I have seen others on various forums, including this one do similar things. Would I be better off using a pencil or a more narrow pen? I ask because for now it is easier for me to get things like that done what with having a 18 month son constantley wanting to do everything Daddy does. So this just helps me move it along a little more quickly.

I am always willing to learn more. Would it help if I put another light application of the top coat or is the bleed-through inevitable? I am still pretty new to all of this so I appreciate your feedback Arki.

Regards,

Jeff 

  • Member since
    February 2004
  • From: Second City
Posted by arki30 on Tuesday, March 25, 2008 8:25 PM
 firesmacker wrote:

...I did the panel lines with a fat tipped Sharpie....

Dead [xx(]

Typically, not a good idea.  Sharpie lines tend to bleed through the layers of paint applied over them.

There are much better methods of preshading.  Do a search on the forums for preshading and drink in the good info.

Building Now:

1/48 Academy Bf-109G6 - 100%

1/48 Tamiya F4U-1A - 5%

Upcoming:

1/48 Revell F-14D

  • Member since
    September 2006
  • From: From Vernal UT OH YEA!!
Posted by raptordriver on Tuesday, March 25, 2008 6:52 PM
Great job Firesmacker And Chris, pretty fast progress. Big Smile [:D]

Andrew


  • Member since
    September 2007
  • From: Crystal Lake, IL
Posted by firesmacker on Tuesday, March 25, 2008 6:37 PM

Here is what I have so far. This is my first time taking and/or posting model pics. Sorry for the poor quality. I did the panel lines with a fat tipped Sharpie and didn't really cover the tail fin or the stabalizers on my first attempt good enough. I will fix that tomorrow. Any and all comments are welcome.

Regards,

Jeff


  • Member since
    July 2007
  • From: Sweden
Posted by Azgaron on Tuesday, March 25, 2008 12:18 PM

Thanks for the link JMart!

That was really useful reading! I'll try that method!

Cheers,

Azgaron


  • Member since
    March 2007
  • From: NJ
Posted by JMart on Tuesday, March 25, 2008 9:23 AM

Azgaron & ridleusmc - great start! Seams and flaw detection can be such a bane... did you catch Hawkeyes' "Reading the seam" thread? lots of good info & tips within...

/forums/883138/ShowPost.aspx


  • Member since
    July 2003
  • From: Cincinnati, Ohio
Posted by ridleusmc on Tuesday, March 25, 2008 3:21 AM

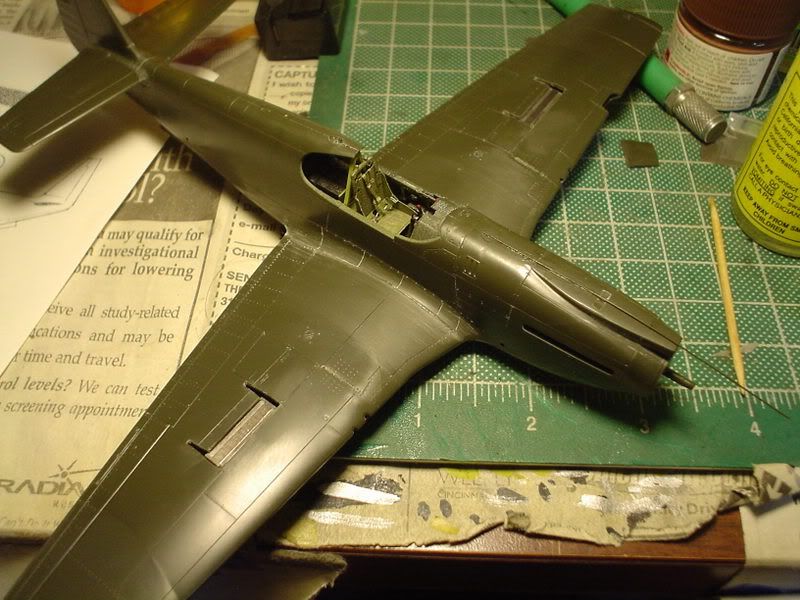
Thanks T-Bolt.  Good tip, it may prove useful.  I did close up the wings, but I can still work on the sides of the cut-outs.  I've been scraping the sides with my knife from time to time. 

The fuselage halves fit well together with a minimum of sanding.  However, the wing to the fuselage joints took some filling, sanding, and effort. 

You may notice the piece of stretched-sprue across the top of the engine cowling.  That's just filling a small gap that barely caught my fingernail, but persisted after sanding.  It's attached with Tenex Plastic welder.  I'll cut it, scrape it, and sand it.  That should take care of that gap. 

I still have to rescribe some of the panel lines that I sanded over/around.  Rescribing is difficult for me, so it may take some time. 
Semper Fi,

Chris 

  • Member since
    April 2005
Posted by Thunderbolt379 on Monday, March 24, 2008 8:35 PM

Hi all, 

My Tamiya -D should be in the post shortly.

Chris -- if you took too much plastic scoring out the divebrakes, shim the edges of the hole with some microstrip, attached with superglue. Let the strips overhang, then sand them down flush. This'll get your correct area back. You can do the same with the brake flaps themselves if they've ended up too small, applying strips to the outer edges, same procedure.

TB379

http://worldinminiature.blogspot.com/

  • Member since
    September 2006
  • From: From Vernal UT OH YEA!!
Posted by raptordriver on Saturday, March 22, 2008 8:29 PM
Ok thunderbolt thanks your on the list.Smile [:)]

Andrew


  • Member since
    April 2005
Posted by Thunderbolt379 on Saturday, March 22, 2008 7:34 PM

Hi Raptordriver,

I'm thinking probably Tamiya 1:48 P-51D; markings -- mmmm, maybe Petie 2nd, though if I can find the markings I've always wanted to do somewthing from the 343rd. I'd better check my Superscale stash.

TB379

http://worldinminiature.blogspot.com/

  • Member since
    July 2007
  • From: Sweden
Posted by Azgaron on Saturday, March 22, 2008 7:07 PM

Thanks Andrew!

Yes, at least that's my intention!

Cheers,

Azgaron


  • Member since
    September 2006
  • From: From Vernal UT OH YEA!!
Posted by raptordriver on Saturday, March 22, 2008 5:17 PM
Looks great Azgaron looks like it will be painted pretty soon.

Andrew


  • Member since
    July 2007
  • From: Sweden
Posted by Azgaron on Saturday, March 22, 2008 5:08 PM

I used a light grey color as primer. I'll check for flaws as soon as it has dried!

Once they're fixed, I'll mask and glue the canopy, before I start to paint.

Cheers,

Azgaron


  • Member since
    September 2006
  • From: From Vernal UT OH YEA!!
Posted by raptordriver on Saturday, March 22, 2008 3:09 PM
Sure you can join Welcome.Sign - Welcome [#welcome]

Andrew


  • Member since
    September 2007
  • From: Crystal Lake, IL
Posted by firesmacker on Saturday, March 22, 2008 2:56 PM

Andrew,

I have a Tamiya 1:48 P-51B that is about 40% complete. I started it sometime in Febuary but with moving and all it had to go back into the box for awhile. My Eduard canopy mask came in the mail today so now seems as good a time as any to get back to it. Mind if I get in on this one?

Regards,

Jeff 

  • Member since
    September 2006
  • From: From Vernal UT OH YEA!!
Posted by raptordriver on Saturday, March 22, 2008 1:48 PM
Welcome Vassar never to late to join.Sign - Welcome [#welcome]

Andrew


  • Member since
    June 2007
  • From: Vassar, Michigan
Posted by Vassar-13 on Saturday, March 22, 2008 1:41 PM
Is it too late to join?  I have a Revell 1/72 P-51B and a 1/48 AM P-51A I just started.
  • Member since
    September 2006
  • From: From Vernal UT OH YEA!!
Posted by raptordriver on Saturday, March 22, 2008 8:20 AM
Welcome Thunderbolt what mustang are you building?

Andrew


  • Member since
    April 2005
Posted by Thunderbolt379 on Saturday, March 22, 2008 7:47 AM

Hi guys,

Would love to come aboard, I've been an absolute Mustangaholic for nearly 20 years (have the engineering and pilot's manuals on my bookshelf!) and heaps of Stangs in my stash. Something by Tamegawa (-D) or possibly an ICM -C.

Over,

TB379

http://worldinminiature.blogspot.com/

  • Member since
    December 2006
  • From: Kennewick, WA
Posted by kbuzz01 on Friday, March 21, 2008 11:53 PM

Mustang lovers-

Picked up the Summer 2008 edition of Flight Journal at a local magazine rack today.  It's total P-51 Mustang with lots of neat pics and stories.  Thumbs Up [tup]

Ken 

animation6.gif image by kbuzz_photos
  • Member since
    January 2007
  • From: Cherry valley il.
Posted by invertman on Friday, March 21, 2008 4:43 PM

looking real good chris.

keep it up.

jason

  if you want permission for a test flight.... the answer is "no".

  • Member since
    March 2007
  • From: NJ
Posted by JMart on Friday, March 21, 2008 2:27 PM
Chris, good luck with the build fix, look forward to the rest! I also learn something from every build but I am still in the "no brush strokes, no seams, no blobs of glue" stage ;)cheers


  • Member since
    July 2003
  • From: Cincinnati, Ohio
Posted by ridleusmc on Friday, March 21, 2008 1:07 PM

Thanks Andrew, Thanks Azgaron,

Trying something new on every build. 

Semper Fi,

Chris

  • Member since
    July 2007
  • From: Sweden
Posted by Azgaron on Friday, March 21, 2008 10:45 AM

Nice work, Chris! I hope that the dive brakes turns out OK!

Cheers,

Azgaron


  • Member since
    September 2006
  • From: From Vernal UT OH YEA!!
Posted by raptordriver on Friday, March 21, 2008 8:17 AM
Great progress Chris it may take a while there but its something most people don't do.

Andrew


  • Member since
    July 2003
  • From: Cincinnati, Ohio
Posted by ridleusmc on Thursday, March 20, 2008 11:41 PM

Hey all,

Much of last night was dedicated to cutting holes in the Apache's wings.  I was a little disappointed when I opened AccumMini's A-36 kit.  It has dive brakes, but they're molded into the wings.  I really wanted to pose my dive brakes open, because it is the "Special" thing about the A-36.  I bought eduard's detail set, because it had some PE dive brakes (most AccumMini's projects don't need PE).  However, that means I had to chop holes in my wings.  I've never done that before, and they don't look that great right now.  I'm going to clean them up a bit, but I worry that I've removed too much plastic.  If that is the case, I may give it solid wings, cover over the engine nacel gun ports and call it a P-51A.  Here's pics:

Semper Fi,

Chris

JOIN OUR COMMUNITY!

Our community is FREE to join. To participate you must either login or register for an account.

SEARCH FORUMS
FREE NEWSLETTER
By signing up you may also receive reader surveys and occasional special offers. We do not sell, rent or trade our email lists. View our Privacy Policy.