SEARCH FINESCALE.COM

Enter keywords or a search phrase below:

Red Storm on the Reich GB - Sept. 8, 2008 - May 9, 2009

61930 views
710 replies
1 rating 2 rating 3 rating 4 rating 5 rating
  • Member since
    November 2007
  • From: Wisconsin Rapids, WI
Posted by moose421 on Monday, September 22, 2008 8:04 PM
espins1  Your off to a great start and looking great.  Come on now, whats wrong with a mountain of PE?  At least if it is covered by the bigger mountain of resin and aluminum barrel. Smile,Wink, & Grin [swg]Whistling [:-^]
  • Member since
    April 2005
  • From: Piscataway, NJ!
Posted by wing_nut on Tuesday, September 23, 2008 11:09 AM

Moose... nothing wrong at allBig Smile [:D]

The wheels are captured between the 2 tires halves. I got to the 3rd one and figured these were going to be a pain to paint.  Why didn't they leave off the collar around the center of the wheel so it can be added after painting.  I got out the Dr4mel and did exactly that.


The gun and more PE.


Not much gluing left.  Painting should start tonight. There is still a real good interior view with the gun in place.


Marc  

  • Member since
    November 2006
  • From: Coastal Maine
Posted by dupes on Tuesday, September 23, 2008 11:28 AM

Wingy - I've been operating under the (wrong!) assumption that you were doing a 234/2 not a 234/3...ignore all previous comments about not seeing the interior. Whistling [:-^]

Looks good! 

  • Member since
    December 2002
  • From: Reno, NV
Posted by espins1 on Tuesday, September 23, 2008 11:47 AM
Marc, you're just going to town!  Great work!  Cool [8D] Thumbs Up [tup] Thumbs Up [tup]

Scott Espin - IPMS Reno High Rollers  Geeked My Reviews 

  • Member since
    August 2008
  • From: Round Lake Heights, IL
Posted by Lofweir on Tuesday, September 23, 2008 1:22 PM
So I finally unboxed some things last night and started planning out my build.  The Tamiya kit for the Panther is pretty simple, so the overall build shouldn't take to long (should have some pictures tonight).  As I am not doing any PE or resin here, I am scratch-building some screens for the rear cooling vents  There are four rounded-rectangle cooling vents and two raised, round fan vents on the rear of the Panther.  The screens for the rectangles are relatively easy, and I have tried a test screen using a frame built from styrene strip that should look ok after a little sanding and paint.  My question is on the approach for the raised round fan vents.  I tried a both flat and quarter-round styrene and can't get a good look with it.  I am thinking either two-part putty or bakable clay for building the screen frame, and was wondering if anyone had tried either of these approaches and could give me some guidance.  Thanks.
Currently Building: Tamiya 1/35 Panther Ausf. A
  • Member since
    December 2002
  • From: Reno, NV
Posted by espins1 on Wednesday, September 24, 2008 10:54 AM
Hmmm, you have your work cut out for you Lofweir, I have no experiance fabricating screen frames.  I've always used the PE screen sets and they're usually pretty affordable.  Good luck with that!

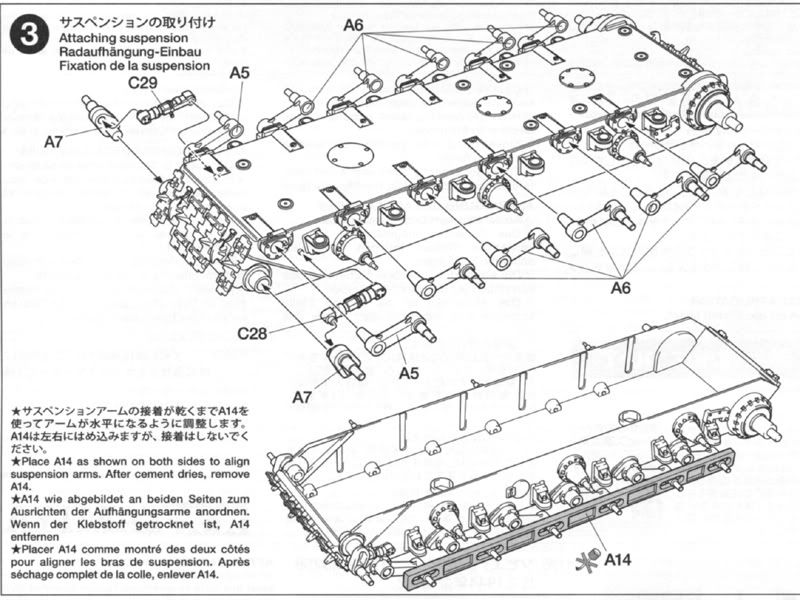
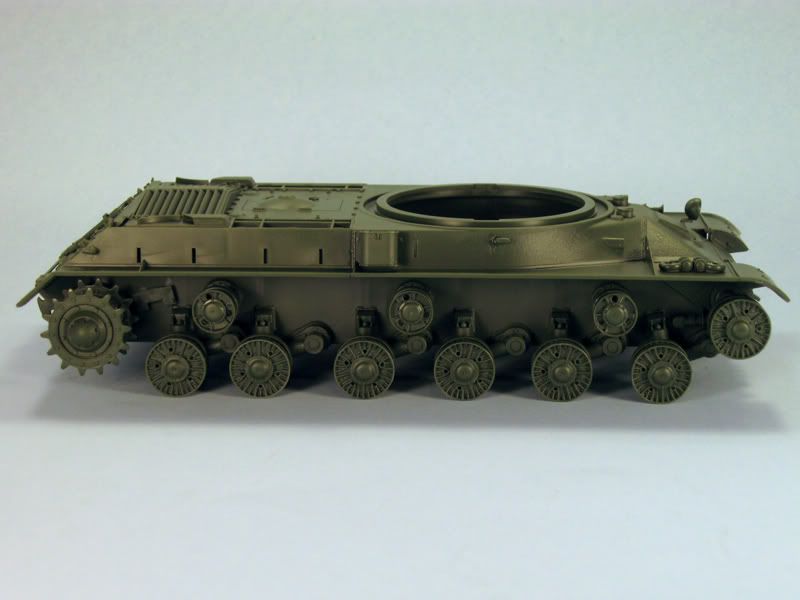
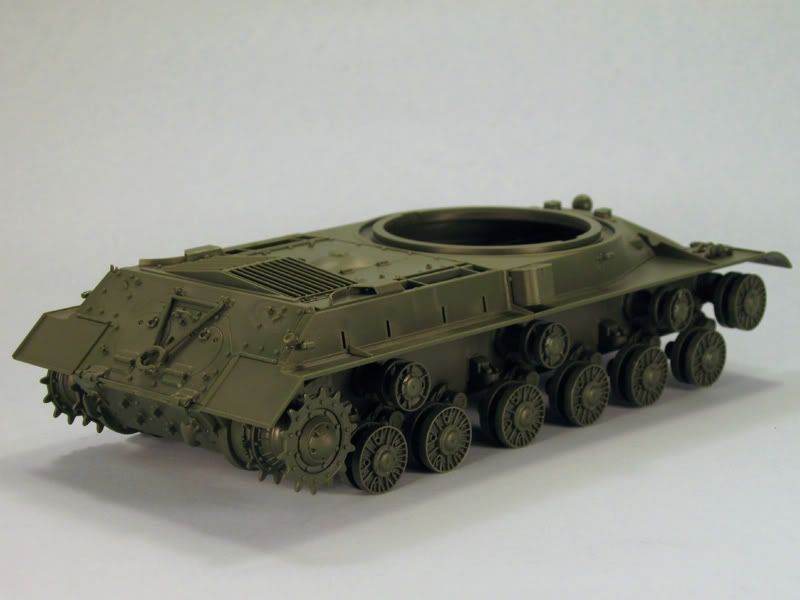
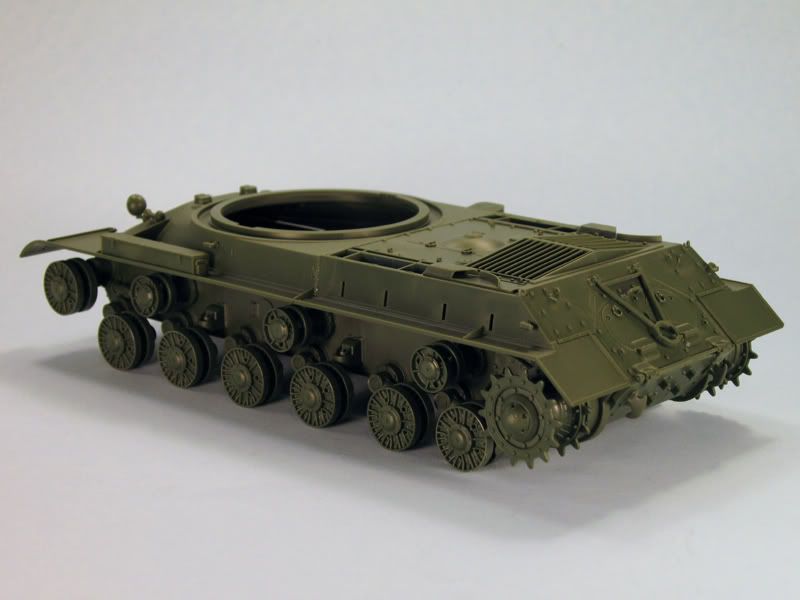
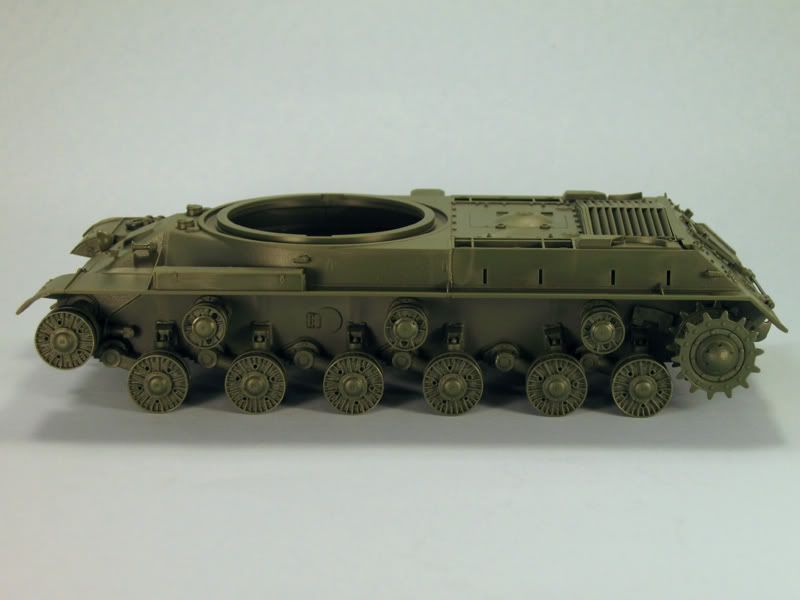
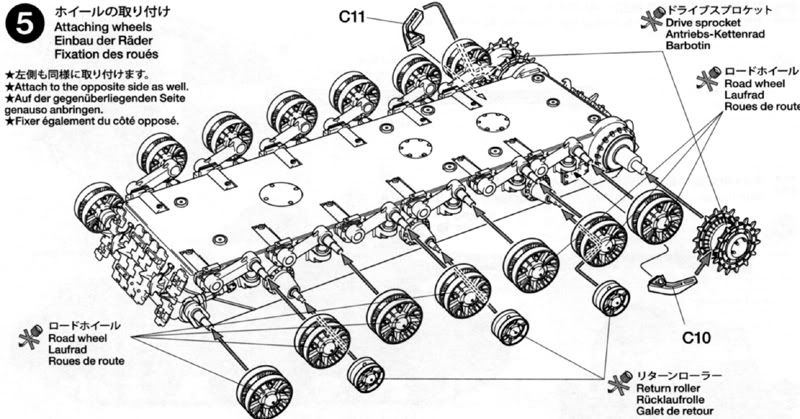
I've made some more progress on the JS-2 last night.  The suspension arms have been attached.  Be careful when sorting them out as the very front suspension arm (A5) is different from the rest of them (A6), it's beefier and has an angular shape to it instead of the rounded shape.  It was pretty easy to install them all, they just snug right into the holes and have a small pin which goes into a locating hole to help with the alignment.  As an added bonus Tamiya has included two nifty jigs that ensure that all the axles are in perfect alignment and that they're all level.  That should prevent the dreaded "floating roadwheel" which can really detract from an otherwise nice build as it sticks out like a sore thumb.


Scott Espin - IPMS Reno High Rollers  Geeked My Reviews 

  • Member since
    April 2005
  • From: Piscataway, NJ!
Posted by wing_nut on Thursday, September 25, 2008 9:39 AM

No worries dupes.  But it does expalin why I was thinking..."Open hatches?  The gigundo hole in the top isn't big enough?  Did I miss something on the instruction sheet?"Wink [;)]

One last shot...before the real fun begins. All pretty and clean like it was shined up for a custom car show.  But now, lie the local commercial syas when the monster trucks come to town...

"TIME TO GET DOWN AND DIRTY IN THE MUUUUD"

I used 1 different wheel hub style and painted it gray as if it were scrounged from one used ofr parts.  Pluasible?

Marc  

  • Member since
    April 2007
  • From: Schroon Lake, NY
Posted by SMJmodeler on Thursday, September 25, 2008 9:53 AM
 wing_nut wrote:

"TIME TO GET DOWN AND DIRTY IN THE MUUUUD"

...that's when the fun begins!..oh yeah...dig inDinner [dinner] and get 'er dirty!

 wing_nut wrote:

I used 1 different wheel hub style and painted it gray as if it were scrounged from one used ofr parts.  Pluasible?

Definately plausible...but make sure you INTENTIONALLY show the wear differently than the others...in fact, I'd OVERDO the dramatic difference to bring attention to it and make sure it doesn't look like an oversight.  How about a ton of dirt on the old tires and much less/hardly any on the "odd-ball"....It's a cool idea, make sure it gets noticedThumbs Up [tup]!

  • Member since
    April 2005
  • From: Piscataway, NJ!
Posted by wing_nut on Thursday, September 25, 2008 10:04 AM

WEAR?????   Crap. All the tires look like they are factory fresh.  I forgot to wear 'em down and chunk 'em up. Angry [:(!]

Still can but what are the chances I can match the mix i did for the tire color Sad [:(]

Marc  

  • Member since
    December 2002
  • From: Reno, NV
Posted by espins1 on Thursday, September 25, 2008 10:53 AM
Marc, Looks great!  Let's just "assume" that this vehicle just came back from the repair depot with some refurbished rims and new tires!  Whistling [:-^]

Scott Espin - IPMS Reno High Rollers  Geeked My Reviews 

  • Member since
    April 2007
  • From: Schroon Lake, NY
Posted by SMJmodeler on Thursday, September 25, 2008 10:55 AM
 wing_nut wrote:

WEAR?????   Crap. All the tires look like they are factory fresh.  I forgot to wear 'em down and chunk 'em up. Angry [:(!]

Sign - Oops [#oops], I meant weather it differently...nothing to do with tire wear...sorry

  • Member since
    November 2006
  • From: Coastal Maine
Posted by dupes on Thursday, September 25, 2008 12:07 PM
 wing_nut wrote:

No worries dupes.  But it does expalin why I was thinking..."Open hatches?  The gigundo hole in the top isn't big enough?  Did I miss something on the instruction sheet?"Wink [;)]

"GIGUNDO"! Laugh [(-D]
 

 wing_nut wrote:

I used 1 different wheel hub style and painted it gray as if it were scrounged from one used ofr parts.  Pluasible?

So long as these were ever delivered in Panzer Gray it does. Not sure when the /3's were released - is there an overall Panzer Gray scheme on the sheet?


Great camo, btw. 

  • Member since
    April 2005
  • From: Piscataway, NJ!
Posted by wing_nut on Thursday, September 25, 2008 1:32 PM

None in gray on the sheet but I did see a pic online.somewhere... of a /3 in a museum in gray. I know they could have just painted it gray but seems to me that someone form a museum would keep it as it was.

EDIT--I just remembered... it was in with the pics luftwoller posted form his trip to Bovington

Marc  

  • Member since
    July 2007
  • From: Ohio
Posted by Geist on Thursday, September 25, 2008 7:19 PM

I like your idea wing_nut. BTW, how do you have the badge in your sig already?


I'm still working on the PE for my ISU 152. This is the most PE I've ever used on a kit before. Its strange how I've been working on the kit for a few weeks and I have almost nothing to show for it. I guess PE is fun that way.


Erik

On the bench: Italeri Leopard 1A2 correction build with Perfect Scale turret and Eduard PE

  • Member since
    November 2007
  • From: Wisconsin Rapids, WI
Posted by moose421 on Thursday, September 25, 2008 7:27 PM

Geist I feel your pain.  Trust me I do.  You finish one piece and wait there is another and another.  I have been working on the turret basket for a couple of nights now.  Finally it is starting to look good.

Wing_nut looking great. Can't wait to see it get all dirty and dingy.  Dingy is a word right?  Well I think it is.

Everyone keep up the great work.  I am off to the basement to work on mine now.

  • Member since
    February 2007
  • From: Calgary, Alberta, Canada
Posted by T-rex on Thursday, September 25, 2008 7:50 PM

Finish my panther, and just in time for the ATV contest.


This is tamiya 1/48 series, but not just is my first 1/48, it also the first model with airbrush camo, and looks amazing, glad of the result.

Else than the copper antennas (will need to remove the antennas on the turret) this kit is out of the box, and is on late version, I didn't wanted to go thought the trouble of zimmerit coat (beside the kit didn't ask for so) and I say this ones complete.

Working on: Trumpeter SU-152 (1/35) Trumpeter E-10 (1/35) Heller Somua (1/35)

"The world is your enemy, prince of a thousand enemy. And when they'll find you, they will kill you... but they will have to catch you first ''

  • Member since
    February 2008
  • From: ladner BC Canada
Posted by stick man on Thursday, September 25, 2008 11:45 PM

Nice camo Wing nut! and cool touch with the gray wheel. I can't wait to see it all weathered up!

Smile [:)]

I'm 15 and I model I sk8board and I drum what could be better.
  • Member since
    April 2005
  • From: Piscataway, NJ!
Posted by wing_nut on Friday, September 26, 2008 6:40 AM

Thanks for the comments guys. 

Was I not supposed to take the badge until competion?

T-rex, nice job... subdued weathering. Looks good.  The rust is a bit bright and even toned.  You might be able to tone it down with some stippling and dry brushing of a cople of shades of brown. Then a dry brush of steel to show some usage.

Marc  

  • Member since
    December 2002
  • From: Reno, NV
Posted by espins1 on Sunday, September 28, 2008 2:41 PM

I'm ok with everyone who is actively building to have the badge in their signature line.  Nothing wrong with advertising the GB as we still have a lot of time left.  Big Smile [:D]

I spent most of the day on my workbench yesterday alternating work between the JS-2 and the Char B1 bis.

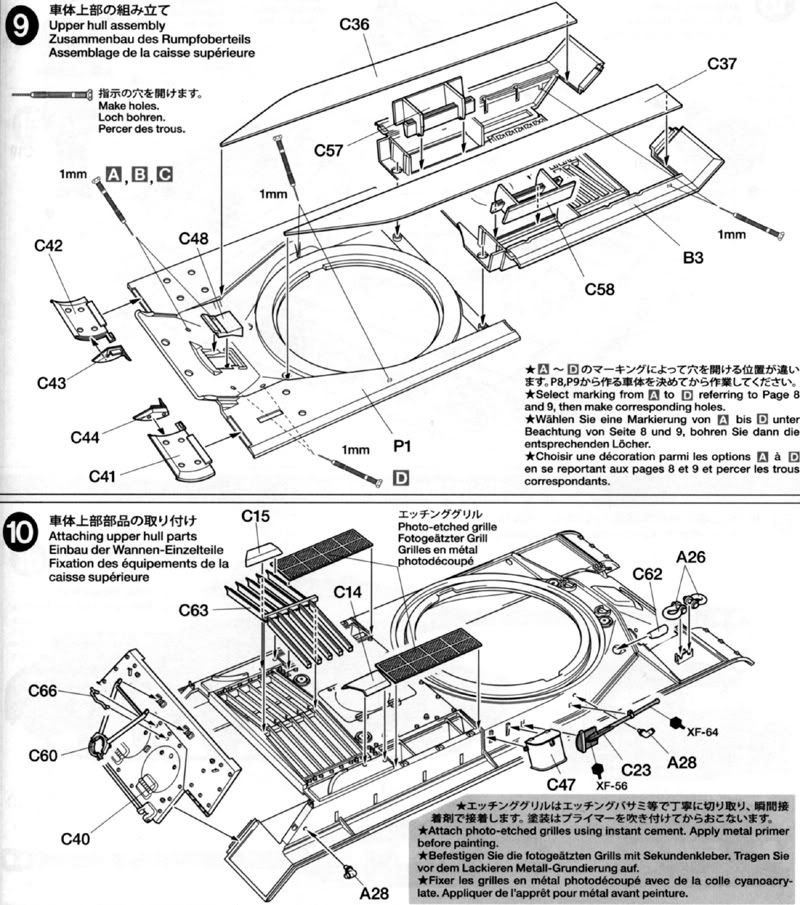
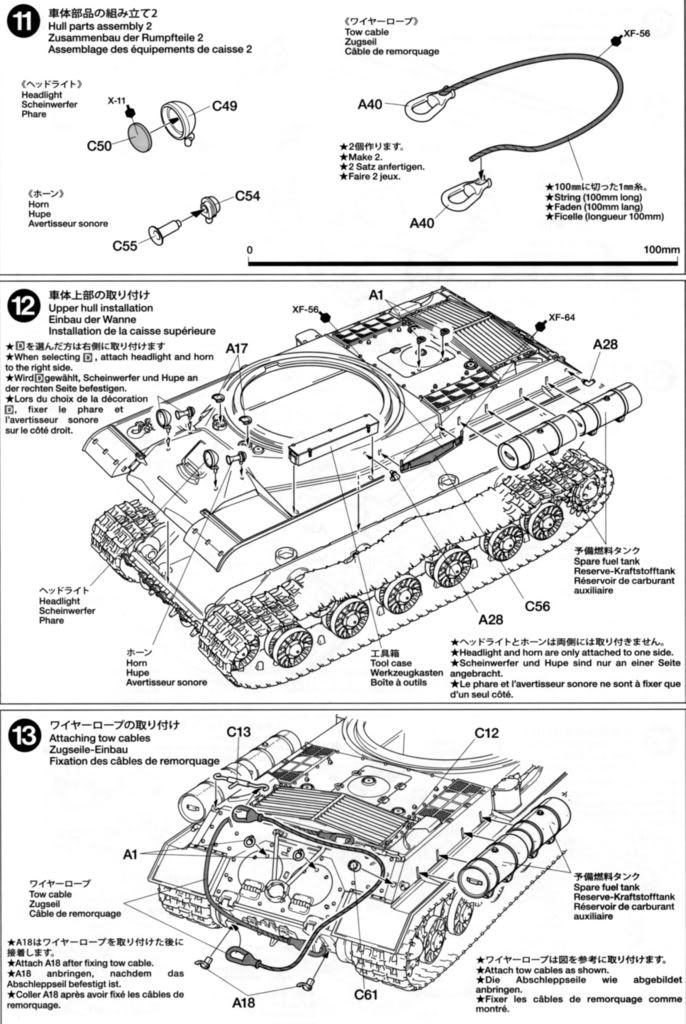
I've completed most of steps 3, 4, 5, 9, 10, 11, 12 and 13.  There are a few more detail parts that need to be added, but they will go on after painting. 


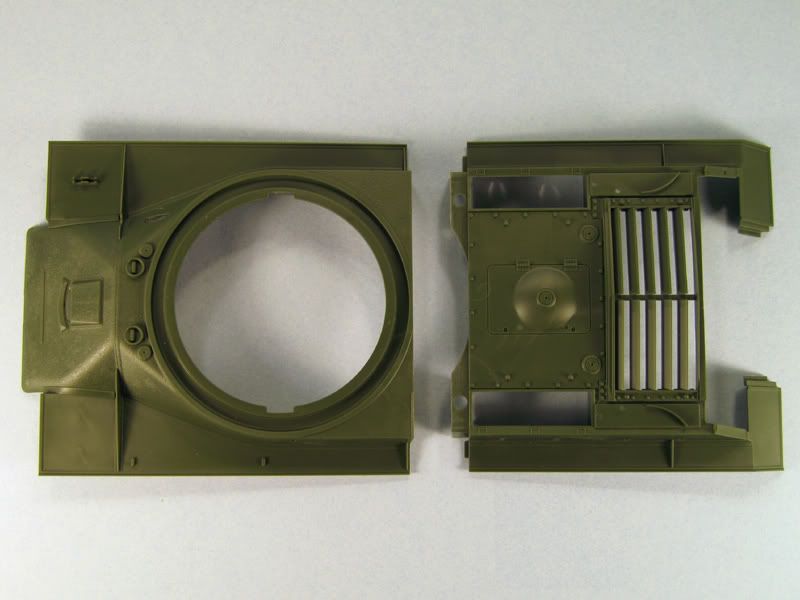
The hull was pretty easy to mate up once I dry fitted a couple of times and came up with the game plan for applying the glue and keeping the parts flush and aligned.  I started by placing them together upside down, put a little liquid cement where the connecting tabs and locating circles were, gave that just a sec to solidify then ran cement all along the seam, flipped it all over then carefully held the front and back halves together to get a nice, solid joint.  worked like a champ!  Just be careful though as you want the upper hull surfaces to be level with each other.  As long as you keep them butted up together firmly, this won't be a problem.


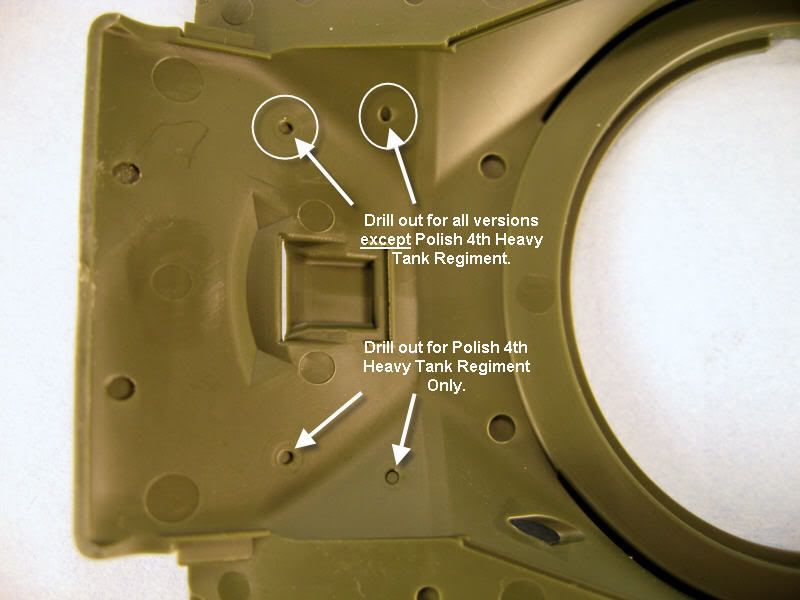
At this point you need to decide which scheme you're going with so you can drill the holes for the headlamp and the horn.  If you're doing yours as one the one that served with the Polish 4th Heavy Tank Regiment then you'll need the holes right side (left if looking from underneath).  All other variants have them mounted on the left (right if looking from underneath) so be careful!  Also think through the angle you need to drill the holes at as the surfaces they're mounted on are at an angle.  You'll want the hole for the headlamp to be completely vertical, the hole for horn should be perpendicular to the angled surface.  Make sense?


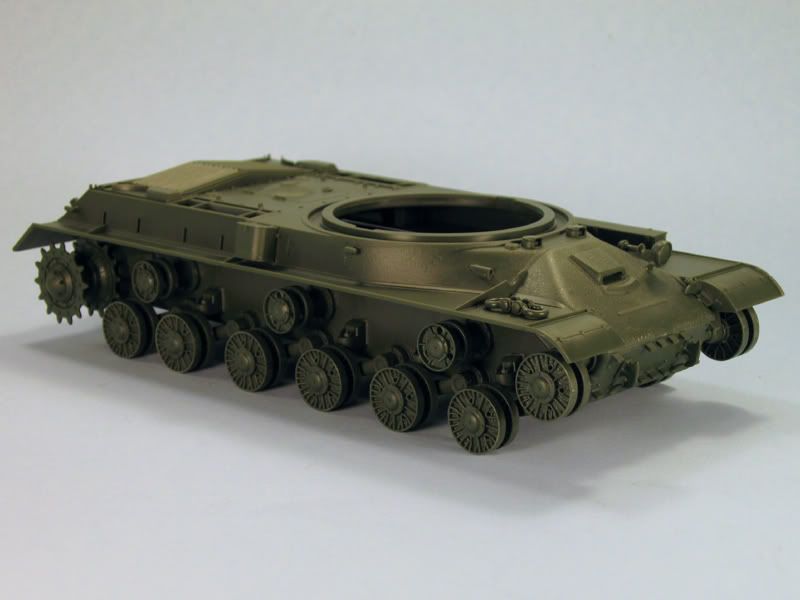
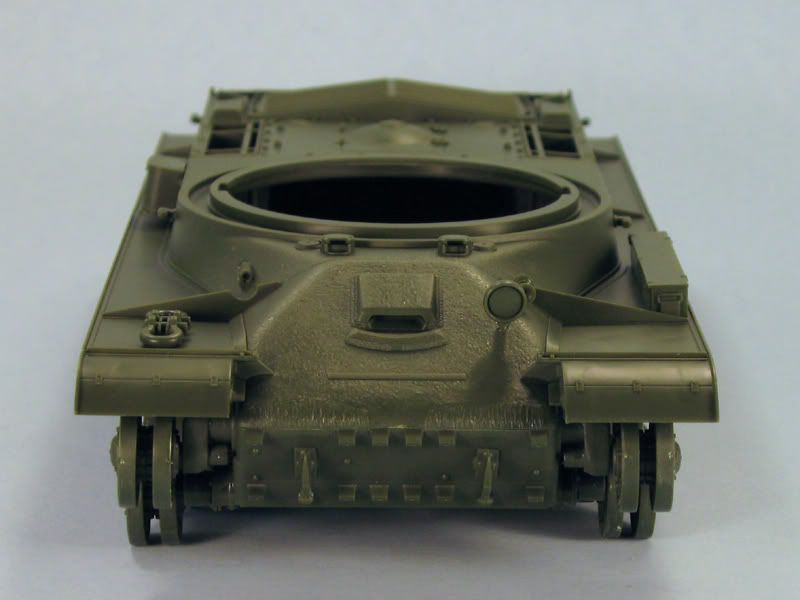
Here are a series of photos from this morning of the almost completed hull and running gear.  I still need to install the mud scraper for the drive sprockets, and various tools.  I'm going with the Aber engine grill set, so I have some modifications to do to remove the molded on hinges which don't look at all like the real thing.  The Aber set will rectify that although I have to make my own hinge wires as they're not provided.  More on that in a later build log installment.


Today the game plan is to build the turret and install the Aber D-25T 122mm gun.     

Scott Espin - IPMS Reno High Rollers  Geeked My Reviews 

  • Member since
    December 2002
  • From: Reno, NV
Posted by espins1 on Monday, September 29, 2008 10:34 AM
I'm just about finished with the Aber gun barrel, very nice set.  

Yesterday I went about the process of attaching the two small photo etch parts to the base of the muzzle break which need to be bent into a 90 degree angle.  The parts are very small so they can be a little tricky to handle.  It took me a long time because they each wound up on the floor at some point or another.  Good thing I was using my mobile work bench (12x12 inch ceramic tile) and was working in the kitchen.  I still managed to lose one for good though, so I ended up making one of my own.  I cut a small strip from the photo-etch fret, drilled a small hole using the tip of an old airbrush needle, then carefully held the part down with tweezers on the ceramic tile work bench while I filed it down to shape using a flat needle file.  I know, crazy, but it actually looks pretty good!  Whew!   Shock [:O]

I still need to fabricate the two little pegs that attach next to the brackets and so far haven't found anything suitable to use.  I will probably end up using some stretched sprue chopped to the appropriate length and will deal with that when I get home this evening.


Scott Espin - IPMS Reno High Rollers  Geeked My Reviews 

  • Member since
    February 2005
  • From: Nashotah, WI
Posted by Glamdring on Monday, September 29, 2008 4:22 PM

 espins1 wrote:
I'm just about finished with the Aber gun barrel, very nice set.  

Yesterday I went about the process of attaching the two small photo etch parts to the base of the muzzle break which need to be bent into a 90 degree angle.  The parts are very small so they can be a little tricky to handle.  It took me a long time because they each wound up on the floor at some point or another.  Good thing I was using my mobile work bench (12x12 inch ceramic tile) and was working in the kitchen.  I still managed to lose one for good though, so I ended up making one of my own.  I cut a small strip from the photo-etch fret, drilled a small hole using the tip of an old airbrush needle, then carefully held the part down with tweezers on the ceramic tile work bench while I filed it down to shape using a flat needle file.  I know, crazy, but it actually looks pretty good!  Whew!   Shock [:O]

I still need to fabricate the two little pegs that attach next to the brackets and so far haven't found anything suitable to use.  I will probably end up using some stretched sprue chopped to the appropriate length and will deal with that when I get home this evening.


Good heavens!  The Carpet Monster would definitely eat both of those if I were working on it.  Or the shirt monster... or the desk monster..... Smile [:)]

Great job!

Robert 

"I can't get ahead no matter how hard I try, I'm gettin' really good at barely gettin' by"

  • Member since
    July 2003
  • From: Perth, Western Australia
Posted by madmike on Monday, September 29, 2008 6:44 PM

My Italeri JS-2 is progressing nicely even with the issues of butt joined grab rails and other Italeri "eccentricities" Next time I might try the PST kit!

Paintwork on the Calibri Gaz-67b has gotten underway as well.

Best of all, the cobblestone bases arrved from Jadar Hobbies, so all the components now are coming together Smile [:)]

Cheers

Mike

"I do not feel obliged to believe that the same God who has endowed us with sense, reason, and intellect has intended us to forgo their use." - Galileo Galilei
  • Member since
    December 2002
  • From: Reno, NV
Posted by espins1 on Tuesday, September 30, 2008 9:58 AM
Thanks Glamdring, it's a miracle I didn't wind up losing both of those little tabs!  Shock [:O]  Laugh [(-D]

Scott Espin - IPMS Reno High Rollers  Geeked My Reviews 

  • Member since
    April 2005
  • From: Piscataway, NJ!
Posted by wing_nut on Tuesday, September 30, 2008 4:07 PM

The light at the end of the tunnel is getting a little brighter.

While layers of weathring dry, I have been woorking on the pioneer tools, jerry cans etc.  The bracket for the jerry can has all the hinged points working.  1 bracket... 35 minutes. 5 more to go.  And they will be glued as I go since there is no need for wroking anything.  Once mounted they will be permanent.  The shell casing catcher was textured with slow CA and tissue. The kitfire extinguisher needs to have all the detail filed off leaving a cylinder.  Aluminum tube was cut to length making...OMGShock [:O] a cylinder.


Spent awhile last night giving all the little dodads a pin wash of burnt sienna then the whole thing got a filter of dj yellow, raw sienna lighten with white and thinned 90/10 and a few scratches.  Dullcoat and dot filter next.  Underside and wheel wil get some MIGs.  1st time using these.

Definately on the down wind leg....OOPS... that's an aircraft term Whistling [:-^]


Marc  

  • Member since
    July 2007
  • From: Ohio
Posted by Geist on Tuesday, September 30, 2008 6:15 PM

I've made some progress on my ISU152. I have the main gun, and mantlet complete. I should have bought an aluminium barrel but its too late for that. I've also added some random parts to the upper hull. Its coming together nicely. I've been working on the PE for some time now. The details that are added with the PE is so much better than the original kit. I think I'm doing well. My Etchmate tool is so helpful. As for painting I think I'm going to try the salt method as detailed in Arron Skiners article in this this past months FSM.


Erik

On the bench: Italeri Leopard 1A2 correction build with Perfect Scale turret and Eduard PE

  • Member since
    November 2006
  • From: Coastal Maine
Posted by dupes on Wednesday, October 1, 2008 9:20 AM

So Wingy...I take it we'll be seeing this guy next year in the "wheeled vehicles" category? Cool [8D]

Those PE brackets are Thumbs Up [tup]Thumbs Up [tup].

  • Member since
    December 2002
  • From: Reno, NV
Posted by espins1 on Wednesday, October 1, 2008 9:35 AM
That's some excellent work there Marc!  The PE is beautiful!  Cool [8D]

Scott Espin - IPMS Reno High Rollers  Geeked My Reviews 

  • Member since
    February 2008
  • From: ladner BC Canada
Posted by stick man on Wednesday, October 1, 2008 6:34 PM

Nice PE there wingy! looks great!

Smile [:)]

I'm 15 and I model I sk8board and I drum what could be better.
  • Member since
    April 2005
  • From: Piscataway, NJ!
Posted by wing_nut on Thursday, October 2, 2008 2:09 PM

Stick a fork in this one baby...


Marc  

  • Member since
    December 2002
  • From: Reno, NV
Posted by espins1 on Thursday, October 2, 2008 3:13 PM

Marc, that looks really great!  I love the weathering, the camo, the quality of the finish, the PE work, the gray wheel.... everything!  I really want to build one of those! 

Excellent work my friend!  And congrats on being the first one finished!  Cool [8D] Thumbs Up [tup] Thumbs Up [tup]

Scott Espin - IPMS Reno High Rollers  Geeked My Reviews 

JOIN OUR COMMUNITY!

Our community is FREE to join. To participate you must either login or register for an account.

SEARCH FORUMS
FREE NEWSLETTER
By signing up you may also receive reader surveys and occasional special offers. We do not sell, rent or trade our email lists. View our Privacy Policy.