SEARCH FINESCALE.COM

Enter keywords or a search phrase below:

Red Storm on the Reich GB - Sept. 8, 2008 - May 9, 2009

61930 views
710 replies
1 rating 2 rating 3 rating 4 rating 5 rating
  • Member since
    December 2002
  • From: Reno, NV
Posted by espins1 on Wednesday, September 10, 2008 11:15 AM

 Lofweir wrote:
Picked up Fall of Berlin 1945 a couple of days ago and started reading.  Great book.  The bizarre, willful blindness of the German High Command is almost mind-boggling.

Agreed.  I'm reading a great book on the War in the East 1943/44 called:

Scorched Earth by Paul Carell.  Hitlers meddling which began during the Fall/Winter of 1941/42 began to completely unravel and doom the Wermacht as he became more and more delusional.  He became even worse as the war progressed.  His insistence on holding on to every piece of ground to the last man cost countless lives which Germany simply could not replace.  Not to mention taking away the biggest advantage the Germans had - the ability to totally kick butt in mobile armored warfare.  Amazing....... 

Scott Espin - IPMS Reno High Rollers  Geeked My Reviews 

  • Member since
    December 2002
  • From: Reno, NV
Posted by espins1 on Wednesday, September 10, 2008 11:22 AM
 paul_toz wrote:

Hi Scott,

can I join in this one? I don't do armour very often, but I want to do a 1/35 Universal Carrier for my Dad after Xmas. So I thought I had best get some practice in before then. I have a 1/72 Dragon Pro Panther G which has decals for the Herman Goering Division, East Prussia in January 1945 that fits in nicely with the requirements for this GB.

Paul

Nice!  Welcome aboard Paul!  Sign - Welcome [#welcome]  I've added you to the roster.

Scott Espin - IPMS Reno High Rollers  Geeked My Reviews 

  • Member since
    December 2002
  • From: Reno, NV
Posted by espins1 on Wednesday, September 10, 2008 11:25 AM

Great progress Marc, your build is off to a fantastic start my friend!  Smile [:)]

There are some great projects in the works and I'm really looking forward to seeing all the great builds.  We've got a great bunch of people in this GB with some serious skills.  Cool [8D]

Scott Espin - IPMS Reno High Rollers  Geeked My Reviews 

  • Member since
    July 2007
  • From: Ohio
Posted by Geist on Wednesday, September 10, 2008 1:27 PM

Well, I started working on the lower hull of my ISU152 last night. It was then I realized that some pieces were missing. The piece that holds the drive sprocket to the hull is missing from both sprues. As you can imagine I'm not very happy about that. Does Dragon supply replecement parts? If so, how can I contact them?


Erik

On the bench: Italeri Leopard 1A2 correction build with Perfect Scale turret and Eduard PE

  • Member since
    April 2005
  • From: Piscataway, NJ!
Posted by wing_nut on Wednesday, September 10, 2008 1:37 PM
Dupes, maybe the word "fully" is misleading, implying it has a full ramge of motion. It goes up and down and the knuckle steers.  Up/down is limited bythe nature of the construction.  The locating pins are cut off the knuckles... the kit parts... and holes are drilled.  Holes are also drilled in the ends of the arms and the connection is made with .5mm plastic pins.  A working ball joint would be great and give a full range of motion.  If anyone has an idea how to scatchbuild a working ball joint that size... brother i am all ears.

Marc  

  • Member since
    March 2003
  • From: Rain USA, Vancouver WA
Posted by tigerman on Wednesday, September 10, 2008 6:07 PM
Great start Marc. I'm looking forward to see what you do with this guy.

   http://i7.photobucket.com/albums/y269/wing_nut_5o/PANZERJAGERGB.jpg

 Eric 

  • Member since
    November 2007
  • From: Wisconsin Rapids, WI
Posted by moose421 on Wednesday, September 10, 2008 7:33 PM

Geist

I have heard that dragon care does sell replacements parts. Try this link.

http://www.dragoncare.com/chsmain.asp

I have never used them, but have heard that others have used them and had good luck.


wing_nut  your off to a beautiful start.  All those litttle pieces are a wake up to mine.  Except, I have just the PE and handles for my tiger.  I plan on washing up all my parts tonight.


  • Member since
    July 2007
  • From: Ohio
Posted by Geist on Wednesday, September 10, 2008 10:09 PM
 moose421 wrote:

Geist

I have heard that dragon care does sell replacements parts. Try this link.

http://www.dragoncare.com/chsmain.asp

I have never used them, but have heard that others have used them and had good luck.


Thanks!Thumbs Up [tup]

On the bench: Italeri Leopard 1A2 correction build with Perfect Scale turret and Eduard PE

  • Member since
    October 2004
  • From: Nelson, BC, Canada
Posted by paul_toz on Thursday, September 11, 2008 11:32 PM

First post...sprues have been washed and are drying ona shelf. This is a pic of the box lid. Hopefully I will be able to make a start this weekend.

Paul

  • Member since
    March 2003
  • From: Rain USA, Vancouver WA
Posted by tigerman on Friday, September 12, 2008 12:02 AM

Washed my sprues for the Pak-40. Lot's of itsy pieces, especially the bolts for the shield. I wonder how many of them will be lost? I hope there are extras. I built the Tamiya kit many years ago and I remember I hated constructing the shield. This one is PE and looks beautiful. Also included is an aluminum barrel, but comes oddly enough with a two-piece baffle.

My Pak came as part of a 2-in-1 with a 251/D. I'm not ready to tackle that beast yet.

   http://i7.photobucket.com/albums/y269/wing_nut_5o/PANZERJAGERGB.jpg

 Eric 

  • Member since
    November 2006
  • From: Coastal Maine
Posted by dupes on Friday, September 12, 2008 6:44 AM
But Tigerman! Think how cool that PaK 40 would look with a 251 attached to it! Big Smile [:D]
  • Member since
    March 2003
  • From: Rain USA, Vancouver WA
Posted by tigerman on Friday, September 12, 2008 11:38 AM

 dupes wrote:
But Tigerman! Think how cool that PaK 40 would look with a 251 attached to it! Big Smile [:D]

I knew you were going to chime in with that! LOL Sorry I missed out on your GB my friend. Just so little time right now. 

   http://i7.photobucket.com/albums/y269/wing_nut_5o/PANZERJAGERGB.jpg

 Eric 

  • Member since
    November 2007
  • From: Wisconsin Rapids, WI
Posted by moose421 on Friday, September 12, 2008 6:42 PM

Here is a picture of all the glorious parts that will be on my b-berg tiger.Whistling [:-^]

Bad thing is, while looking closely at the pictures of the tiger I realized that I am going to have to have a couple of the road wheels off of it.  Oh well, out comes the plastic and an order to the tank workshop for tiger hubs.  Also gave a reason to buy the mortor kit for a side build as well.  BONUS Party [party]

Last night I got all the parts washed up, so the build may commence.


  • Member since
    July 2007
  • From: Ohio
Posted by Geist on Friday, September 12, 2008 6:59 PM

Not sure how many of you read my post about the missing parts in my ISU152. Today I got in touch with a rep from DragonCare. They told me what I feared the worst. They don't have the parts becasue the kit is so old. They said they could contact Dragon in Hong Kong to see if they had the parts but that may take weeks to find out and even longer to ship if they even have the parts.

Does anyone have parts from Dragon kit 6047 or 6803 or even a JS2? I'm looking for part B10, and I need 2 of them. They are the piece that holds the drive sprocket to the hull.


Erik

On the bench: Italeri Leopard 1A2 correction build with Perfect Scale turret and Eduard PE

  • Member since
    March 2007
  • From: NJ
Posted by JMart on Friday, September 12, 2008 8:45 PM

wing_nut - wow, quantity AND quality... that is great work and great pics... excellenT!

moose421 - that is some serious build plan... :)

Erik - no dice with me, sorry! :(


  • Member since
    April 2005
  • From: Piscataway, NJ!
Posted by wing_nut on Friday, September 12, 2008 9:12 PM

Holy smokes moose. That might equivilent to the GDP of Lackacrapistan.  That is some serious Am stuff.


And of course Imean no offense to any lackacrapistaniwarians out there

Marc  

  • Member since
    November 2006
  • From: Coastal Maine
Posted by dupes on Saturday, September 13, 2008 10:47 AM
 tigerman wrote:

 dupes wrote:
But Tigerman! Think how cool that PaK 40 would look with a 251 attached to it! Big Smile [:D]

I knew you were going to chime in with that! LOL Sorry I missed out on your GB my friend. Just so little time right now. 

Heck, I'd be happy to see that 251 attached to it for this GB! Big Smile [:D]

Geist - sucks about Dragoncare. I have the 6804 boxing of the JS-2, I can see if there's any spares included...may require some serious excavation of the stash closet. Heh. Let me see what I can do. Wink [;)]

Moose - are you planning on build TWO Tigers for this GB? Or is all that stuff going onto one kit??? Smile,Wink, & Grin [swg]

Wingy - I'm 1/8 lackacrapistaniwarian. You'd better take that back. Laugh [(-D]

  • Member since
    November 2007
  • From: Wisconsin Rapids, WI
Posted by moose421 on Saturday, September 13, 2008 5:29 PM

Nope, just one.  That's the problem when I was researching the tiger.  Or at least the one at b-berg.  It was an early with late tracks.  Also had a later style manlet.  The resin one I got is a lot better than the one in the kit.  Well, I just couldn't build it with out a PE set.  Also wanted to try the griffin hinges.  I think biffa turned me on to those.  The barrel, what can I say but it is awsome.  Like I said I forgot to buy hubs for this kitty.  Last minute checks of the pictures showed some of the road wheels were missing.  And the Bison decals to round out the build.

Seams that this was a depot level maintance and was rushed out for the defense of Berlin.

By far the most am that I will be using on a kit.

The build begins tonight.

  • Member since
    April 2005
  • From: Piscataway, NJ!
Posted by wing_nut on Sunday, September 14, 2008 1:07 PM
Some life stuff getting in the way of bench time but manage a bit.

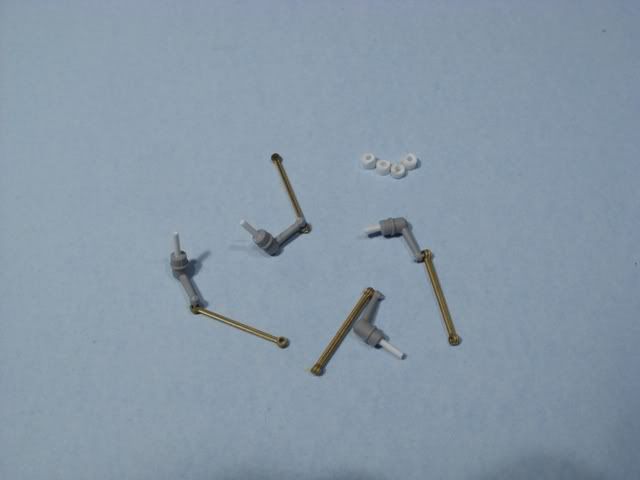
The AM suspension just about kicked my butt. The plastic pins the instructions have you use are fragile and I have made about 1/2 dozen repairs as I went along. After I had already purchased the set I found a review on the PMMS site that basically said it does not gain in detail over the kit parts since the tie rods a 2 dimensional.  And given the fact that it has very limited movement it really is not worth the upgrade.  It was however very good practice with AM multimedia products.  With a copy of the instruction sheet the mod the the kits part can easily be made to accomplish the same thing.

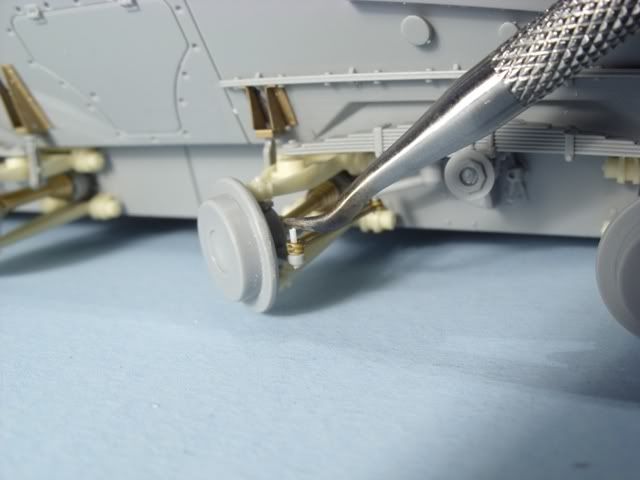
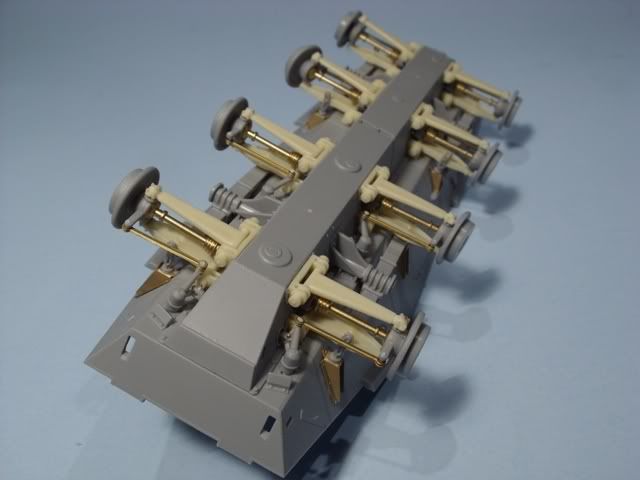
After cutting off the pins and drilling holes on the steering arms, new longer pins are added to be able to pivot when the collars made from plastic tube are glued in place inside the hull.  The ties rods were attached before installing the steering arms.  The instructions have you make small plastic pins to attached the tie rods but no way for them to stay on so I heated a tool and melted the pin down.


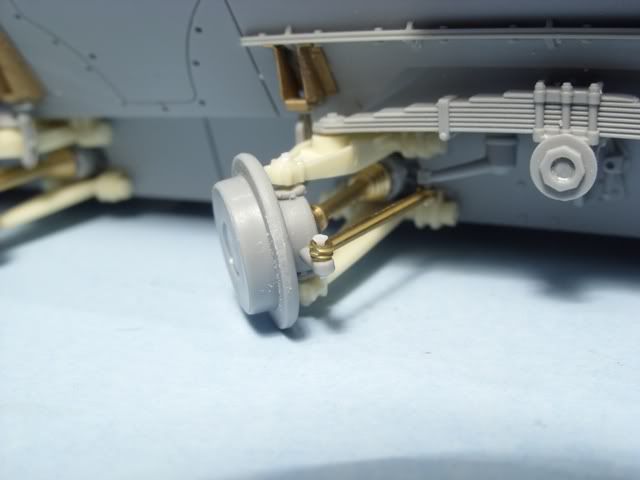
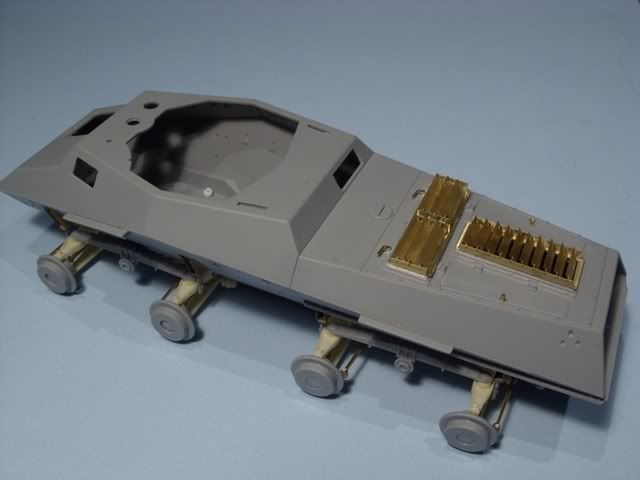
The suspension is all finished.  the small crescent shaped guides are backwards in this pic but have since been corrected.


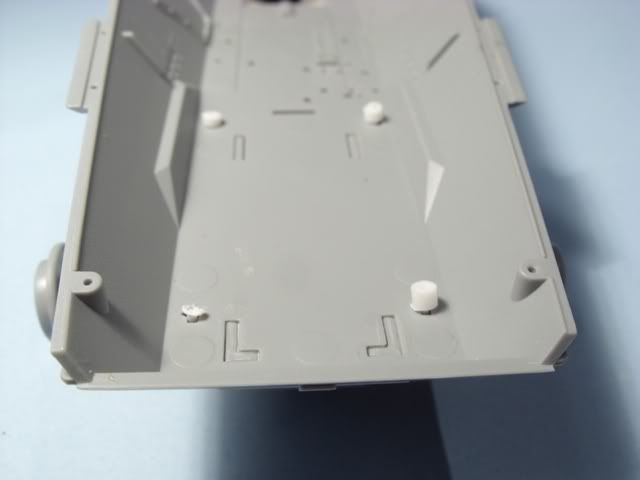
There is slight gap in places between the upper and lower hull halves.  There is a ridge on the lower hull edge to help in alignment but creates the gap.  Most of the ridge needs to be removed, as seen on the left side, for a nice fit.  Putting together the louvered panels were tedious to say the least.


Marc  

  • Member since
    March 2003
  • From: Rain USA, Vancouver WA
Posted by tigerman on Sunday, September 14, 2008 1:21 PM

Wholly Smokes Moose, it looks like you held up a LHS!

Marc, that PE is incredible. Great stuff.

   http://i7.photobucket.com/albums/y269/wing_nut_5o/PANZERJAGERGB.jpg

 Eric 

  • Member since
    February 2008
  • From: ladner BC Canada
Posted by stick man on Sunday, September 14, 2008 1:33 PM

WOW!!!!!!!!! wing nut that PE work is INCREDIBLE I would never have the patiance to do that.

Smile [:)]

I'm 15 and I model I sk8board and I drum what could be better.
  • Member since
    October 2004
  • From: Nelson, BC, Canada
Posted by paul_toz on Monday, September 15, 2008 5:40 PM

Moose - that is some serious investment in AM there. I always worry when the cost of the AM is greater than the kit it all has to go on.

Wing_nut -  nice work. You have more patience than me. When things are going badly I have to take frequent breaks.

I made a a start at the weekend and the turret is mostly together. 

Being a comparative newbie to armour kits I have a question. How would you guys go about a winter whitewash on a dunkelgelb Panther?

Paul

  • Member since
    March 2003
  • From: Western North Carolina
Posted by Tojo72 on Monday, September 15, 2008 5:51 PM
Wow Wingnut !!!! That really is NUTTS !!! I mean seriously that is some great detailed work,takes patience and nerves of steel,way beyond my capabilities,but all your hardwork will pay off in a great build,looking foward to see more !!!

  • Member since
    November 2006
  • From: Coastal Maine
Posted by dupes on Tuesday, September 16, 2008 10:19 AM
Wingy - looks great! I'm hoping you're going to display this puppy upside down, though, or a lot of this excellent work is going to go unnoticed. Boohoo [BH]
  • Member since
    April 2007
  • From: Schroon Lake, NY
Posted by SMJmodeler on Tuesday, September 16, 2008 10:41 AM
wing_nut:  INTENSE detail work...flawlessly executed!  You @#$%^& A/C types sure can build 'em!Thumbs Up [tup]

  • Member since
    October 2007
  • From: N.H.
Posted by panzerguy on Tuesday, September 16, 2008 3:46 PM


  WOW! Wing nut Moose you guys are starting this thing of with a serious BANG!

   Should be finishing up my BergeTiger tonight so tommorow the JS2 hits the bench. I'll only be adding MK tracks to this one. The paint job I have planned is whats going to be the fun part.

"Happiness is a belt fed weapon"

  • Member since
    April 2005
  • From: Piscataway, NJ!
Posted by wing_nut on Tuesday, September 16, 2008 5:54 PM
Thanks for the comments guys.  Sadly the wheels are no longer steerable.Because nearly all of the inteiror can be seen though hatches and the open top, all the pivots for the steering arms are visible. Not to mention that 2 of them come up through the lower hull under where other parts have to be glued to the inside. So all the pivot points are cut off and the the wheel will be glued into position.  BummerDisapprove [V]  Not sure what Voayager was thinking on this.  And I am bit ticked at them.  The box for the second detail set shows full fenders in brassbut this is actually not included. What's up with that.  Anyone else notice this type of thing with Voyager products?

Marc  

  • Member since
    July 2007
  • From: Ohio
Posted by Geist on Tuesday, September 16, 2008 7:30 PM

Here is a little update on my missing parts. I found the exact same kit on ebay today and I bid on it. Well, less than 30 minutes later my DragonCare rep eailed me saying that they had found the sprue I needed in another kit. They will send them to me for free. You can imagine that I was happy and a little mad considering I had just bid on the kit. Oh well... I guess I can use the ebay kit and build the 122mm version...

 I received my Eduard detail set in the mail a couple of days ago. I've hacking away at the upper hull of the ISU the last few days. So far I've installed the deck grills and at the moment I'm working on the front mud guards. Pics will come once I get more done.


BTW, wing_nut, your PE work is amazing! It makes my work look, well bad.


Erik


On the bench: Italeri Leopard 1A2 correction build with Perfect Scale turret and Eduard PE

  • Member since
    November 2007
  • From: Wisconsin Rapids, WI
Posted by moose421 on Tuesday, September 16, 2008 8:26 PM

wing_nut  looking good, makes me think my PE fetish is not wrong.Whistling [:-^] 

Here is a couple of pictures of my PE work on my b-berg kitty.  I am trying the giffin hinges for the first time and I love them.  Instead of the three pieces that lion roar has it is only two.  I know doesn't sound like much but bending the griffin hinges is sweet.  Thanks to biffa for that one heads up.  Also installed is the tiger workshop front armor plate.  Haven't put the vision block yet.  Of course the filling of location holes and removal of various brackets is evident.

Bad thibng is that I removed the mounting bracket for the rear fenders.  WOOPS, had to rebuild them.  I now have a beautiful set of rear fenders.  Don't need them for my kitty.


  • Member since
    November 2006
  • From: Coastal Maine
Posted by dupes on Wednesday, September 17, 2008 7:39 AM

Moose! You're flying! Big Smile [:D]

Wow, that is going to be a lot of PE work...not to mention all the other goodies you're adding. Looking good so far! Thumbs Up [tup]

JOIN OUR COMMUNITY!

Our community is FREE to join. To participate you must either login or register for an account.

SEARCH FORUMS
FREE NEWSLETTER
By signing up you may also receive reader surveys and occasional special offers. We do not sell, rent or trade our email lists. View our Privacy Policy.