SEARCH FINESCALE.COM

Enter keywords or a search phrase below:

#6 Polish Artillery Tractor C7P-WIP 4/18--More Weathering Pics Page 12

43139 views
170 replies
1 rating 2 rating 3 rating 4 rating 5 rating
  • Member since
    January 2012
Posted by I make stuff on Saturday, February 6, 2010 4:46 PM

Hi guys,

Last night I spent about an hour or two re-doing the rear fender detail, I decided to solder on brass strip instead of that plastic detail. It was tough without the propoer equipment, but today I picked up some alligator clips, next time I will be ready.  Here are the new, improved, rear fenders


I also got the fruils assembled and blacken-it-ed, and here they are for a test fit:


More later!

Bill

  • Member since
    July 2004
  • From: Texas
Posted by wbill76 on Saturday, February 6, 2010 8:06 PM

Tracks look suitably blackened and the rework on the fenders is sharp as well Bill! Yes

  • Member since
    January 2012
Posted by I make stuff on Sunday, February 7, 2010 1:25 PM

Thanks, Bill, slow, but sure is the name of the game.

I decided that the styrene detail was insufficient, so I riped it off and re-did the fron fenders, and this had the added bonus of making funsional fender mounts.  My soldering is coming along, slowly.

On to the anti super bowl entertainment!


Now for some bolt/and/or rivet detail...more to come!

Bill

Van
  • Member since
    February 2010
  • From: London, UK
Posted by Van on Sunday, February 7, 2010 2:34 PM

Hi,

All those improvements make your model looks really good...Bow Down

I want to share some photos of the C7P tractor from the beginning of IIWW. Some are Polish and some German photos....


"So many models so little time"

  • Member since
    January 2009
  • From: Everett, WA
Posted by Schnobs on Sunday, February 7, 2010 2:39 PM

Hi Bill,

Your hard and dedication to push yourself to try new techniques is really showing here.  I am very proud of you!  Very cool indeed.This is going to look fantastic with Primer on it. Take lot's of pics before and after primer please!!

"There is a principle which is a bar against all information, which is proof against all arguments and which cannot fail to keep a man in everlasting ignorance. That principle is contempt prior to investigation." Herbert Spencer
  • Member since
    April 2008
  • From: Ventura (at the beach) in California
Posted by *INDY on Sunday, February 7, 2010 5:42 PM

~Van~ Beautiful collection of relevant photos---very nice to share those!

~Ed~ hi Ed ! I agree, he better, huh?

~Bill~ This little tractor of yours is becoming increadably impressive. As Schnobs says "Are you going to go watch other men exersize(I can't even spell it) or are you going to model!? Let's do this!

When I saw your fenders at this point I had to......It made me....

proud as the day my kitty got her 1st kill


"Well...you gunna pull them pistols, or just whistle Dixie?"

  • Member since
    January 2012
Posted by I make stuff on Tuesday, February 9, 2010 12:14 AM

Thanks for the wonderful pictures, VAN!  Those are more than I have found online in a couple months of searching, great detail shots there.

Edmund and Adam, my brothers in styrene, thanks so much for your support.  You guys are really inspirations and standouts, your consistent ability and results really inspire me.

Tonight, a Riddle:  What do you get when you cross this:

with an obscure early WW2 tractor lacking in detail and recently having recieved fenders, devoid of surface detail?

Oh, just THIS!!!

A bit of missing proportionaility, I chalk that up to being stupid and putting the critical framework on after bending and attaching the fenders, lesson learned!


A bit of under edge detail:


Then, since I can't simply call this construction done and prime this, I decided to use the new punch set to add some detail to the running gear, the top is "as is", the bottom is, maybe, improved?  Please let me know if you think this looks like it's worth the effort:


I punched some details, and I added a bit of brass rod as a spring clamp.

Well, not bad for a Monday update!

Thanks for looking, and comments always welcome!

Bill

  • Member since
    January 2009
  • From: Everett, WA
Posted by Schnobs on Tuesday, February 9, 2010 12:32 AM

Bill you are the cool guy on the block with a Punch and Die set! 

Most of it looks great but not to rain on your parade or anything I think I would go with a smaller rivet on the fender bracket at least in my opinion based on these photos. 

The running gear looks great and that size works well.

Keep it up we wanr to see primer!!!

"There is a principle which is a bar against all information, which is proof against all arguments and which cannot fail to keep a man in everlasting ignorance. That principle is contempt prior to investigation." Herbert Spencer
  • Member since
    May 2009
  • From: Poland
Posted by Pawel on Tuesday, February 9, 2010 2:57 AM

I'd opt for smaller rivets/bolts too. Do some calculations, how big would those be in 1:1? On the fenders I would expect bolts with heads no bigger than 17mm. That would make 0.5mm in scale.  By the way, for all those people who don't have that cool punch&die set, you can add rivet detail by stretching the sprue and then cutting slices off of it, and using those as rivet heads. You can even file the stretched sprue hexagonally and by slicing you get very realistic bolt heads. Keep up the good work & have a nice day

Pawel

All comments and critique welcomed. Thanks for your honest opinions!

www.vietnam.net.pl

  • Member since
    January 2012
Posted by I make stuff on Tuesday, February 9, 2010 1:10 PM

Thanks for the critical eye, Ed and Pawel, that's why I post the pictures here....well, OK, it's nicer when you get "Wow that's cool!", but honestly the eyes here help me be a better modeler.

This morning, I uncermoniously pried off the offending gigantor rivets, and will dig out a smaller punch tonight and try to do better.

Thanks, guys!

Bill   

  • Member since
    July 2004
  • From: Texas
Posted by wbill76 on Tuesday, February 9, 2010 2:16 PM

Bill,

Nothing to add to what's already been said except to offer the following suggestion. As a kind of size-reality check, compare the size of your bolts with the size of the rivets on the hull glacis plate. The bolts would likely be simillar size to that vs. what you've got now in terms of scale reference and should help bring things more in line. 

I think the work on the suspension is worth it. IMHO once you add it and paint it it will add some more depth to that area especially when you get to the wethering process. Yes 

  • Member since
    January 2012
Posted by I make stuff on Friday, February 12, 2010 12:42 AM

Thanks, Bill, I agree on the suspension, I did some more tweaking, sort of artsy for me, trying to put on realistic detail onto something I don't have a good picture of, but I think with paint on it it will catch washes and look fine.

On to the progress: The prior version of the fender rivest was done using the smallest of the large Waldron punch and die set.  I used Bill's suggested method of comparing the hull rivets to the punches to get an approximation.  I ended up using the secind smallest punch, it's roughly the size of a hat pin in diameter.

Before using the tiny die, I bought this, my now smallest hammer:

I used that teeny hamer to make new rivets for the fenders, and discovered something about halfway through.  It appears that if you let the punched out rivets accumulate, subsequent punches squash and distort the earlier punched out parts, which gives you varying sized rivets.

On with the new and hopefully improved front fender rivets:


And I also added some more detail to the running gear, this is what i came up with so far:


Comments welcome! THanks for the extra eyes on this,

Bill

  • Member since
    May 2005
  • From: Eugene, Oregon
Posted by hughes2682 on Friday, February 12, 2010 1:06 AM
Bill, That's the spirit! Don't settle for OK. I am seriously liking what you are doing with this beastie. Funny how the broken fender got you to where you are. What you've done has most certainly been exceptional! I've been following this one mostly from the sidelines. Now that I see you've been using a product produced a few miles south of me I felt the need to chime in. Keep up the fantastic work Cheers Dave

http://img.photobucket.com/albums/v317/Aaronw/Groupbuilds/ClassicAviationGB2010bomb.jpg

With enough thrust, pigs fly just fine.

  • Member since
    July 2004
  • From: Texas
Posted by wbill76 on Friday, February 12, 2010 9:50 AM

Rivets 2.0 look much better Bill. Have to agree with Dave, it's amazing how you've turned a problem into a great opportunity to scratch and enhance this little beastie. Wink Beer

  • Member since
    January 2009
  • From: Everett, WA
Posted by Schnobs on Friday, February 12, 2010 10:46 AM

Bill if your day job doesn't work out for you I believe you would have an excellent career as a hand Model.  If Bob Barker was still around I know he would hire you for Price Is Right!  It's all I can do to restrain myself form either guessing the Price of that little ball peen or rushing out and buying one!

I agree with my esteemed Colleauge Wbill 2.0 Rivits are an improvement.  I like the additional detail you applied to the bogeys!  Well done!


"There is a principle which is a bar against all information, which is proof against all arguments and which cannot fail to keep a man in everlasting ignorance. That principle is contempt prior to investigation." Herbert Spencer
  • Member since
    December 2008
  • From: Goffstown, NH
Posted by New Hampshire on Friday, February 12, 2010 7:29 PM

Citadelgrad87

  It appears that if you let the punched out rivets accumulate, subsequent punches squash and distort the earlier punched out parts, which gives you varying sized rivets

I won't tell ya how many of those deformed disks came out of mine (actually mine is from Micro Mark, but the same thing) before I realized what was going on.  I kept scratching my head thinking "why the H*LL are these things all messed up!?!?!?"  I actually thought I was doing something wrong.  Then it dawned on me...... Embarrassed

But anyways Bill, your build is looking wonderful so far!

Brian

  • Member since
    March 2003
  • From: El Dorado Hills, CA
Posted by IBuild148 on Friday, February 12, 2010 7:49 PM

Hi Bill,

Trying to catch up on all the aircraft/armor threads since January. Stumbled across yours and read all replies.

Very Interesting subject along with punch and die, fabricating, metal, soldering, Palmolive, fruils, ball peen hammers.......ROCK & ROLL and way FRIC_EN Cool!


IBuildOne48

Teach modeling to youth!

Scalefinishes.com

http://i712.photobucket.com/albums/ww122/randysmodels/NMF%20Group%20build%20II/Group%20Badge/NMFIIGBbadgesmall.jpg


  • Member since
    January 2012
Posted by I make stuff on Saturday, February 13, 2010 2:40 PM

Thanks, guys, Hughes, Edmund, Bill, Brian, and I build 48!

This one seems to be 2 steps forward, one back.  I have been trying to get this assembled and primed/painted.

But in putting what I thought were the final details, I found this:

These are some kind of clamp deal that holds the bogie assemblies in place:


Sorry for the blurry pics, anyway, there are 4 bogies, but TWO clamps:

Not broken off, just never formed....

Never fear, I had an idea:


Punch some appropriate sized holes in styrene, double it up and use the punch as an alignment mandrel, a little dremel, a little hand sanding, a little railroad bolt, and here's the planned replacement, on the left, compared to the finely detailed original:


Well, assuming this meets aproval after seeing it in magnified glory, that's what I'll be doing today...

Thanks for looking

Bill

  • Member since
    January 2012
Posted by I make stuff on Saturday, February 13, 2010 4:24 PM

Bumping my own thread, but I went ahead and increased the thickness by another .015, and made up 4.  Here they are


And here is one that is placed where they will end up


I guess the detail on this one is not what I hoped, and the scratch, while interesting and challenging, has sort of become a necessity to just get it assembled.  I hole to get this into paint this week, although this weekend is sort of busy.

Bill

  • Member since
    January 2012
Posted by I make stuff on Sunday, February 14, 2010 11:37 AM

A few small steps toward paint, yesterday I noticed that the rivet "detail" on the front plates was lost to the sanding stick, never fear, I added a couple rows to the mix, I like this new ability to repace or add what is missing or lost:


Nearly ready for paint, I showed my wife today and she said, "That's not a tank, is it a car, or what?"

I was so proud of her!

  • Member since
    August 2008
  • From: S.W. Missouri
Posted by Pvt Mutt on Sunday, February 14, 2010 1:09 PM

Big Smile Modern Women will surprise you these days. You're sure putting the slick on this build man.Yes

Tony LeeSmile

Shoot Low Boys They're Ridin Ponys

  • Member since
    July 2004
  • From: Texas
Posted by wbill76 on Sunday, February 14, 2010 2:41 PM

You're really going to town with that punch and die set Bill! Nice work on the replacement rivet work on the front. Yes The fix on the suspension for the missing parts looks like it will do the trick as well, you never know with some of these Eastern European kits when parts will just not be there at all and you've cleard that hurdle just fine IMHO.

  • Member since
    April 2008
  • From: Ventura (at the beach) in California
Posted by *INDY on Sunday, February 14, 2010 5:07 PM

I'da said, " Honey you're right, not a tank, a vintage S.U.V. ! "

Rivet Me this.................Whats got tracks like a duck, tows guns like a duck, but aint a duck?

Rubber Duck

"Well...you gunna pull them pistols, or just whistle Dixie?"

  • Member since
    January 2009
  • From: Everett, WA
Posted by Schnobs on Monday, February 15, 2010 1:34 PM

Danger! Danger! Will Robinson!!

Wow Bill this is really starting to take shape and all your hard work and prep is payng off.  Do not and I repeat do not put any rivets on your dog!

You have really stretched yourself on this one with your Brass Fenders and rivets.  Two great skill sets that will serve you well!

I apologize for not posting sooner it has been pretty busy on the Schnabel Homestead!

Well done!!!  YesYesYesYesYesYesYesYesYesYes


"There is a principle which is a bar against all information, which is proof against all arguments and which cannot fail to keep a man in everlasting ignorance. That principle is contempt prior to investigation." Herbert Spencer
  • Member since
    January 2012
Posted by I make stuff on Monday, February 15, 2010 1:40 PM

Thanks, Tony, Bill, Adam. and Ed!

You wouldn't recognize her right now.  I tried to snap a photo but needed to get in to get some work done, because later, I plan to do a final review and prime it.

Ed, I will call you later to discuss some paint issues.

Thanks, guys, next stop, monochrome city hall!  

Bill

  • Member since
    February 2009
  • From: mass,USA
Posted by scratchmod on Monday, February 15, 2010 3:26 PM

I love all the scratch stuff your adding, nothing beats adding new rivets to a model. Almost ready for paint Bill, she looks awesome. You know what color pops into my head when I see that SUV, yep RUST Big Smile

Looks fantastic Bill, keep up the great work, I'll be watching and waiting to see the paint going on.


Rob

www.scratchmod.com

  • Member since
    January 2012
Posted by I make stuff on Tuesday, February 16, 2010 10:40 PM

Well, the construction phase of this little guy is coming to an end.  As much fun and growing as I did, despite it being a pretty crappy kit, it was my first attempt at scratchbuilding using brass for fenders, my first soldering, pin punch, all that jazz.  Without Indy/Adam pushing me like Bull Meecham in he Great Santini, this thing would be on the shelf already with chunky style manwich fenders made of plastic.

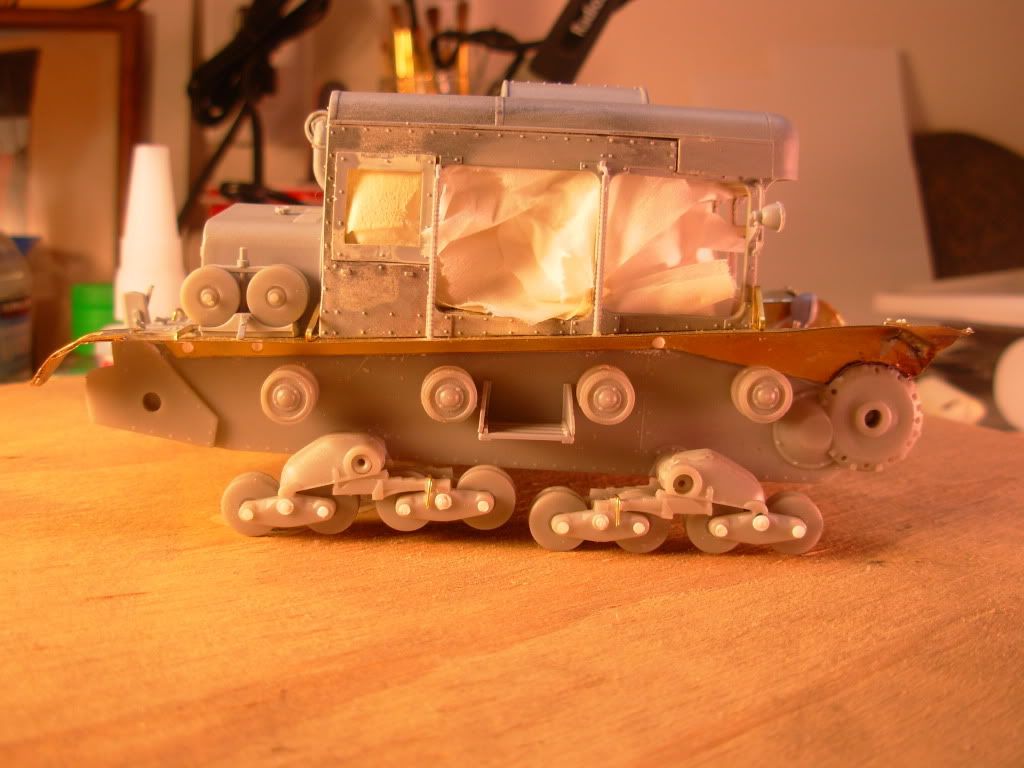
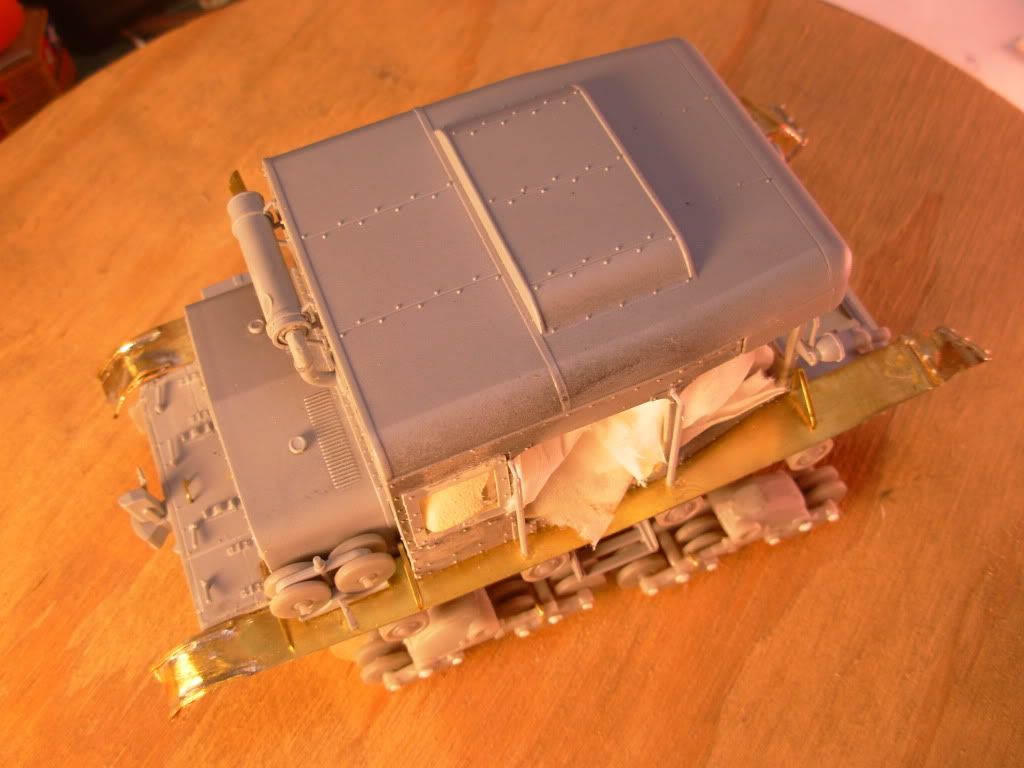
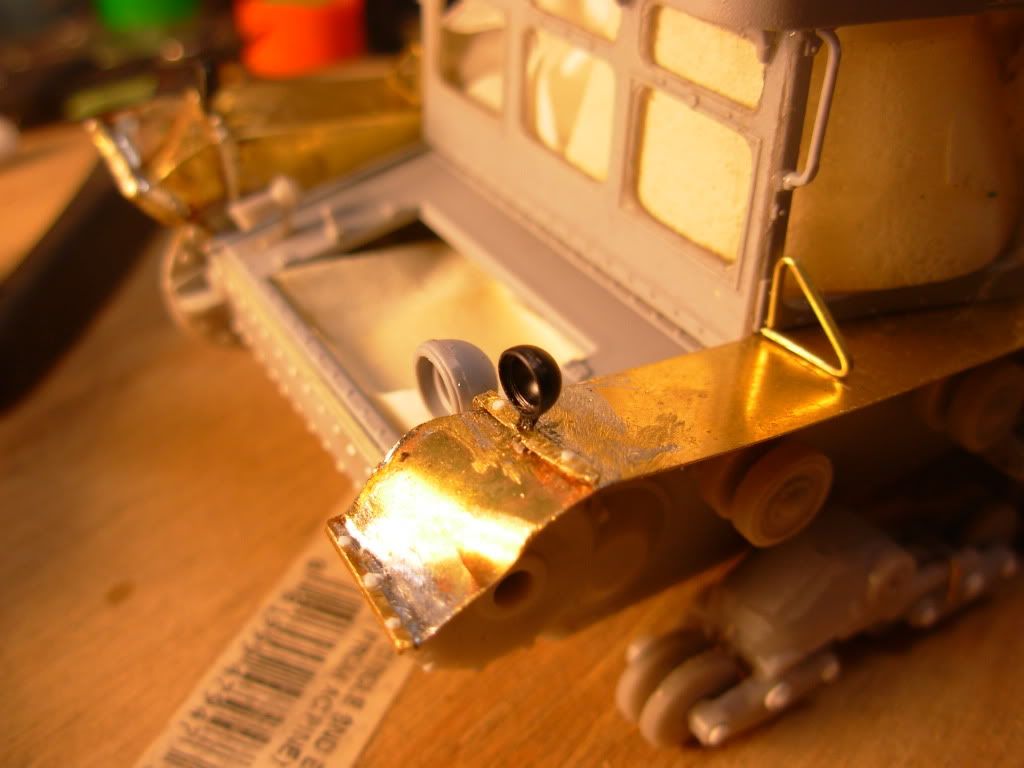
Despite the time spent and the challenges, I am really glad I chose this one to do, and glad I took so much time to try to get it right, or at least better than it originally was.  I'm a bit sad that now I need to cover it all up, I love painting and weathering, but I hate to cover up all this brass and styrene rivets.

Anyhow, here's my last review before priming, I don't mind putting off priming a while (although it might kill Ed) if I can fix anything anyone is nice enough to point out.

On to the walk around, sorry dial up guys, you are going to hate this:


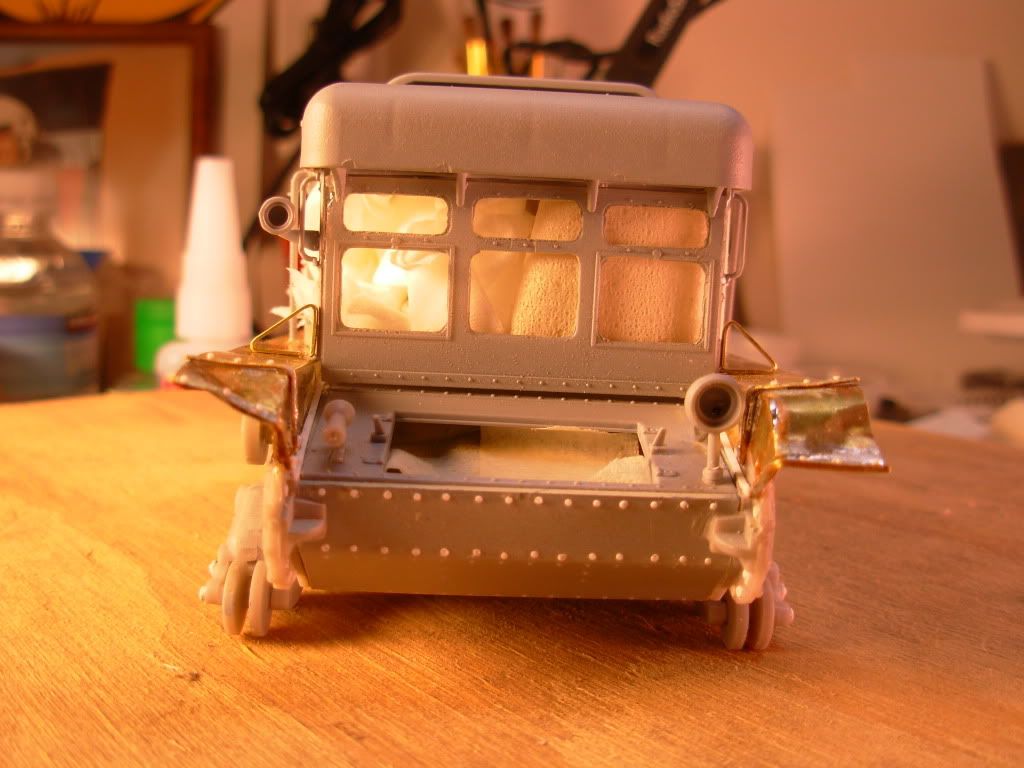
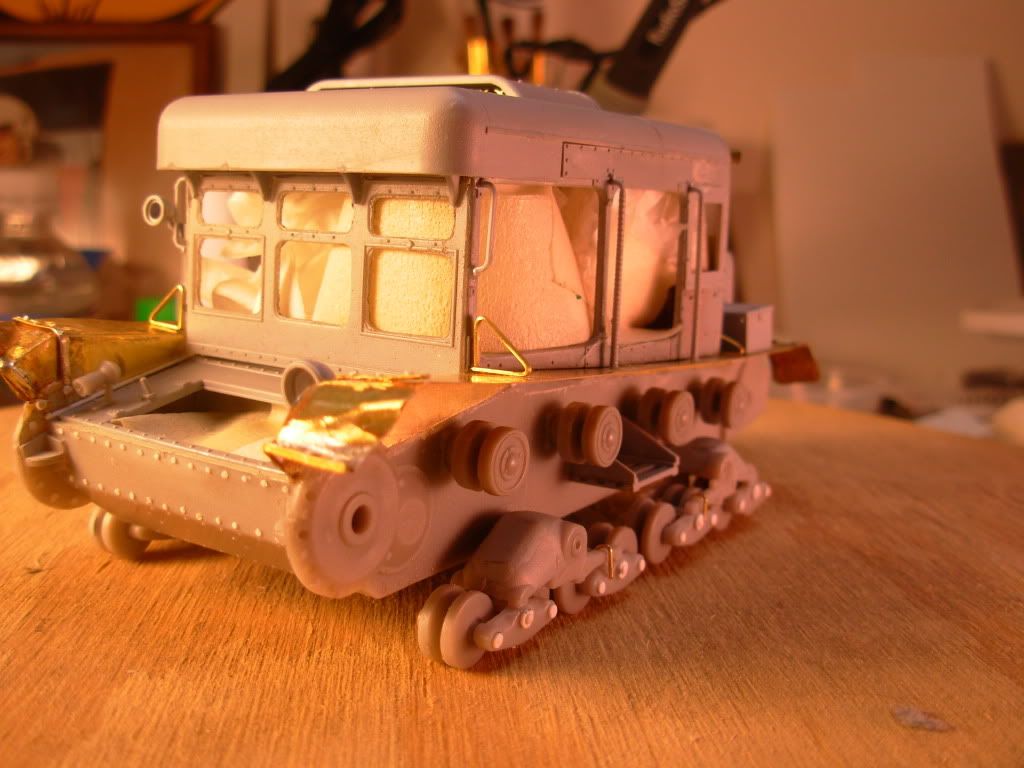
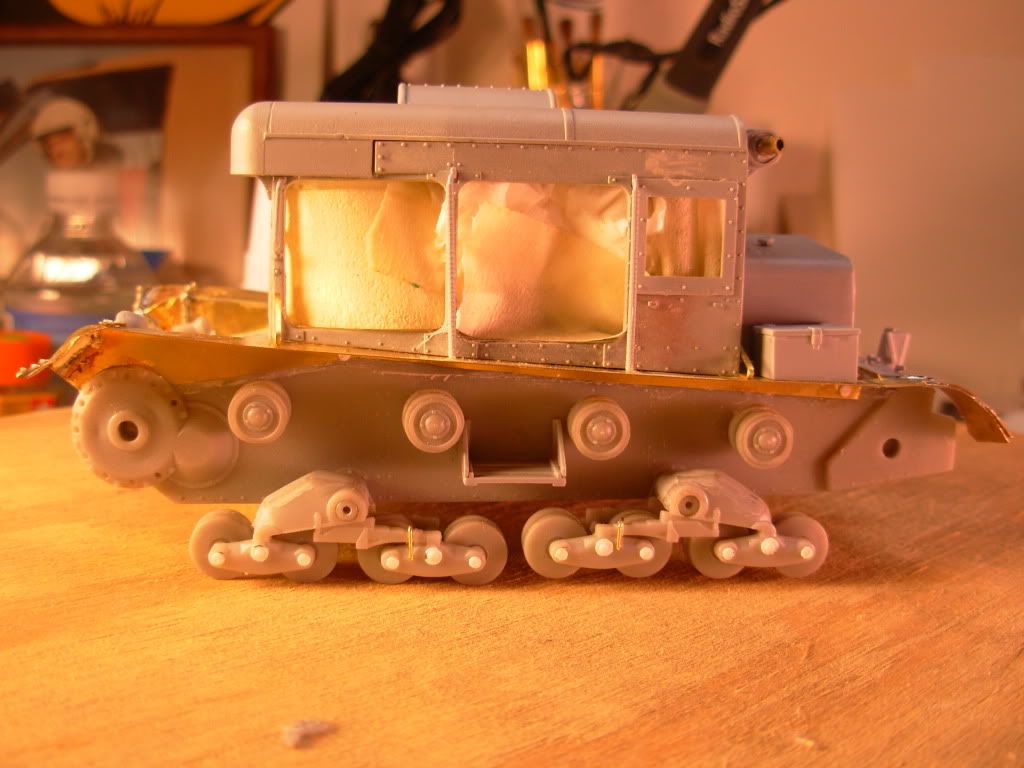
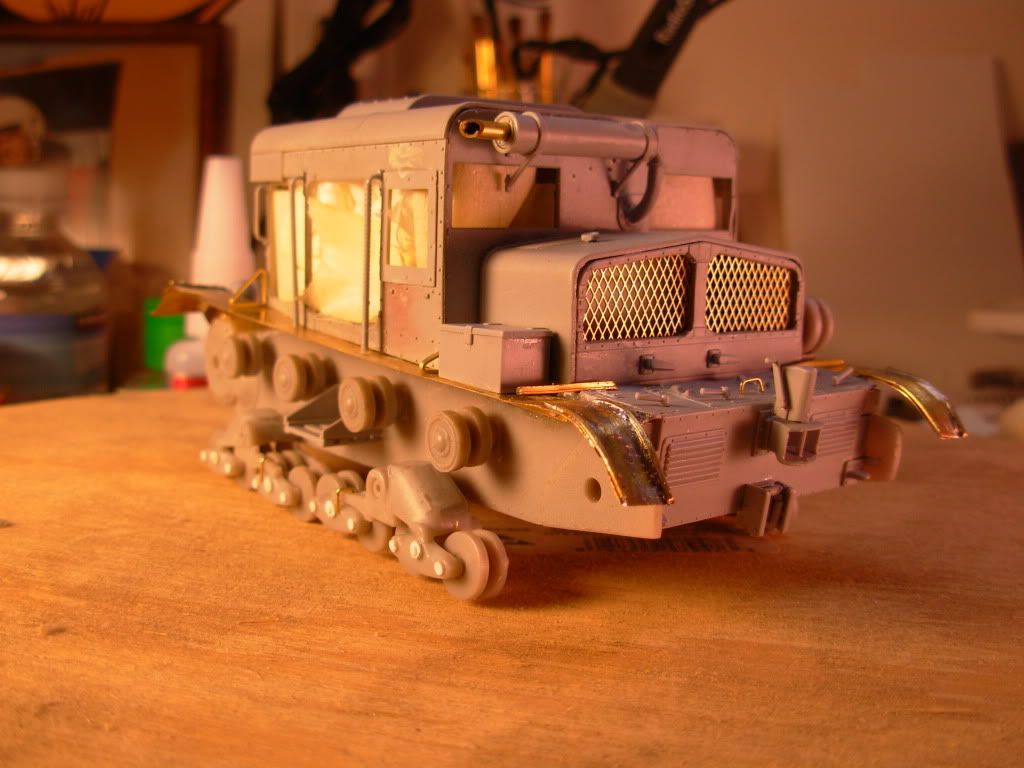
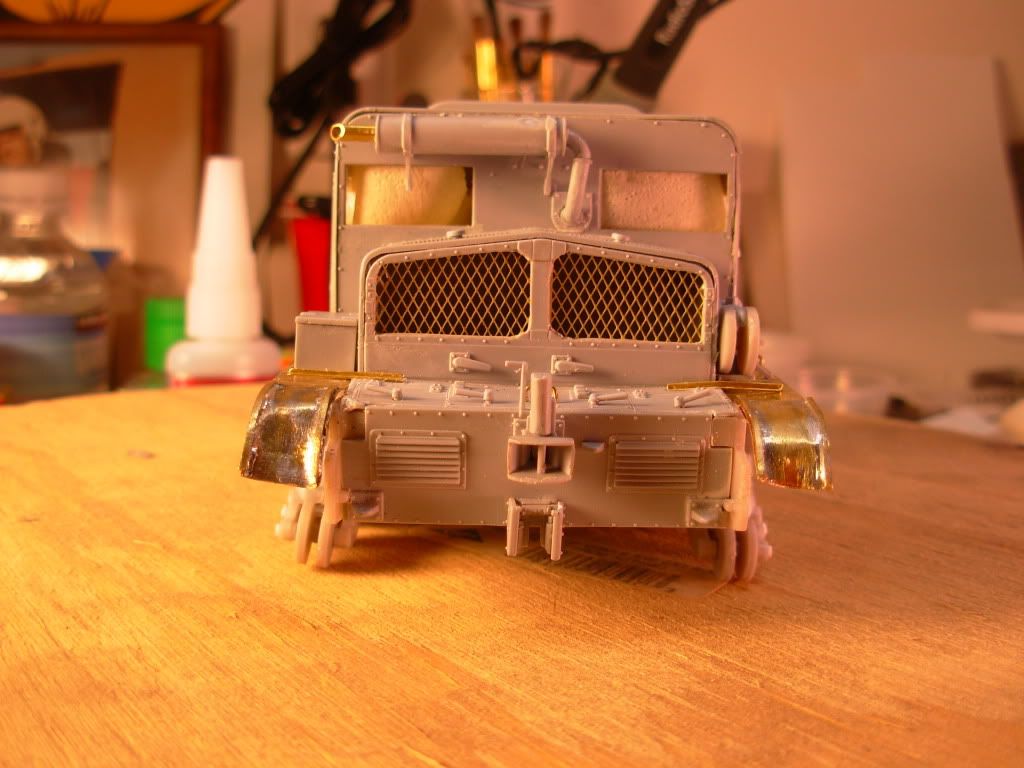
Finally, I almost forgot the fender mounted headlights, which turned out to be solid styrene "bullets," so I busted out the ELF replacement headlights, sized small on the large set, courtesy of Ed's recommendation, and voila, nicer lights.


Next time anyone sees her, she will be monotone primer grey, then I'll keep it under wraps until I get the paint done.

THanks for looking, please sound off if you see any problems that need to be dealt with before paint.

Bill 


  • Member since
    May 2005
  • From: Eugene, Oregon
Posted by hughes2682 on Wednesday, February 17, 2010 3:35 AM
Bill, Now this little beastie has got character. You've done some amazing scratch building you've done! Cheers Dave

http://img.photobucket.com/albums/v317/Aaronw/Groupbuilds/ClassicAviationGB2010bomb.jpg

With enough thrust, pigs fly just fine.

  • Member since
    July 2004
  • From: Texas
Posted by wbill76 on Wednesday, February 17, 2010 1:21 PM

Bill,

Only thing I can see is some possible small gaps (may be a trick of the lighting) at the rear both where the cab top meets the rear vertical plate and also around the engine air intake grating. If there are gaps there, this is your best chance to putty and sand them prior to throwing paint on this bad boy! I hear you about covering up all that brass and styrene scratch work but that's what WIP photos are for so you can go back and look at it after it's all done and see it in the pristine stage anytime you want! Wink Beer

  • Member since
    January 2012
Posted by I make stuff on Wednesday, February 17, 2010 9:23 PM

Thanks, Bill, and as much as I'd like to blame it on the angle, there is a gap there that no amount of clamping could address.

My plan is to mask off a narrow strip, remove the rivets, putty and sand, and replce the rivets.

Wish me luck...

Bill

JOIN OUR COMMUNITY!

Our community is FREE to join. To participate you must either login or register for an account.

SEARCH FORUMS
FREE NEWSLETTER
By signing up you may also receive reader surveys and occasional special offers. We do not sell, rent or trade our email lists. View our Privacy Policy.