SEARCH FINESCALE.COM

Enter keywords or a search phrase below:

Revell 1:83 Mayflower

50305 views
601 replies
1 rating 2 rating 3 rating 4 rating 5 rating
  • Member since
    July 2014
  • From: Franklin Wi
Posted by Bakster on Sunday, March 12, 2017 11:22 AM

One down... 29 more to go.  This 1 piece took me maybe 15 to 20 minutes. Egads. And, there will be another 30 for the top part of the shrouds, not including a few for the stays.

For now though, I need to focus on the 29. I need these done in order to install the strops and chains. 

  • Member since
    July 2010
  • From: Tempe AZ
Posted by docidle on Wednesday, March 15, 2017 11:46 PM

Are those BlueJacket deadeyes Steve? Man, that is tedious work but the end result is fabulous! Personally, I would prime them before painting them. You might want to soak them in vinegar for a bit first to etch them. Just my opinion but hopefully someone who has used them before will know better.

Steve


  • Member since
    July 2014
  • From: Franklin Wi
Posted by Bakster on Thursday, March 16, 2017 3:18 PM

Hey Steve, yes they are BlueJacket. It's tedious for sure, but I am enjoying the change from masking and painting. Thanks on that.

After working through some of these I have the process down to 8 to 10 minutes per. On really bad ones, it is a little longer. Very soon I will be working on the mizzen deadeyes, and those are even smaller. The odd thing is is that those appear to be in better shape. Hopefully, that equates to less work. Based on what I see with the other sizes, I may have received a bad batch of the 5/32 size. The worst part of all this is trying to clean out the grooves. 

It is funny what you said about the primer because I was having some inklings that I should still do it. A vinegar soak sounds like an interesting idea. I will test that! It might even add some texture back to them, more to scale. Not that anyone might see that at this scale. 

Thanks much for your input!


  • Member since
    May 2003
  • From: Greenville, NC
Posted by jtilley on Thursday, March 16, 2017 9:27 PM

I don't want to think about how many hours I've spent cleaning up Bluejacket blocks and deadeyes. I paid a visit to Bluejacket last October (Nick and Al are wonderful hosts), and saw some of their fitting molds. They're made of rubber, and the smallest blocks and deadeyes tax them just about to their limits.

What color do you want for the deadeyes? If you want to make them brown you'll have to paint them - and yeah, a coat of primer would be a good idea. If you want them black, there's an easy way. Order a bottle of Bluejacket's "Pewter Black" and dunk the deadeyes in it. In a minute or so they'll be a nice, even black. It's a good idea to give them a shot of Dullcoat; if you don't, the black may wear off.

Good luck.

Youth, talent, hard work, and enthusiasm are no match for old age and treachery.

  • Member since
    July 2014
  • From: Franklin Wi
Posted by Bakster on Thursday, March 16, 2017 11:26 PM

Say John--it is great to hear from you.  How is retirement treating you? 

Thanks for the tips on these, John. Your timing is perfect. I just finished working on them when your post came through, and I was just thinking on if I should try reordering the 5/32 deadeyes. The ones that I received were truly awful. From what you are telling me though, it sounds like a crapshoot that replacements will be any better.

I did my best to correct things on these, but with some, it was impossible to maintain good symmetry. In most cases there is a good side and a bad side to them. I will face the good side outward. The 3/32 deadeyes were all pretty good. They are the 7 at the bottom of the image. I did not have to do too much with them, and the channels were pretty decent.

I am waffling about the color, but leaning to black. I was going to ask what other people thought.

Again--good to hear from you!


Steve

PS: I will have to try loading the image at another time. Once again, Photobucket will not allow me to load the image. Not with using my PC, nor with using my Ipad. I despise Photobucket.


  • Member since
    July 2014
  • From: Franklin Wi
Posted by Bakster on Friday, March 17, 2017 2:33 PM

Well, a couple of things to mention.

1. I am still unable to load the photo to PB. It seems that I have hit a brick wall with that service. I used three different devices and no luck. It is time to seek out a new service, or punt.

2. Reviewing the photo, the one that I can't load, I can see how bad the affected parts look. I am not satisfied. The pieces had been molded so poorly that the front and back of each deadeye is misaligned, being offset. I tried correcting them, visually, and in general, they look inconsistent in shape and size. I wrote BlueJacket about the problem and they checked their stock confirming the problem. They promised to sort out good from bad if I choose to reorder, which I did. 

We will see how this works out.

Later...

  • Member since
    July 2014
  • From: Franklin Wi
Posted by Bakster on Friday, March 17, 2017 5:29 PM

I was finally able to load the image. The camera is distorting things some but ... I am not happy with them none the less. The pieces above the dime are the ones that I had to fix.  The deadeyes below are the ones that were in pretty good shape requiring minimal work.  You can see the difference.


  • Member since
    December 2010
  • From: Salem, Oregon
Posted by 1943Mike on Saturday, March 18, 2017 5:00 PM

I empathize with your frustration regarding Photobucket. I'm in the process of switching some old images but certainly uploading all my new images to Flickr. Flickr may not be the best free image hosting site out there but it's sure a lot better than Photobucket IMHO.

Your project is a major tutelage on patience as well as a fascinating WIP.

Mike

"Le temps est un grand maître, mais malheureusement, il tue tous ses élèves."

Hector Berlioz

  • Member since
    July 2014
  • From: Franklin Wi
Posted by Bakster on Saturday, March 18, 2017 9:46 PM

1943Mike
Flickr may not be the best free image hosting site out there but it's sure a lot better than Photobucket IMHO.

Say Mike--I totally agree. Most importantly, Flickr works. I am moving forward with Flickr as well. I ran it through some testing and it works without a hitch. 

Thanks about the WIP.  I appreciate the kind words, and the encouragement...


  • Member since
    July 2014
  • From: Franklin Wi
Posted by Bakster on Wednesday, March 22, 2017 9:42 PM

I received the replacement Blue Jacket deadeyes today and they look good. They will still need a little work, but it is nothing like the ones that I had first received. These are useable. So, a big thank you to Nic at Blue Jacket.

I did a little trial and error stroping last night and when it comes down to it, it will certainly be interesting. Here are some preliminary observations:

1. In working with these deadeyes I have come to learn that the less that you have to do to them, the better off you'll be. This material is extremely soft, and it is easy to take too much material off. I was using a very small file to clean those grooves out, and I learned that the file was just not small enough. It was helping to destroy the size and shape of the deadeyes. I switched to using the backside of a hobby blade to sort of wear away the material. It takes longer, but it helps to maintain the integrity of the piece. This can be overdone too though. Secondly, I learned that I can't use a serrated holder to hold them with because it mars up the deadeyes. I have to hold them with my fingers as best as I can. Lastly, I learned that these have a low melt temp. I briefly put one into a flame to burn away some CA, and very quickly the deadeye began to melt. Long story short--these are very delicate. This is not really a problem if you have pieces that don't require a lot of work, and with the new ones that I received, I should be ok.

2. I had to order some smaller gauge wire because in some cases 30awg will not be small enough for what I am trying to do.

3. What have I got myself into! I tested the chains that I purchased and holy cats, this will take extreme hand eye coordination. I am not sure that I'll be able to do it, but I will give it a whirl.

I settled on two sizes for the chains. I purchased 27 links per inch for the main plates, and 42 links per inch for the mizzen. I think that they will work perfectly. Thanks to JT on this because he mentioned those sizes many months back. 

4. Many months back when I researched finding deadeyes, I had quickly learned that the smallest ones that I could find, are just not small enough. They are oversized for this scale of ship. Seeing them on the model for the first time really brought that to light. If I was to do this over, I might reconsider how I approached this. Maybe I'd try to use some of the kit pieces in conjunction with aftermarket pieces in a sort of hybrid. Anyway, I am stuck with it, and I'll just have to imagine the original had bigger deadeyes.

My next testing will be with a blackening agent that I purchased. I need to see how well it will work on the wire, and will it work on the deadeyes.

More to come...

PS: The image is applied via Flickr. What a huge difference from PB. I had zero glitches and awesome response times. I am still working out some things on how best to use it, but its working like a dream in comparison. Can someone tell me what happens when you click on the image? For me it trys to download it. Are you seeing the same thing?


  • Member since
    July 2010
  • From: Tempe AZ
Posted by docidle on Thursday, March 23, 2017 12:26 AM

Steve,

When I click on the image it downloads the image quickly in a new window. I think I mighit have to follow you gents over to Flickr. Photobucket is becoming too frustrating. The probem is that I have a boatload of pictures on my PB site. It will take me time to hopefully transfer them over as I have had to clear out the pictures in my Dropbox. 

On another note, the work you are doing is awesome! On making new deadeyes on the smaller ones.... You might try Syren's deadeyes or ModelExpo's.... The issue will be that they are round verses triangular. Another approach might be to make them out of styrene. Although that route will have you sandwiching three pieces together. And at that size?! Whichever approach you take, you are a better man than I am, Gungadin.

Steve


  • Member since
    July 2014
  • From: Franklin Wi
Posted by Bakster on Thursday, March 23, 2017 10:18 AM

Hi Steve, thanks for confirming that about the image. It later occurred to me to view it from my work computer, which I did. I kind of like it. It opens in Windows Photo Viewer, and I get the option to open or save the image. Also, when I chose to open it, I was able to expand the image by rolling the mouse wheel. That is nice! I hated that about PB, it is very convoluted to expand an image and, the image doesnt expand much anyway. With the Flickr way, you control how large the image gets by the turn of the mouse wheel.

I hear you about all those images. Why not just leave the images on PB? Don't close the account, just leave it there. Once and a while maybe add something to it so it does not become inactive. I am guessing that might happen, not sure. That is my plan. I will leave it open and leave what's there, there. Then anything new goes to Flickr. 

Yeah that was the issue, I wanted the pear shaped deadeyes. Maybe the round ones are worth another look though. Sigh. Do you think that round deadeyes are out of keeping for  chainplate assemblies? I do seem to recall seeing round ones on some of the replica photos that I have.

And yeah...I won't be trying to fabricate them. Too small, and I am losing patience with these setbacks. 

Thanks, Steve!


  • Member since
    July 2014
  • From: Franklin Wi
Posted by Bakster on Friday, March 24, 2017 10:27 PM

Well, I am seriously thinking about taking Steve's advice and go with the round deadeyes in order to get the smaller sizes that I need. I think that it will really bug me if I go with the oversized Blue Jacket deadeyes. I like the look of the Syren deadeyes, but what's this business about a block tumbler. I really do not want to spend money on that too, but if necessary, I will. ME's deadeyes come shaped, but they look pretty rough.

Any thoughts on this guys? 

My inexperience takes me on lots of twists and turns, but I guess that is the nature of the beast. 

  • Member since
    September 2012
Posted by GMorrison on Saturday, March 25, 2017 12:44 AM

I'd not go there on the basis of this kit.


 Modeling is an excuse to buy books.


  • Member since
    July 2014
  • From: Franklin Wi
Posted by Bakster on Saturday, March 25, 2017 6:03 AM

Say GM, can you clarify? Not go where? Not go with the Syren? The Me? The Blue Jacket? And why?

I value your opinion. Thanks for responding.

  • Member since
    September 2012
Posted by GMorrison on Saturday, March 25, 2017 11:15 AM

Those BJ dead eyes look very convincing. It's a shame they need so much work.

But it's the way you've proceeded and trust your instinct.

ive had too many builds stall because I got myself hung up a little on something that probably was going better than I realized.

 Modeling is an excuse to buy books.


  • Member since
    September 2005
  • From: Groton, CT
Posted by warshipguy on Saturday, March 25, 2017 3:19 PM

I am truly impressed with your work and attention to detail!  I bought this model, hoping to emulate your fine job, but the wales were molded with warps.  I'm not sure how that happened, but I had to return the kit to my LHS.  The only other one they had in stock was equally bent.Perhaps another time . . .

Bill Morrison

  • Member since
    July 2014
  • From: Franklin Wi
Posted by Bakster on Saturday, March 25, 2017 6:14 PM

Bill, thank you so much for the kind words. I really appreciate that. 

I have to say though, I am really saddened to hear about your experience with buying this kit. What does this say about the future of this kit? My kit has issues too, but not as serious as what you are describing. I hope that the manufacturer fixes the quality issues because I would hate to see this model go out of production.

And, most of all, I am really sorry for you that you couldn't find a decent copy to enjoy building. That is a real bummer!

Thanks for posting, Bill.

  • Member since
    July 2014
  • From: Franklin Wi
Posted by Bakster on Sunday, March 26, 2017 10:06 PM

Well, as I looked closer at the other deadeye options I have come to learn that neither Syren nor ME have anything more to offer than what I already have. In fact, the smallest that Me has is 3.5MM, while both Syren and BlueJacket are at 3mm. What I truly need for the mizzen plate is closer to 2mm, and the other plates at 3mm. I am going with 5/32 (about 4mm) on the others in order to maintain the needed size variation between them. 

So, Mr Master Morrison, your instincts theory is dead on right. Well done sir! You called it.

I am moving on with the BlueJacket. It's a bummer, but it is what it is. 


  • Member since
    September 2012
Posted by GMorrison on Monday, March 27, 2017 1:09 AM

I agree with Bill.

KIS


 Modeling is an excuse to buy books.


  • Member since
    July 2014
  • From: Franklin Wi
Posted by Bakster on Monday, March 27, 2017 11:04 PM

Tonight I experimented with a blackening solution that was recommended to me in another FSM Forum. The solution is called Brass Black, and it's made by Birchwood Casey.


What I learned:

1. It worked pretty well on the chain. It leaves a sort of oxidized coating that you have to wipe off, or you'll get a lot of black stuff on your fingers, or on whatever else. Under extreme magnification I can see some areas where the blackening came off by my wiping. I would probably try giving it another dip. 

2. It works on the copper wire as well, but I am left with a dilemma to sort out. I tested bending the wire and as I feared, the blackening starts to break up at the pressure points. This may be a problem for me depending on how I do things. Worst case though, I could resort to touch up paint.

3. The solution had no effect on the deadeyes. That leaves me with having to paint them. Which, that may actually work best because I could paint the wire stroping as well. John Tilley recommended Pewter Black for the deadeyes. I had already ordered the Brass Black and that is why I didn't try the Pewter Black first. Go figure. So, I need to consider the installation process and its order. I am still working all that out. 

4. The blackening is fairly delicate. I could easily scrape it off with my fingernail. I think that this is true with all the blackening solutions. John mentioned, and I have heard it elsewhere as well, that a spray of Dullcoat will help to seal the deal.

That's all for now.


  • Member since
    May 2003
  • From: Greenville, NC
Posted by jtilley on Tuesday, March 28, 2017 7:12 AM

Pewter Black will do a good job on the deadeyes - though there's nothing wrong with painting them either. I do recommend giving any part that's been blackened a quick shot of Dullcoat. That'll reduce the tendency to chip and flake.

For the deadeye strops themselves, I can offer two suggestilons. One - when you're ordering the Pewter Black from BJ, also order some of its annealed black wire. That stuff is super-flexible. You could blacken the chains and the deadeyes separately, then, when they're dry, use the black wire to connect them. Two - use black thread for the strops. It's easy, and the knots can be hidden below the deadeyes. Put a drop of CA on the knot, and it will be plenty strong enough to withstand the pull of the shrouds.

Hope that helps. Good luck.

Youth, talent, hard work, and enthusiasm are no match for old age and treachery.

  • Member since
    July 2014
  • From: Franklin Wi
Posted by Bakster on Tuesday, March 28, 2017 7:50 PM

jtilley
also order some of its annealed black wire. That stuff is super-flexible. You could blacken the chains and the deadeyes separately, then, when they're dry, use the black wire to connect them.

I didn't know that this wire is available! Thanks for mentioning this because this solves some vexing problems for me. Now for the first time in weeks I feel like I have a clear path forward.

Both the Pewter Black and wire are on order.

Thanks John!


  • Member since
    July 2014
  • From: Franklin Wi
Posted by Bakster on Saturday, April 1, 2017 2:52 PM

Credit where credit is due:

I made a mistake when I had reordered the BlueJacket deadeyes. I should have ordered three packs of each, and not the two that I ordered. It is funny how you can look at something several times and still not see it. I reordered by looking at my original packing slip, and that had the correct information. Yet, I still got it wrong. I caught the error the next day well after the order was placed.

I emailed BlueJacket, explained the situation, and I asked if they could increase my order. They instead shipped them at no charge.

I thought that was good of them.


  • Member since
    July 2014
  • From: Franklin Wi
Posted by Bakster on Wednesday, April 5, 2017 10:23 PM

Well, my order came in, and I had my first look at things.

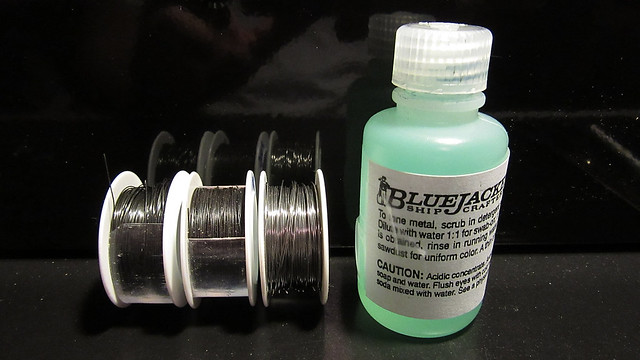
Along with the Pewter Black I ordered three sizes of wire. They are 28 awg, 32 awg, and 34 awg. This should hopefully cover all the contingencies. 

The wire is black, as advertised. It is stiffer to work with than the bare copper wire that I was experimenting with, which can be good and bad. Either way, I think it is a horse a piece, and a non-issue. I won't fully know until I get at it.


Here is the plan, as it stands now.

1. Clean up the replacement deadeyes.

2. Blacken the deadeyes and chains.

3. Seal the deadeyes and chains with dullcote.

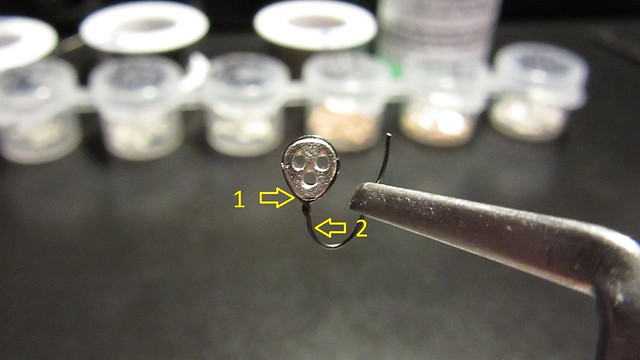
Below: I will wrap the wire around the deadeyes to create the strop. To snug the wire around the deadeye, I will twist the wires one to two times at its base. That little twist nub will mostly be hidden within the channel, I hope.

The deadeyes will be positioned above the channel and the wire fed through the pre-drilled holes. Below the channel, cut one end (wire side 1 ), and the other end (2) inserted through and wrapped around an end chain link. The wire is then snipped, and fed up into the same hole of the channel. At this point, a dab of CA in the hole to secure things.

On the other end of the chain a piece of wire is fed through and looped around the end link. Then the wire is fed through the backing link, and secured to inside walls of the hull by using some CA. Later, I will go back and smear some spru-goo over the CA connections to make sure that they never come loose from the inside of the hull. Once that main deck gets installed, there is no going back to reconnect it if it fails.


That's the plan. Like everything else, plans often change.

I tested the first parts of this method with using the bare copper wire. It's proved to be doable, but not easy because of the tight quarters. My concern with this stiffer wire is in bending the wire around the chain link, and then bending it back up into the channel. I have found that with this wire, the bend does not transition in a nice curve, but instead it bends in more of a kink. I'll have to play with it and see what I can do. The good of it being stiffer is that it holds the shape of the strop much better than the bare copper wire that I was working with. 

Anyway--having the wire come in black trumps the bend issue.

More to follow in the days ahead.


  • Member since
    May 2013
  • From: Indiana, USA
Posted by Greg on Friday, April 7, 2017 11:00 AM

Just checking in, Steve.

It's fun following along. Your attention to detail is inspiring, as is the help you continue to get in this thread.

I still know nothing about ships, but this continues to be a fun and informative WIP.

  • Member since
    July 2014
  • From: Franklin Wi
Posted by Bakster on Sunday, April 9, 2017 10:58 AM

Greg
I still know nothing about ships

Say Greg--that's ok because neither do I!  In every sense it's a work in process.

Stay tuned because there are more thrills and spills to follow.  

Seriously though, thanks for posting and for following this WIP. 


  • Member since
    July 2014
  • From: Franklin Wi
Posted by Bakster on Sunday, April 9, 2017 12:42 PM

Batter up!

Ohhh... it's a swing and a miss. It was a curve ball!

I did another dry run using the BJ wire and I ran into some problems. In my previous update I had mentioned the bend issue connecting to the chain link. With this last test I was able to get a so--so bend, but another problem reared its ugly head. I was not able to feed the wire back up into the channel. It wouldn't fit. I was able to do it using the same 34 awg hobby wire; why not with the BJ? Good question.

I did some checking. When I checked BJ's data they show the wire at .01 diameter. The hobby wire is at .006 diameter. Ok...so what is going on here? In my world, a gauge, is a gauge, is a gauge. It is a standard to ensure dimensional consistency. I checked the net for some reference charts and what I found shows that 34 awg equals .006 diameter. The hobby wire has it correct. BJ sells their 34 gauge wire at .01. At .01, that equates to 30 awg. Why sell it as 34 awg? I have no clue. I will leave that for better minds than mine to pontificate over.

So...what do I do? I could drill the holes bigger? I don't like that option because this process is getting far too muddled. There has to be a better way. I am staring at both wires when it hit me. Why not use both wires? Why not strop the deadeye using the BJ, do the wire twist, cut the excess wire just below the twist nub, then feed the hobby wire around the bottom of the strop and then through the channel? I would then use the hobby wire to connect the chain to. This time though, I would tie the wire to the chain, similar to what JT mentioned and if I was using string. The hobby wire is thin and flexible enough to tie with, sort of. I'd have to paint the hobby wire connection, but this is a very minimal concern. 

I like this solution better because...

1. I can still use the black BJ wire. What I like about this wire is that it is already black, but additionally, it does a fantastic job bending and forming around the deadeye. It really does form nice bends around the deadeye, and it simulates the strop really-really well. I should also add that this wire is seriously strong.

2. Tying the hobby wire to the chain will be a whole lot easier than trying to feed the wire back up into the channel. Also--I should be able to get better consistency with positioning the chains in relation to the channel. My first plan would have made this much--much harder to achieve. Lastly, tying the wire should prove to be a much stronger connection.

All in all, I think this new solution will take much of the pain out of this. 

Below: This shows the differences in the two wires.  

Testing is done. I am moving on to clean up the deadeyes.


  • Member since
    July 2014
  • From: Franklin Wi
Posted by Bakster on Tuesday, April 11, 2017 9:33 PM

I was not planning to update again until I got further along, but I just had to report on how the Pewter Black worked out. The answer is....excellent!

I am really impressed with how this product worked. I got good coverage the first time around. Like with the Brass Black though, it leaves a sort of gritty oxidation that you need to clean off after rinsing each piece. I let them dry a bit before I did that though. And how I removed that oxidation was by sliding each piece on some paper towel. Each side got about three passes. Then I took a cotton swab and brushed along the outer edges. Doing all this left a nice, clean, and black finish.

Below: A birds-eye view of my messy station. This is in my basement where if I spill something, it will spill on concrete. I need to clean this mess up one day. I have another bench upstairs where I mostly work.

Btw...that little tray that I used for the solution is the bottom of a Tamiya X-20A AB thinner bottle. The plastic held up well to the acidic solution. So ... keep that in mind the next time you have an empty bottle.

Next step is to shoot some dullcote on them. 

PS: Just for grins, I tested a piece of brass chain in the Pewter Black and it didn't seem to have an affect. So out came the Brass Black. I confirmed that it takes two soakings for best coverage.


  • Member since
    September 2012
Posted by GMorrison on Wednesday, April 12, 2017 8:03 AM

Bakster


Once again proving Morrison's Third Law of Modeling:

"No matter how large the workbench, the available

workspace is always exactly two square feet".

 Modeling is an excuse to buy books.


JOIN OUR COMMUNITY!

Our community is FREE to join. To participate you must either login or register for an account.

SEARCH FORUMS
FREE NEWSLETTER
By signing up you may also receive reader surveys and occasional special offers. We do not sell, rent or trade our email lists. View our Privacy Policy.