SEARCH FINESCALE.COM

Enter keywords or a search phrase below:

Moebius Seaview 1:350 scale WIP

42476 views
928 replies
1 rating 2 rating 3 rating 4 rating 5 rating
  • Member since
    December 2005
Posted by PTConsultingNHR on Thursday, May 25, 2017 10:37 AM
I'm a little confused here; the kit has propellers, as a little kid, seeing both the movie and the TV show, ... I always thought the NAUTILUS was somehow jet-powered. Or, was powered like how RED OCTOBER was, i.e.: a CATERPILLAR DRIVE-styled device. So, it had props? Additionally, can someone clarify something for me? In the movie, it was operated under the control of an organization which was the navy, but not the navy, I'm guessing like what Star Fleet is, but - in the TV show - was it in the USN?
  • Member since
    July 2014
  • From: Franklin Wi
Posted by Bakster on Thursday, May 25, 2017 1:53 PM

Say Greg, thanks for all that and I am glad that you are enjoying this!

Yeah, I really like that image too. Seeing the nuke being launched is a bit disconcerting but the imagery is very very cool.

  • Member since
    July 2014
  • From: Franklin Wi
Posted by Bakster on Thursday, May 25, 2017 1:56 PM

PTConsultingNHR
I'm a little confused here; the kit has propellers, as a little kid, seeing both the movie and the TV show, ... I always thought the NAUTILUS was somehow jet-powered. Or, was powered like how RED OCTOBER was, i.e.: a CATERPILLAR DRIVE-styled device. So, it had props? Additionally, can someone clarify something for me? In the movie, it was operated under the control of an organization which was the navy, but not the navy, I'm guessing like what Star Fleet is, but - in the TV show - was it in the USN?


PTC, I dont have answers to your questions but maybe there are other movie buffs here that can. 

  • Member since
    March 2010
  • From: Boston
Posted by mach71 on Thursday, May 25, 2017 4:44 PM

Very nice build!

One correction, The Moebius Seaview is a new mold, it's currently in production.

The older Aurora kit was re-released by Polar lights in 2002 and is out of production 

again. This is the kit we all built as kids.

Also Paragrafix has a very nice phoyo-etch kit and a resin Flying sub for the Moebius

kit.


  • Member since
    July 2014
  • From: Franklin Wi
Posted by Bakster on Thursday, May 25, 2017 6:10 PM

mach71

Very nice build!

One correction, The Moebius Seaview is a new mold, it's currently in production.

The older Aurora kit was re-released by Polar lights in 2002 and is out of production 

again. This is the kit we all built as kids.

Also Paragrafix has a very nice phoyo-etch kit and a resin Flying sub for the Moebius

kit.


Thanks for the kudos!

Regarding the mold. I had read somewhere that the 1:350 scale version is a reissue using the older mold, and that the 1:128 scale is a brand new mold. Based on what I have seen thus far with this kit, I believe it's from the older mold. The fit issues with the upper deck, the sail, and undersized baffles is exactly what I remember with the older Aurora kit. But, I can't prove it either way. So, I am open to the possibility of what you are saying.

Thanks again!


Steve

  • Member since
    March 2010
  • From: Boston
Posted by mach71 on Thursday, May 25, 2017 8:27 PM

Here is the Moebius Seaview next to the old Aurora (Polar Lights reissue)


The Aurora one was only the 8 window movie Seaview. 

The Moebius kit is about an inch longer and is the 4 window TV Seaview.


I love the work you've done on yours. The misslie hatch work is outstanding!

I've never seen the TSDS interior, I like it! I've used their stuff before with good 

results.


  • Member since
    July 2014
  • From: Franklin Wi
Posted by Bakster on Friday, May 26, 2017 10:59 AM


Say Mach71—

Thanks for posting those images. That is a hoot to see the old Aurora kit.  Seeing your image reminded me that it was made in black. I remember as kids that my brother and I were disappointed in the kit. When we opened the box we both looked at each other with a, huh? We were not happy that they molded it in black. This meant we’d have to paint it! Who wants to do that! We wanted to glue it together and start playing.

Thanks, about the missile hatches, and thanks for your enthusiasm with this build! I appreciate that.  Lastly, thanks for bringing this mold question to light. I am still stymied about this, and here is why. The second time that I built the Seaview was in the mid-1970s. Now that I was older, I was setting out to take my time, and to try and do a nice job. When I opened the box, I remember thinking that hey, this is different from the first kit. It was molded in a beige or gray. What I don’t remember is what the company’s label was on the box, and I don’t recall if it was the TV version, or the movie version. What I clearly remember though is confronting the fit issues already mentioned. They were exactly the same problems as I have had with this new kit. I had to notch out the recesses for the top deck, and I remember being disappointed in the gaps with that assembly. Then I moved on to the sail and the top piece. It had that exact same step on the leading edge, and I remember that the top piece was too wide as well. This was my achilles heel with that build. My attempt to fix it was to sand down the sail until the leading edge became flush with the top piece. Well, that was bad news bears because when it got to that point, it was apparent that the entire assembly became way too undersized. I was bummed. Such a simple kit and I had messed it up already. It was that experience that caused me to be careful and not over-sand it with this kit. If I hadn’t used CA to build up that leading edge on the top piece, I guarantee that I would have made the same error. I came dang close to messing it all up again.

Anyway—therein lies the mystery. How can the exact same problems occur if the current mold is a new one?  Did they make the new mold off the old specs? I suppose that is possible. Did they take the old mold, upgrade it, and then call it new? The answer is out there somewhere, floating around. Maybe someone will shed some light on this. For now, though, I am moving on. Thanks for educating me on this! 

Steve 


  • Member since
    July 2014
  • From: Franklin Wi
Posted by Bakster on Friday, May 26, 2017 11:08 AM

A brief history of the Seaview's design and Filming

http://www.vttbots.com/seaview.html


  • Member since
    July 2014
  • From: Franklin Wi
Posted by Bakster on Friday, May 26, 2017 11:50 AM

Mach71...was the Aurora kit molded in black? I was just thinking that maybe you painted it. This was a long time ago, and I fear my recollection is wrong. Let me know.

  • Member since
    March 2010
  • From: Boston
Posted by mach71 on Friday, May 26, 2017 12:50 PM

It is molded in black. The sail and the top of the sail are molded onto the hull sides.

Mine is the older Polar Lights kit from 2002, but it is an exact copy of the old Aurora

kit. Like many early PL kits they took an unbult original kit and had new molds made 

from them. The parts are interchangable with the original kit.


I do know that the moebius kit is an all new tool. It's a true 1/350 scale. The old Aurora kit was listed as 1/375, but was really box scale.

Thanks for the Seaview history link! I'll read it tonight.

  • Member since
    July 2014
  • From: Franklin Wi
Posted by Bakster on Friday, May 26, 2017 1:11 PM

mach71

It is molded in black. The sail and the top of the sail are molded onto the hull sides.

Mine is the older Polar Lights kit from 2002, but it is an exact copy of the old Aurora

kit. Like many early PL kits they took an unbult original kit and had new molds made 

from them. The parts are interchangable with the original kit.


I do know that the moebius kit is an all new tool. It's a true 1/350 scale. The old Aurora kit was listed as 1/375, but was really box scale.

Thanks for the Seaview history link! I'll read it tonight.


Ok good to know. Thank you...

  • Member since
    July 2014
  • From: Franklin Wi
Posted by Bakster on Sunday, May 28, 2017 10:36 AM

Well, it's raining outside again. Do you know what that means? It means that it's model time.

I thought that it would be cool to give a visual of the beams when looking in from the front. What, and how that I did it is pretty self-explanatory, but I can add one thing. I cut a rectangular piece of styrene and glued it to the center section of the inside window assembly. I needed a good join for the beams to attach too, and this piece provides that. I undersized it some so that the joins don't overlap into the viewing area of the windows. As it is now, the joins won't be seen from the front.  

Btw...I am very pleased in how the window assembly fits into the hull. I was concerned about this at the onset of this build. The window section will be the focal point of this build, and a bad design/fit could have ruined what I am chasing after. The assembly fits into the hull perfectly. 

There is more work to do and more things to sort out with this assembly. More to follow...


  • Member since
    July 2014
  • From: Franklin Wi
Posted by Bakster on Tuesday, May 30, 2017 9:24 AM
Did you bring popcorn with you? Because... 
I made some chairs for you. I spared no expense by detailing them in, "soft... corinthian... leather."  Don't just take my word for its luxury, click HERE
 
The Seaview, luxurious in all its appointments. Coming soon to a submarine dealer near you.
 
Well, there you have it. I cut the seats out of some styrene square stock. The cushions are made out of ultra soft CA. To mount them, I didn't want to risk smearing up the fresh new carpet. So, I drilled a hole in both the seat and the floor, then anchored them from below via some round stock. Indeed, it is connection overkill. But, for this pseudo military operation the specifications require it. It was an Admiral Nelson mandate. 
 
Don't shoot the messenger.


  • Member since
    April 2016
  • From: Parsons Kansas
Posted by Hodakamax on Tuesday, May 30, 2017 11:35 AM

Ah, I found you! Fun post going on here! I'll keep an eye on you and your project!

Max Felixmuller 

  • Member since
    May 2013
  • From: Indiana, USA
Posted by Greg on Tuesday, May 30, 2017 11:45 AM

Bakster
The Seaview, luxurious in all its appointments. Coming soon to a submarine dealer near you.

That made me smile.

Nice attention to detail, as usual.

  • Member since
    July 2014
  • From: Franklin Wi
Posted by Bakster on Tuesday, May 30, 2017 7:37 PM

Greg


Bakster
The Seaview, luxurious in all its appointments. Coming soon to a submarine dealer near you.


That made me smile.

Nice attention to detail, as usual.


Glad that it did, Greg.

  • Member since
    July 2014
  • From: Franklin Wi
Posted by Bakster on Tuesday, May 30, 2017 7:39 PM

Hodakamax

Ah, I found you! Fun post going on here! I'll keep an eye on you and your project!

Max Felixmuller 


Max, I am glad that you found it. 

  • Member since
    July 2014
  • From: Franklin Wi
Posted by Bakster on Tuesday, May 30, 2017 8:08 PM

Well, I think that I can call this assembly done.

The painting and installation fought me a bit. I had some AB issues with it getting clogged up. The paint that I used was Alclad Aluminum. I should have stayed with my trusty Anthem.

In my opinion the assembly still looks crude but what I did should improve the inward view. Most of any defects will be hard to see anyway. Overall, I think that I got what I was looking for.

Not much else to say at this point.

  • Member since
    July 2013
Posted by steve5 on Tuesday, May 30, 2017 9:47 PM

look's great as alway's steve , can't wait to see this baby done LOL ,


  • Member since
    July 2014
  • From: Franklin Wi
Posted by Bakster on Tuesday, May 30, 2017 10:26 PM

steve5

look's great as alway's steve , can't wait to see this baby done LOL ,


Hey thanks Steve. I appreciate the encouragement! 

  • Member since
    May 2013
  • From: Indiana, USA
Posted by Greg on Wednesday, May 31, 2017 10:34 AM

Interior, with all your custom work, looks good Steve. I'm sure thru the window it's gonna be a huge improvement over OOB.

I'm trying to figure out how you managed to clog your a/b with Alclad Alum? I think I've sprayed just about every Aluminum variation they have, and they are all very thin far as I can recall. Did you use a small needle/nozzle?

  • Member since
    July 2014
  • From: Franklin Wi
Posted by Bakster on Wednesday, May 31, 2017 1:30 PM

Greg

Interior, with all your custom work, looks good Steve. I'm sure thru the window it's gonna be a huge improvement over OOB.

I'm trying to figure out how you managed to clog your a/b with Alclad Alum? I think I've sprayed just about every Aluminum variation they have, and they are all very thin far as I can recall. Did you use a small needle/nozzle?


Say Greg—thanks, and I agree. It is much better than OOB, and better still than how the insert comes as. The changes that I made make a difference. I took a sneak peek with it in the hull and I must say, it looks dang cool. It was worth all the effort that I put into this.  


There is one thing that I forgot to mention about the window assembly. If you look at the before and after of that assembly you will notice that the beams were much longer before I painted them. I had to shorten them because they were sloping down too much, interfering with the view of the rear graphic. I made them longer to start with so I could adjust it later. There wasn’t an easy way that I could gauge the length that I needed until I could glue them to the window. They needed to be attached and then test fitted within the hull. That initial length would have worked if I had made them arch at a higher angle. In the end, I am good with them shorter because the beams arch out of view. It leaves it to the imagination on what happens after that.   


Thanks for asking about the AB. Right or wrong, here is what I was thinking and what happened. I had some concerns that with Alclad being a lacquer it may be too hot for the styrene. In short, that I might damage the pieces if I applied the paint too heavy. Too much work went into this and I was not going to take any chances. Or at least, too big a chance. I was not too interested in applying a barrier coat. Why? I think that I was just being lazy. So, I decided to use my Badger 200 single action. With this AB, the air/paint mixture is set with the adjustment screw. You set it, and forget it. With my Anthem being a dual action AB, there was the risk of applying too much paint. One wrong twitch and I will have loaded the piece with a heavy soaking. Potentially, it not being a good thing. Anyway, I had a terrible time using the 200. It didn’t take long for the AB to clog up. In short order, it reached a point that unless I kept spraying continuously it would clog up within one to two seconds. To clear it I had to adjust the needle back and forth and until it sprayed again. It was very irritating. I have never had good luck with this brush for the same reason. This is my second copy of it and only my second time using it since I had bought it. I can’t even remember a time that my Anthem ever clogged up. What needle size I have on the 200 is whatever comes with it at the time of purchase. I might be wrong but I think that it is a medium.   


Probably more than you wanted to know.


  • Member since
    July 2014
  • From: Franklin Wi
Posted by Bakster on Thursday, June 1, 2017 10:54 AM


Hello folks. I recently migrated over from using Photobucket to using Flickr. It has come to my attention that one person is having issues viewing my images. More specifically, he is getting some kind of graphic interface message when the images are clicked on for a larger view.  I would like to know if anyone else is having problems.  Please let me know if you are.


Thank you..


  • Member since
    July 2014
  • From: Franklin Wi
Posted by Bakster on Thursday, June 1, 2017 11:40 AM

Bakster


Hello folks. I recently migrated over from using Photobucket to using Flickr. It has come to my attention that one person is having issues viewing my images. More specifically, he is getting some kind of graphic interface message when the images are clicked on for a larger view.  I would like to know if anyone else is having problems.  Please let me know if you are.


Thank you..


The mystery is solved. The issue was a browser setting. If there are other issues you are seeing, please continue to advise me. Otherwise, I will consider this problem closed.

  • Member since
    July 2014
  • From: Franklin Wi
Posted by Bakster on Saturday, June 3, 2017 1:54 PM

Well, it's raining again, and it's time to sort out the lighting.

With the insert taped in place, I started by aiming a small LED flashlight from behind the assembly. I needed to sort out the best position of the insert. I found that I had two options to go with, and both had their plus and minuses.

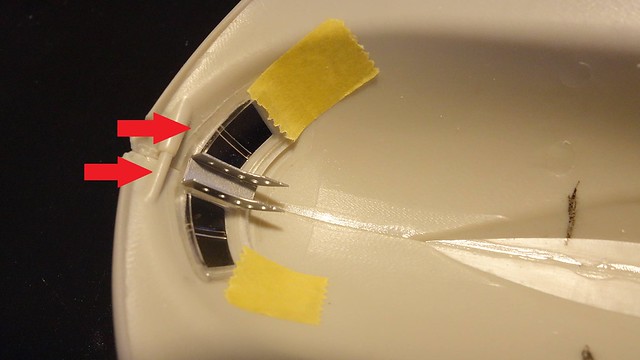
The first was with the insert positioned where the top arrow points to in this image. In this position the side walls come much closer to the hull, and this reduces much of the stray light coming from behind the insert. The drawback seems to be that the main graphic is pushed farther from the window. I then tried the position as noted by the bottom arrow. In this case, much more light streams in from the sides. But, the main graphic comes closer to the window, and the header that I built becomes much more visible. You get a visually tighter feel to it. I went back and forth several times and I ultimately decided that I like option two. 

Next... I hooked up an LED light that I purchased. I positioned it here, there, and everywhere. My first impression was that dang it, the light seems very weak. Of course, my reference was skewed because I had just used a hi intensity LED flashlight for the insert deal. That is a bad comparison. None the less--I quickly figured out that one LED is not going to cut it. So... I hooked up another LED and worked on placing them in various locations. After some fumbling around, I found out what works.

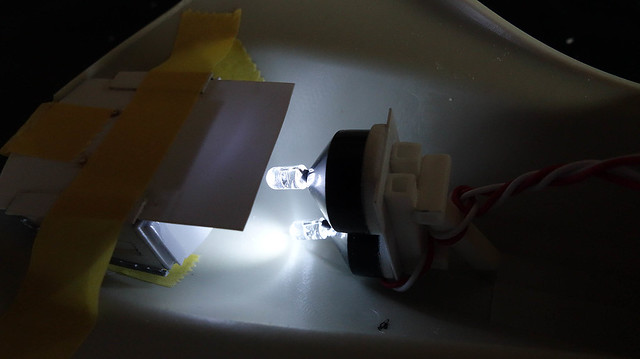
What seems to work is by placing 1 LED behind the main graphic, and one LED just above it to illuminate the observation area. The latter causes light to spill over the top and around the insert, and this seems to illuminate the observation area very nicely. Also, if you peer upward towards the top of the bulkhead, you almost get a sense that there is a spotlight up there, or maybe even an emergency light. I thought that it looks pretty cool. With the lower LED, it of course backlights the main graphic. I fine-tuned the positions, and I then marked their locations on the hull for later reference.

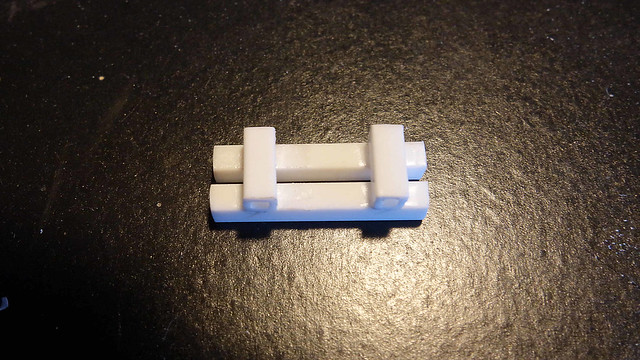
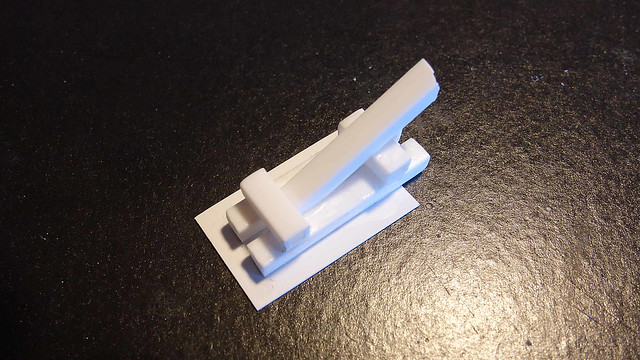
Below: Time to make the light assembly. 

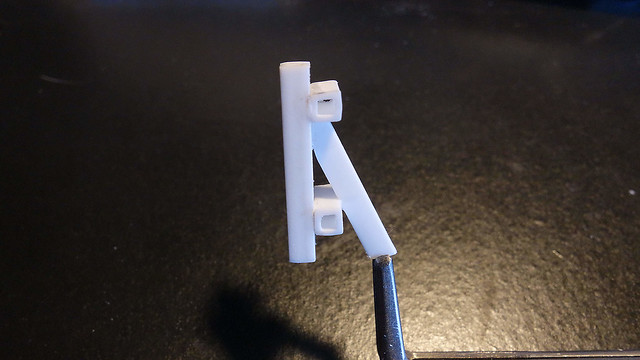
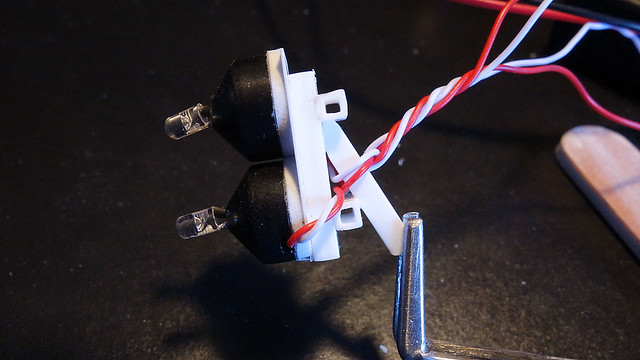
Below: How it will sit.


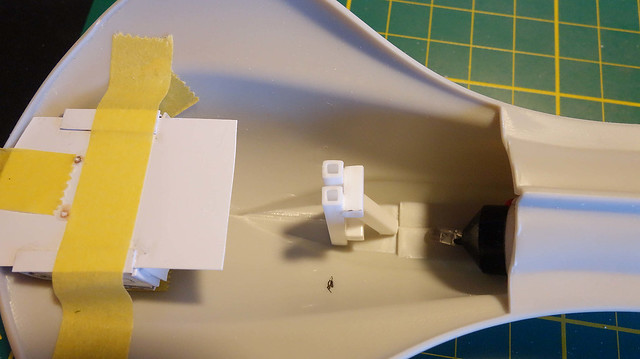
Below: The LEDs are taped on. The double sided tape that come with the LED mount is made by 3m. This is strong stuff. I doubt that I could pull them off if I tried. Or at least, I don't think that I could without breaking things.

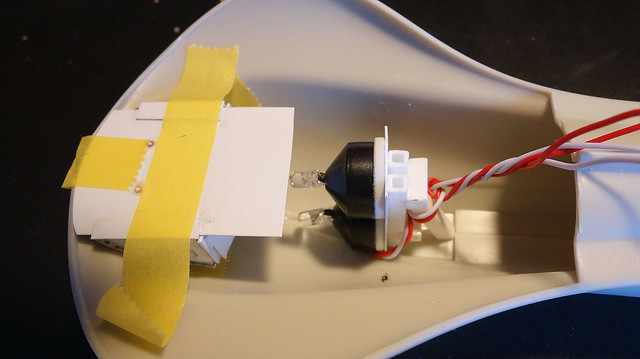
Bellow: Loosely installed, just for reference.

End of update.

  • Member since
    April 2016
  • From: Parsons Kansas
Posted by Hodakamax on Sunday, June 4, 2017 10:42 AM

Will you be able to wire directly into the Moebius power supply?

Max Hmm

  • Member since
    May 2013
  • From: Indiana, USA
Posted by Greg on Sunday, June 4, 2017 10:53 AM

Clever work on the lighing fixture thingie.

Not too much info on the airbrush clogging. I guess the clog will remain a mystery.

  • Member since
    July 2014
  • From: Franklin Wi
Posted by Bakster on Sunday, June 4, 2017 11:46 AM

Hodakamax

Will you be able to wire directly into the Moebius power supply?

Max Hmm


Yes via a 1 OTT cable direct to the reactors generator. 

Surprise

  • Member since
    July 2014
  • From: Franklin Wi
Posted by Bakster on Sunday, June 4, 2017 12:07 PM

Greg

Clever work on the lighing fixture thingie.

Not too much info on the airbrush clogging. I guess the clog will remain a mystery.


Thanks Greg.

Yeah I am not sure what happened. Maybe I didn't clean the brush well enough with the last use. There is a strong chance that the Alclad will come out again because I noticed some interior framing on the windows. I would try using my Anthem this time and then see how that goes.

  • Member since
    July 2014
  • From: Franklin Wi
Posted by Bakster on Sunday, June 4, 2017 9:43 PM

The interior of the window frame is now metalized to match the beams. I should mention that this is somewhat of a departure from the TV show. From what I can tell they had those areas in a dark brown or black. I am going with the aluminum as a matter of personal taste. As they say, I am taking some artistic license.

My Anthem had no issues with clogging up but I did have an instance of splatter. Paint had accumulated on the needle tip. It is very rare that I see paint build up when using this AB. Maybe the paint needed to be thinned? I am not sure. I don't have a lot of experience with Alclad. This is an older bottle and when I pulled it out for use I noticed that all the metallic had settled into a thin layer on the bottom of the bottle. I assumed the remaining 7/8ths of clear fluid was thinner. It seemed adequate to me but ... again, I am not experienced with this paint. I mixed it up and it looked fine.

The final finish is OK to me but that is about it. It seems a bit grainy.

Looking at the window from the front (no image posted), the masking seems to have turned out OK, and that is what I was most concerned about. The area that I masked was in a recess, and it was a bit of a challenge. I posted an image below. BTW... here is another use for silly putty. It made a great holder for the window as I worked on masking it. You minimize the danger of scratching the piece and it does a decent job holding it. What is nice too is that it does not appear to leave any residue.


And another weekend comes to an end.

JOIN OUR COMMUNITY!

Our community is FREE to join. To participate you must either login or register for an account.

SEARCH FORUMS
FREE NEWSLETTER
By signing up you may also receive reader surveys and occasional special offers. We do not sell, rent or trade our email lists. View our Privacy Policy.