SEARCH FINESCALE.COM

Enter keywords or a search phrase below:

Moebius Seaview 1:350 scale WIP

42471 views
928 replies
1 rating 2 rating 3 rating 4 rating 5 rating
  • Member since
    May 2013
  • From: Indiana, USA
Posted by Greg on Monday, June 5, 2017 10:22 AM

Beams look like real metal or alum in the pic, so you mustn't have screwed up the Alclad application to badly. Stick out tongue

I don't have a lot of Alclad experience either, but so far I just follow the needle size and PSI recommendations on the bottle and have yet to have an issue.


  • Member since
    July 2014
  • From: Franklin Wi
Posted by Bakster on Monday, June 5, 2017 8:16 PM

Thanks Greg. As they say; Onward, ho!

  • Member since
    July 2010
  • From: Tempe AZ
Posted by docidle on Monday, June 5, 2017 11:35 PM

Steve,

She is looking great so far! You are doing a great job on her even with the issues you have experienced.

And I too, had to watch every episode when it came out. I finally saw the movie years later. I think my favorite was the flying sub.

Looking forward to your next installment.

Steve


  • Member since
    April 2016
  • From: Parsons Kansas
Posted by Hodakamax on Wednesday, June 7, 2017 9:08 AM

Hey Steve, I have admit I was off somewhere else in life when when the Mobius Seaview was on it's voyage to the bottom of the sea. College and some other life adventures of the times I think. Anyway, I did Google and read about the history of the movie and series. Cool project but stay away from the reactor I read.

Carry on!

Max

  • Member since
    July 2014
  • From: Franklin Wi
Posted by Bakster on Saturday, June 10, 2017 1:29 PM

Hodakamax

Hey Steve, I have admit I was off somewhere else in life when when the Mobius Seaview was on it's voyage to the bottom of the sea. College and some other life adventures of the times I think. Anyway, I did Google and read about the history of the movie and series. Cool project but stay away from the reactor I read.

Carry on!

Max


Max--too bad you missed this fun TV series. You can still catch the show though. In my area it is broadcast early Sunday morning on ME TV. Thanks for posting...

  • Member since
    July 2014
  • From: Franklin Wi
Posted by Bakster on Saturday, June 10, 2017 1:31 PM

docidle

Steve,

She is looking great so far! You are doing a great job on her even with the issues you have experienced.

And I too, had to watch every episode when it came out. I finally saw the movie years later. I think my favorite was the flying sub.

Looking forward to your next installment.

Steve


Steve, thanks for your comments and for viewing this WIP. I always enjoy hearing from you.

  • Member since
    July 2014
  • From: Franklin Wi
Posted by Bakster on Saturday, June 10, 2017 2:18 PM

Today, I sprayed Tamiya primer over all the areas that I used filler on. As I might have expected I have some additional work to do. You can see examples of that in the photo below. Generally, I did well in areas where I had plenty of room to work. As an example, the filler work that I did on the forward stabilizers. Those areas have turned out perfectly.

Ok guys... I need your advice. At this point, I will try using Tamiya Putty to finish this off. Can I apply the putty right over the primer? Or do I have to sand it first?

Next topic: Simmering on the back burner was the option of illuminating the bow light. Up until very recently I had figured that getting the light to be visible through the water would be at the cost of too much effort, at too high a risk of failure. I had pretty much scrapped the idea. Recently though, I had an epiphany of how I might do it. The risk versus reward changes considerably. In "light" of that, I am going for it. I will begin research to find a suitable LED to use. They make LEDs pretty small, but will it be small enough? This change in direction will hinge on that. More to follow...


  • Member since
    June 2014
  • From: New Braunfels , Texas
Posted by Tanker - Builder on Tuesday, June 13, 2017 7:36 AM

Ah !

You have discovered my Achilles Heel. Despite many attempts from the good folks here I cannot yet post images . Seems also that P.B. has lost my pictures and log in info once again .

 I still have an out , but I have to work on that . I might be able to post from my phone . We'll see .  T.B.

  • Member since
    June 2014
  • From: New Braunfels , Texas
Posted by Tanker - Builder on Tuesday, June 13, 2017 7:48 AM

Hmmm , Greg ;

   Now ,  you know why that is ? The thing about Automotive putties ? I have been using 3 - M brand putty ( red ) for more years than I can remember . It's always been part of my filler arsenal .

 What I like about it is toward the end of fill work sanding , I can take my finger and dab some on and then carefully using Lacquer Thinner drop by drop , smooth the whole mess for final sanding .

   This method works with both Acryl - Green , Acryl - Red and the Light turquois one I found once by accident . I don't think they are Acrylics we know though . You cannot do anything with it and water . Or Acrylic thinner . Only Full strength Lacquer Thinner .  T.B.

  • Member since
    June 2014
  • From: New Braunfels , Texas
Posted by Tanker - Builder on Tuesday, June 13, 2017 7:58 AM

Hi Again ;

   Just a note on the molds . When I worked in the color lab at a plastics company I discovered something . We were asked if we could change the size of the object being molded .

 I and two of my associates worked on the problem for a week . We used Protractors and Other drafting tools to measure the tooling . Down to every little fill channel .  Then using a pantograph we enlarged the specs and got them to the machinists .We created a mold that doubled the size of the product .

 This resulted in a Model Car that suddenly was twice as big and everything went together the same way . I don't know who we did it for , But we all got Brown Box kits of this car for Christmas from the Company we did it for .Their name was NOT on the boxes though . T.B.

  • Member since
    June 2014
  • From: New Braunfels , Texas
Posted by Tanker - Builder on Tuesday, June 13, 2017 8:02 AM

He-He;

 When I first saw this top picture , because of the lighting , I thought I was looking at a Clutch and Brake Pedal assembly !

 Geez ! I didn't know the Seaview had a manual transmission !  Cool ! Lol.LOL.LOL. T.B.

  • Member since
    June 2014
  • From: New Braunfels , Texas
Posted by Tanker - Builder on Tuesday, June 13, 2017 8:03 AM

Hi;

 For your lighting you might try Model Rail Road lighting in " N " or " Z " scale . T.B.

  • Member since
    June 2014
  • From: New Braunfels , Texas
Posted by Tanker - Builder on Tuesday, June 13, 2017 8:11 AM

Well ;

 Now this project goes in my files . Nice job so far . Oh ! Don't forget to paint the inside of the hull black around where you have the lights . Otherwise you could get reflective bleed through . T.B.

  • Member since
    July 2014
  • From: Franklin Wi
Posted by Bakster on Tuesday, June 13, 2017 11:32 AM

Tanker - Builder

He-He;

 When I first saw this top picture , because of the lighting , I thought I was looking at a Clutch and Brake Pedal assembly !

 Geez ! I didn't know the Seaview had a manual transmission !  Cool ! Lol.LOL.LOL. T.B.


Say TB—I am laughing about the clutch. BTW—not only does this sub have a clutch, but it also has a transbrake for when I drag race other subs. My plan is to be the fastest sub in the Midwest.  

It is interesting that you are using 3M brand putty. I have a short story to tell. I am sure it’s just me because people swear by the stuff, but I was not able to figure out Tamiya’s brand of putty. I cannot get it to feather. Frustrated, I ran out to an auto parts store and picked up some 3M (two part) Glazing and Spot Putty. My experience thus far is that there is a learning curve in mixing this stuff. It won’t cure properly if you get it wrong. I think I was close. This stuff dries fast... maybe too fast because I had maybe a minute to get it on the model before it started setting up. Once cured, it sands and feathers easily. But, man oh man… this stuff STINKS to high heaven!! This is some nasty smelling stuff! Honestly, I don’t think that I can use it in the house because it wreaked for hours on end. I was getting a headache and I had to open all the windows. I even went as far as to take the model in the garage to de-fume. It is bad smelling stuff.

My ideal putty self-levels, feathers well, doesn’t stink to high heaven, low shrink, strong, non-porous, and is fast drying. I guess that is why I like CA so much because for the most part, it has those qualities. Thus far, it is the only type of filler that I can get to work for me. Still searching though because there are times I need something that is not self-leveling.  

More than you wanted to know.


  • Member since
    May 2013
  • From: Indiana, USA
Posted by Greg on Tuesday, June 13, 2017 11:38 AM

You can smooth Tamiya putty with Acetone just as TB describes using lacquer thinnner with the automotive putty, just FYI. That might help with feathering issue. Maybe.

I can't remember, did you ever try Perfect Plastic Putty, Steve?

  • Member since
    July 2014
  • From: Franklin Wi
Posted by Bakster on Tuesday, June 13, 2017 11:54 AM

Greg

You can smooth Tamiya putty with Acetone just as TB describes using lacquer thinnner with the automotive putty, just FYI. That might help with feathering issue. Maybe.

I can't remember, did you ever try Perfect Plastic Putty, Steve?


Greg, I did not know or try that with acetone. I will try to experiment with that. Doesn't acetone attack plasic? Have you tried this?

I have not tried PPP. Is it good? Is it good for small gaps and such? Is it sandable? Or do you smooth it out before it sets?

Educate me... please.

  • Member since
    July 2014
  • From: Franklin Wi
Posted by Bakster on Saturday, June 17, 2017 5:15 PM

The Bow Light

I was not sure if my 2 AA 3 volts battery pack could handle a third LED. So, I ran a test. I hooked up a third LED to the pack and flipped the switch. All three LEDs lit up. Yea! I left the LEDs on for about 4 hours and I didn't see any appreciable reduction in light output. I did this again for another 2 hours and with the same outcome.

This was good news. If I can get at minimum 6 hours on two AA batteries, I am good with that. Btw--the LEDs didn't heat up at all. They were cool to the touch. That is the beauty of LED technology. They have low power consumption, and they produce little heat.

I measured the bow light port and behold... the LED size that I have will fit. This was a stroke of good luck. One thing though, I have to remove the mounting base, and I will have to open up that port some.

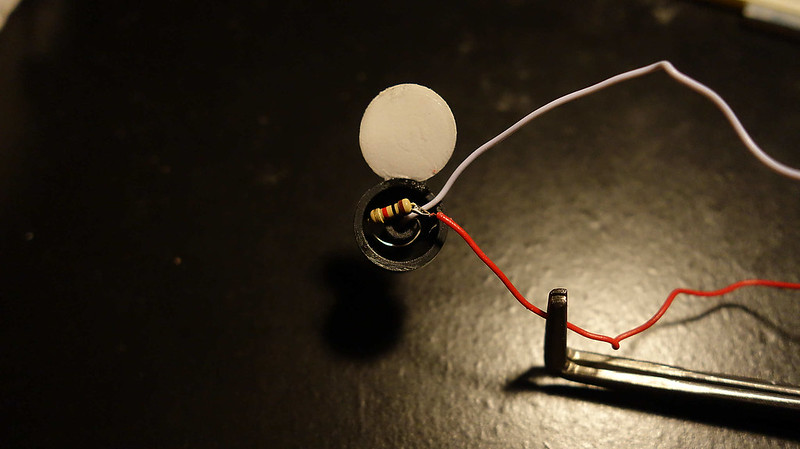
Below: 3M tape pulled away.

Below: How it looks from the back. 

Below: Neither the resistor nor the LED would fit through the front hole. I have two options to remove that black piece. Either cut the resistor or LED off and pull the wires through. Or, cut the plastic away. I opted for the latter. 

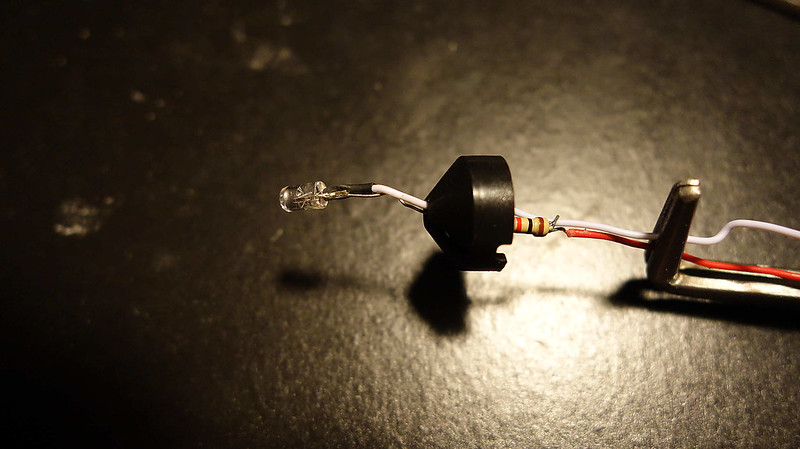
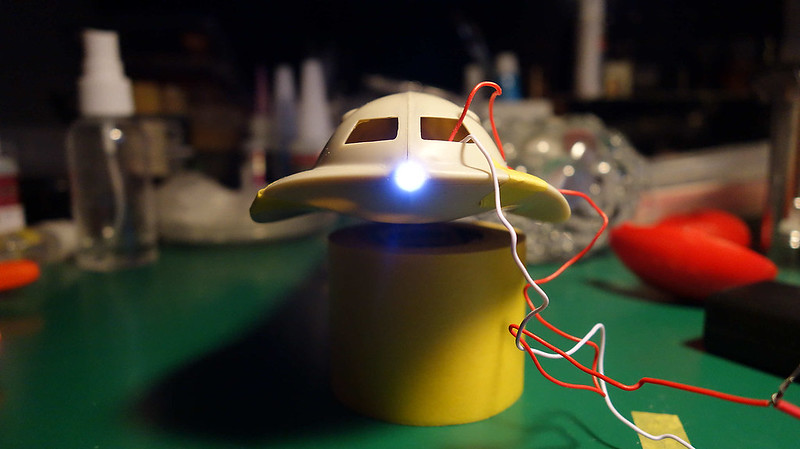
A naked LED assembly. Don't stare too long. 

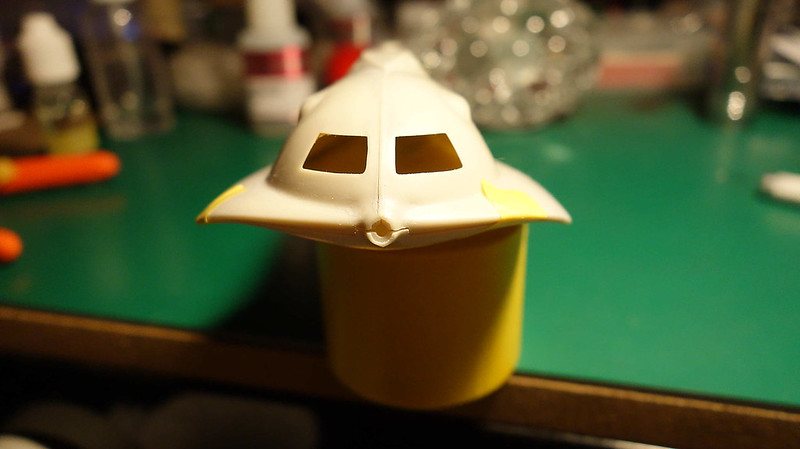
Below: How the light port looks before cutting. I have two ways that I could go with mounting the LED.

1. I could insert the bezel that comes with the model and then mount the LED behind it. In this case, I would not need to cut the opening much. I think that this option would drastically reduce the amount of light that comes out of the bezel. I bet it would look cool as heck though.

2. Cut away that inner flange so that the LED can come through it. In this case the LED will act as its own bezel. You will definitely get more light this way.

For this project...I need the light. Option 2 is the way that I am going.

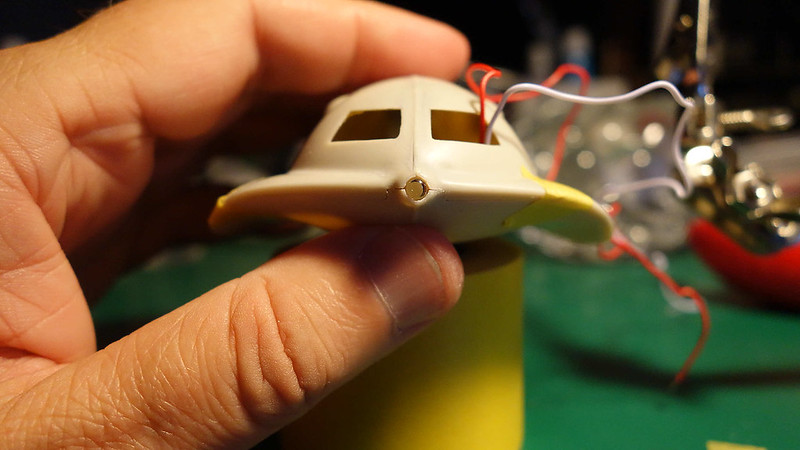
Below: This will need some fine tuning and filler work, but you get the gist.


Lastly, here is a link that offers a nice and simplified synopsis of how to work with LEDs. The easiest way to do a simple lighting project may be by using what I have bought. The LEDs already have the correct current limiting resistors for a 3 volts power supply. You can use batteries for the power, or... buy a wall transformer that outputs 3 volts. Then--it is just a matter of hooking up the wires and mounting things.

http://www.instructables.com/id/LEDs-for-Beginners/


  • Member since
    July 2014
  • From: Franklin Wi
Posted by Bakster on Sunday, June 18, 2017 3:09 PM

Working with these LEDs has stirred a

nostalgic moment...

The year is 1980, one year after graduating high school. The economy is in terrible shape. Manufacturers are closing their doors at an alarming rate, and finding a job is extremely difficult. Running out of options... I set out to get some training in the field of electronics repair. I didn't know this then, but this low cost training set me into a career genre that will encompass my entire time of employment. 

Near this time, the first personal computers are hitting the market in a big way. The Commodore 64 is released, and it goes down in history as the most popular computer ever sold. Other changes include the mighty vacuum tube. It is in its last death throes; being replaced by the smaller, sleeker, and less power-hungry transistor. Even still, the standalone transistor is in jeopardy by its more powerful kin known as the integrated circuit.

Items like Atari game consoles, CBs, VCRs, CDs, CD changers, and multichannel stereo systems were poised to, if they were not already, transform our entertainment landscape. The popular video arcade games of that time are Centipede, Missile Command, Pac-Man, Frogger, and Asteroids. These would soon become available on at home video game consoles. It had been only 4 years earlier that I played on the most basic game of all, Pong. Pong was the first commercially successful video game to break through for in home use. Around this same time, blockbuster movies like Star Wars and Close Encounters hit the silver screen. The special effects of the day use stop motion technology, and this would soon be replaced by the revolutionary digital process of CGI. Television sets will soon morph into large screen rear projection technology.

Looking back now, it seems like this was a time when an electronics renaissance took hold. What a privilege it was to see these changes take place.


  • Member since
    April 2016
  • From: Parsons Kansas
Posted by Hodakamax on Sunday, June 18, 2017 6:07 PM

Yep, my dad was the local Admiral TV guy with sales and repair. I helped dad part time in high school, mostly delivering TVs but I did get to test vacuum tubes and help put up antennas. Later I did have a Commodore 64 which had a flight simulator which was cool. I can relate to all of this!

Max

  • Member since
    July 2014
  • From: Franklin Wi
Posted by Bakster on Sunday, June 18, 2017 7:53 PM

Hey Max, that is interesting. Once upon a time the company that I work for delivered parts to all the local TV dealers. When I first started working there I helped to stock  orders for those dealers. At that time, this was a big part of the business. Now, all those dealers are gone. It is sad that all the mom and pop shops have closed up. Btw...I dabbled in TV repair as well. I wasn't repairing long enough to get good at it though. The nature of TVs changed from repairable, to expendable. 

Yet another thing that we have in common. Very cool, and thanks for sharing that!


  • Member since
    July 2014
  • From: Franklin Wi
Posted by Bakster on Monday, June 19, 2017 4:45 PM

Kind of funny. I just wrote about Atari and look what shows up in the news.

http://www.foxnews.com/tech/2017/06/19/atari-working-on-its-first-video-game-console-in-over-20-years.html

Anyway--back to modeling.


  • Member since
    July 2014
  • From: Franklin Wi
Posted by Bakster on Monday, June 19, 2017 8:56 PM

My concern here is LED light leakage. At this point, it will be pretty hard to apply black paint deep into the sub. I suppose I could buy a very long brush, soak it with black paint, slather it around in the hull, and then hope that I get every nook and cranny. Though that might work, it seems messy and inefficient.

I have another idea. Why not fabricate a bulkhead closer to the light source. By doing this I will only have to worry about painting the section forward of it. 

Below: It is crude, but who cares. In this image the styrene piece is not glued in place yet, and the tape is my makeshift handle to position it.

I still need to drill a hole through it so that I can run my wiring towards the stern. I plan to exit it there. Once when the piece is glued in, I will sprue-goo the gaps between the bulkhead and the hull. After that, I can apply black paint on the forward side.


The truth is, this might be overkill. I can't say for certain that light will bleed through that far from the light source. But, I suspect it would, and I am not taking any chances.


  • Member since
    July 2014
  • From: Franklin Wi
Posted by Bakster on Tuesday, June 20, 2017 8:18 PM

Whoever came up with the idea to melt sprue in liquid cement should get a medal. That is all that I will say about that.

End of update.

  • Member since
    April 2016
  • From: Parsons Kansas
Posted by Hodakamax on Tuesday, June 20, 2017 9:00 PM

Is it time to stoke the reactor yet? Scale wise this might take lotsa watts. Careful there, limit exposure times. No model is worth an overdose. Just yaking, the project is looking good!  Cool

Max

  • Member since
    July 2014
  • From: Franklin Wi
Posted by Bakster on Tuesday, June 20, 2017 10:22 PM

Yeah Max, I am very close to stoking it. I have my radiation suit ready to go.

The next step will be to apply anti-radiation black to the observation compartment. We can't have any radioactive leakage. I mean really. That just wouldn't be up to code. Besides, it would be a short season of Voyage to the Bottom of the Sea if I end up frying everyone. That wouldn't be cool. Then there is the whole Admiral Nelson thing. He'd be livid...

Phew. This reactor business is stressful. It is time for a nap, and hopefully it's not a dirt nap.

Thanks Max!


Steve


  • Member since
    July 2013
Posted by steve5 on Wednesday, June 21, 2017 12:43 AM

going well steve , I have never tried that technique of melted sprue , do you just use a nearly empty bottle of glue , and fill it with cut sprue , and leave for a coulpe of week's ?


  • Member since
    June 2014
  • From: New Braunfels , Texas
Posted by Tanker - Builder on Wednesday, June 21, 2017 8:43 AM

Hi Steve 5 ;

 I have been doing Spru-Glu for years . I take a bottle of slightly contaminated ( All liquid glue gets contaminated from use , believe me . ) liquid glue for styrene . About half to a quarter full .

 Now here's the important part . The Sprue .You will have much better luck with sprue from Tamiya , Trumpeter and Hasegawa . The others work , But there is a difference in flow and bond rates .

    You cut enough sprue in 1/8 " pieces to fill the bottle till sprue is sticking out of the liquid. Set aside for a week or so and check it . At this point if you have a smooth colored liquid you're good to go . Stir slightly and gently .This makes sure you don't have lumps . If you do , wait another day or two .

  The liquid should be the consistency of honey . Apply with your tool of choice . I use the pointed end and the  dull end of a bamboo skewer . The Skewer is just big enough if you have Molding depressions from the kick - out pins used , the Spru -Glu mixture will fill them on the first try . Do , NOT , Expect it to fill your problem area Unless you over fill slightly .

   Now that said , Using the edge of a piece of paper you can feather it fairly well . Wait a couple of days and sand away . The nice part ? If it's on the outside , your are not sanding filler that can be a pain and react to paints . You are sanding the same plastic pretty much as what the model is made from .

 This results in much finer finish .I always use this method on planes . Make sure the fuselage is a straight and correct as you can get it . In a bright light , pick out sink marks and imperfections . Bleed the Spru - Glu in the line where the halves meet .Leaving a heavier amount on problem areas . When set , come back and sand smooth and re-scribe lines .

     The thing to remember is this  , you have to recharge the bottle from time to time ., But make sure you label this glue bottle properly .  You don't want to be at a show or contest and find the glue you brought for repairs is the Spru - Glue bottle . Good Modeling - - T.B.


  • Member since
    July 2014
  • From: Franklin Wi
Posted by Bakster on Wednesday, June 21, 2017 12:03 PM


Hey Steve, thanks. 

I see that Tanker Builder replied as well. So—take what you will from the both of us. 

You can certainly use the bottle that the cement comes in. I know that this is how many people are doing it. But, I do it a little differently. Go figure. Right?  LOL.  

I am using a paint jar, one that has a lid. Why am I using a different jar? I feel that I have more control of the mixture by doing it this way. I can add the plastic pieces in as little, or as much as that I want to make. The same is true with the amount of plastic cement. Also, by doing it this way, I am not committing an entire bottle of liquid cement just to make some plastic. Liquid cement usually comes with an applicator brush to apply the plastic cement. This may or may not be a plus to use their bottle. I use whatever to apply it, usually a sharpened hobby stick. Here again, I feel that I have more control using a stick versus a big glop from a brush. It just depends on what you are trying to do. Long story short--- that’s my reasoning.  

A few more things that I can note: 

  1. You asked how long it takes to melt. My experience is about 3 days. I didn’t make a big batch though. I filled a standard AB jar 1/4 full of plastic. I add about the same amount of plastic cement. I seem to recall mixing it each day to help the process along.

  2. You may recall some posts on my Mayflower WIP when I was using this stuff. At the time, I had complained about it being stringy, and how you need to be very careful where those strings land. I have since learned that by adding more plastic cement to the mixture that I could reduce the stringy issue dramatically. Keep in mind, the danger is still true. If it does happen, it will stick immediately. Trying to wipe it will make a mess. Let it cure, and then sand it. I will go as far as to tape the surrounding areas of the model just to avoid any mishaps. The good news is, if it does happen, it sands beautifully. You can even scribe it if needs be.

  3. Tanker Builder gave some good application tips. So, I won’t add anything to that. I will just say this. I have given up on using plastic epoxies. In my experience, they don’t hold. Too many times the connections popped free on me. Sprue-goo as I like to call it works great in its place. This stuff bonds beautifully. This is the way to go when trying to strengthen some internal structure. Also, just like in the case with the bulkhead that I just did, it fills gaps nicely too.

  4. Don’t feel that you must make new batches between jobs. This stuff keeps well. And like what TB said, you can regenerate the stuff. I had to do that for this latest application. Over long periods of time the PC evaporates out, somehow, and you are left with a solid piece of plastic in the jar. Just add more PC, and you are good to go again. 

This stuff is great!  

In the end, you do what works for you. 

Any other questions, feel free to ask.


  • Member since
    July 2014
  • From: Franklin Wi
Posted by Bakster on Wednesday, June 21, 2017 12:05 PM

Hey TB--do you have bubbles that form in the plastic?

  • Member since
    July 2013
Posted by steve5 on Wednesday, June 21, 2017 2:49 PM

steve , TB , thank's for the tutorial guy's , must give this stuff a go .

steve5


JOIN OUR COMMUNITY!

Our community is FREE to join. To participate you must either login or register for an account.

SEARCH FORUMS
FREE NEWSLETTER
By signing up you may also receive reader surveys and occasional special offers. We do not sell, rent or trade our email lists. View our Privacy Policy.