SEARCH FINESCALE.COM

Enter keywords or a search phrase below:

P-40 GB 2014

55327 views
508 replies
1 rating 2 rating 3 rating 4 rating 5 rating
  • Member since
    June 2013
Posted by bvallot on Sunday, February 23, 2014 11:10 PM

fightnjoe, to reference the framing behind the seat...it seemed to be open to allow servicing of the fuselage fuel tank.  I've been looking and looking for more photos of this to see what variant this was on and whether or not it wasn't some part of a refirbish.  But so far this is all I've found.


cockpit_7-1 by brittvallot, on Flickr

Maybe if somebody else knows something I don't they can throw a bone out here.  But in the meanwhile Joe you may want to consider how you'd go about opening up this piece to show that nice fuel tank you worked so hard on.  Just a thought! =] I've been looking but so far this is it.  I've already cut out my piece that's on the TrueDetails cockpit.  When I look more closely at it...it is very, very thin...but it does seem to represent the fuel tank.


image by brittvallot, on Flickr

Any thoughts?  It sure makes a lot of since to me to leave this open and make it accessible to service. (Not that any of it is visible anyhow!! =P) 

On the bench:  

Tamiya F4U-1  Kenneth Walsh


  • Member since
    October 2004
  • From: Northern Virginia
Posted by ygmodeler4 on Sunday, February 23, 2014 11:41 PM

Looking good Joe.

Got a lot of sanding done and a couple other things, put a light coat of primer on it to see where I'm at....I think I have a tiny bit sanding left, then can start moving on.

-Josiah

  • Member since
    September 2011
Posted by fightnjoe on Monday, February 24, 2014 8:44 AM

really some very nice work happening across the board in this build.  

many thanks for the kind words on what i have fumbled together.

bvallot i have the same photo.  i had thought that i needed to open it up as well.  two things come into play though.  first if you look at the photo the tank is not a metal tank.  i am not sure if the picture is of a redone bird or exactly what but the tank is "different".  also in my wanderings for ref photos several had turned up with the 5th bulkhead (the one in the pic) as solid.  i went on the chance there were two (or more) versions of that bulkhead and thus i came up with mine.  i have a couple of resin sets for the 1/48 bird and depending on the set, both bulkheads are represented.  going back to the idea there were two bulkheads, maybe there was a panel that covered that opening.  

joe

Veterans,

Thank You For Your Sacrifices,

Never To Be Forgotten

Where you can find me:

Workbench on FaceBook  Google Plus  YouTube

  • Member since
    April 2010
Posted by Theuns on Monday, February 24, 2014 8:52 AM

After Tamiya grey primer I did some pre-shading and the results were laughable to say the least!

This is my attempt at a Mk1 eyeball mix of Azure. Not totally acurate but more so that the humbrol standard mix.

Theuns

  • Member since
    November 2003
  • From: State of Mississippi. State motto: Virtute et armis (By valor and arms)
Posted by mississippivol on Monday, February 24, 2014 10:41 AM

Nice work, y'all! Josiah, I'm glad you were able to get that wing/fuselage joint closed up. There's hope for me yet!

  • Member since
    June 2013
Posted by bvallot on Monday, February 24, 2014 8:01 PM

Joe, you may be right about that. Certainly would make since. That sort of leaves me with the dilemma of what to do next. I may leave it open and build the fuel tank for practice.

Ygmodeler that's piecing together very nicely. It's making feel better about what I can expect to see for mine.

Theuns, that blue looks quite blue! What are you referencing for it?

And lastly...random question about the radio aerials...would anybody out here happen to know the typical arrangement for how these lines attached to the wings.  Nothing I search for gives a definitive answer.

On the bench:  

Tamiya F4U-1  Kenneth Walsh


  • Member since
    April 2010
Posted by Theuns on Monday, February 24, 2014 10:26 PM

I tried to get the averege of all the  pix of azure I have seen. Ranging from Humbrols 157 witch is to dark and grey to the pic of the azure that has a slight violet tint to it. Since no-one makes an ACURATE out the tin azure I came up with this mix  lol

Theuns

  • Member since
    October 2004
  • From: Northern Virginia
Posted by ygmodeler4 on Monday, February 24, 2014 10:29 PM

Thanks guys, from what I've seen, yall are much better modelers than I and it shouldn't be any problem for you other than a little extra time and elbow grease.

Got to the bench today after class...

Wasn't completely satisfied with some seams, so I sanded some more...then some more....

Also doing some dry fitting of the wheel wells...though it makes it an option in the painting "instructions" it doesn't tell you how to make it an in flight bird so this is my best educated guess lol.

It's going to be a dog to get all that to fit well for sure. The good news is the tail wheel will close up like a dream. the kit piece for the wheel well with the doors open....all you have to do is cut the doors off and flip the piece over and boom, fits perfectly and keeps the contour of the tail section pretty good. All I have to do is sand the "20" (the part number) off and fill in the hole and it'll be good to go.

-Josiah

  • Member since
    September 2011
Posted by fightnjoe on Tuesday, February 25, 2014 6:29 PM

bvallot sorry to cause you issue.  i am pretty confident you could do either way as the am companies have paved the way with what they have done.

josiah anyone can do what i am, and most would do it much better than i have.  that kit should have the inflight pieces that "theoretically" fit without too much issue.  your test run looks about right.  have not tried to do an inflight model myself.  figured i would end up messing it up somehow.

joe

Veterans,

Thank You For Your Sacrifices,

Never To Be Forgotten

Where you can find me:

Workbench on FaceBook  Google Plus  YouTube

  • Member since
    November 2003
  • From: State of Mississippi. State motto: Virtute et armis (By valor and arms)
Posted by mississippivol on Tuesday, February 25, 2014 7:34 PM

Nice work thus far, y'all! I almost have the cockpit pieces in place, but this cold I contracted is keeping me from painting so I have to live vicariously through you for now. Maybe I'll start scratching up the cooling scoops; I think I have some window screen in the garage.

  • Member since
    June 2013
Posted by bvallot on Tuesday, February 25, 2014 8:46 PM

Not at all Joe. It's a simple fix. =]  I'm not sweating it at all.  I'm still on the fence about what I'll do. Either way it'll be easy to fix it. I'm assuming there's a tube that connects to the fuselage fuel tank behind the seat. The opening should be that first cap more forward, correct?

Theuns, are you building a British Tomahawk II for the N African theatre?

On the bench:  

Tamiya F4U-1  Kenneth Walsh


  • Member since
    April 2010
Posted by Theuns on Wednesday, February 26, 2014 12:27 AM

Actually a SOuth African AF North African plane, but basically exactly the same as RAF. I have found though if I make the mix lighter, you loose the "blue" and it starts to look more blue-grey.

Theuns

  • Member since
    September 2011
Posted by fightnjoe on Friday, February 28, 2014 8:46 PM

sorry it took so long to respond.

was looking for a decent pic of the fuel filter caps.  i dont have one.  however p-40.com does.

www.p40warhawk.com/.../P-40B.htm

there are two.   one showing the first cap, directly behind bulkhead #5, and the other shows a off side view with both cap holes visible.

as for what hose goes where i can only go with my suspicions.  the top of the fuel tank has a filler spout.  this just about lines up with the second hole.  so i suspect the forward cap is for the tank in the wings.  just not sure.

joe

Veterans,

Thank You For Your Sacrifices,

Never To Be Forgotten

Where you can find me:

Workbench on FaceBook  Google Plus  YouTube

  • Member since
    September 2011
Posted by fightnjoe on Saturday, March 1, 2014 11:56 AM

well its the little things that make life go round. 


for models its the little things that we grind on for hours at a time.

for me it just means i am doing the little things to try to button up the cockpit.

first up is the throttle assembly.

i came in under my estimate for pieces for this. only 12. i was thinking 18 or so.


yes that little thing is on a popsicle stick. and then a close up.


also worked on the seat and the frame. now this is a bugger and a half. took me the better part of four hours to try to fashion it.

the detail on the sides are for the seat belts. the detail on the back is noticed in the pictures but cant tell you what it is. a tether of some kind goes through the loop and is attached to the lower part of the frame.


now with these two things done what do i have left?

large item(s):

-instrument panel
-foot pedals
-attach seat/frame

small item(s):
-rods for throttle controls
-assorted wires and tubes for radio and boxes.
-attach radio


not sure if i have missed anything. need to take some time to study the pictures and decide.


all comments, critiques, and criticism are encouraged.


joe

Veterans,

Thank You For Your Sacrifices,

Never To Be Forgotten

Where you can find me:

Workbench on FaceBook  Google Plus  YouTube

  • Member since
    September 2013
Posted by blackdog62 on Monday, March 3, 2014 1:46 PM

Wow I just spill'd a cup of coffee on a stack of 11 p-40 reference books.  :(

  • Member since
    April 2010
Posted by Theuns on Monday, March 3, 2014 10:23 PM

Hey guys, we have been having constant rain now for 5 days and it is really "getting old fast!"

I have in the meantime put some humbrol mid stone on the top side, and so far I am happy with the pre-shading showing through. I do however think that the dark earth might be to dark for it to still show up.

Pix to follow.

Theuns

  • Member since
    September 2013
Posted by blackdog62 on Tuesday, March 4, 2014 9:18 AM

Theuns.   Are you west coast USA we have 5 day rain also ?

  • Member since
    April 2010
Posted by Theuns on Tuesday, March 4, 2014 9:45 AM

No mate, I am at the southern tip of Africa LOL.

We usually have a summer rain, but this year something went wrong and they say it will last till next monday! This is a problem as I can't get to the airfield I work from and am loosing $ at a rate of knots now :(

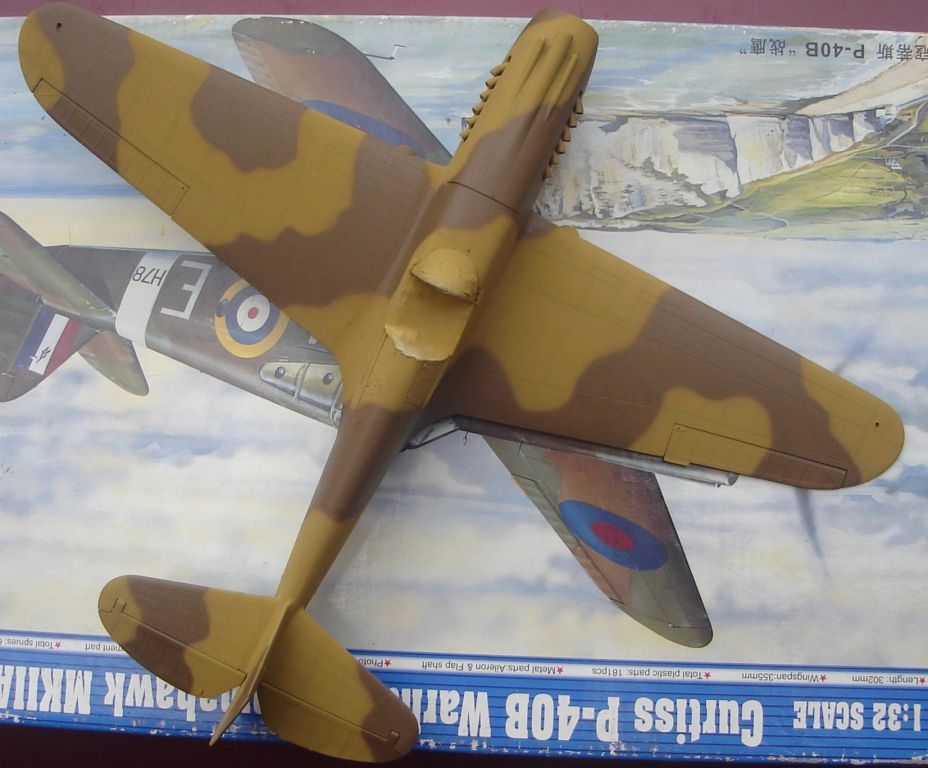
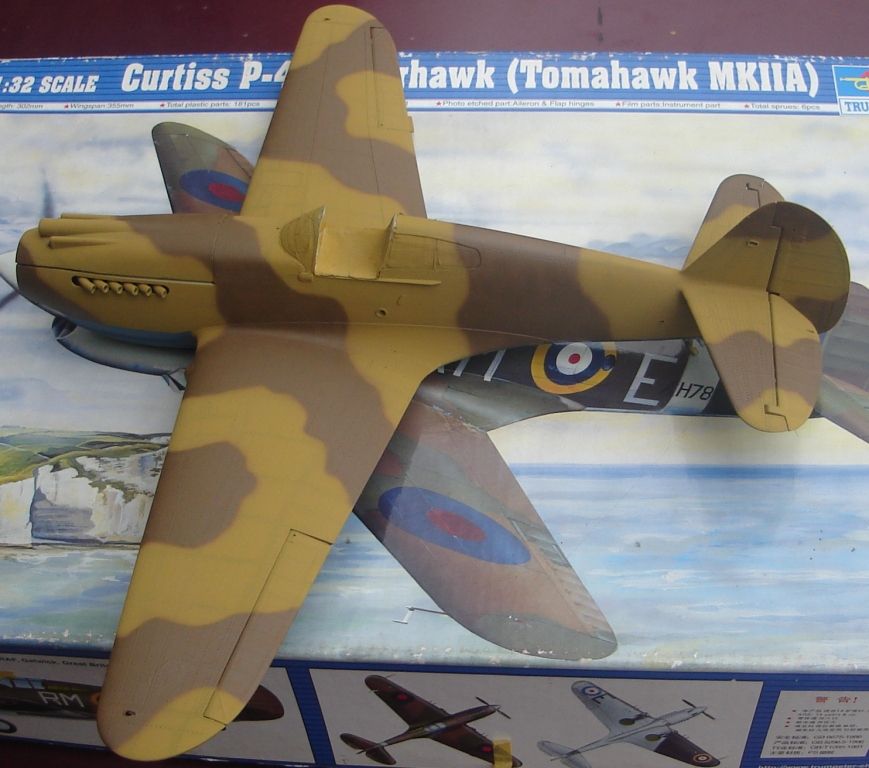
Anyway, here is the P-40 so-far.

The mid stone is Humbrol and the dark earth is model master. I was to lazy to mask so I freehanded the cammo on. I recon in this scale it doesn't look to far from correct. 

The RAF had a policy that the overspray edge should be between 1 to 1.25" wide. I think the 0.7mm I got is close enough.

As soon as the paint actually dries I will micromech sand it and put the clearcoat on for decals. I will have to mask and paint a white area for the top wing roundals as the orange will show through. I don't know why the did not have seperate centers like on the bottom roundals.

Theuns

  • Member since
    June 2013
Posted by bvallot on Tuesday, March 4, 2014 3:10 PM

Damn Theuns! You're beasting this one out.  =]  This camo scheme is looking great.  That's a fine job painting freehand as well.  I'm fairly confident I could pull that off too, but I don't know for sure if I'd chance it.  Lol

On the bench:  

Tamiya F4U-1  Kenneth Walsh


  • Member since
    December 2003
  • From: Charleston, SC
Posted by sanderson_91 on Tuesday, March 4, 2014 6:57 PM

Theuns, that camo looks awesome!  

Steve


  • Member since
    September 2013
Posted by blackdog62 on Tuesday, March 4, 2014 9:56 PM

Theuns.   LOL That is definitely not west coast USA. Africa has many different zones it looks like a beautiful continent. Her in California it's a dust bowl we haven had rain or snow all winter. But it's dumping now.

Your camo is looking great. The pattern looks pretty tight. What airbrush/tip are you using ?

  • Member since
    November 2003
  • From: State of Mississippi. State motto: Virtute et armis (By valor and arms)
Posted by mississippivol on Tuesday, March 4, 2014 10:23 PM

Nice paint, Theuns!

  • Member since
    April 2010
Posted by Theuns on Wednesday, March 5, 2014 2:30 AM

Thanx guys. .......and the rain continues! SOme residential dams are overflowing and folks stuck on the roads I hear.

As for the AB, is is one of these "el cheapo" ones from China (cast me about $25-00) and I think it has a .3mm tip. I just kept the tip close to the model to minimize the overspray.

Now as soon as it actually gets a little hotter, I will put the clearcoat of for decals.

In the meantime I am practicing my rigging on the new 1/72 Airfix Gladiator, what a cool little kit!

Theuns

  • Member since
    September 2013
Posted by blackdog62 on Wednesday, March 5, 2014 1:10 PM

Theun 1 of my airbrush is made by a company in the states called harbour fright they make tons of tools just not high quality. I have one of their a/b and it's a copy of my anger and works as good just can't get parts for it and not as well maid I paid $10 for it.. it works fine

  • Member since
    January 2012
  • From: Barrie, Ontario
Posted by Cdn Colin on Wednesday, March 5, 2014 4:06 PM

I reckon this is the best place to ask this question.

I want to build another P-40B and don't want to spend a lot.  I have the old Monogram kit and plan to use the RCAF decals from it.  I've heard that the Monogram kit is the most accurate proportionally, but I'm dreading fitting the nose piece to the fuselage again.

How does the Academy kit compare?  The wheel wells look a lot better to me, but I want to know how far off it is proportionally compared to the Monogram kit.

Any help would be appreciated.

I build 1/48 scale WW2 fighters.

Have fun.

  • Member since
    September 2011
Posted by fightnjoe on Wednesday, March 5, 2014 8:37 PM

if you want to build a p-40b/c in 1/48 your options are the revell/monogram (seems right shape however the pit is sparse and the ip is for an "e" version), the academy (pit is better but still lacking in detail), or trump (pit is ok in detail but very shallow).  they all look like hawks when completed and all build decent.  you will find little things on each that could be considered wrong but to be honest i would build any of them.  

joe

Veterans,

Thank You For Your Sacrifices,

Never To Be Forgotten

Where you can find me:

Workbench on FaceBook  Google Plus  YouTube

  • Member since
    January 2012
  • From: Barrie, Ontario
Posted by Cdn Colin on Thursday, March 6, 2014 12:03 PM

Thanks, Joe.  I think I'll wait until I see an Academy kit at my LHS.

I build 1/48 scale WW2 fighters.

Have fun.

  • Member since
    September 2011
Posted by fightnjoe on Thursday, March 6, 2014 4:06 PM

i have built up the academy kit a couple of times.  with and without an am pit kit.  you will be happy.

joe

Veterans,

Thank You For Your Sacrifices,

Never To Be Forgotten

Where you can find me:

Workbench on FaceBook  Google Plus  YouTube

  • Member since
    February 2012
  • From: Olmsted Township, Ohio
Posted by lawdog114 on Friday, March 7, 2014 12:28 AM

I thought I would pop in to check it out.  There's some fine work so far.  I hope to jump in soon with the Amtech P-40L, but I'm have trouble finding a cockpit solution.  I don't like the way the kit's pit looks so I need to do something with it.  I know the defunct Cutting Edge had one but its impossible to find now.  The sidewalls seem ok so I may just replace the IP and seat.  I can't even find an Eduard set for this kit...Any ideas folks?  

Colin, having built all of those in 1/48 scale, here's what I've found out about the P-40 B/C in this scale...........We need a new one.  If you care about accuracy (I shoot for "reasonable" accuracy), the Monogram kit is the most accurate in shape, but 50 years has taken it's toll on the molds which are now horrendous.  It also needs an AM cockpit.  To do it justice, get a "vintage" version when the molds were crisp.  Ebay has them (look for the white box with black lettering).  Then add a True Details cockpit.  The Academy/Hobbycraft kit is relatively modern but it has serious shape issues.  The most noticeable is the belly which is completely wrong for a B/C and as Joe said, it could use a cockpit too.  The latest attempt by Trumpeter has a laughably small cockpit and is tricky in the upper cowl assembly.  There are other issues as well but they escape me at the moment.  I believe the tail is wrong.  Should I do the P-40B again, I'll go with option #1.    Like the Ju-88 A-1 and the P-40F/L (Merlin), I cannot believe we don't have decent example of this subject in 1/48.  Think Eduard is listening?  I bet they could create a dandy and it would sell like hotcakes....

Joe


 "Can you fly this plane and land it?...Surely you can't be serious....I am serious, and don't call me Shirley"


  • Member since
    April 2010
Posted by Theuns on Friday, March 7, 2014 12:49 AM

I got 2 coats of future brushed onto my 40 and hoping to get to final sanding and decaling this weekend.

As a pre-emtive fix I had to paint the upper wing roundal positions a base white over the camo as the orange center of the decal could be to opaque to cover well.

The weather here is really bad so most painting of models are taking really long and I am getting tired of watching paint dry LOL

Theuns

JOIN OUR COMMUNITY!

Our community is FREE to join. To participate you must either login or register for an account.

SEARCH FORUMS
FREE NEWSLETTER
By signing up you may also receive reader surveys and occasional special offers. We do not sell, rent or trade our email lists. View our Privacy Policy.