SEARCH FINESCALE.COM

Enter keywords or a search phrase below:

P-40 GB 2014

55328 views
508 replies
1 rating 2 rating 3 rating 4 rating 5 rating
  • Member since
    October 2004
  • From: Northern Virginia
Posted by ygmodeler4 on Sunday, February 2, 2014 11:42 PM

Thanks for the help guys....about the cowls....I couldn't find any great pictures of in flight of the bottom, but some of them have those flaps opened slightly, so I tried to do that on mine and it does make that gap look more natural...

All I need to do now from what I understand and going back and looking back at your cowling bvallot is to fill the gaps closest to the  engine, are my correct in that statement?

-Josiah

  • Member since
    June 2013
Posted by bvallot on Monday, February 3, 2014 12:21 AM

Pretty much.  They opened and shut by way of fitting over a thin aluminum band.  That's what kept them all together.  Here's a picture for your reference:

dsj_p-40b_04

by brittvallot, on Flickr

Whatever you do to fashion that band, it should be thin. As in "very!!"  =]

On the bench:  

Tamiya F4U-1  Kenneth Walsh


  • Member since
    April 2010
Posted by Theuns on Monday, February 3, 2014 3:35 AM

I started assembling the cockpit only to find the instrument face plate missing :-(

Maybe a previous owner liberated it allong with some of the PE harnass detail!

Ah well, I raided my 1/32 P-51 Kit for it's harnass as I have n\better ones for that and took a piec of white plastic I painted black and will scribe for a new inst pannel.

No wonder I got the kit so cheap lol.

Theuns

  • Member since
    June 2013
Posted by bvallot on Monday, February 3, 2014 7:52 PM

That's unfortunate.

Or an opportunity in disguise.... =]

On the bench:  

Tamiya F4U-1  Kenneth Walsh


  • Member since
    November 2003
  • From: State of Mississippi. State motto: Virtute et armis (By valor and arms)
Posted by mississippivol on Monday, February 3, 2014 9:22 PM

Theuns, that's like an A-10 kit I got at an antique store for $5. Everything looked like it was there, but when I got home, the entire cockpit was missing. Might be time for my first resin cockpit...

Glenn

  • Member since
    September 2011
Posted by fightnjoe on Monday, February 3, 2014 9:58 PM

pit floor and starboard side. sorry about the pics. white on white doesnt really go well. working off of a couple of drawings and photos. actually pretty happy. i have to add the map case yet but other than that......


now i also redid the control stick. mind you the stick from the kit is not bad. in fact it is decent. i just......well.......i cant help myself.


and side by side with the kit piece.


now for the port side. hopefully in the next few days.


comments, critiques, and criticism are very much encouraged.


joe


Veterans,

Thank You For Your Sacrifices,

Never To Be Forgotten

Where you can find me:

Workbench on FaceBook  Google Plus  YouTube

  • Member since
    November 2003
  • From: State of Mississippi. State motto: Virtute et armis (By valor and arms)
Posted by mississippivol on Tuesday, February 4, 2014 7:34 PM

Joe, in my research on the cockpit, it was noted that the floor was actually the top of the wing, and as such, it had a curvature to it. I don't know that it would be all that noticeable once you get it in. I like the detailing on the walls; I'll have to steal some of that for mine!

Glenn

  • Member since
    September 2011
Posted by fightnjoe on Tuesday, February 4, 2014 7:43 PM

you are absolutely right.  and it wont be all that noticable.   (i hope)

you are welcome to anything used.

many thanks.

joe

Veterans,

Thank You For Your Sacrifices,

Never To Be Forgotten

Where you can find me:

Workbench on FaceBook  Google Plus  YouTube

  • Member since
    April 2010
Posted by Theuns on Tuesday, February 4, 2014 10:24 PM

Nice work guys.

We are having loads of hassles with the internet connection here and it is only luck I can get online now!  If I am absent for a little while please continue the builds.

As for my P-40, I have completed the basic cockpit assembly, aswell as added the throttle and mixture controll pushrods and wire harnasses to the electric box.

The PE harnass is almost painted.

Theuns

  • Member since
    October 2013
Posted by ajd3530 on Wednesday, February 5, 2014 12:39 AM
Well I received a package today from a gentleman in Central Iowa..


Nice little spread there if I do say so myself...

Anyway, I know I said I probably wouldn't get around to this till mid-late spring, but I'm already itching to get the interior/airframe together. If this happens, the line of little airplanes waiting for the paint booth is going to start looking like the drive-thru line at Hardees at about 8:30 AM!! (Those of you in the southern United States will know exactly what I'm talking about)
  • Member since
    April 2010
Posted by Theuns on Wednesday, February 5, 2014 3:09 AM

Nice parcle you got there :-)

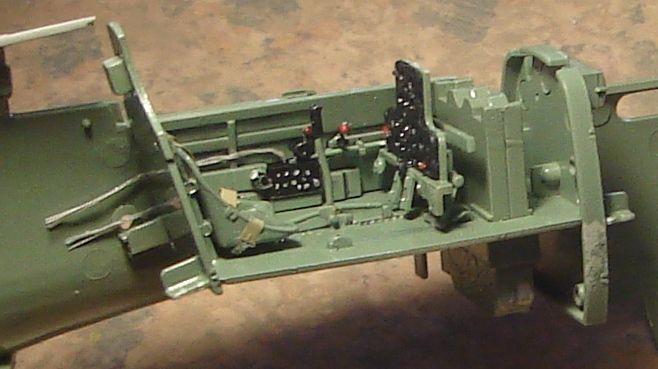
Here is my attempt ad office detailing.

Only "extras" are the wire harnass to box from thin twisted sprue and the engine controll pushrods.

The Safety harnass is from my Tam 1/32 P-51 with acrylic tan paint.

The instrument face was white plastic card painted black and scribed with a needle.

  • Member since
    April 2010
Posted by Theuns on Wednesday, February 5, 2014 3:13 AM

  • Member since
    April 2010
Posted by Theuns on Wednesday, February 5, 2014 3:17 AM
  • Member since
    June 2013
Posted by bvallot on Wednesday, February 5, 2014 10:13 AM

Theuns, that IP doesn't look bad at all!! =]  I'd have probably just bought another one.  Seeing things like that help open new doors to what i can imagine pulling off.  

If I recall, you're doing the British B variant and I'm not sure if they were painting the seat yet.  I would double check your sources to be sure.  =]

On the bench:  

Tamiya F4U-1  Kenneth Walsh


  • Member since
    December 2003
  • From: Charleston, SC
Posted by sanderson_91 on Wednesday, February 5, 2014 8:07 PM

There's some really nice work going on here!   I hope to get to my P-40 this weekend.

Steve


  • Member since
    November 2003
  • From: State of Mississippi. State motto: Virtute et armis (By valor and arms)
Posted by mississippivol on Wednesday, February 5, 2014 8:19 PM

@ajd3530: There's checkerboards in them there decals! Please, please tell me you're doing that version...

Glenn

  • Member since
    October 2013
Posted by ajd3530 on Wednesday, February 5, 2014 9:02 PM

mississippivol, I don't think so. Its for "Stud" the gloss black one. Which I just really have no desire of doing. If it were of a normally marked one, i'd be ALL for it.

  • Member since
    November 2003
  • From: State of Mississippi. State motto: Virtute et armis (By valor and arms)
Posted by mississippivol on Wednesday, February 5, 2014 10:19 PM

Sounds good, aj!

  • Member since
    October 2013
Posted by ajd3530 on Thursday, February 6, 2014 12:21 AM

I'm actually going to do an L model stationed in the Anzio area between Opperation Shingle and the drive to Rome. It was originally the typical RAF desert camo, but was field modified by the pilot. Should be really interesting looking when its done.

  • Member since
    November 2003
  • From: State of Mississippi. State motto: Virtute et armis (By valor and arms)
Posted by mississippivol on Thursday, February 6, 2014 7:21 PM

That's got me curious! I'm looking forward to seeing it.

  • Member since
    February 2012
  • From: Olmsted Township, Ohio
Posted by lawdog114 on Friday, February 7, 2014 3:19 AM

I was just getting caught up in here and this is some impressive work guys.  I hope to jump in as soon as I'm done with my Ju-88.  It appears that me and aj will be building the same kit.  I can't wait until that one gets underway to see what I'm in for.  

Joe    

 "Can you fly this plane and land it?...Surely you can't be serious....I am serious, and don't call me Shirley"


  • Member since
    June 2013
Posted by bvallot on Friday, February 7, 2014 4:23 AM

Oh boy!!

On the bench:  

Tamiya F4U-1  Kenneth Walsh


  • Member since
    April 2010
Posted by Theuns on Saturday, February 8, 2014 9:49 AM

Latest on my P-40, I still need to figure out the best way to paint the exhaust stubs before I install the sub-assembly into the fuse.

Theuns

  • Member since
    June 2013
Posted by bvallot on Saturday, February 8, 2014 10:52 AM

I'm so happy to see this coming along Theuns!!  Researching the P-40 has brought up lots of photos of the Trumpeter 1:32 kit and it reminded me that 1:32s usually have a more detailed engine/mount included along with the kit (which makes me jealous).  So I've been anxious to see yours come together.  What do you think about the kit so far?

On the bench:  

Tamiya F4U-1  Kenneth Walsh


  • Member since
    June 2013
Posted by bvallot on Saturday, February 8, 2014 11:12 AM

I was just thinking too...I believe I've seen that the exhaust manifold for the Trumpeter kit comes piece by piece...so if I were painting it I think I might make up a jig to place each piece approximately how they'd go in succession and paint them that way.  Once you're done with weathering and what not, just fit them all in from back to front.  You can always tape them off while painting the fuselage.

Just my two cents.  =]

On the bench:  

Tamiya F4U-1  Kenneth Walsh


  • Member since
    February 2014
Posted by JW CDN on Saturday, February 8, 2014 12:54 PM
Hi everyone,

I'd like to get into this GB as well if that's alright....I'll be doing the Academy Tomahawk II in 1/48.
  • Member since
    December 2003
  • From: Charleston, SC
Posted by sanderson_91 on Saturday, February 8, 2014 1:06 PM

Theuns - your P-40 looks really nice!  There are some great P-40's going here!

Steve


  • Member since
    November 2003
  • From: State of Mississippi. State motto: Virtute et armis (By valor and arms)
Posted by mississippivol on Saturday, February 8, 2014 2:34 PM

Got some more work done today. I used the kit floor as a base for the P-51 floor, then used some strip to cover the gaps in the side, then made the bulkhead for the seat. I cut away the headrest area too, though I was too aggressive on one side, and have a gap to fill. I may work on the instrument panel next, or the seat mount. The detail on the sidewalls will take a while. It won't be 100% accurate, but I hope it'll be an improvement.


  • Member since
    November 2003
  • From: State of Mississippi. State motto: Virtute et armis (By valor and arms)
Posted by mississippivol on Saturday, February 8, 2014 6:28 PM

Got a little more done since the last post. I made the seat rail from a section of AMT NASCAR roll cage; it's a little narrow, but does the trick. I also cut off a square section from a Monogram NASCAR rear shock assembly for the cross bar that the instrument panel sits on. Digging through the parts box looking for those items, I came across the cockpit sidepanels from the same Accurate Miniatures P-51 kit that the floor came from; another problem solved....thank you spare parts box!

  • Member since
    April 2010
Posted by Theuns on Sunday, February 9, 2014 12:53 AM

Nice detail there :-)

As for the trump kit, it is highly detailed, the fit of the big parts is OK , but I had a hard time building up the exhaust stubs. They are 2 parts each and the fit was poor.

For the rest sofar it is not bad atall. The engine for me was the most frustrating part of the build, very fidly for parts that might not be seen anyway LOL.

Theuns

JOIN OUR COMMUNITY!

Our community is FREE to join. To participate you must either login or register for an account.

SEARCH FORUMS
FREE NEWSLETTER
By signing up you may also receive reader surveys and occasional special offers. We do not sell, rent or trade our email lists. View our Privacy Policy.