SEARCH FINESCALE.COM

Enter keywords or a search phrase below:

Mustang Build

80090 views
1582 replies
1 rating 2 rating 3 rating 4 rating 5 rating
  • Member since
    July 2014
Posted by modelcrazy on Friday, April 3, 2015 2:10 PM

goldhammer
Looks like they stayed with just bare alum when they got done ripping out all the un-needed stuff.  Appreciate it,  no big rush.  They might even have some shots you can use of the floor and stuff

I just received an email from Brent Hisey who replied;

"I will take some pics for you. Light grey is the color"

As soon as I get them I'll post them up.

Steve

Steve

Building a kit from your stash is like cutting a head off a Hydra, two more take it's place.


http://www.spamodeler.com/forum/

  • Member since
    August 2014
  • From: Willamette Valley, Oregon
Posted by goldhammer on Friday, April 3, 2015 4:11 PM

You and Brent are men among men!!!!!  Going to test me now to get the pit right.Bow Down

  • Member since
    February 2010
  • From: New Jersey
Posted by 68GT on Friday, April 3, 2015 8:12 PM

I'm going to jump in with this 95 GT.  It's been sitting on the shelf mocking me so I pulled the shrink wrap off.

On Ed's bench, ???


  • Member since
    July 2014
Posted by modelcrazy on Saturday, April 4, 2015 9:52 AM

I got you down GT.

And welcome to our little Mustang Build.

Steve

Building a kit from your stash is like cutting a head off a Hydra, two more take it's place.


http://www.spamodeler.com/forum/

  • Member since
    February 2010
  • From: New Jersey
Posted by 68GT on Saturday, April 4, 2015 9:54 PM

So I got started

and noticed a problem with the vinyl tires.  They seem to have some type of gold color contamination.  Does anyone have some suggestions as to what I can do? 


On Ed's bench, ???


  • Member since
    June 2013
Posted by RobGroot4 on Sunday, April 5, 2015 5:53 AM

68GT

So I got started and noticed a problem with the vinyl tires.  They seem to have some type of gold color contamination.  Does anyone have some suggestions as to what I can do? 

It looks like the issue continues onto the sprues which would lead me to believe it's something in the vinyl.  Rustoleum may work for you, but I would test on sprue first.  If that fails I would contact Revell.

Did anyone else notice the cover story for this month's FSM magazine?  Timely indeed!

In any event, I also wanted to toss out an update as I plod along slowly on my 51B's.  After several coats and some retaping and repainting I think I have the invasion stripes done.  Turns out bare metal foil is not so great on painted surfaces and the white ran under pretty significantly.  So I retaped with Tamiya tape over the white and gave both aircraft another hit with the grey and green.  I'll still need to do some drybrushing to help out some areas later on, but I think I'm pretty much done airbrushing the grey and green (for the moment).

So the stripes are done.  I'm sure someone will notice the tail on one is striped whereas it isn't on the other.  The Kitsworld decals I have for Miss Dallas and Ill Wind denote that Ill Wind had recently been repainted when the photos were taken and that the tail stripes were removed as were the red outlines for the fuselage letters whereas Miss Dallas was still sporting both.  So it should add some nice variance for 2 aircraft from the same squadron that will add to visual appeal.

Next step is to prep for red paint.  I'll be hitting the noses and the step here marks on the flaps with insignia red (that's what I've got according to my color chart anyway).  So I spent my bench time this morning taping all that off.  I still need to tape for the red bands on the alclad drop tanks, but that should go pretty quickly (it's all straight lines and no angles).  As an aside, I stumbled across a pretty good trick for masking the compound curves on the nose if anyone is interested as a straight strip won't work.  One of the schemes that decals are included for in this kit has a checkerboard nose with decals included (if I remember correctly, the Tamiya 1/48 P-51D also has a scheme like this).  I used the handy tracing paper Tamiya includes to protect the decals and traced the aft edge of the the 2 decals, the cut out the curves and transferred them to pieces of wide Tamiya tape.  From there it was a simple issue of peeling the tape and putting it in the right place.  Hopefully it'll work well!

That's where I'm at for the moment, after I get the red done I'll do some drybrushing to tighten up my demarcation lines and then fade the rudders a bit (still haven't decided if I want to do this with an airbrush, drybrush, or weathering powders), and then clear coat!  Thanks for looking!

Groot

"Firing flares while dumping fuel may ruin your day" SH-60B NATOPS

  • Member since
    February 2010
  • From: New Jersey
Posted by 68GT on Sunday, April 5, 2015 9:16 AM

Kit is copy righted in 1995 and I didn't see one put out since so I don't think Revell is going to be much help.  It's been 20 years since this kit was made.  I'd be happy with some paint that would stick or even a dye.

On Ed's bench, ???


  • Member since
    August 2014
  • From: Willamette Valley, Oregon
Posted by goldhammer on Sunday, April 5, 2015 10:05 AM

Might try the local auto paint store for some SEM vinyl trim paint and their adhesion promoter.  I think they have s semi flat black or something close.  Available in a rattle can

  • Member since
    February 2010
  • From: New Jersey
Posted by 68GT on Sunday, April 5, 2015 1:11 PM

I'm going to try some of that stuff out but if I remember correctly its kind of thick.  I have plenty of old tire to try it out on.

On Ed's bench, ???


  • Member since
    December 2013
Posted by CodyJ on Sunday, April 5, 2015 11:56 PM

Also if you use an acrylic semi-gloss black that should do well. I have used tamiya on rubber/vinyl.  May want to dullcoat it afterward.  I had to do that before and its held so far so good.  Nice Mustang by the way!

  • Member since
    April 2010
Posted by Theuns on Monday, April 6, 2015 8:00 AM

Done and dusted.

Alclads with kit decals and alclad clear semi matt ocer all to dull down the "metal" as most Korea Mustprangs were. Silver on the rudder shows new alluminium dope on the fabric. 

Note the different rates the undercart doors are drooping ;-)

I drilled out the exhausts and guns.

Theuns

  • Member since
    August 2014
  • From: Willamette Valley, Oregon
Posted by goldhammer on Monday, April 6, 2015 8:58 AM

Another beauty.  

  • Member since
    August 2014
  • From: Willamette Valley, Oregon
Posted by goldhammer on Monday, April 6, 2015 8:59 AM

Not too bad, I did a cupholder that had some texture to it and it is still nicely visilble .  Just use a couple of light coats.

  • Member since
    July 2014
Posted by modelcrazy on Monday, April 6, 2015 9:06 AM

WOW Theuns! That's just beautiful   YesYesYes

That is really show quality man.

Cody will get your pic up on the wall when he gets a chance.

Nicely done.

Steve

Building a kit from your stash is like cutting a head off a Hydra, two more take it's place.


http://www.spamodeler.com/forum/

  • Member since
    April 2010
Posted by Theuns on Monday, April 6, 2015 10:09 AM

Thanx for hosting the GB  :-)

Theuns

  • Member since
    December 2009
Posted by ww2psycho on Monday, April 6, 2015 10:57 AM

Great work Theuns!

Here's where my two are at right now. Preshaded last night and now I'm painting the stripe colors. going to mask them and then do the OD and NG.

i168.photobucket.com/.../20150406_004810_zpsaploynkg.jpeg

  • Member since
    April 2010
Posted by Theuns on Monday, April 6, 2015 11:13 AM

Very cool, both "B's"  ?

Theuns

  • Member since
    July 2014
Posted by modelcrazy on Monday, April 6, 2015 11:18 AM

Theuns
Thanx for hosting the GB  :-)

You bet. It was originally your idea.

Steve

Building a kit from your stash is like cutting a head off a Hydra, two more take it's place.


http://www.spamodeler.com/forum/

  • Member since
    December 2009
Posted by ww2psycho on Monday, April 6, 2015 11:45 AM

One is a B, the other is an A-36.

  • Member since
    April 2010
Posted by Theuns on Monday, April 6, 2015 11:53 AM

Ah yes, I should have looked at the top cowl...

Theuns

  • Member since
    February 2010
  • From: New Jersey
Posted by 68GT on Monday, April 6, 2015 3:45 PM

Very nice Mustang Theuns!

On Ed's bench, ???


  • Member since
    February 2010
  • From: New Jersey
Posted by 68GT on Monday, April 6, 2015 6:25 PM

I was thinking of using this green that was left over from a pine wood derby car but now I'm not sure if I'm going to like it on this body.

On Ed's bench, ???


  • Member since
    December 2013
Posted by CodyJ on Tuesday, April 7, 2015 12:48 AM

Nice Job Theuns!  Your Pic has been posted in the finished builds!

Ed- Cool Color for the Mustang!

  • Member since
    January 2015
Posted by BrandonD on Tuesday, April 7, 2015 1:05 AM

Theuns - that's a fantastic job. I can only hope my P-51D comes out looking anywhere close to yours. That finish really pulls it together and looks very realistic.

-BD-

  • Member since
    January 2015
Posted by BrandonD on Tuesday, April 7, 2015 1:14 AM

I got the P-51B assembled, and it took only minor filling and sanding. After that, it was to the paint shop. First, I shot the insides of the flaps in Alclad polished aluminum, and they're way too bright, so I'll have to tone them down a bit. Maybe I'll spray them with Duraluminum, but I really don't want to mask them again. We will see...

Then it was to the underside, which I did with a triple layer in neutral gray over a black primer. After masking that off last night, I shot the top tonight. Again, this was the triple layer technique over a black base.

Here is a progress shot (yes, I paint on the floor. Yes, I'm getting too old for that, and yes, I need to make space on the garage workbench for painting).

The blend coat came next, and while the base olive drab seemed way, way too dark, the lightening coat really helped, and the blend coat pulled it together. It's a darker than in the photos, and is a pretty close match to the color photos of Don Gentile's Shangri-La I found online.

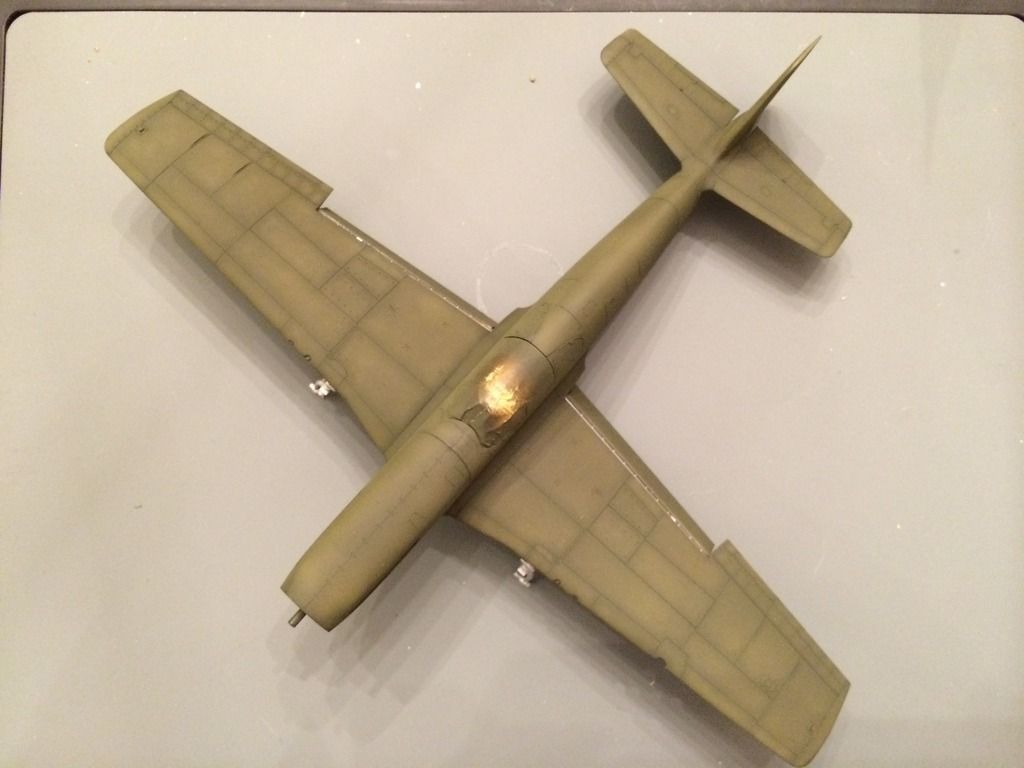
In the photo below, you can see the interiors of the flaps and why I say I need to tone them down.

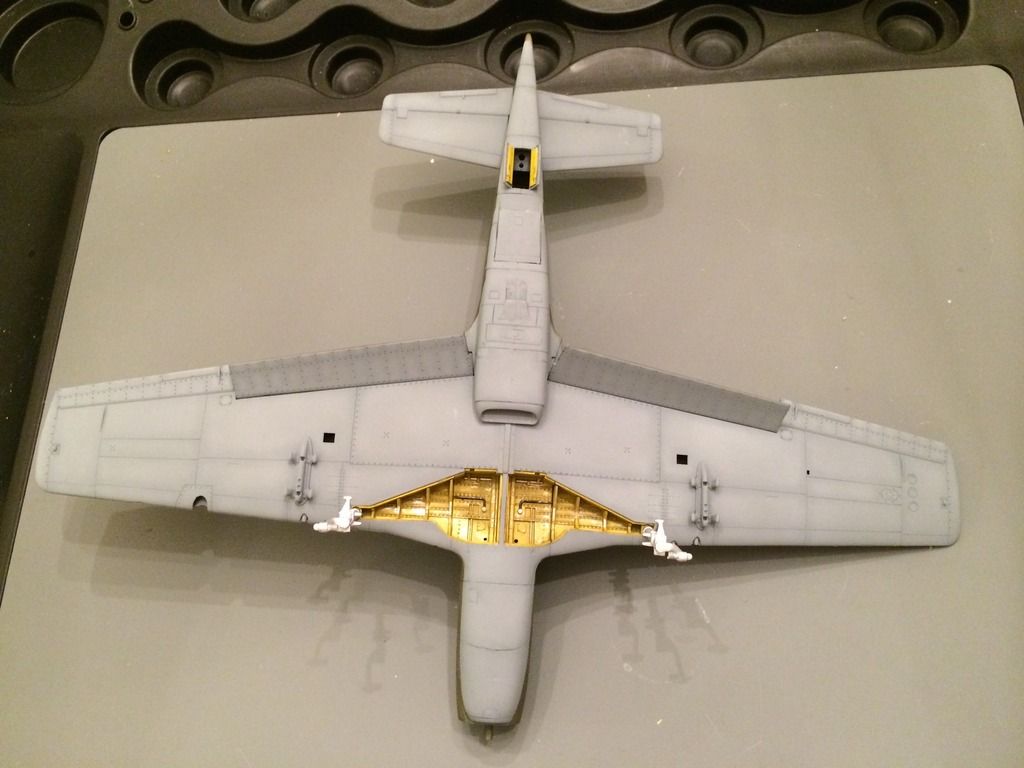
And the underside. I'm not sure if Shangri-La's wheel wells were in the yellow zinc chromate or the more greenish one, but I did find a color photo of an olive drab P-51B that definitely had the yellow zinc chromate wheel wells, so I'm going with it.

Due to my painting technique comprising four coats, I decided to paint the stripes after everything else was done. I may regret this, but hopefully not. I plan on a misting coat of light gray, then following with full white and finally just dusting it with buff to give it a little bit of a faded look if it is too bright. Hopefully that doesn't give me too much of a ridge, but I also plan to cut down on that with some 6000 grit sandpaper followed by 12000 grit micro mesh. 

I must say, it's nice working on a plane I can actually see.

-BD-

  • Member since
    June 2013
Posted by RobGroot4 on Tuesday, April 7, 2015 2:56 AM

Theuns,

 Very nice finish on your F-51!

Brandon,

 I like the way your painting method looks.  To make sure I followed correctly you go with a solid coat (in multiple thin layers) of a darker base color, do the panel lines, and then go over with a lighter final color?  It looks really good!

Groot

"Firing flares while dumping fuel may ruin your day" SH-60B NATOPS

  • Member since
    April 2010
Posted by Theuns on Tuesday, April 7, 2015 3:06 AM

That od really looks good, love the shading showing through.

As for the alclad, if you put a satin coat over the rest of the plane, it should tone down the shine enough to look like raw alluminium.

Theuns

  • Member since
    January 2014
  • From: Toronto
Posted by Rob S. on Tuesday, April 7, 2015 5:34 AM

That shading technique looks fantastic Brandon!! Very well done for sure!!

______________________________________________________________________________


On the Bench: Nothing on the go ATM

  • Member since
    July 2014
Posted by modelcrazy on Tuesday, April 7, 2015 9:08 AM

I like your technique Brandon.

Steve

Building a kit from your stash is like cutting a head off a Hydra, two more take it's place.


http://www.spamodeler.com/forum/

  • Member since
    January 2015
Posted by BrandonD on Tuesday, April 7, 2015 12:58 PM

Thanks for the kind words, all!

Theuns - The method is just a slightly modified version of the one I read on doogsmodels.com. Basically, I use a black primer/light base coat, then lay down the first layer of the main color. The black base coat keeps it dark and helps with the later shading.

After that, I mix the main color 50 percent white, and spray the inside of the panel lines. Then I use a 75 percent thinner/25 percent paint (for Tamiya acrylics) and spray coats over the top to blend until the panel shading is where I want it.

It's more paint, but I like it because I find it easier to control the paint by lightening the panels rather than pre-shading the lines, giving me opportunities to have some panels lighter or darker, and also to keep paint out of the panel lines so they hold a wash better. It does take quite a while, though. Preshading is faster.

Here is how the technique looks on a finished model. Sorry for the 109 contamination in here :)

-BD-

JOIN OUR COMMUNITY!

Our community is FREE to join. To participate you must either login or register for an account.

SEARCH FORUMS
FREE NEWSLETTER
By signing up you may also receive reader surveys and occasional special offers. We do not sell, rent or trade our email lists. View our Privacy Policy.