SEARCH FINESCALE.COM

Enter keywords or a search phrase below:

Mustang Build

80081 views
1582 replies
1 rating 2 rating 3 rating 4 rating 5 rating
  • Member since
    July 2014
Posted by modelcrazy on Tuesday, April 7, 2015 10:34 PM

RobGroot4
Did anyone else notice the cover story for this month's FSM magazine?  Timely indeed!

Yeah, I thought that was cool. You guys who are building the 1/32 Tamiya may find some ideas, also the "New Products" section has the remake of the Phantom Mustang in the original packaging.

Very timely, I wonder if the staff is paying attention to the build, or if it's just serendipitous.

Steve

Building a kit from your stash is like cutting a head off a Hydra, two more take it's place.


http://www.spamodeler.com/forum/

  • Member since
    July 2014
Posted by modelcrazy on Tuesday, April 7, 2015 10:36 PM

BrandonD
Sorry for the 109 contamination in here

That's OK, I see it as a target  Wink

Steve

Building a kit from your stash is like cutting a head off a Hydra, two more take it's place.


http://www.spamodeler.com/forum/

  • Member since
    January 2015
Posted by BrandonD on Wednesday, April 8, 2015 1:53 AM

Well, I went to mask the plane for the stripes tonight. I guess this is one compelling argument for painting the stripes first Whistling

After all that masking, I shot the flaps first to see how it covered, and it took multiple small coats, but after the masking was off, I could barely feel a ridge. I shot the white, and it was pretty stark, as I'd expected. To tone it down, I put in two drops Tamiya buff to 10 drops thinner and misted it over the top a couple of passes. I think it really helped.

Here is the top (and this is actually more accurate to the color of the plane).

And the bottom.

While the airbrush was loaded up with white, I shot the spinner. Next step is masking the cowl and shooting it and the rear portion of the spinner insignia red. I can never get Tamiya flat red to cover over darker colors, so I'll be shooting it with a Model Master enamel. Thankfully Tamiya paints seem to be pretty robust and the olive drab will have had 48 hours to cure by then.

Oh, and yes, I'm going to repaint the rear gear door interiors silver to match the main gear doors.

-BD-

  • Member since
    July 2014
Posted by modelcrazy on Wednesday, April 8, 2015 12:55 PM

Very sharp lines. Nice Yes

Steve

Building a kit from your stash is like cutting a head off a Hydra, two more take it's place.


http://www.spamodeler.com/forum/

  • Member since
    December 2013
Posted by CodyJ on Wednesday, April 8, 2015 4:27 PM

Indeed The lines look great!

  • Member since
    February 2010
  • From: New Jersey
Posted by 68GT on Wednesday, April 8, 2015 5:44 PM

Nice and straight lines!

I didn't like all of the green on the 95 GT so I'm changing it up a bit.  I'm going with a two tone of the green on the bottom and black on the top.

Think I might also go with these wheels also but I'll see when things start to come together.


On Ed's bench, ???


  • Member since
    July 2014
Posted by modelcrazy on Wednesday, April 8, 2015 11:50 PM

That's going to be a great looking Stang GT!

Steve

Building a kit from your stash is like cutting a head off a Hydra, two more take it's place.


http://www.spamodeler.com/forum/

  • Member since
    February 2010
  • From: New Jersey
Posted by 68GT on Saturday, April 11, 2015 7:12 AM

I got some more work done yesterday.

On Ed's bench, ???


  • Member since
    January 2015
Posted by Radial9 on Saturday, April 11, 2015 11:48 AM

I’m wrapping up my Bf109 F-4 for the Messerschmitt GB and turning my attention to the P-51D. I went a bit heavy in the add on department. Figured I can try a bunch and form my own opinions about each option. Might as well give PE a go and see how I get on with it. Besides, I need to start that “spares” pile, don’t I??

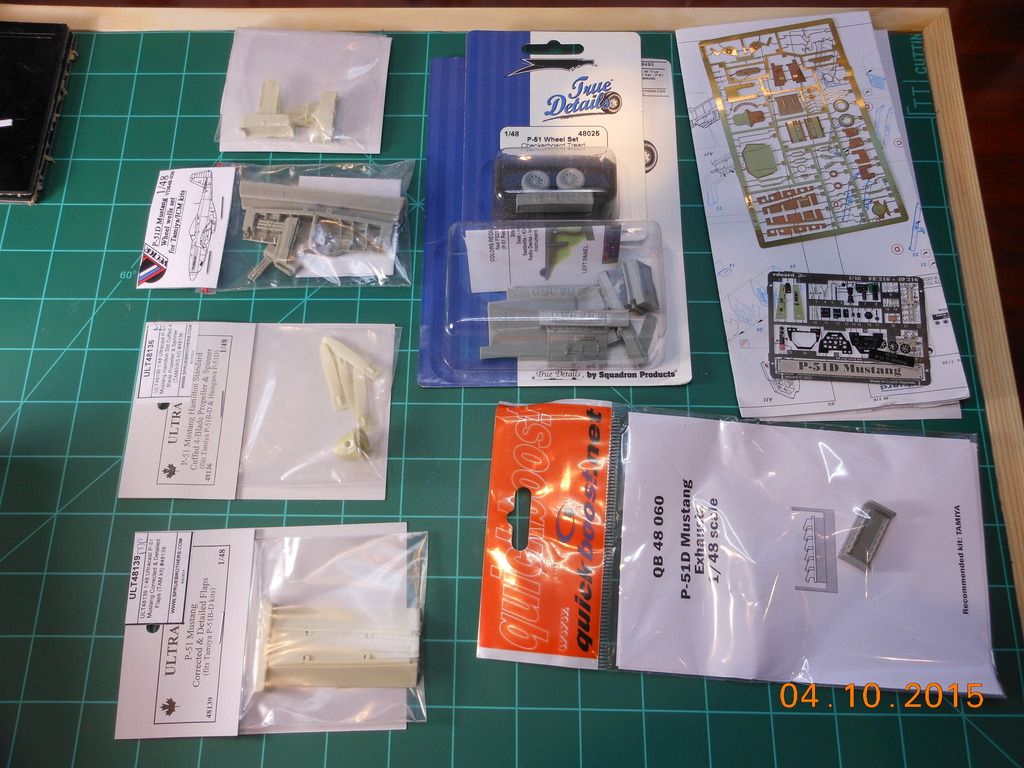
Ended up with AM Eduard PE Interior/Exterior Set, True Details Cockpit Detail Set and Wheels, Quickboost exhausts, Ultra Hamilton Prop/Spinner; seats and corrected flaps, Vector Wheel Wells.

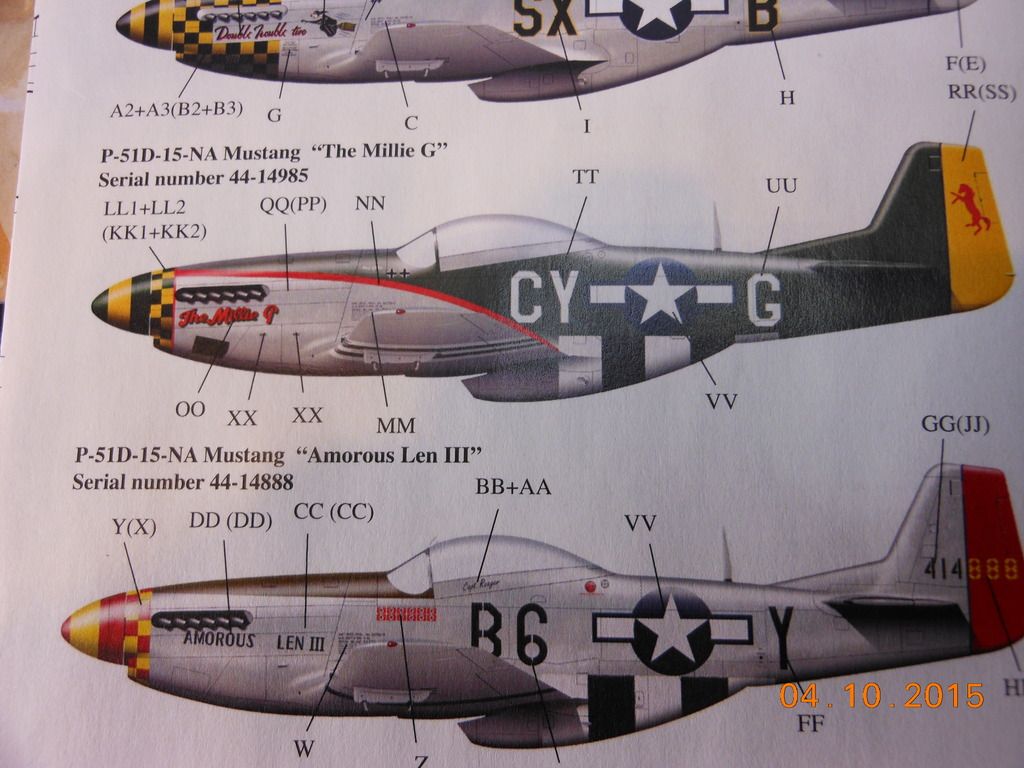
Barracuda Decals P-51D-15-NA Mustang “The Millie G” 55th Fighter Group, 343 Fighter Squadron, 8th Air Force Flown by Major Edward Giller, Wormingford Airfield, England 1944-45. He was the CO of the 343rd.

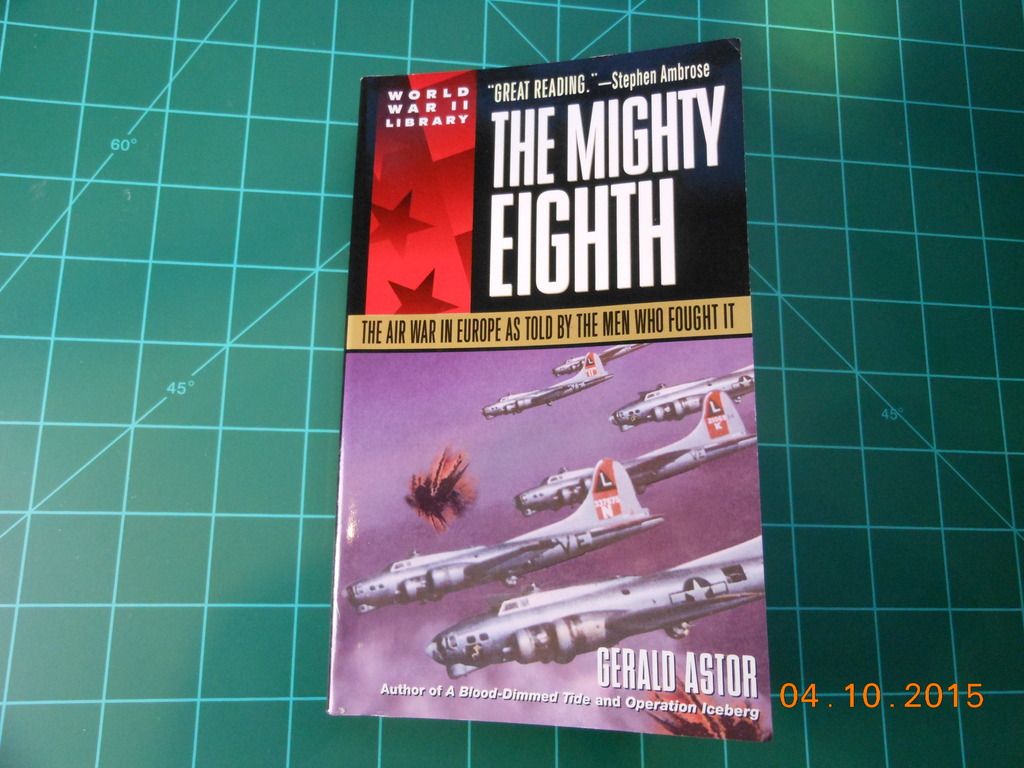
I also show “The Mighty Eighth” by Gerald Astor. I’m about half way through it. A book full of first person accounts of the crewmen and pilots of the air war in Europe within The Mighty Eighth. I will be in the 8th Air Force Museum in Savannah, GA this coming week. Thought it would be good to get at least a little background prior to my spending the day there. Will take as many pics as I can as requested here a few weeks ago.

Have been following the builds here almost daily since joining. Learning a great deal from those that are done and those builds that are still in progress. Some truly impressive work done and being done! Rob, PlasticJunkie, Brandon, Thuens, THANKS for blazing a trail for this newbie! I’m learning every time I visit here. Will be keeping an eye on Pycho and Matt to see how they get on too!

Cheers,

Bob

  • Member since
    July 2014
Posted by modelcrazy on Saturday, April 11, 2015 12:16 PM

GT,

That balck and green are going to look amazing.

Radial,

That is quite the impressive stack of AM you have there. Should make for a fantastic build.

Steve

Building a kit from your stash is like cutting a head off a Hydra, two more take it's place.


http://www.spamodeler.com/forum/

  • Member since
    June 2010
Posted by 5-high on Saturday, April 11, 2015 6:25 PM

 Radial9   Very nice indeed  still waiting for my1/32 AM to arrive seems like forever  waiting for some . But this trump mustang  will a welcome change incomparison to the e.u Revell spitfire I'm finnshing. I'll be watching

  • Member since
    July 2014
Posted by modelcrazy on Saturday, April 11, 2015 11:48 PM

Well I need to get something on page 2, so While I work on the 1/32 Pony and other things I'm going to build the 1/48 Revell D.

It looks like a pretty easy build. The markings are for either "Big Beautiful Doll" or "Miss Merilyn II". I  will probably go with  "Big Beautiful Doll"

Steve

Steve

Building a kit from your stash is like cutting a head off a Hydra, two more take it's place.


http://www.spamodeler.com/forum/

  • Member since
    September 2003
  • From: Northern hemisphere - most of the time-
Posted by blkhwkmatt on Sunday, April 12, 2015 1:33 AM
modelcrazy

Well I need to get something on page 2, so While I work on the 1/32 Pony and other things I'm going to build the 1/48 Revell D.

It looks like a pretty easy build. The markings are for either "Big Beautiful Doll" or "Miss Merilyn II". I  will probably go with  "Big Beautiful Doll"

Steve

I feel the same way. I have been slowly working through the big scale mustang, but felt that I needed a quick build that I could use as a practice build for Alclad. I went with the Tamiya 1/48 scale P-51 B, id guess that it could be added to my build list for this GB as well. I will try and get some pictures up, if I can get Photobucket to stop being stubborn.

Quidquid latine dictum sit, altum videtur!!! - Anything said in Latin sounds profound!


  • Member since
    September 2003
  • From: Northern hemisphere - most of the time-
Posted by blkhwkmatt on Sunday, April 12, 2015 2:23 AM
Since I have never used Alclad II before, I realized that I needed a practice kit before I used the stuff on my big mustang. I went with the 1/48 Tamiya P-51B, and will be using AM decals for LT Overstreet's bird "Berlin Express". I will be finishing her in the markings found here: http://www.cebudanderson.com/357profileberlinexpress.htm Cockpit is OOB with the addition of a few eduard PE placards. Fuselage went together as expected, with only minimal sanding, filling needed around the radiator area. Right now it is primed and has the invasion stripes painted and masked. Need to redo the fuselage white bands to make sure the coverage is right and then they will be masked. Next up will be the gloss black coats as a base for the Alclad.         Here is the final look at the big Mustang Cockpit / engine sub assembly before the fuselage got buttoned up:   Thanks for looking,

Quidquid latine dictum sit, altum videtur!!! - Anything said in Latin sounds profound!


  • Member since
    December 2013
Posted by CodyJ on Sunday, April 12, 2015 2:37 AM

Ed- Nice progress man!

Bob-  Sweet setup and items there!  You look all set!

blkhwkmatt- Wicked cool interior!!!  Superb job!  The detail is extraordinary!

  • Member since
    February 2010
  • From: New Jersey
Posted by 68GT on Sunday, April 12, 2015 8:39 AM

I love that scheme Radial9.

That's a boat load detail Matt!

On Ed's bench, ???


  • Member since
    February 2010
  • From: New Jersey
Posted by 68GT on Sunday, April 12, 2015 10:24 AM

This is probably the last of the modeling for the weekend cause everyone is up now.  I did get a lot done though on various kits.  I got the green on the 95 GT.


On Ed's bench, ???


  • Member since
    July 2014
Posted by modelcrazy on Sunday, April 12, 2015 10:53 AM

blkhwkmatt,

I'm with Cody, that pit looks amazing YesYesYes. Nice job on the invasion stripes, they are a little tricky to get straight. That's going to be a beautiful build man.

GT,

Wow, that is a great looking green. Kinda metallic Sea Foam green Yes. Goes perfect with the black.

Steve

Building a kit from your stash is like cutting a head off a Hydra, two more take it's place.


http://www.spamodeler.com/forum/

  • Member since
    January 2015
Posted by BrandonD on Sunday, April 12, 2015 12:59 PM

68GT - that paint looks great!

I got some time with the P-51B this week. I was able to clear coat it, get the decals on, seal them, then run a panel line wash (really just over the underside and the stripes, since the olive drab is too dark in the shaded areas to make it worthwhile).

I also got the masking off the rear windows and removed the closed canopy that was just tacked on for paint masking. I put on the exhaust stacks and flaps and will be doing the final bits over the next few days. The open canopy is mostly painted - just need the final interior green on the inside of the front canopy, then I'll put it on. Other bits remaining include landing gear, propeller tips, drop tanks, pitot tube and antenna mast.

-BD-

  • Member since
    February 2010
  • From: New Jersey
Posted by 68GT on Sunday, April 12, 2015 3:14 PM

Thanks but I think it's the lighting.  It's the first green I was shooting with but this time it was through an airbrush.  The green is more of the rally Green used on a 69 Camaro.

Looking good there Brandon.

On Ed's bench, ???


  • Member since
    December 2013
Posted by CodyJ on Monday, April 13, 2015 12:02 AM

Brandon-  Nice work!  I see a soon-to-be gallery picture in the near future... :)

68GT- Killer color combo Ed!

  • Member since
    September 2014
Posted by rooster513 on Monday, April 13, 2015 12:01 PM

Brandon that B is looking great! I've just got a quick update for everybody. Progress is slow but pushing forward...Drilled out the cooling vents. Little hard to tell but I promise they are drilled outSmile Should look good once paint is on.

And got the fuselage halves together. Dry fitting wings and such now. Finally starting to look like a plane.

 Keep up the great work everybodyYes

-Andy

-Andy

  • Member since
    January 2014
  • From: Toronto
Posted by Rob S. on Monday, April 13, 2015 7:46 PM

Good call on drillin' out those vents...good call Yes

______________________________________________________________________________


On the Bench: Nothing on the go ATM

  • Member since
    July 2014
Posted by modelcrazy on Monday, April 13, 2015 11:10 PM

that is awesome Rooster. After looking at your work, I wanted to do the same to mine, Revell however, didn't find it necessary to put enough detail in the access panels for me to drill out, Oh well, what do you expect from a model I got from Michaels with a 50% coupon.

Anyway, here's my little pony...see what I did there? my little pony...Ha I kill me.

The pit is typical for an inexpensive Reveliogram, Nice detail, molded in only. The only rescue would be PE, scratch building, or exceptional painting skills, none of which I have.

So here's what I did..... I painted it the best I could.

Well, it's certainly not to the level of whats been going on in here, but it's a start. Tomorrow, time permitting, I'll close up the fuselage and maybe stick the wings on.

Steve

Steve

Building a kit from your stash is like cutting a head off a Hydra, two more take it's place.


http://www.spamodeler.com/forum/

  • Member since
    September 2014
Posted by rooster513 on Tuesday, April 14, 2015 7:32 AM

Thanks guys. That pit looks pretty good to me Steve! You've done a great job on giving it some wear and tear. Seat looks great and love the dry brushing, especially the IP. I used kit decals for the harness and IP and they just didn't turn out right for me. They look way too bright and new compared to the rest of my pit. You nailed it though SteveYes Looking forward to seeing more.

-Andy

  • Member since
    April 2010
Posted by Theuns on Tuesday, April 14, 2015 10:42 AM

Brandon, that is a sweet looking pony, very nice change from the usual NMF.

GT, you car guys amaze me with your skills, on aeries we can get away with some imperfections but not on cars....I must try my hand at a car oneday.

Theuns

  • Member since
    December 2009
Posted by ww2psycho on Tuesday, April 14, 2015 2:35 PM

Does anyone know if the pylons for bombs/drop tanks could be taken on or off? if they were always on are they the same color as the under side of the fuselage?

  • Member since
    July 2014
Posted by modelcrazy on Tuesday, April 14, 2015 6:57 PM

ww2psycho
Does anyone know if the pylons for bombs/drop tanks could be taken on or off? if they were always on are they the same color as the under side of the fuselage?

The pictures I have seen show some with them on and some with them off. Granted the 51's missing the pylons are post war personally owned aircraft, however, that does tell me they were removable. Now, were they were removed in the field? I would say probably not.

As far as color, again the pictures I have seen does show the same color as the underside.

I hope that was helpful.

Steve

Building a kit from your stash is like cutting a head off a Hydra, two more take it's place.


http://www.spamodeler.com/forum/

  • Member since
    December 2009
Posted by ww2psycho on Tuesday, April 14, 2015 10:10 PM

Thanks it helps. I forgot to drill out the holes in the B for the pylons. I'm not going to put them on now.

  • Member since
    July 2014
Posted by modelcrazy on Tuesday, April 14, 2015 10:15 PM

OK, a little progress tonight.

The newer Revell's panels are a much better fit that their older molds. After watching Plasticjunkie's nightmare I was a little concerned. The left wing machine gun bay and lower cowl closed right up. I just need a little sanding and very little filling. The fuselage seams need a little work, but not as much as I was expecting and The wing roots don't look like they need any work at all. The cowl nose, on the other hand, is going to need some work.

That's all folks.

Steve

Steve

Building a kit from your stash is like cutting a head off a Hydra, two more take it's place.


http://www.spamodeler.com/forum/

JOIN OUR COMMUNITY!

Our community is FREE to join. To participate you must either login or register for an account.

SEARCH FORUMS
FREE NEWSLETTER
By signing up you may also receive reader surveys and occasional special offers. We do not sell, rent or trade our email lists. View our Privacy Policy.