SEARCH FINESCALE.COM

Enter keywords or a search phrase below:

Mustang Build

80081 views
1582 replies
1 rating 2 rating 3 rating 4 rating 5 rating
  • Member since
    July 2014
Posted by modelcrazy on Tuesday, April 14, 2015 10:19 PM

ww2psycho
Thanks it helps. I forgot to drill out the holes in the B for the pylons. I'm not going to put them on now.

Well at least you have a choice. My Revell has them molded on so I couldn't remove them without some surgery.

Steve

Building a kit from your stash is like cutting a head off a Hydra, two more take it's place.


http://www.spamodeler.com/forum/

  • Member since
    January 2015
Posted by Radial9 on Saturday, April 18, 2015 8:07 AM
I spent the day yesterday at the 8th Air Force Museum just outside Savannah Georgia. Cannot put into words the experience. Spend a day there if you can. HIGHLY recommended. Took dozens of great pics. The P51 in the museum is hanging from the ceiling, so wasn’t able to get what was asked. I did get some shots of the tail and rudder section, but it is tucked in closely to a Stearman next to it, and they are not "close up" by any measure. They had three Allison engines on the floor, got great close ups of them. Will get it posted in the next few days when I dump my camera. They also have a Bf109 hanging from the ceiling along with a newly restored B17 in the room, The City of Savannah, that is just beyond beautiful. VERY enjoyable day. Spent some time talking with the veteran pilots who were there giving first person accounts of their experiences. They did this museum right. Unbelievable experience. Sorry for the formatting here, posting on my Surface and the rich text will not become "rich". Cheers, Bob
  • Member since
    June 2013
Posted by RobGroot4 on Saturday, April 18, 2015 8:53 PM

Hello all, I figured I'd drop in with a quick update as I won't be doing much modelling for the next couple weeks due to work and family obligations.  I finally managed to get the red painted on my birds.  Going over the OD proved to be a real pain.  2-3 coats of red in and I could barely tell there was any red on it.  Then I hit it with a real light coat of white and that made all the difference in the world.  
This is the first time I've really tried to replace any decals with paint and I'm pretty happy with the results.  I need to straighten up the red on the upper cowling and knock down some light ridges but that will be easy.  This is also the first time I've used Alclad and I'm thrilled with the results.  Anyone building the 51B will notice that there are no ridges along the nose and tail of the drop tanks.  Based on the few reference photos I could find they don't seem to be there.  So I sanded them all off.  I like the streamlined result anyways!  I also painted the red bands on the drop tanks.  The upper stripe that runs longitudinal on the drop tanks didn't turn out great on all of them, but they really won't be visible, so I'm not overly concerned about it.   In any event, pictures-

This one probably shows off the "step here" markings the best

Here are both birds with the spinner caps.

An overhead view

And an overhead sans flash

I also have the prop blades mostly done.  I painted them insignia yellow with Tamiya gloss black over.  I then went back and lightly sanded each one and then polished with Novus and they shine quite nicely.  I need to touch up the yellow in a spot or two where I sanded down to the primer, but I may just opt to cover that up with weathering as props tend to get beat up pretty well, particularly on the edges.  I'll toss on the prop blade decals hopefully this weekend and then attach to the spinners and hit with some flat to knock down the shine.  That's probably it for me for a little while.  

Groot

P.S. I think I'll probably go back and drill out the vent holes in the cowlings.  I'll be doing that after I clean the coffee table!

"Firing flares while dumping fuel may ruin your day" SH-60B NATOPS

  • Member since
    July 2014
Posted by modelcrazy on Saturday, April 18, 2015 10:37 PM

Moving right along Groot. Don't worry about taking some time off, we'll be here.

Steve

Building a kit from your stash is like cutting a head off a Hydra, two more take it's place.


http://www.spamodeler.com/forum/

  • Member since
    January 2006
  • From: Pineapple Country, Queensland, Australia
Posted by Wirraway on Sunday, April 19, 2015 5:38 AM

Hi.  Would like to chime in with the old Bandai 1/24 P51D.  I noticed no-one was building one.  I'll be doing the "Millie G" which is still flying, of course, in Tulsa, Oklahoma.

"Growing old is inevitable; growing up is optional"

" A hobby should pass the time - not fill it"  -Norman Bates


GIF animations generator gifup.com

  • Member since
    July 2014
Posted by modelcrazy on Sunday, April 19, 2015 8:51 AM

I got you down Wirraway. At 1/24, that's going to be one big horse.

Steve

Steve

Building a kit from your stash is like cutting a head off a Hydra, two more take it's place.


http://www.spamodeler.com/forum/

  • Member since
    April 2010
Posted by Theuns on Sunday, April 19, 2015 11:00 AM

" that's going to be one big horse.

  a Clydsdale maybe?  lol

Theuns

  • Member since
    December 2009
Posted by ww2psycho on Sunday, April 19, 2015 8:09 PM

I'll try to have an update by tomorrow night. Didn't realize how far I got from my last posted pictures.

  • Member since
    January 2015
Posted by BrandonD on Wednesday, April 22, 2015 12:43 AM

Groot - those are looking great. I tried to paint my drop tank lines, and I failed miserably. Gave up and used the decals. Fortunately they came out OK, but yours look better. Well done, sir.

-BD-

  • Member since
    January 2015
Posted by BrandonD on Wednesday, April 22, 2015 12:53 AM

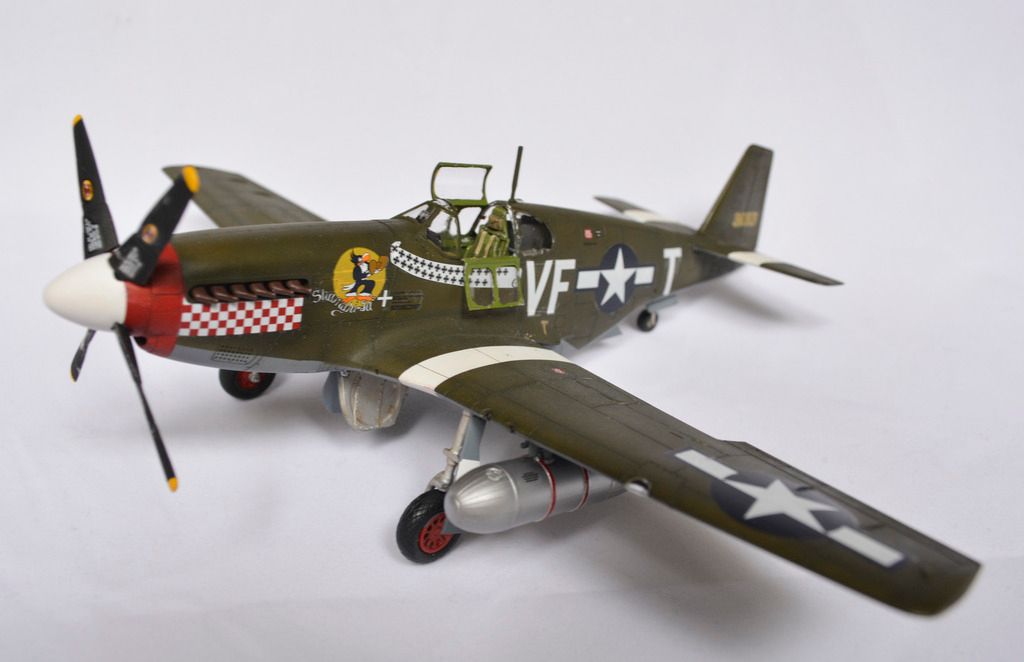
I'm calling this one done. I may go back and weather the exhaust stains and gun smoke streaks, but after doing a lot of looking, I see few WWII aircraft with noticeable exhaust streaks when parked before a mission (as this one has drop tanks attached, it would be prior to a mission).

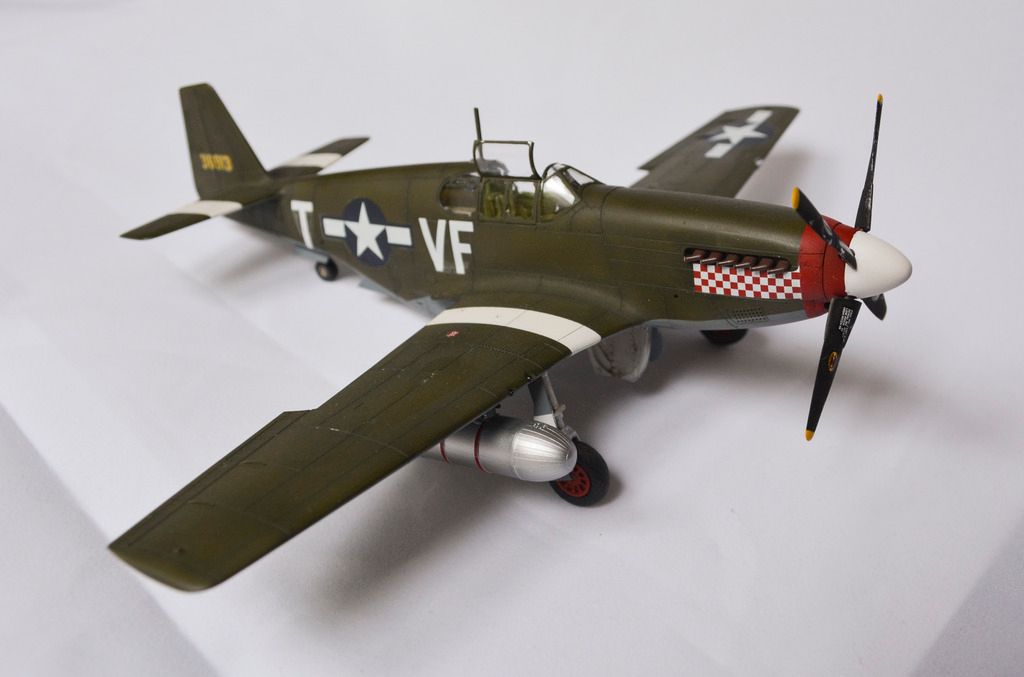
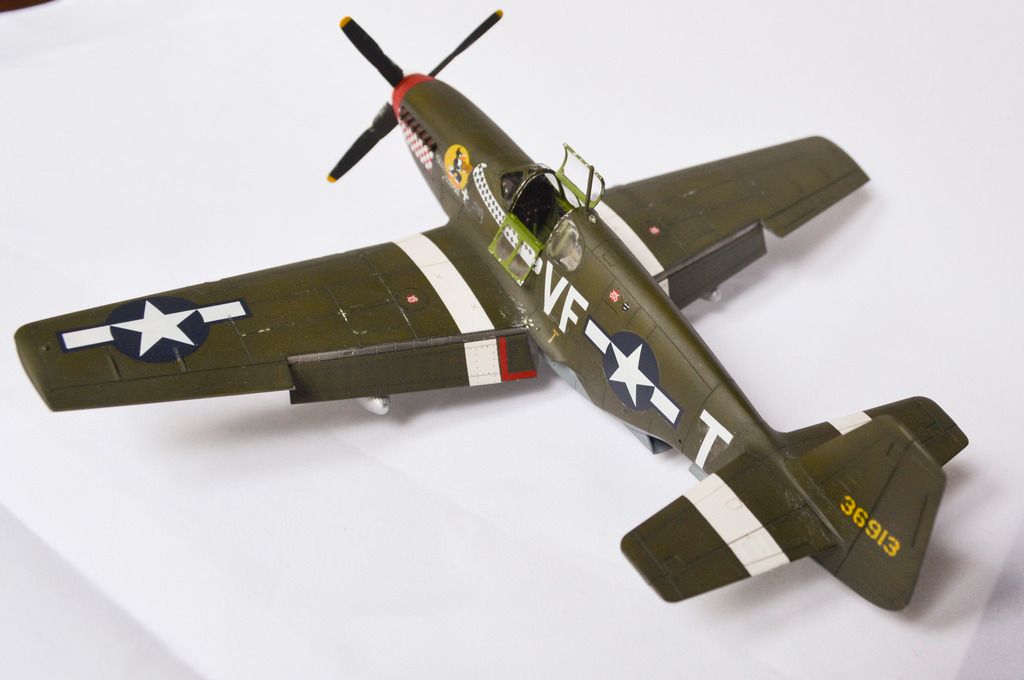
Anyway, here is the 1/48 Tamiya P-51B Mustang in Don Gentile's Shangri-La markings. I really, really enjoyed this build. I had fun painting the stripes, and I tried out some new techniques (masking part of the canopy glass while it was already installed, toning down the brightness of the stripes with a mist coat of buff).

Te kit is mostly stock. The only AM piece is the harness, which is an Eduard PE piece. I think it was sorely needed and completes the cockpit.

Enough talk - you'd all rather look at the pics than read my rambling, I'm sure. I took these shots with my new camera, so for a change you aren't getting cellphone shots, and since it's the finished product, I actually took the time to color correct, and these photos are accurate to what the model really looks like.

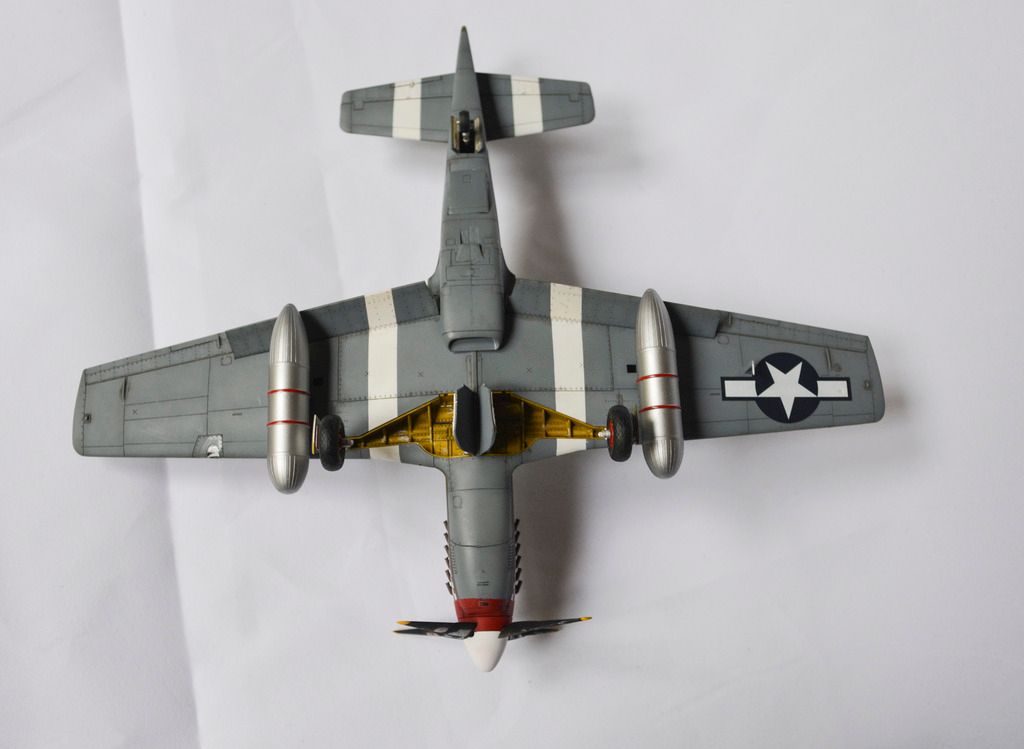
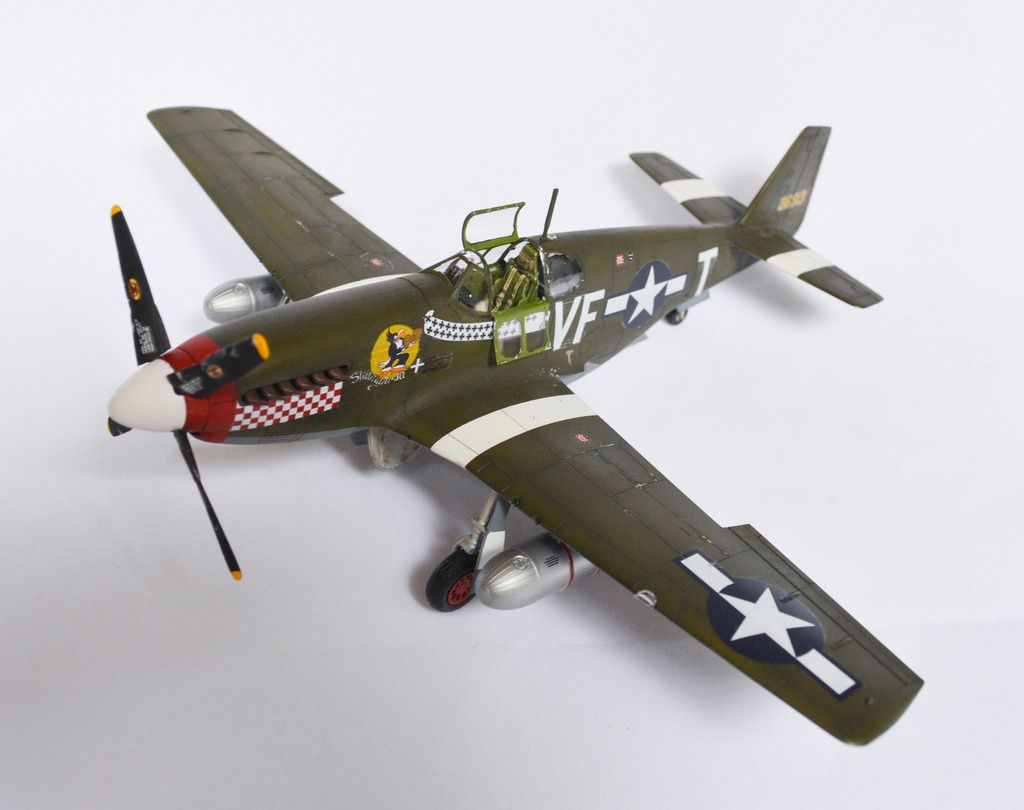
I think I like the fourth photo for the front page, since it shows the flaps down, whereas the front quarter views just look like part of the wing is missing.

If I do end up adding exhaust streaking (did they clean them on the ground after missions?), I will re-shoot a photo for the gallery.

Thanks for looking, all!

-BD-

  • Member since
    January 2006
  • From: Pineapple Country, Queensland, Australia
Posted by Wirraway on Wednesday, April 22, 2015 5:45 AM

really nice work- love the dropped flaps.  well done !

"Growing old is inevitable; growing up is optional"

" A hobby should pass the time - not fill it"  -Norman Bates


GIF animations generator gifup.com

  • Member since
    April 2010
Posted by Theuns on Wednesday, April 22, 2015 6:56 AM

Super build :-)

Theuns

  • Member since
    July 2014
Posted by modelcrazy on Wednesday, April 22, 2015 7:54 AM

Beautiful build Brandon.It really turned out great Yes

Thank you for participating, you really did justice to that classic pony.

Cody will get your pic up as soon as he can.

Steve

Steve

Building a kit from your stash is like cutting a head off a Hydra, two more take it's place.


http://www.spamodeler.com/forum/

  • Member since
    September 2014
Posted by rooster513 on Wednesday, April 22, 2015 11:10 AM

Looks great Brandon!

-Andy

-Andy

  • Member since
    September 2003
  • From: Northern hemisphere - most of the time-
Posted by blkhwkmatt on Wednesday, April 22, 2015 5:55 PM

Well done sir.  looks great and the photos do the bird justice as well.

<Matt

Quidquid latine dictum sit, altum videtur!!! - Anything said in Latin sounds profound!


  • Member since
    December 2003
  • From: Charleston, SC
Posted by sanderson_91 on Wednesday, April 22, 2015 6:59 PM

Great looking work Brandon!

Steve


  • Member since
    December 2013
Posted by CodyJ on Thursday, April 23, 2015 2:51 AM

Great work Brandon, pic is up in the gallery!

  • Member since
    September 2014
Posted by rooster513 on Thursday, April 23, 2015 12:20 PM

A lot of nice work going on here! I've got a quick progress update for your viewing pleasure...Cut out the molded gun barrels after trying (in vain) to drill out the center to add a little interest to them. Before...

And after...

I just plan on cutting a length of brass tube, won't be much but should look better than the mold would have.

And here she is with the wings on. I'm pretty happy with the fit. Shouldn't really require any filler in the wing root which is enough to brighten up any day! (hey it's the little things in lifeSmile)

-Andy


-Andy

  • Member since
    July 2014
Posted by modelcrazy on Thursday, April 23, 2015 12:28 PM

That is a nice fit Andy. I wish I had such good luck with the cowling on my Revell. Oh well  I'll get back to it before long.

I like the idea regarding the guns, should look nice.

Steve

Building a kit from your stash is like cutting a head off a Hydra, two more take it's place.


http://www.spamodeler.com/forum/

  • Member since
    January 2015
Posted by Radial9 on Friday, April 24, 2015 12:33 PM

Here are some of the pics I took at the 8th AF Museum last week. I had a hard time focusing on the Mustang as the camera focus bounced off the Stearman next to it. Tried to get some tail and rudder pics, most did not take. Of course cockpit pics were not possible. Some pics of the Rolls Royce and the Allison sitting on the floor. Got dozens of nice pics of the B17 and the Bf109 there too.

Cheers,

Bob

  • Member since
    August 2014
  • From: Willamette Valley, Oregon
Posted by goldhammer on Friday, April 24, 2015 5:13 PM

I got some closeups of Erickson's P51D tail and flaps and gear bays that I sent MC.  If you need them, just holler and I'll email.

Paul-  with the 1/24th horse, if you haven't already, might cross over with the going big GB going on now as well.

  • Member since
    July 2014
Posted by modelcrazy on Friday, April 24, 2015 11:35 PM

Nice belly pics Radial.

Goldhammer's pics are epic as well.

This is the only museum 51 pic I have. I got it at Boeing's Air and Space museum outside of Seattle. I have a TON of other aircraft including some sweet WW1 stuff.
Caproni Ca 20, S.E.5, Sopwith Triplane, Camel, Fokker Eindecker,  Dr1, DVII, Albatross, Newport 27, Spad, P-47,38, 40, F4U, Yak, Ki-84, Spit, 109E, and that's only the WWI and II subjects.

Steve

Building a kit from your stash is like cutting a head off a Hydra, two more take it's place.


http://www.spamodeler.com/forum/

  • Member since
    August 2014
  • From: Willamette Valley, Oregon
Posted by goldhammer on Saturday, April 25, 2015 11:55 AM

Last time I was up at Boeing was before they put up the big building, what, must be close to 25-30 years ago.  Got to take a w/e and run up there again.....sometime. Only about 250 miles from here.

  • Member since
    June 2008
Posted by lewbud on Tuesday, April 28, 2015 5:37 PM

There's some good stuff going on here!  Itching to get started on mine, but have a couple of builds to get out of the way first.  

Buddy- Those who say there are no stupid questions have never worked in customer service.

  • Member since
    July 2014
Posted by modelcrazy on Tuesday, April 28, 2015 5:57 PM

No worries Lewbud. You still have 15 months to get something done.

Steve

Building a kit from your stash is like cutting a head off a Hydra, two more take it's place.


http://www.spamodeler.com/forum/

  • Member since
    January 2014
  • From: Nampa, Idaho
Posted by jelliott523 on Tuesday, April 28, 2015 6:04 PM

Just thought I'd drop in for a bit and see how everything is coming along.  Looks like everyone is doing some fantastic builds.  I'm still waiting on my -51B to arrive so I can get started.  I've got the decals for the Boise Bee.  You know how life can get in the way at times and with work I've been out and traveling quite a bit lately.

On the Bench:  Lots of unfinished projects!  Smile

  • Member since
    February 2012
  • From: Olmsted Township, Ohio
Posted by lawdog114 on Thursday, April 30, 2015 1:20 AM

I figured I would peek in here.  Great stuff folks...some I've seen already.  Got room for me?  Well here I am here with my Tamiya P-51B.   I'm doing a subject I've always wanted to do, Ralph "Kid" Hofer's Salem Representative from the 4th FG.  Hofer was reportedly sort of a Maverick and not particularly fond of discipline. You'll have that.  I don't think he was one of Don Blakeslee favorites, however, Hofer was also one of the top strafers in the 8th AF and would amass 15 kills before being KIA on June 26th 1944.  Here is my trubute to Hofer's P-51B Serial # 42-106924. 

 p-51

I'm starting with Tamiya's excellent P-51B.  I grabbed an Eduard PE set for the cockpit and Ultracast tires. 

The cockpit was my starting point.  The Tamiya 'pit is passable, better than their D, but not great.  I normally replace it but this time I wanted to see if I could get away with using a bit of color PE.  I used Gunze Aqueous Interior Green which I thibk is dead on  Also, Merlin Mustangs had a flat floor and the kit's is curved.  I didn't feel like fixing it, so I painted it XF-49 Khaki and added Tamiya Clear Orange over it to make it look like wood.  Truthfully, once assembled, the seat hides the curve so no big whoop here.  I  added the PE seatbelts and used the PE instruments.  I thought Eduard did a nice job here and even added the belt stitching. I also added some wiring around the battery to spice it up a bit.   Rather than rehash my whole cockpit process, check out my Dauntless build for an actual tutorial:

 http://cs.finescale.com/fsm/modeling_subjects/f/2/t/160714.aspx


The best part of out of the box parts......everything fits like a glove....


A test fit...I don't forsee issues...

Joe 


 "Can you fly this plane and land it?...Surely you can't be serious....I am serious, and don't call me Shirley"


  • Member since
    December 2013
Posted by CodyJ on Thursday, April 30, 2015 3:08 AM

Oooo Very Nice Joe!!!

  • Member since
    September 2014
Posted by rooster513 on Thursday, April 30, 2015 8:24 AM

Beautiful start Joe! Great to have you aboard. Looking forward to seeing more of this one!

-Andy

-Andy

JOIN OUR COMMUNITY!

Our community is FREE to join. To participate you must either login or register for an account.

SEARCH FORUMS
FREE NEWSLETTER
By signing up you may also receive reader surveys and occasional special offers. We do not sell, rent or trade our email lists. View our Privacy Policy.