SEARCH FINESCALE.COM

Enter keywords or a search phrase below:

Mustang Build

80080 views
1582 replies
1 rating 2 rating 3 rating 4 rating 5 rating
  • Member since
    June 2010
Posted by 5-high on Sunday, January 24, 2016 10:23 PM

from the top

  • Member since
    June 2010
Posted by 5-high on Sunday, January 24, 2016 10:27 PM

no the best pic ..its smooth as a babys bottom

  • Member since
    June 2010
Posted by 5-high on Sunday, January 24, 2016 10:39 PM

a view of the evergreen i used for backing of the exhaust fairing

with the fairing installed

  • Member since
    July 2014
Posted by modelcrazy on Sunday, January 24, 2016 11:08 PM

5, nice progress. I need to learn how to use styrene as a filler.


I completed the PE for the oil tank. The instructions aren't the best so I kinda had to play it by ear.

Steve


Steve

Building a kit from your stash is like cutting a head off a Hydra, two more take it's place.


http://www.spamodeler.com/forum/

  • Member since
    June 2010
Posted by 5-high on Sunday, January 24, 2016 11:22 PM

opp,s double pic,s Embarrassed 

now im ready for the fun part of this hobby i like best......PAINT TIME!!!!

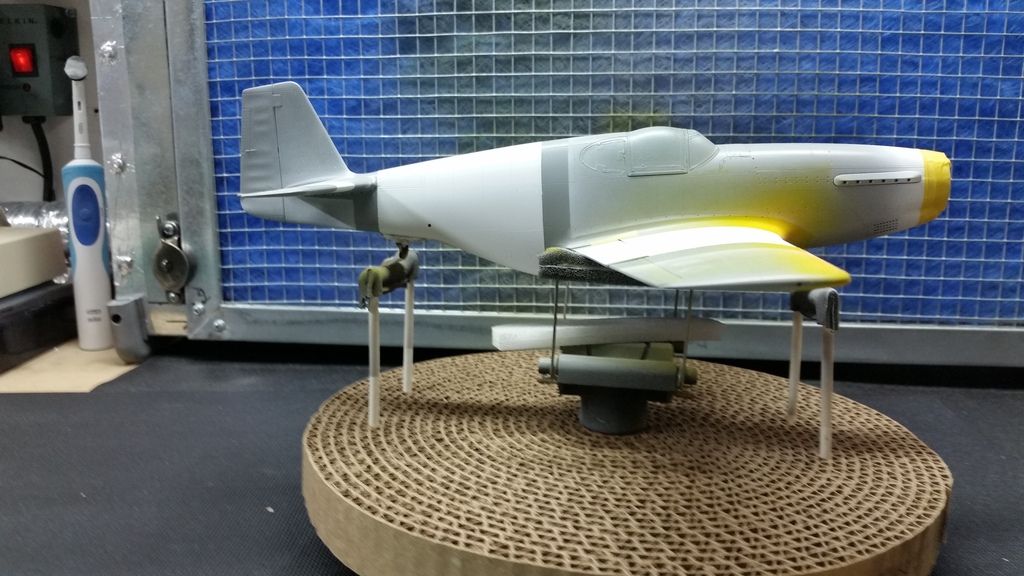
first the yellow then the white for the invasion strip,s 

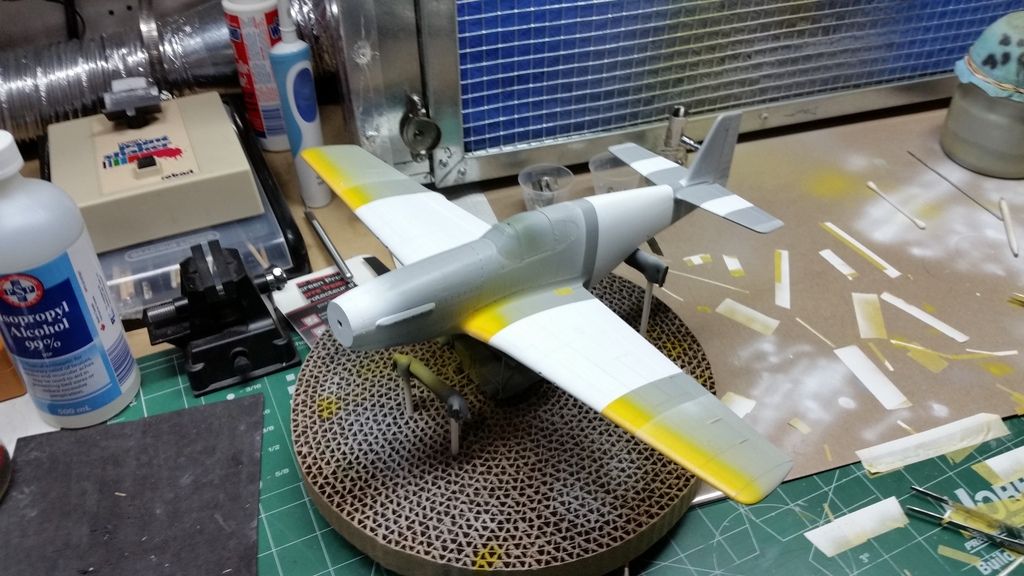
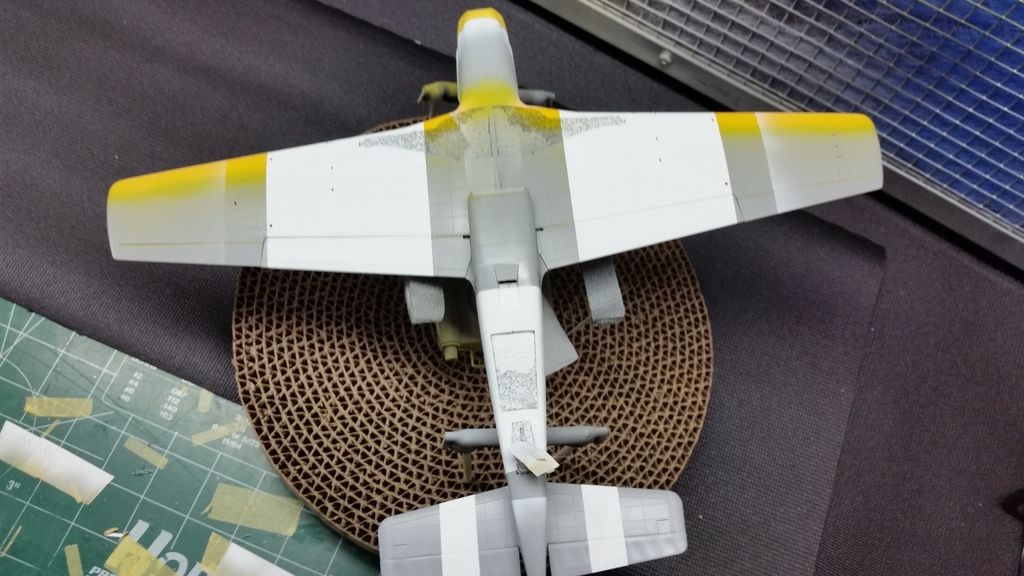
tommaro i,ll share i how to do those uneven " sarg..you want me to paint his ship with ...AHH MOP!!!??...Surprise  .LOOK that i came up with . 

5-high cheer,s Toast

p.s special thanks to BVALLOT for helping me figure out how to post multiple pic,s in one threadBow Down

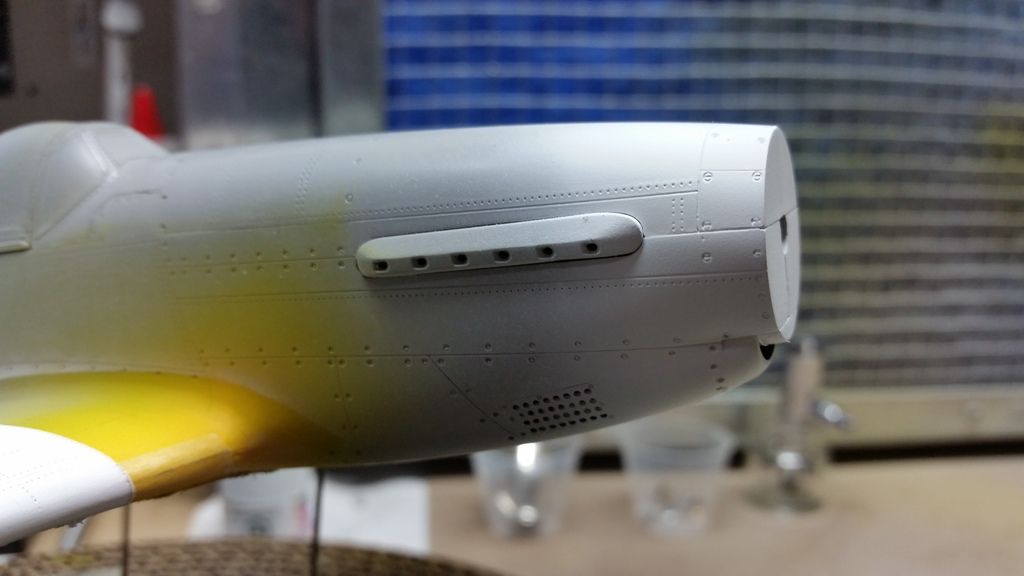
modelcrazy ..WOW!!! thats some great detail on bulkhead and oil tank ..good earWink.

i,ll be happy to share modelcrazy about useing styrene as a filler with yaa

5-high

  • Member since
    July 2014
Posted by modelcrazy on Monday, January 25, 2016 12:27 AM
Yeah, I'm never gotten a tutorial about it so I think I figure it out, but don’t want to ness it up
Seve

Steve

Building a kit from your stash is like cutting a head off a Hydra, two more take it's place.


http://www.spamodeler.com/forum/

  • Member since
    September 2014
Posted by rooster513 on Monday, January 25, 2016 8:06 AM

Don't check my email for a weekend and it's packed with replies from this thread! Love to see how much life it still hasYes

5-high - That mustang is looking sweet!

Steve - Great start on the Merlin! It's going to be a beauty!

-Andy

  • Member since
    July 2014
Posted by modelcrazy on Monday, January 25, 2016 10:28 AM

lzdaily@comcast.net
Steve, The Merlin's looking good so far. What scale is that?

Sorry Larry, I just saw this post. It is 1/18 scale and solid resin. It weighs in scale what a real one would probably weigh.

Steve

Building a kit from your stash is like cutting a head off a Hydra, two more take it's place.


http://www.spamodeler.com/forum/

  • Member since
    December 2015
Posted by Kyuzo on Monday, January 25, 2016 10:38 AM

Here's one of the rims. It's a bit sloppy due to 2 things. 1)my hand brushing skills are not the best, especially with fine detail & 2) the Duplicolor adhesion promoter prove to be a bit too aggressive of a chemical for the plastic that the rims were made out of. It ate away at the surface of the plastic. So it left a lot of excessive texture which shows in the paint. I couldn't Sand it out without messing the rims up further. But I am posting it anyway just to show an idea of what they are supposed to look like when they're done.

Also, no Pete. The color on those rims is Southern Pacific daylight red from Floquil's railroad line. 

Vallot,  that paint work is sick 

  • Member since
    July 2013
Posted by lzdaily@comcast.net on Monday, January 25, 2016 11:07 AM

modelcrazy

No worries. Solid resin, eh. It must weight a ton! I thought the oil tank looked good, that photoetch looks like it was probably a fiddly bunch of bits to get in place.

  • Member since
    July 2014
Posted by modelcrazy on Monday, January 25, 2016 11:07 AM

Well excessive texture or not, that color scheme looks great.

Steve

Building a kit from your stash is like cutting a head off a Hydra, two more take it's place.


http://www.spamodeler.com/forum/

  • Member since
    July 2013
Posted by lzdaily@comcast.net on Monday, January 25, 2016 11:09 AM

Like everyone else on the East Coast, I've had a bit of forced time off. Here's Ding Hao after a quick trip to the paint booth for olive drab over neutral gray with a white nose and ID stripes. Tomorrow I can spray a coat of Future, and then I can start decalling.

Larry

  • Member since
    June 2008
Posted by lewbud on Monday, January 25, 2016 12:54 PM

I just realized I never posted pics of my finished Stang.  Here she is in all her finished glory.  Tamiya's 1/72 P-51D, with Hasegawa decals (probably the only thing they got right).  Markings represent the IDF's Big Wing Squadron.  Started 4 Dec 2015 and finished on 19 Dec 2015.  Either the tailwheel got eaten by the carpet monster, or it's in a box somewhere around my worktable.

I kind of like the third picture best.

Buddy- Those who say there are no stupid questions have never worked in customer service.

  • Member since
    July 2014
Posted by modelcrazy on Monday, January 25, 2016 1:09 PM

Cool Lebud! I've been intrestid in getting this one, did it build up OK? Too bad about the tailwheel. I hate it when that happens.

Steve

Steve

Building a kit from your stash is like cutting a head off a Hydra, two more take it's place.


http://www.spamodeler.com/forum/

  • Member since
    December 2015
Posted by Kyuzo on Monday, January 25, 2016 1:43 PM

Thanx Steve 

  • Member since
    July 2013
Posted by lzdaily@comcast.net on Monday, January 25, 2016 6:17 PM

Ding Hao has been back to the paint booth. Important lesson here. Keep reviewing your sources, even in the middle of building a model. I knew that at some point, the white ID stripe on the vertical tail on the P-51’s was painted over with olive drab. After all my research, I managed to come up with the idea the vertical tail stripe on Ding Hao had been painted over while it still had the standard P-51 canopy. This morning, though, I was looking over my source photos and something bugged me in what I saw. I finally realized what it was: every photo I have of Ding Hao with the standard canopy had the ID stripe, one with the Malcolm hood had the ID stripe, and all the rest with the Malcolm hood did not have the tail stripe. I did a little more research on line and, best I can tell, the ID stripe stayed on the aircraft until after it was fitted with the Malcolm hood. At least I caught it before clear coating and decalling.

Larry

  • Member since
    June 2013
Posted by bvallot on Monday, January 25, 2016 7:00 PM

Good catch.  We've all done something like that before.  I'm already looking at doing another TBF-1 Avenger again to redo the .30 MG on the left cowl that the pilot had.  They were erased in later editions and if you don't dig hard enough, you'll never hear of it.  Makes me so mad to do things like that. 

This looks like an easier fix! =D

On the bench:  

Tamiya F4U-1  Kenneth Walsh


  • Member since
    July 2013
Posted by lzdaily@comcast.net on Monday, January 25, 2016 7:07 PM

bvallot,

It was a fairly easy fix.Smile

Thanks for posting the pics of the lights you made from stretched sprue. Have you ever attempted replacing the teardrop shaped nav lights on a Mustang?

Larry

  • Member since
    June 2013
Posted by bvallot on Monday, January 25, 2016 7:27 PM

You know...I haven't yet.  I'd have to reference a few photos to see how they're set up. Different variants may have updated how they looked.  Some times you have to be careful not to utilize a modern photo that's using something modern.  Either way it's the same set up.

What I'd do for a tear drop shape is create the overall width I need and file it down to the tear drop shape.  I did this for a signal light on the P-40B I completed a while back.  It can be a bit tedious as it's so small.  The trick is to leave attached to the sprue so you have a solid piece to grab.  Smooth and polish until you're satisfied, then clip and work the bottom shape to suit what you need.  Not too much to it.  Just be patient.  If the carpet monster grabs it...screw it.  Just make another.  It's not too hard to do. =]

Trust me.  It's not worth the grief. =]


On the bench:  

Tamiya F4U-1  Kenneth Walsh


  • Member since
    November 2003
  • From: Naples, FL
Posted by tempestjohnny on Tuesday, January 26, 2016 7:34 PM

There is some great builds here.  Time for mine. Both in 72nd scale

Hasegawa P-51B done up as Hell-er Bust

And the Airfix P-51D done as Nooky Nooky

Thanks for looking. John


  • Member since
    July 2014
Posted by modelcrazy on Tuesday, January 26, 2016 8:24 PM

John, That is so cute! After looking at 1/32 and 1/48 Mustangs, a 1/72 looks so tiny.

Steve

Building a kit from your stash is like cutting a head off a Hydra, two more take it's place.


http://www.spamodeler.com/forum/

  • Member since
    June 2010
Posted by 5-high on Tuesday, January 26, 2016 8:50 PM

WOW THAT'S TINY JOHN . I HAVEN'T TOUCHED THAT SCALE SINCE I WAS IN MY TEENS ...GREAT JOB ON THAT TINY LITTLE  INSTRUMENT PANEL Toast

5-high 

  • Member since
    July 2014
Posted by modelcrazy on Wednesday, January 27, 2016 9:40 AM
I completed Moonbeam McSwine. She sits receiving some maintenance, while Bill Wisner, his crew chief and another pilot from the 352nd are in discussion. The Tamiya kit was an exceptional kit that lends itself to an enormous amount of detail. This build was dragging on some though and I just wanted to get it past the finish line.
Comments and critique’s welcome.


Steve


Steve

Building a kit from your stash is like cutting a head off a Hydra, two more take it's place.


http://www.spamodeler.com/forum/

  • Member since
    July 2013
Posted by lzdaily@comcast.net on Wednesday, January 27, 2016 9:50 AM

Steve, excellent job on Moonbeam. The base and figures look great, too.

John, great work on those 1/72 scale Mustangs. The detail on the IP looks really good.

Larry

  • Member since
    November 2003
  • From: Naples, FL
Posted by tempestjohnny on Wednesday, January 27, 2016 10:31 AM
I'd love to take credit for the IP but it is actually the decal from the kit. In this scale it looks great


  • Member since
    February 2015
  • From: California
Posted by PA24-250Flyer on Wednesday, January 27, 2016 12:26 PM

Great job Steve! I really like the way everything ties together to tell a maintenance story! Nicely done!

George

  • Member since
    December 2015
Posted by Kyuzo on Wednesday, January 27, 2016 2:40 PM

That's some seriously awesome work Steve!

  • Member since
    December 2015
Posted by Kyuzo on Wednesday, January 27, 2016 2:43 PM

Hey guys, I know I'm taking my time with the most things that I am building so in the meantime I took it upon myself to build a p-51 C Mustang on my phone. Is it alright to post the pictures of that here?  Please do note that the paint job is just something I threw together it is not an authentic paint job.


  • Member since
    July 2014
Posted by modelcrazy on Wednesday, January 27, 2016 5:21 PM

On your phone? That's intresting, I'd like to see that.

Steve

Building a kit from your stash is like cutting a head off a Hydra, two more take it's place.


http://www.spamodeler.com/forum/

  • Member since
    December 2015
Posted by Kyuzo on Wednesday, January 27, 2016 9:16 PM

K

JOIN OUR COMMUNITY!

Our community is FREE to join. To participate you must either login or register for an account.

SEARCH FORUMS
FREE NEWSLETTER
By signing up you may also receive reader surveys and occasional special offers. We do not sell, rent or trade our email lists. View our Privacy Policy.