SEARCH FINESCALE.COM

Enter keywords or a search phrase below:

RAF 100th Anniversay GB

84967 views
3404 replies
1 rating 2 rating 3 rating 4 rating 5 rating
  • Member since
    March 2015
  • From: Streetsboro, Ohio
Posted by Toshi on Tuesday, May 9, 2017 3:32 PM

On The Bench: Revell 1/48 B-25 Mitchell


Married to the most caring, loving, understanding, and beautiful wife in the world.  Mrs. Toshi


  • Member since
    March 2015
  • From: Streetsboro, Ohio
Posted by Toshi on Tuesday, May 9, 2017 3:34 PM

On The Bench: Revell 1/48 B-25 Mitchell


Married to the most caring, loving, understanding, and beautiful wife in the world.  Mrs. Toshi


  • Member since
    July 2014
Posted by modelcrazy on Tuesday, May 9, 2017 3:56 PM

Those are looking great Toshi.

Steve

Building a kit from your stash is like cutting a head off a Hydra, two more take it's place.


http://www.spamodeler.com/forum/

  • Member since
    October 2016
  • From: .O-H-I-O....
Posted by DasBeav on Tuesday, May 9, 2017 9:34 PM

Supermarine Walrus: Scratchbuilding interior. A tip of my hat to "real modellers" who scratchbuild. It's coming along OK for my woeful skills. I need to clean it up a little(alot)? I tried to make radio headphones...probably ditch that effort. All in all, should look better than what Smer gave me to start with. Paint, hopefully, covers up alot of the flaws. " target="">

 Sooner Born...Buckeye Bred.


  • Member since
    July 2014
Posted by modelcrazy on Tuesday, May 9, 2017 11:16 PM

Is that a spring I see for electronic cableing? What a neat idea.

I sprayed the green on the Spit. I still need to fix some areas. I just havent been able to get pre-shading right. I'll give it another try on another build. I will spray the bottom tomorow night.

Steve

Building a kit from your stash is like cutting a head off a Hydra, two more take it's place.


http://www.spamodeler.com/forum/

  • Member since
    July 2008
  • From: Vancouver, the "wet coast"
Posted by castelnuovo on Tuesday, May 9, 2017 11:42 PM

Some progress here, it looks like a flying thingy Smile


  • Member since
    December 2002
  • From: Bury St Edmunds, Suffolk, England
Posted by Bish on Wednesday, May 10, 2017 2:03 AM

Cheers guys. I came into work early today as the sysetm here is not to bad first thing and just ordered my lead off Amazon. So we will see how long that take. Now got to try and catch up again.

Check, those yellow bombs, i can't remember if they were the colour for the RAF training ordanance or standard colour for pre/eary war live ammunition.

I am a Norfolk man and i glory in being so


On the bench: Airfix 1/72nd Harrier GR.3/Fujimi 1/72nd Ju 87D-3

  • Member since
    December 2002
  • From: Bury St Edmunds, Suffolk, England
Posted by Bish on Wednesday, May 10, 2017 2:05 AM

BrandonK

Wowzers you guys are cranking out some outstanding work. 

Quick update. I've finally got most of the seem work done. Nearly every inch of this kit needed to have the seems fillled. A nice kit and fit is very good, but the seems just would'nt go away. I've started work on the engines and the landing gear are nearly done as well. I have some small things to do and then I'll get the black base down hopefully this weekend.

BK


Looking good Brandon, don't see many kits in black plastic.

I am a Norfolk man and i glory in being so


On the bench: Airfix 1/72nd Harrier GR.3/Fujimi 1/72nd Ju 87D-3

  • Member since
    December 2002
  • From: Bury St Edmunds, Suffolk, England
Posted by Bish on Wednesday, May 10, 2017 2:09 AM

Scott, i know what you mean about a lack of instruction in rigging. My first bi-plane was the Airfix 72nd 0/400, my other half thought it would be nice to try somthing differant Angry. But it took me a lot of digging to work out how the wires go. Some of what i have seen in the larger scales with turnbuckles and so on is just amazing and really looking forwardto seeing how you get on with this.

I am a Norfolk man and i glory in being so


On the bench: Airfix 1/72nd Harrier GR.3/Fujimi 1/72nd Ju 87D-3

  • Member since
    December 2002
  • From: Bury St Edmunds, Suffolk, England
Posted by Bish on Wednesday, May 10, 2017 2:14 AM

Greg

Scott, is that the Dremel drill press stand? Whatever it is, do you like it and/or use it much? I agree, if you can rig a sailing ship as the one you showed us, you can handle this two-winger.

Bish, I forgot it was 11 more months. Yikes, I might have gone with one of my more aggressive (and expensive) choices. But alas, I shall start with one I'm confident to finish. We'll hold down the fort, sorry about the machine. We'll miss you.

CMK, thanks for the info on the Humbrol trainer yellow. I may have to break down and order some Humbrol paint one of these days. I do see an Airfix kit in my future and some of the Humbrol callouts might be hard to match, though I do try to steer clear of solvent based paints.

Gamera, this would be a great week to jump in. If things go as planned, I will be too. We can really make things complicated for Bish when he gets back. Wink


Greg, i will be looking forward to what ever you decide to jump in with.

And ye, like i need things to be more complicated with this thread. Big Smile With any luck the new lead willturn up on Monday. My battery has now gone completly, which is handy seeing as the marking layouts for 2 of my Stukas are pictures off the net.

I am a Norfolk man and i glory in being so


On the bench: Airfix 1/72nd Harrier GR.3/Fujimi 1/72nd Ju 87D-3

  • Member since
    December 2002
  • From: Bury St Edmunds, Suffolk, England
Posted by Bish on Wednesday, May 10, 2017 2:20 AM

Now to catch up on the builds.

Toshi, great work on those engine mounts. You are putting some stunning effort into those.

Das, that is some very nice work there. How did you do the instrument dials. And i think those head phones don't lookto bad. Lovely scratch work.

Steve, i have given up on pre shading. I just end up covering it all no matter how thin i lay it down. The Spit is looking good.

castel, looking nice. Whats the scheme for this one.

I am a Norfolk man and i glory in being so


On the bench: Airfix 1/72nd Harrier GR.3/Fujimi 1/72nd Ju 87D-3

  • Member since
    November 2009
  • From: SW Virginia
Posted by Gamera on Wednesday, May 10, 2017 7:19 AM

Again, looking awesome guys!!! Yes


Greg: Thanks, looking forward to seeing what you bring in too. 


Bish: Good luck, I know how annoying it can be to have your computer go down. I remember a few years ago taking mine to the only repair shop in town that turned out to be mostly incompetent and them taking about three or four visits over a month to screw the thing up worse and worse. I finally just took it about the next shop about 45 mins away to get it finally fixed right. 

"I dream in fire but work in clay." -Arthur Machen


  • Member since
    March 2015
  • From: Streetsboro, Ohio
Posted by Toshi on Wednesday, May 10, 2017 9:41 AM

modelcrazy

Those are looking great Toshi.


Thank you!

Toshi

On The Bench: Revell 1/48 B-25 Mitchell


Married to the most caring, loving, understanding, and beautiful wife in the world.  Mrs. Toshi


  • Member since
    March 2015
  • From: Streetsboro, Ohio
Posted by Toshi on Wednesday, May 10, 2017 9:42 AM

Bish

Now to catch up on the builds.

Toshi, great work on those engine mounts. You are putting some stunning effort into those.

Das, that is some very nice work there. How did you do the instrument dials. And i think those head phones don't lookto bad. Lovely scratch work.

Steve, i have given up on pre shading. I just end up covering it all no matter how thin i lay it down. The Spit is looking good.

castel, looking nice. Whats the scheme for this one.


Thank's Bish!

On The Bench: Revell 1/48 B-25 Mitchell


Married to the most caring, loving, understanding, and beautiful wife in the world.  Mrs. Toshi


  • Member since
    March 2015
  • From: Streetsboro, Ohio
Posted by Toshi on Wednesday, May 10, 2017 9:43 AM

castelnuovo

Some progress here, it looks like a flying thingy Smile


Nice engine work!

Toshi

On The Bench: Revell 1/48 B-25 Mitchell


Married to the most caring, loving, understanding, and beautiful wife in the world.  Mrs. Toshi


  • Member since
    December 2002
Posted by Bossman on Wednesday, May 10, 2017 11:35 AM

Scott -  If my feet were smaller - it looks like I could jump in there and actually move the rudder !  Sweet !    (and nice Constitution too !)

Toshi - Good idea to leave the sprue attached to stabilize those spindly parts while you work with them.  Those Merlins and frames look mighty fine !  I can almost hear them humming.

Beau looks great Brandon.  Very Ominous looking.

Beave - very nicely done detailing - that will add a ton to the appearance of the pit.  I think those headphones look pretty awesome.

Nice Camo Steve.  If the pre-shading don't work, there's always post-shading.   A very pretty bird !

Castel - nice engine work.  Do you have a scheme picked out for this one yet ?   If I ever build a Texan/Harvard - I think this would make a very cool diorama:

Scary - but very cool.

Chris

  • Member since
    October 2016
  • From: .O-H-I-O....
Posted by DasBeav on Wednesday, May 10, 2017 2:32 PM

modelcrazy

Is that a spring I see for electronic cableing? What a neat idea.

I sprayed the green on the Spit. I still need to fix some areas. I just havent been able to get pre-shading right. I'll give it another try on another build. I will spray the bottom tomorow night.


It's just a piece of wire wrapped around an old airbrush needle. "Stole" idea from MBrindos I believe. BTW Great paint job!

 Sooner Born...Buckeye Bred.


  • Member since
    July 2014
Posted by modelcrazy on Wednesday, May 10, 2017 2:36 PM

Still great idea. Being in electronics I have springs that small that would work for that purpose. Thank you and Mike B for the idea.


BTW. The dark green on the Spit looks brown. I didn't notice that when I uploaded it last night.

Steve

Building a kit from your stash is like cutting a head off a Hydra, two more take it's place.


http://www.spamodeler.com/forum/

  • Member since
    October 2016
  • From: .O-H-I-O....
Posted by DasBeav on Wednesday, May 10, 2017 2:38 PM

Bish

Now to catch up on the builds.

Toshi, great work on those engine mounts. You are putting some stunning effort into those.

Das, that is some very nice work there. How did you do the instrument dials. And i think those head phones don't lookto bad. Lovely scratch work.

Steve, i have given up on pre shading. I just end up covering it all no matter how thin i lay it down. The Spit is looking good.

castel, looking nice. Whats the scheme for this one.


Thanks, Bish. The dials I made from Evergreen styrene rod assortment. I'm stiil going to redo the headphones. They look too "Earmuffy" is the technical term, I believe. I thought I was making decent progress then realized I still have the other side of the fuselage....Sad

 Sooner Born...Buckeye Bred.


  • Member since
    March 2015
  • From: Streetsboro, Ohio
Posted by Toshi on Wednesday, May 10, 2017 2:43 PM

On The Bench: Revell 1/48 B-25 Mitchell


Married to the most caring, loving, understanding, and beautiful wife in the world.  Mrs. Toshi


  • Member since
    July 2014
Posted by modelcrazy on Wednesday, May 10, 2017 2:46 PM

Those look awsome Toshi. Are you going to leave the coweling open to see the engine(s)?

Steve

Building a kit from your stash is like cutting a head off a Hydra, two more take it's place.


http://www.spamodeler.com/forum/

  • Member since
    March 2015
  • From: Streetsboro, Ohio
Posted by Toshi on Wednesday, May 10, 2017 3:31 PM

modelcrazy

Those look awsome Toshi. Are you going to leave the coweling open to see the engine(s)?


Yes, most definately!

Toshi

On The Bench: Revell 1/48 B-25 Mitchell


Married to the most caring, loving, understanding, and beautiful wife in the world.  Mrs. Toshi


  • Member since
    July 2014
Posted by modelcrazy on Wednesday, May 10, 2017 3:53 PM

Then if you want, add some ignition wires to them. That would really make them pop. Some small solder wire would work well.

Steve

Building a kit from your stash is like cutting a head off a Hydra, two more take it's place.


http://www.spamodeler.com/forum/

  • Member since
    September 2003
  • From: AandF in the Badger State
Posted by checkmateking02 on Wednesday, May 10, 2017 4:03 PM

Bish

Check, those yellow bombs, i can't remember if they were the colour for the RAF training ordanance or standard colour for pre/eary war live ammunition.

Bish:  I think they are early war live bombs.  I don't know when the color change came about, but by the end of the war, RAF bombs were a dark green.  

The Hampden kit carries markings for John Hannah's plane when he won the VC on 15 September, 1940; maybe early enough for yellow bombs.  At least that's what Airfix says!

Anyway, I researched RAF bombs previous to painting, but didn't come up with much.

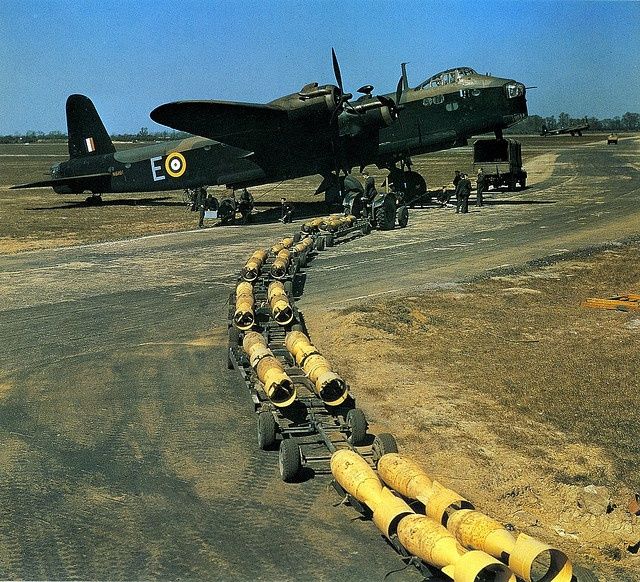
Here's a photo of yellow bombs going out to a four-engine bomber.  It's a Short Stirling, I think, which didn't enter squadron service till early 1941.  Unless it's a photo of a training mission, yellow bombs were still in use.

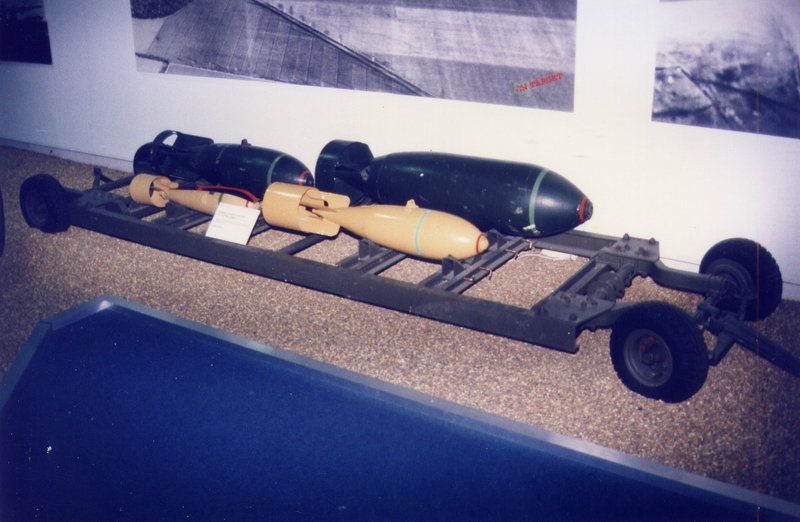
I also found a photo of several types of bombs--some yellow, some green.  Looks like the picture may have been taken in a museum.

From other information on the web, it seems that the British Army and Navy started using a buff color to identify ordinance back in the mid-1800's, and aircraft bombs kept to this through WWI and into early WWII.  The color was changed to a bronze green to help camouflage them in outdoor bomb dumps.  

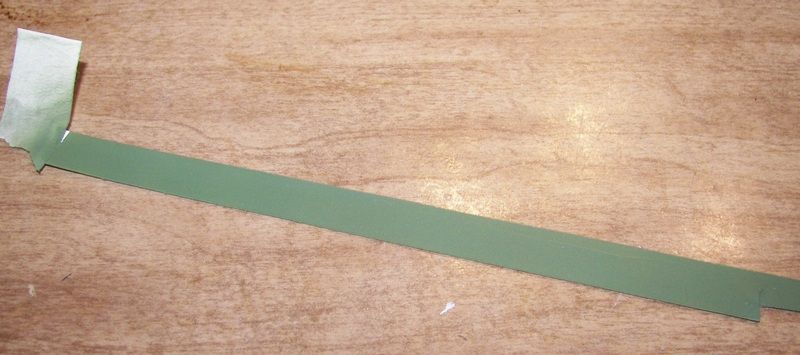
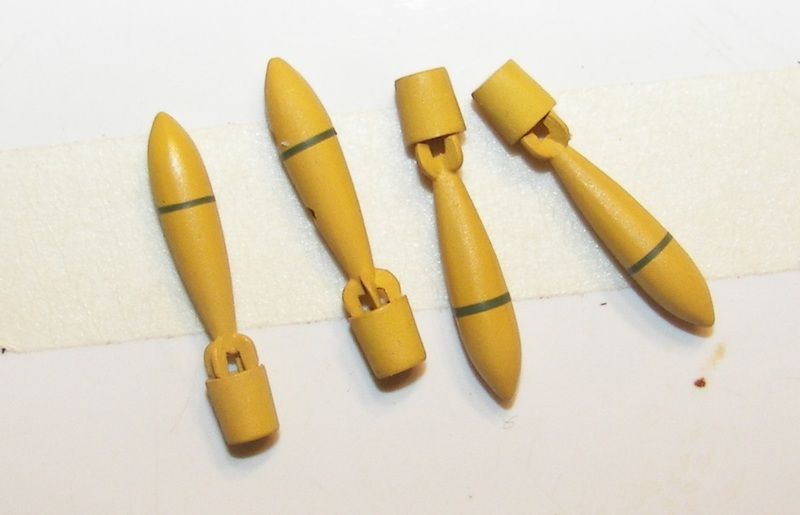
I wanted to dress up the bombs, but couldn't find any green decal stock.  I painted some ink jet white decal stock green then cut stripes.

The green stripe is said to indicate that the bomb used Amatol as an explosive.

A red stripe was added around the nose to indicate that the bomb was filled.

Tried the same thing with painted decal stock for the red band, but it defied my efforts and wouldn't cooperate.  Even though I coated the painted decal with Micro's decal saver, they still just fell apart and shattered.

Based on the first photo above, though, it appears that yellow bombs didn't always carry any striping.

Unfortunate that no one seems to make a decal sheet for marking RAF bombs.  I checked Hannant's, and the only things available were decals for USAAF bombs.

So much for what I could find on British bombs!


  • Member since
    September 2003
  • From: AandF in the Badger State
Posted by checkmateking02 on Wednesday, May 10, 2017 4:05 PM

And--after the bomb lecture:  great work going on, with everyone else.

Yes


  • Member since
    July 2014
Posted by modelcrazy on Wednesday, May 10, 2017 10:37 PM

I have a better picture of the Spit (shows the green) and I painted the bottom. After the pictures I sprayed Future so I can hopefully spray the interior green in the wheel wells (should have done that before) and start the decals tomorrow. I'm at the point were I feel like I'm missing something.

Steve

Building a kit from your stash is like cutting a head off a Hydra, two more take it's place.


http://www.spamodeler.com/forum/

  • Member since
    April 2006
  • From: ON, Canada
Posted by jgeratic on Wednesday, May 10, 2017 10:46 PM

modelcrazy

...

and start the decals tomorrow. I'm at the point were I feel like I'm missing something.


Only thing I see missing is perhaps the Sky coloured fuselange band?  Other than that, looks to be a fine laying of the camou colours.

---------------------

Killer stuff in here everyone, keep it up! Beer

regards,

Jack

  • Member since
    July 2014
Posted by modelcrazy on Wednesday, May 10, 2017 10:54 PM

That's it, thanks Jack!

Steve

Building a kit from your stash is like cutting a head off a Hydra, two more take it's place.


http://www.spamodeler.com/forum/

  • Member since
    December 2002
  • From: Bury St Edmunds, Suffolk, England
Posted by Bish on Thursday, May 11, 2017 2:09 AM

Check, i know what you mean. I know theres a site with plenty of info on German bombs, but very little on British. I am surprised flightpath doesn'tinclude decals, they do a host of nice bomb trolley sets with bombs.

You notice also those yellow bombs in the Stirling photo look 'worn' with new looking tailfins. I have seen this sort of thing on green british bombs as well. And i don't think it is a training sorty, i doubtthey would carry that many.

Some good info and pics there check, and the strips look really nice on those.

I am a Norfolk man and i glory in being so


On the bench: Airfix 1/72nd Harrier GR.3/Fujimi 1/72nd Ju 87D-3

  • Member since
    December 2002
  • From: Bury St Edmunds, Suffolk, England
Posted by Bish on Thursday, May 11, 2017 2:10 AM

modelcrazy

I have a better picture of the Spit (shows the green) and I painted the bottom. After the pictures I sprayed Future so I can hopefully spray the interior green in the wheel wells (should have done that before) and start the decals tomorrow. I'm at the point were I feel like I'm missing something.


Nice work Steve. And yep,know that feeling. Always handy to have a second spare of eyes to spot what you missed.

I am a Norfolk man and i glory in being so


On the bench: Airfix 1/72nd Harrier GR.3/Fujimi 1/72nd Ju 87D-3

JOIN OUR COMMUNITY!

Our community is FREE to join. To participate you must either login or register for an account.

SEARCH FORUMS
FREE NEWSLETTER
By signing up you may also receive reader surveys and occasional special offers. We do not sell, rent or trade our email lists. View our Privacy Policy.