SEARCH FINESCALE.COM

Enter keywords or a search phrase below:

War In The Pacific Group Build 2009 - 2010

225051 views
2012 replies
1 rating 2 rating 3 rating 4 rating 5 rating
  • Member since
    October 2007
  • From: Inland Northwest
Posted by Summit on Friday, September 25, 2009 1:14 PM

Dirk - If your decals are coming off in one piece you can use some "future" to stick them down in place . Brush some on where the decal needs to be. Bad thing is it is really hard to get the solvents to get them to take the shape of rivits , panel lines ect..

This is a 1/48 kit ? I may have a spare set of decals but would not get the chance to look until later this weekend. 

Sean "I've reached nearly fifty years of age with my system." Weekend GB 2008
  • Member since
    March 2008
  • From: New Jersey
Posted by Dirkpitt289 on Friday, September 25, 2009 1:22 PM

 carsanab wrote:


Dirk....Looks like Sandecker has kept you busy..havent seen you around for a bit....looks like your only answer is aftermarket....question.....you are decalling over the coat of future..normally thats not a big deal but could that be the problem??

Carlos

I always use Future first to cut down on the silvering. I really think it was because the decals got wet a while back. I decaled the SBDat the same time and the same way I did my F4U Bunker Hill Corsair and their was no problem with that one.  

Dirk

On The Bench:

B-17F "Old 666" [1/72]

JU-52/53 Minesweeper [1/72]

Twin Me 262's [1/72] Nightfighter and Big Cannon

  • Member since
    March 2008
  • From: New Jersey
Posted by Dirkpitt289 on Friday, September 25, 2009 1:30 PM

Summit

Thanks but my Lil SBD is 1/72 scale 


Dirk

On The Bench:

B-17F "Old 666" [1/72]

JU-52/53 Minesweeper [1/72]

Twin Me 262's [1/72] Nightfighter and Big Cannon

  • Member since
    April 2005
  • From: Monster Island-but vacationing in So. Fla
Posted by carsanab on Friday, September 25, 2009 1:40 PM
Dirk...never used the future method of decalling...Ialway put them down on the painted surface...never had a problem. I do though after they are nice and dry and have settled down hit the whole thing with a shot of dull coat...really gives the decals the painted on look...all the edges dissappear...oh and I always score my decals along the panel lines and hit them with lots of solvent to really get in the panel line and helps them hold on...

Like the others..I have spare 48 decals but no 72' or else you would have been more than welcomed to them.

Carlos

 Photobucket

  • Member since
    March 2008
  • From: New Jersey
Posted by Dirkpitt289 on Friday, September 25, 2009 2:07 PM

Thanks Carlos

I'll have to give that a try sometime soon.

Dirk

On The Bench:

B-17F "Old 666" [1/72]

JU-52/53 Minesweeper [1/72]

Twin Me 262's [1/72] Nightfighter and Big Cannon

  • Member since
    July 2003
  • From: Pennsylvania
Posted by jay12472 on Friday, September 25, 2009 3:45 PM

GUY the corsair is coming along great love the detail in the cowling. Also great pic on cutting the flaps away. I have to try that someday.

John (eatthis ) Welcome abroud! Those are some great looking ships. As I am starting to dabble in ships I will watch closely

Dirk sorry to hear about the decals I only have 48th to

Jason


  • Member since
    February 2006
  • From: Cincinnati Ohio
Posted by DantheMan85 on Friday, September 25, 2009 4:22 PM

Hay Darson, can I enter in a Monogram 1/48 B-29 Superfortress Bockcar?

On my Work Bench: Tamiya Ford GT 1/24

Up Coming: ?


  • Member since
    July 2003
  • From: Bicester, England
Posted by KJ200 on Friday, September 25, 2009 4:39 PM

Guy, nice job on the Corsair.

Looking forward to seeing that one finished...

...so by the end of the weekend then?Wink [;)]

John, that's a mighty fleet you're building there.

Welcome aboard.Sign - Welcome [#welcome]

The Ki-44 is now fully decaled and Futured up, so tomorrow it's time for an oil wash.

For a quick & easy build this really hasn't proved either!

Karl


Currently on the bench: AZ Models 1/72 Mig 17PF

  • Member since
    September 2004
  • From: Vernon, BC, Canada
Posted by razordws on Friday, September 25, 2009 5:55 PM

Dirk, I have a 1/72 scale techmod sheet of the early us roundels that would work.  If you tell me what diameter the roundels are I'll cut out a set and send them to you.  I'm sure we could find something for the numbers too in the spares box which would just leave the stripes on the rudder.  Let me know if this would help.

John, nice looking fleet there.  Can't wait to see more on the Repulse.  Thumbs Up [tup]

Karl, pics... we need pics!!

FieldMarshall, are you sure you couldn't find something bigger for this GB?  Shock [:O]

Dave

  • Member since
    March 2008
  • From: New Jersey
Posted by Dirkpitt289 on Friday, September 25, 2009 9:48 PM
 razordws wrote:

Dirk, I have a 1/72 scale techmod sheet of the early us roundels that would work.  If you tell me what diameter the roundels are I'll cut out a set and send them to you.  I'm sure we could find something for the numbers too in the spares box which would just leave the stripes on the rudder.  Let me know if this would help.

That would be great

The roundels are 9/16 need 4, the strips on the tail are ok (for now). The other decal I would need is the "S" for the tail. The other stuff could be painted on.


Dirk

On The Bench:

B-17F "Old 666" [1/72]

JU-52/53 Minesweeper [1/72]

Twin Me 262's [1/72] Nightfighter and Big Cannon

  • Member since
    September 2004
  • From: Vernon, BC, Canada
Posted by razordws on Friday, September 25, 2009 11:54 PM

Shoot me a PM with your address Dirk and I'll send them off.  I'll take a look through the spares for an S. 

Edit:  I don't have an exact match for the font style but if your looking just for something close I may have several options.  I'll need an approximate size for the S if you are still interested.

Dave

  • Member since
    July 2003
  • From: Bicester, England
Posted by KJ200 on Saturday, September 26, 2009 7:54 AM
 razordws wrote:

Karl, pics... we need pics!!

Later.

I'll try and post some tonight.

Karl

Currently on the bench: AZ Models 1/72 Mig 17PF

  • Member since
    March 2006
Posted by simpilot34 on Saturday, September 26, 2009 8:24 AM

John that is a very nice fleet you have there!!! Looking forward to seeing updates!!!!Thumbs Up [tup]

Dirk, wish I could have helped with the decals!! That is in the scale I build but a plane I do not have yet.Wink [;)]

Feld Sign - Welcome [#welcome]aboard!!!! Darson will be along soon to officially welcome you!!! Had one of those kits once, looking forward to seeing your come together!!! Thumbs Up [tup]

Cheers, Lt. Cmdr. Richie "To be prepared for war, is one of the most effectual means of preserving the peace."-George Washington
  • Member since
    March 2008
  • From: New Jersey
Posted by Dirkpitt289 on Saturday, September 26, 2009 9:25 AM
 razordws wrote:

Edit:  I don't have an exact match for the font style but if your looking just for something close I may have several options.  I'll need an approximate size for the S if you are still interested.

I'd have to see the font before I can say yeah, or Nay. The current "S" is 1/4 x 1/8. If you do then I would need 2 so they would match

Thanks again

Dirk

On The Bench:

B-17F "Old 666" [1/72]

JU-52/53 Minesweeper [1/72]

Twin Me 262's [1/72] Nightfighter and Big Cannon

  • Member since
    February 2006
  • From: Cincinnati Ohio
Posted by DantheMan85 on Saturday, September 26, 2009 11:01 AM

Razordws, yeah I could have.  After doing another B-29 last year, I will learn from my mistakes I did on she.  And this one will look much better.

Simpilot34, Thanks I'm glad to get my Superfortress in a group bulid.  I'm planning on making my Bockcar, in the markings from the 509th bombgroup in 1945.

On my Work Bench: Tamiya Ford GT 1/24

Up Coming: ?


  • Member since
    July 2003
  • From: Bicester, England
Posted by KJ200 on Saturday, September 26, 2009 2:08 PM

In order to placate Dave, some pics of the Ki-44.

I had to very carefully sand out the blemish beneath the victory markings from the setting solution, however touching it up with a brush and some thinned chrome silver worked well.

All the other little bits are painted, including engine, wheels and undercarriage legs, and futured, so tonight.......

(Damatic flourish)

...I apply the oil wash.

Karl


Currently on the bench: AZ Models 1/72 Mig 17PF

  • Member since
    September 2004
  • From: Vernon, BC, Canada
Posted by razordws on Saturday, September 26, 2009 3:36 PM
Oooo... I am soooo placated Karl!!!  It is really looking awesome.  Bow [bow]Bow [bow]

Dave

  • Member since
    July 2003
  • From: Pennsylvania
Posted by jay12472 on Saturday, September 26, 2009 3:59 PM

Karl Great job can't wait to see the next set of pics

Jason


  • Member since
    July 2003
  • From: Bicester, England
Posted by KJ200 on Saturday, September 26, 2009 5:26 PM

Dave, consider yourself officially placated!Wink [;)]

Jason, thanks, it's sitting on my desk looking rather mucky at the moment.

I'll leave it to dry overnight before buffing off the excess.

I don't think I'll go heavy on the weathering on this one, so it should be done in a few days.

Karl


Currently on the bench: AZ Models 1/72 Mig 17PF

  • Member since
    December 2008
  • From: Las Vegas, Nevada
Posted by model maniac 96 on Saturday, September 26, 2009 7:27 PM
Wow, very nice! I will try to post my first update tonight!


Thanks, Jim
"Veni, Vidi, Vici" Julius Caesar: I came, I saw, I conquered.
  • Member since
    March 2006
Posted by simpilot34 on Sunday, September 27, 2009 7:02 AM

Feld, Darson will need a first name when he gets around to adding you to the front page as well, thanks! I had the pleasure of seeing the GENUINE article "Bock'scar" the the USAF museum in Dayton around 1986. I was just awe struck to see her, and so many famous aircraft there!!! If ever given the chance to go back, I will HAVE to buy stocks in Durricell!!! Smile,Wink, & Grin [swg] Looking forward to your build!!Thumbs Up [tup]

Karl, VERYYYYY nice my friend!!!! Can't even tell there was a blemish there now!! Looking forward to seeing her finished soon, not long to go now!!Thumbs Up [tup]

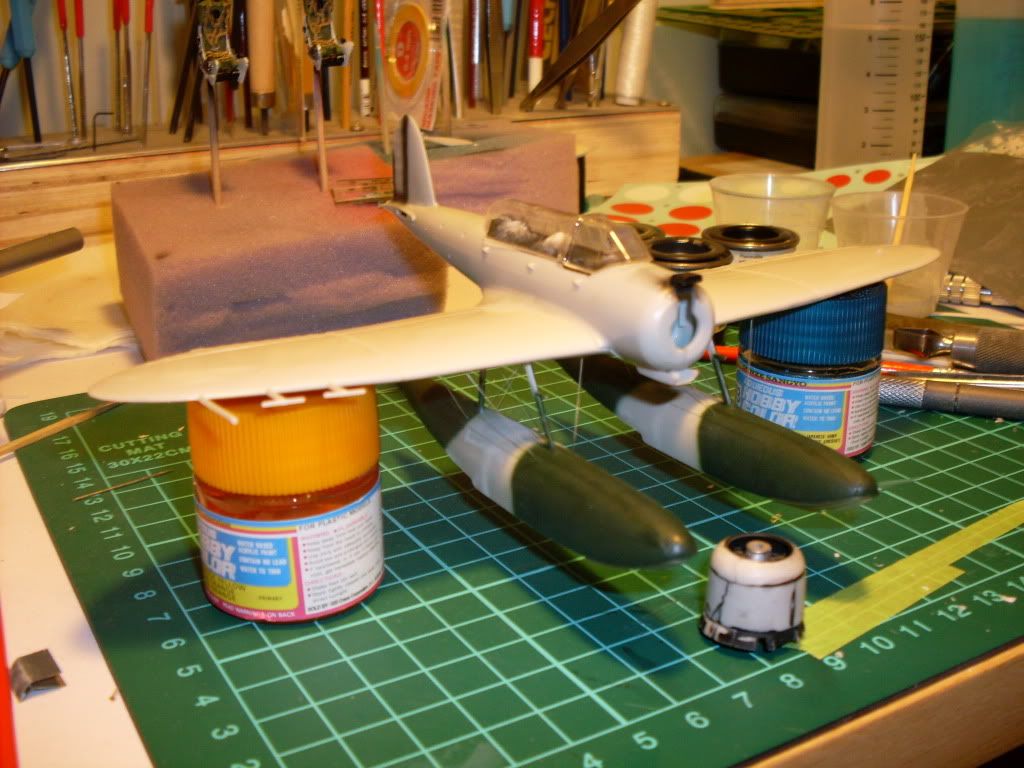
Not much of a progress shot as it is an inspiration shot to me lol!! I placed the falcon vac-form canopy on just to get a feelfor it!, I have sprayed the flat black for the antiglare area under the hoods and the carb intake at the front. Got the oil cooler scoop in place and will have to fanagle the cowl/engine to fit betwixt it all. A bit of preshading on the vertical tail as well. Still haven't glued the fuse to wings yet. I am working on it, honest lol.Big Smile [:D]

Cheers, Lt. Cmdr. Richie "To be prepared for war, is one of the most effectual means of preserving the peace."-George Washington
  • Member since
    July 2003
  • From: Pennsylvania
Posted by jay12472 on Sunday, September 27, 2009 7:14 AM

that looks great up on the floats. I know its 72nd but it looks pretty good sized to me. Is it really that big

Jason

  • Member since
    July 2003
  • From: Bicester, England
Posted by KJ200 on Sunday, September 27, 2009 7:33 AM

Sim, looking good there.

I think we've all had those builds which feel like they will never end.

I'm assuming the seats behind aren't for this build!Wink [;)]

Jim, looking forward to seeing your pics.

Karl


Currently on the bench: AZ Models 1/72 Mig 17PF

  • Member since
    March 2006
Posted by simpilot34 on Sunday, September 27, 2009 9:14 AM

Jason, here is a lil size comparison. It isn't a lil plane by any means, next to my Stringbag.

Karl, hehe you are right, the bangseats in the background are for this,

Airfix 1/48 Buccaneer with PE int and ext and resin wheels, eventually for the FAA GB

Cheers, Lt. Cmdr. Richie "To be prepared for war, is one of the most effectual means of preserving the peace."-George Washington
  • Member since
    February 2006
  • From: Cincinnati Ohio
Posted by DantheMan85 on Sunday, September 27, 2009 12:27 PM

Simpilot34, ok put me down as Daniel.  My last trip to Dayton I took many pictures of the Bockcar.

On my Work Bench: Tamiya Ford GT 1/24

Up Coming: ?


  • Member since
    July 2003
  • From: Bicester, England
Posted by KJ200 on Sunday, September 27, 2009 2:43 PM

Feld, great pics of the big beast.

The oil wash on my Ki-44 has been tidied up, and is now drying off ready for a coat of satin varnish in a couple of days time.

I couldn't resist popping the main parts together to take a few photos.

It looks a little shiny and toy like at the moment, but the satin coat should reduce that.

The cowling and canopy are just resting in place, not glued, for now.

Karl

Currently on the bench: AZ Models 1/72 Mig 17PF

  • Member since
    July 2003
  • From: Pennsylvania
Posted by jay12472 on Sunday, September 27, 2009 3:46 PM

Karl that just keeps getting better the satin should make it  perfect

Jason


  • Member since
    March 2006
Posted by simpilot34 on Sunday, September 27, 2009 8:45 PM

Daniel, thank you for sharing the pics with us!! Was good to see her again! Darson will update the front page when he returns, soon I hope.

Karl, you like to tease us don't you!? Hehe I know what you mean, you just place a couple parts to see how it will look and then you just HAVE to show it, thank you. Can't wait to see her finished!!Thumbs Up [tup]

Cheers, Lt. Cmdr. Richie "To be prepared for war, is one of the most effectual means of preserving the peace."-George Washington
  • Member since
    April 2005
  • From: Monster Island-but vacationing in So. Fla
Posted by carsanab on Monday, September 28, 2009 1:24 AM

Karl...looking good almost there...

Ritchie....another floatie thingy....gotta love them...I remember building or at least trying to build the Nichimo 48 jake....what a disaster of a kit.....that on the other hand is looking good.

Well heres an update on my second floatie......the elves are on the final touchups....they werent up to too much this weekend with the losses of UM and the Dolphins.....oh well.

Pics a bit blury and I noticed theres a patch on the side that i thought i blended in better...need to go back and wash it out....the cowling was a pain to fit right....Im still not happy with it....big gap on top...but Im leaving it alone..the "rub down" weathering was time  consuming but I like the effect.

Will post final completed pics later this week....

Comments as always welcomed.

Carlos

 Photobucket

  • Member since
    March 2006
Posted by simpilot34 on Monday, September 28, 2009 2:33 AM
Thanks Carlos!! WOW that is looking suhhhhwwweeeeet!!!!! Loving hat weathering technique you have!!!!Thumbs Up [tup]Make a Toast [#toast]
Cheers, Lt. Cmdr. Richie "To be prepared for war, is one of the most effectual means of preserving the peace."-George Washington
JOIN OUR COMMUNITY!

Our community is FREE to join. To participate you must either login or register for an account.

SEARCH FORUMS
FREE NEWSLETTER
By signing up you may also receive reader surveys and occasional special offers. We do not sell, rent or trade our email lists. View our Privacy Policy.