SEARCH FINESCALE.COM

Enter keywords or a search phrase below:

Winter Warriors II - The Wintering!

92032 views
598 replies
1 rating 2 rating 3 rating 4 rating 5 rating
  • Member since
    September 2009
  • From: Spring Branch, TX
Posted by satch_ip on Tuesday, December 15, 2009 3:40 PM

Try single ply kleenex tissue soaked in white glue.  I've also heard shirt wrapping tissue works too.

  • Member since
    October 2008
  • From: New Jersey
Posted by oddmanrush on Tuesday, December 15, 2009 5:58 PM

Hey Dupes, that would be an awesome finish, very unique! That is a Type 90 right? You should check out the youtube videos below. They are in Japanese, so unless you're fluent (I am not), you may not understand them (I don't). Never the less (pictures are worth a thousand words anyway), they show a modeler working on a Type 90 and how he fashions the so called tarps and or bed sheets on his model as you had mentioned. Maybe it'll will give you some inspiration.

http://www.youtube.com/watch?v=4VQS_MdvAow

http://www.youtube.com/watch?v=P5JF1qyGiko

http://www.youtube.com/watch?v=C5air9KYdKE

As for my build. I've gone stagnant and haven't touched it since my last post. I've been working on two other projects. My uncle requested a P-51 for Christmas and I'm building another model for a friend. So its slow going for me.

Regards,

Jon

My Blog: The Combat Workshop 

  • Member since
    February 2004
  • From: Second City
Posted by arki30 on Tuesday, December 15, 2009 6:40 PM

Dupes, that would be an awesome scheme to do.  Go for it. Toast

Building Now:

1/48 Academy Bf-109G6 - 100%

1/48 Tamiya F4U-1A - 5%

Upcoming:

1/48 Revell F-14D

  • Member since
    May 2009
  • From: Hobart, Tasmania
Posted by Konigwolf13 on Wednesday, December 16, 2009 1:36 AM

Ok tigers built, in the process of building a small base now.  Next is to decal the girl then, seal, whitewash and weather while the base dries (air dry clay). Then finish the base. 


Andrew

  • Member since
    April 2005
  • From: Piscataway, NJ!
Posted by wing_nut on Wednesday, December 16, 2009 7:50 AM

Dupes that will be very cool.  As previously mentioned, the tissue that comes with shirts is great.  Doesn't pull apart as easy as facial tissue.

I started the T-34 last night.  Nothing worth taking a photo of yet.  Lots of cleans up on the road wheels with every one having huge sprue gates to trim and then sand off the seam since this will hardly be a fresh from the factory vehicle.  As long as i was at it i chunk 'em up to.

Good progress everyone.  Looks like it will be another fine dupes GB.  Anything on the badge yet... or did I miss that post?

Marc  

  • Member since
    November 2006
  • From: Coastal Maine
Posted by dupes on Wednesday, December 16, 2009 9:27 AM

Konigwolf - looks good! What sort of ground are you going to lay down on the base? Going for snow?

Oddmanrush - can't look at the vids here (dialup), but I'll most definitely check them out at the coffee shop later today or tomorrow. Yes

Arki - I really want to bang this guys out...I think you're going to see it happen. Wink

  • Member since
    November 2006
  • From: Coastal Maine
Posted by dupes on Wednesday, December 16, 2009 9:30 AM

Wingy - have not finished the badges yet...looks like I'd best get off my butt and do so though, some of these guys are flying through their builds!

This "shirt tissue" - is that the same stuff used in packing/padding/wrapping Christmas presents?

  • Member since
    April 2005
  • From: Piscataway, NJ!
Posted by wing_nut on Wednesday, December 16, 2009 9:52 AM

Well I found something picture worthy this morning.  In case anyone else goes with this kit, a word of warning.  Check the hull to see if it warp a little.  If so, skip to #4 on the sheet and fit/glue part G1 before installing the suspension arms.  This will pull the hull back in shape and won't twist the arms out of alignment that will likely result in a road wheel floater (not like the one in Austin PowersIck!)  Fortunately I was able to get G1 in and adjust the arms before the glue set.


Here are all the road wheels all chunked up.


Marc  

  • Member since
    November 2006
  • From: Coastal Maine
Posted by dupes on Wednesday, December 16, 2009 10:17 AM

Warp speed, Mr. Sulu! Looks like you took care of it, though.

Hey - if anyone is undecided about something to build armor-wise, just took a look at the instructions for the new DML Wirbelwind - some nifty winter schemes in there if you're so inclined. Yes

  • Member since
    December 2007
  • From: Bridgeview, Illinois
Posted by mg.mikael on Wednesday, December 16, 2009 4:33 PM

dupes- Sweet winter scheme, can't wait to see you pull that one off!

wing nut- Looks like you off to a good start, love the roadwheels.Yes

"A good plan executed now is better than a perfect plan next week." - George S. Patton

  Photobucket 

  • Member since
    December 2007
  • From: Bridgeview, Illinois
Posted by mg.mikael on Wednesday, December 16, 2009 4:46 PM

Okay, now here's my next small update. I basically did a little more hull work(adding texture here and there and attaching a few pieces), but the majority of my work was under the fenders. The classic problem of the fenders not reaching completly to the lower hull was the case here. So to solve that problem I got out the 1/16 thickness basswood(didn't have enough styrene, but I had more then enough basswood sitting around.) All I really did was place the wood where the missing part of the fender should be and made a trace. Then it was a simple matter of getting out the box cutter.

To glue it to the fender, I used gorilla glue, elmer's wood glue, and a touch of crazy glue.(yeah, probably overkill) After that dryed I got out the Testor's Contour putty and filled the gaps, then it was a matter of getting out the sand paper and elbow grease. Unfortunatley, I'm still not done.Bang Head The fenders may be complete, but the lower hull portion doesn't reach up high enough to meet the basswood. That means I now have to expand the height of the lower hull or figure out some other way to fill in the gap.

painting started, so should have another update soon.....

"A good plan executed now is better than a perfect plan next week." - George S. Patton

  Photobucket 

  • Member since
    August 2005
  • From: Long Island, New York, USA
Posted by fjs3 on Wednesday, December 16, 2009 5:10 PM

Still moving along now on this Hs-129 build.  I have painted on the splinter camo and it looked real good, (To me anyway).   Almost changed my mind, BUT I managed to stay on track.  After this is dry, I'll paint on a light coat of a white or really light grey winter distemper.  Here are the shots of the splinter camo...

And here are a few with the Camouflage Grey distemper applied.  I chose the camo grey, because it's already starting out with a little bit of a grubby look to it from the git go.  I have the decals applied, and when THIS step has dried completely, I will hit her with a good flat coat, and then the fun starts, making it a muddy dirty and snowy mess.

When this dries, I will go over the areas of the wings, tail and vertical tail, with 2000 grit sandpaper, that experience the most amount of wear and tear. 

Hopefully by tomorrow, I'll be using the thinned oils and pastels to complete the job.  Then, it's off to the fiddley bits and the "Make a base" shop. 

Thanks for looking at this s o far and I'll post more as time allows.


Freddie from LI

"I'm gonna build all these models one kit at a time!

  • Member since
    April 2005
  • From: Piscataway, NJ!
Posted by wing_nut on Wednesday, December 16, 2009 5:40 PM

YO FREDDIE

What's shakin' bud?  The 129 looks really sweet.  Lovin' the paint.

Marc  

  • Member since
    February 2004
  • From: Second City
Posted by arki30 on Wednesday, December 16, 2009 8:32 PM

Whoa, quick progress on all fronts.  I need to get my butt in gear.

Building Now:

1/48 Academy Bf-109G6 - 100%

1/48 Tamiya F4U-1A - 5%

Upcoming:

1/48 Revell F-14D

  • Member since
    November 2006
  • From: Coastal Maine
Posted by dupes on Thursday, December 17, 2009 8:03 AM

Wow, you know it Arki. Freddie, Mg.Mikael...good stuff! Big Smile

  • Member since
    April 2007
  • From: Schroon Lake, NY
Posted by SMJmodeler on Thursday, December 17, 2009 2:56 PM

dupes

Is this in addition to the HST?

YES!  I have an idea to hook up the Long Tom and have it being pulled by the HST through a nice fresh dump of snow.

  • Member since
    December 2006
  • From: t.r.f. mn.
Posted by detailfreak on Thursday, December 17, 2009 4:29 PM

Very COOL,is it done yet? Heat wave here today,temp. made it to 23 degrees.Past two weeks I do'nt think it got above zero fellas.Kinda goes hand in hand with what we're doing here huh.Looking forward to some pics SMJ.

[View:http://s172.photobucket.com/albums/w1/g-earl828/]  http://i158.photobucket.com/albums/t104/cycledupes/1000Roadwheels4BuildBadge.jpg

  • Member since
    February 2004
  • From: Second City
Posted by arki30 on Thursday, December 17, 2009 10:14 PM

Dupes, as I recall you thought you had this same Hasegawa kit or similar version in the stash.  Quick kit report is...I'm not impressed.

Hasegawa has clearly set this kit up as an attempt to maximize mold use.  There are many parts on the sprues for other Fw-190 variants.  The assembly of the kit is very modular to facilitate the swapping of different pieces to create the different variants.

The problem is that fit isn't all that great, the many extra joints and seams makes the build very fussy, add in a fuselage warp and this thing is a bit of a pain.

And that's a shame because the detail is quite nice.  Just an FYI whenever you get around to building yours.

Cheers

Building Now:

1/48 Academy Bf-109G6 - 100%

1/48 Tamiya F4U-1A - 5%

Upcoming:

1/48 Revell F-14D

  • Member since
    August 2005
  • From: Long Island, New York, USA
Posted by fjs3 on Friday, December 18, 2009 5:00 PM

Hey Marc


We're all good here on the Island.  Just getting ready for the storm, making sure I have plenty of modeling supplies......

Hope things are well by you.  Have a happy healthy and a safe Christmas


Take care and hope to see you during all the shows in springtime.


Freddie

"I'm gonna build all these models one kit at a time!

  • Member since
    November 2006
  • From: Coastal Maine
Posted by dupes on Friday, December 18, 2009 5:02 PM

Wow, surprised to hear about the Hasegawa FW-190...I guess that's why Eduard decided to crank out their series. I'm sure you'll make her look good nonetheless! Yes

  • Member since
    December 2007
  • From: Bridgeview, Illinois
Posted by mg.mikael on Friday, December 18, 2009 5:19 PM

Got quite a bit done the last day or so. I finished painting the lower hull, attached all the roadwheels, fixed the fender gap, added the cast metal texture, and I attached the upper hull to the lower hull.

As you can see from the turret opening, I used more basswood to fix the gap. Simply by gluing it in place at an angle. (yes, more gorilla glue here)

You can probably still see the transition area from the styrene to the wood, but I wasn't going for perfection here since the tracks(and weathering) will cover up anything really noticable. Then to fill in the gap that remained (even after the angled piece of wood was in place), I used some crazy glue and simply relied apon capillary action to fill in any large seams.

All comments, questions, and suggestions welcome!Smile  I'll now be moving onto the tracks and lower hull weathering.

"A good plan executed now is better than a perfect plan next week." - George S. Patton

  Photobucket 

  • Member since
    November 2012
Posted by dioramator on Saturday, December 19, 2009 7:13 AM


Hi All

I feel like I’m dragging the chain here a little, thought I’d better do an update of my progress.

I’m enjoying all the builds so far, MG and Wingy… maybe you should have joined the warped and ill fitting part group build. Wink

Andrew, you are flying along with that tiger… looking good. Yes

My little Kettenkrad is coming along slowly… thank you Mr Optivisor. Person

So here is my first milestone, all the parts cleaned up of mold separation lines.

I still have a few more sub-assemblies to do before I hit it with primer.

I viewed the videos (links) posted by oddy, and that has given me some good ideas on the winter wash (and how to make the frozen muddy slush).

I’ll have to go down to the art supplies and buy some white gouache.

Anyway here is where I am at.


As yet I havn't touched the indy tracks, I'll get some paint on them first


Brett


  • Member since
    September 2007
  • From: Relocating
Posted by Mobious on Saturday, December 19, 2009 8:12 AM

Cool looking builds all! Some very interesting subjects to!

 Is it too late to join up for WWII?

 M0

"It's a problem of applied physics" Roy Brown

  • Member since
    August 2005
  • From: Long Island, New York, USA
Posted by fjs3 on Saturday, December 19, 2009 1:30 PM

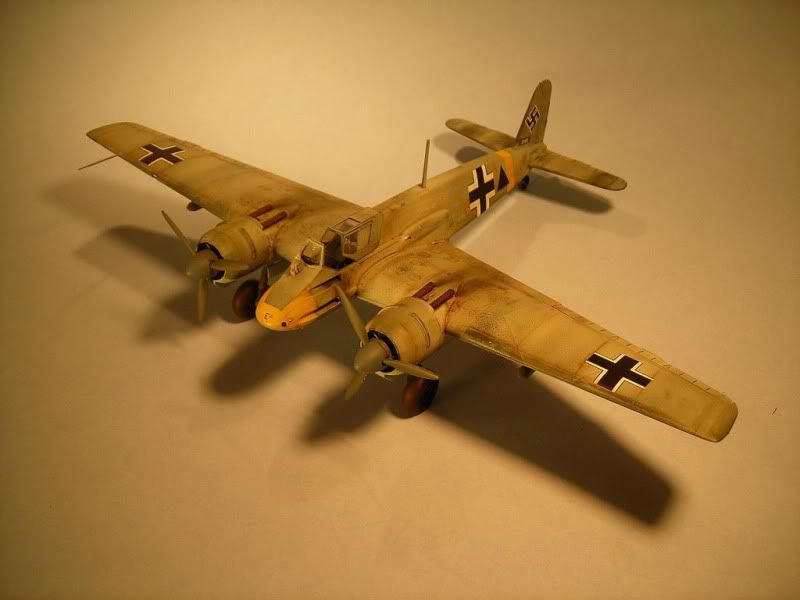
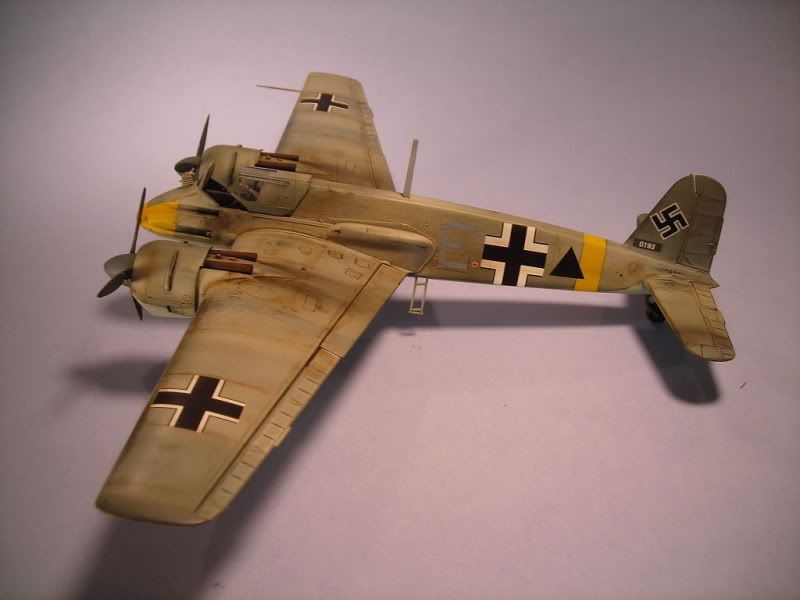
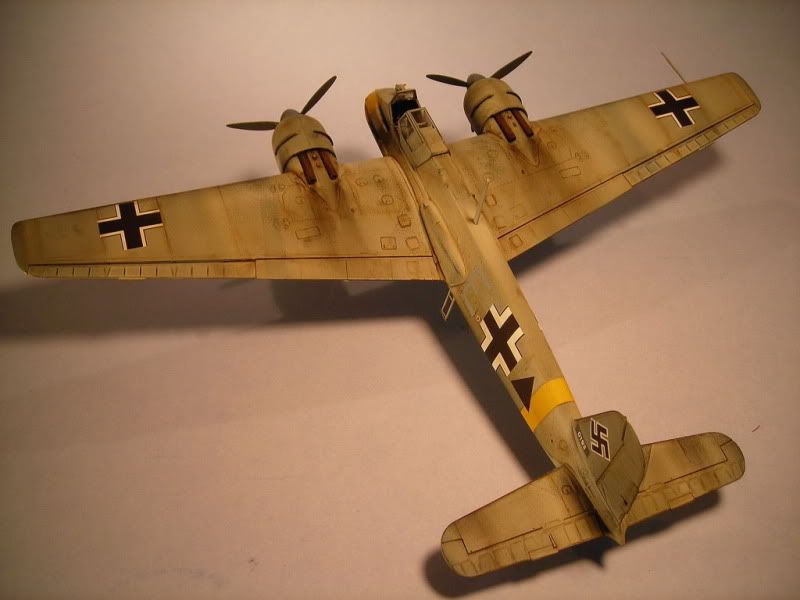
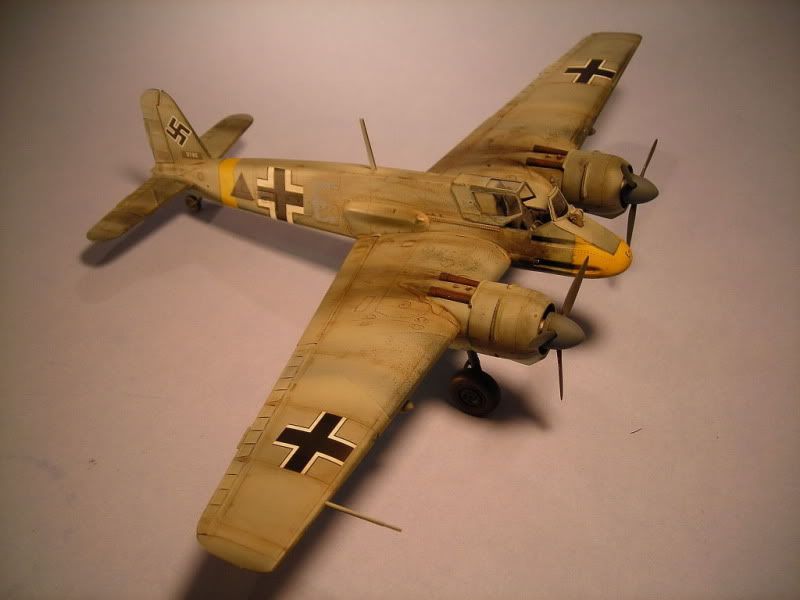
Well, here it is, all finished,...almost.  I applied the flat coat using Testors Dullcoat Lacquer.  After that dried a few hours, the weathering began.  I started off with thinned oils, hitting the panel lines with a 50/50 mix of Grummbacher Black and Burnt Sienna.  I used mineral spirits to thin the paint blob to a coffee like consistency.  I work slowly, hitting a few panel lines at a time, then wiping the excess off, in the dirention of the air flow.  A good thing about oils, is they dry slow, AND you can go back and fix spots that are over done or need more, what ever the issue.  You even have time to fix these spots. 

After the oils have dried, I begin with the pastes.  I have a few items I have "borrowed" from the wife's makeup bag.  Just a few little applicators she had for blush or rouge, that work really well for putting on the pastels.  Again I use a mix of black, grey, and brown.  Sometimes I mix these colors, and other times use them straight up.   I use the make up tools to apply these to the model, using pictures to get the correct patterns.  Pastels can also be washed off if you goof up, and then reapplied.  

Here are the pictures of the nearly finished model.  I still need to put the antenna on, and paint the gauges on the engines.

If you have any questions, don't hesitate to ask.  Thanks for looking at my posts.  Now I'll need to pick another kit from the stash to do another!  Russian maybe?


Freddie from LI


"I'm gonna build all these models one kit at a time!

  • Member since
    November 2006
  • From: Coastal Maine
Posted by dupes on Saturday, December 19, 2009 4:40 PM

Only have a few minutes to get online...not enough time for comments I want to leave.

Good stuff!

  • Member since
    September 2004
  • From: Burke, Virginia
Posted by tellis on Saturday, December 19, 2009 7:22 PM

Got started on the Aufklarangpanzer 38t this week. I've finished the suspension and put on the rear end and fenders. So far have had minor flash and seams to deal with. Ready to paint the interior. It looks like the hull is from an older Italieri kit, the detail is not quite as good as the turret and other new pieces. I'll probably start on the turret tomorrow and maybe get a few pix posted.

T. Ellis

watching over a foot of snow here in VA.

T Ellis  Springfield, VA  http://i158.photobucket.com/albums/t104/cycledupes/WWIIArmorBadge.jpg

  • Member since
    February 2004
  • From: Second City
Posted by arki30 on Saturday, December 19, 2009 8:50 PM

Freddie, wow! Bow Down  Great whitewash, subtle weathering, and speedy to boot.  Well done. Yes

Building Now:

1/48 Academy Bf-109G6 - 100%

1/48 Tamiya F4U-1A - 5%

Upcoming:

1/48 Revell F-14D

  • Member since
    April 2005
  • From: Piscataway, NJ!
Posted by wing_nut on Sunday, December 20, 2009 12:56 PM

MG, Dio... looking good.

Freddie... wow did you make out there opn the island.  I got about 12" where I am.  Pretty light and fluffy though so easy to clear with the blower.  The 129 looks fansatic.  But you have a really great natural stting oustide for it nowWink

Progress has been slow but I managed to get some time at the bench.  Overall the fit is pretty good but the sprue gates are gigantic in places.  The hatch on the rear deck didn’t very well at all.  A little banding and fixing the radius of 2 of the corners and it’s a lot better.  The mud guards, front and rear, were not meant to be removed so there was a little fidgeting and filling of openings needed to get things to looks right. Lots of thinning of the fenders from the under side so they could be bent and dinged.


The kit comes with the photo instructions that, until now, I had only heard about.  Not to crazy about them.  Anyone planning on this kit needs to be careful when it comes to mounting the gun and mantlet.  There is no mention of the parts needed that mount the gun inside the turret.


The bulk of the building is done and now it’s done to adding the fiddly bits before moving on to to paint. 


Marc  

  • Member since
    April 2003
  • From: 41 Degrees 52.4 minutes North; 72 Degrees 7.3 minutes West
Posted by bbrowniii on Monday, December 21, 2009 9:11 AM

Freddie

Nice work on your 129!  Man, you didn't waste any time did you?  Someone already said it, but there is just something about those German multiengine airplanes - they look so utilitarian and tough...

Good job.

'All that is necessary for the triumph of evil is for good men to do nothing' - Edmund Burke (1770 ??)


  • Member since
    April 2003
  • From: 41 Degrees 52.4 minutes North; 72 Degrees 7.3 minutes West
Posted by bbrowniii on Monday, December 21, 2009 9:13 AM

Wing_nut

Lookin' like another masterpiece in the works... got any crazy plans for this one?

'All that is necessary for the triumph of evil is for good men to do nothing' - Edmund Burke (1770 ??)


JOIN OUR COMMUNITY!

Our community is FREE to join. To participate you must either login or register for an account.

SEARCH FORUMS
FREE NEWSLETTER
By signing up you may also receive reader surveys and occasional special offers. We do not sell, rent or trade our email lists. View our Privacy Policy.