SEARCH FINESCALE.COM

Enter keywords or a search phrase below:

Winter Warriors II - The Wintering!

92056 views
598 replies
1 rating 2 rating 3 rating 4 rating 5 rating
  • Member since
    April 2005
  • From: Piscataway, NJ!
Posted by wing_nut on Thursday, December 31, 2009 1:42 PM

DF, Mike... Thanks guys

DF... I never time any of my builds but with the holiday slow down and lots of free time I have been putting in several hours a day for the least week or so.

Marc  

  • Member since
    November 2006
  • From: Coastal Maine
Posted by dupes on Thursday, December 31, 2009 2:54 PM

Marc - that is one hot looking T-34, my friend! Not much time right now, so I'll ask my "how did you do that" questions later. Yes

When I can make the badges look the way I want I'll put them up. I won't let you get away without one. Planning on an a/c build...?

  • Member since
    December 2007
  • From: Bridgeview, Illinois
Posted by mg.mikael on Thursday, December 31, 2009 3:26 PM

bushi- Lookin' forward to seeing some progress on your King Tiger. Is that 1/72 scale?

wing nut- Now that's one nice T-34! Gotta love the white wash, but I'm especially lovin' the mud caked lower hull and tracks.Yes

"A good plan executed now is better than a perfect plan next week." - George S. Patton

  Photobucket 

  • Member since
    January 2008
  • From: Hickory, NC
Posted by Bushi on Thursday, December 31, 2009 7:23 PM

mg.mikael

bushi- Lookin' forward to seeing some progress on your King Tiger. Is that 1/72 scale?

Mikael: Yes it is 1/72 Scale. It is a Dragon Kit.

Starting with as many subs I can get together. Then paint double coat in Dark Yellow, Thgen I will try free hand camo before whitewash. I am going to try the white pastel chalk method mixed with water to do the whitewash.  Then go back after it has dried, and with a stiff brush  remove some of the wash. Then weather.

Everyone Keep your Fingers Crossed Big Smile

Bushi


  • Member since
    December 2007
  • From: Bridgeview, Illinois
Posted by mg.mikael on Thursday, December 31, 2009 9:00 PM

bushi- You're engine area is lookin' good! Nice and dirty.......doesn't get any better then that.Stick out tongue

"A good plan executed now is better than a perfect plan next week." - George S. Patton

  Photobucket 

  • Member since
    November 2012
Posted by dioramator on Friday, January 1, 2010 7:07 AM


I can’t believe it has nearly been a month since my last post, the silly season is upon us!


Bushi – that King Tiger looks like it is coming along nicely

Wingy – your T-34 looks fantastic, nicely weathered indeed

Mg.mikael – love those welds, they should show up nicely when you put down your wash.

Andrew – Looking forward to your next update, that tiger is looking sweet. What did you use for the white wash?

Arki30 – how are you going with those huge gaps on the wing roots? (I’m glad I’m not having to deal with them)

Freddie – Nice job on the HS-129. It looks great with the subtle camo scheme showing through the white.

Dupes – started anything yet? (other that the badges) Huh?


Me – I seem to be spending a lot of time at the bench without getting much done, this little kit has presented me with a few headaches (not impressed Mr Dragon)… add me to the ill fitting parts build.

I had the thing primed all nicely, but when it came to assembly there was some filling and scratchbuilding to be done, but at least now I have the main body done (I haven’t even touched the tracks yet).
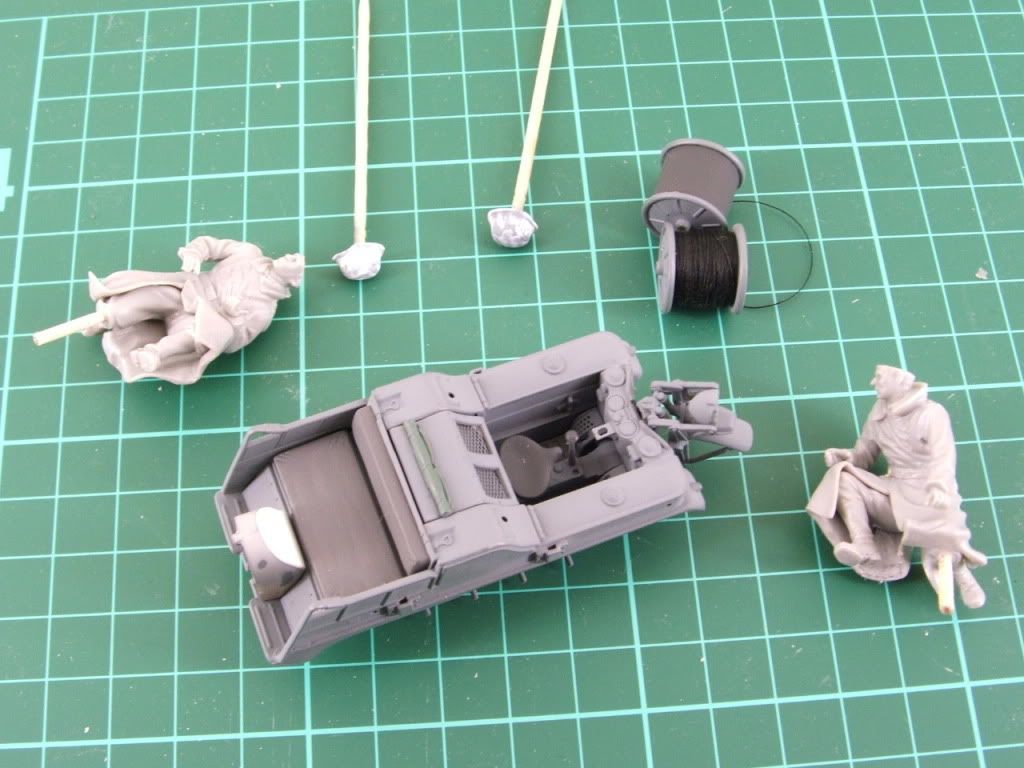
 

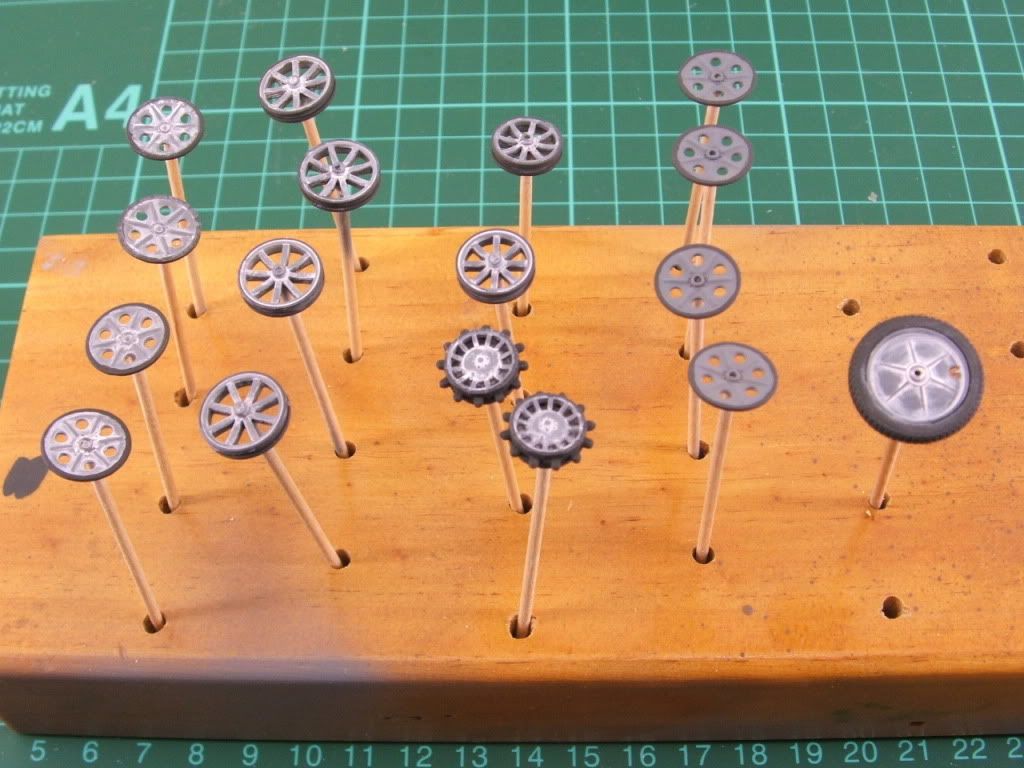
I had a bit of an experiment with the white wash using white gouache, liberally applied to the matt paint (Tamiya XF-66), and (once dry) removed with a damp Q-tip. I’ve done the helmets (above) and the outer wheels. I’m pretty happy with the result, and will be using that technique on everything.
 

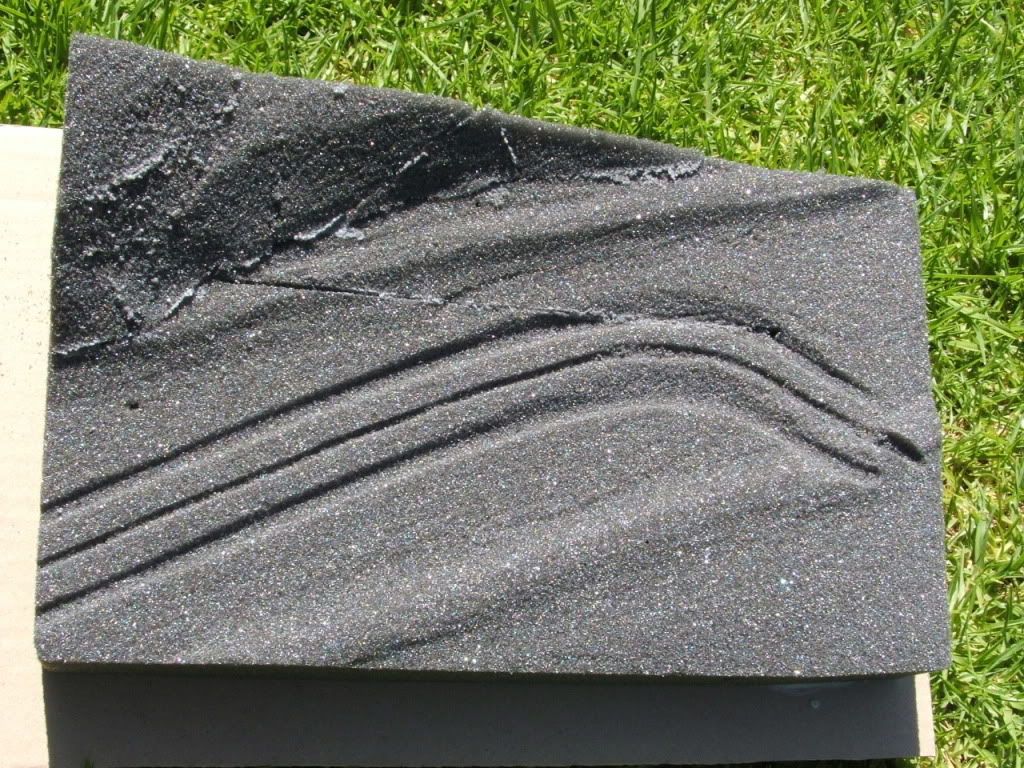
As a stress buster I did some work on the base over the last couple of days. I’m using expanded polyurethane, which is great to work with. As you can see, I will be depicting the Kettenkrad with a thrown track, that has skewed off into the snow bank.
 

Hopefully this build will soon shift into second gear, and with a bit of luck, it will be less than a month before my next update.

Brett


  • Member since
    January 2008
  • From: Hickory, NC
Posted by Bushi on Friday, January 1, 2010 12:16 PM

Well here is where I am at so far. All sub together and painted. Later to today, finish build then weather a little the try the chalk white wash.

Everyone's build looking good.

Bushi

  • Member since
    December 2006
  • From: t.r.f. mn.
Posted by detailfreak on Friday, January 1, 2010 2:44 PM

Just in from the 1000 Roadwheels.Thought I might jump over here and post a little update: been working on the P.E. pile,theres a lot of it.The fenders are all P.E...A little out of practice when it comes to soldering this tiny stuff.But I did get to try out my new butane soldering torch,nice but takes a little getting used to.Got plenty of clean-up work...Also I just about have the gun assembly finished.Its only those OH CRAP I BROKE IT OFF AGAIN pieces to contend with...And lastely I got  the upper fighting compartment resin in place...Have more progress but no pics yet.  Great job so far Everyone.

[View:http://s172.photobucket.com/albums/w1/g-earl828/]  http://i158.photobucket.com/albums/t104/cycledupes/1000Roadwheels4BuildBadge.jpg

  • Member since
    December 2007
  • From: Bridgeview, Illinois
Posted by mg.mikael on Friday, January 1, 2010 5:58 PM

dioramator- That kettenkrad is coming along nicely. Dang, their's alot of pieces in such a small build.

detailfreak- You certainly have alot of patience to deal with all that PE and resin. I probably would have said "screw it" and start building it OOB.Big Smile

"A good plan executed now is better than a perfect plan next week." - George S. Patton

  Photobucket 

  • Member since
    January 2008
  • From: Hickory, NC
Posted by Bushi on Friday, January 1, 2010 8:20 PM

Ok everyone' I have started the whitewash but not sure if  i am headed in the right direction. I am going to build up the wash in layers. I just need some advice if I am going in the right direction.

On a second note I am going to display with the back deck off to show the engine compartment. I was wondering if I should also leave the two deck covers off also?

Bushi


  • Member since
    November 2006
  • From: Coastal Maine
Posted by dupes on Saturday, January 2, 2010 9:30 AM

Hoped to sit down for a few hours today to get organized, but the two feet of snow coming today has changed that...coffee shop is closing. Will have to wait until Monday or Tuesday to get those badges worked out. Embarrassed

On the brighter side, there's a TON of good looking stuff getting cranked out! Nice job, fellas!

  • Member since
    December 2007
  • From: Bridgeview, Illinois
Posted by mg.mikael on Saturday, January 2, 2010 4:24 PM

bushi- Sorry, but I can't really offer up any advice. If anything I'd do more harm then good. Nevertheless I think your white wash is progressing nicely.

dupes- Yikes, two feet of snow! (and I'm complaing about the two inches that fell here in the past few days.Embarrassed)

  ---------------------

As for myself, I've fiished the basecoat of Russian Armor Green on the JS-II and I've started the white camo scheme. It's progressing slowly, but so far I'm happy with the results(the engine deck/grills are nearly finished.) Hope to get a pic up later today.

"A good plan executed now is better than a perfect plan next week." - George S. Patton

  Photobucket 

  • Member since
    December 2007
  • From: Bridgeview, Illinois
Posted by mg.mikael on Saturday, January 2, 2010 9:36 PM

Okay here's my update.....the added texture on the turret was a success(and I made sure I didn't go overboard with it this time.) The build is under a coat of MM Russian Armor Green and now it's "go" time with the camo I've been practicing. It's MM Flat White applied with a brush based off the one web pic I found(unknown unit.)

The engine deck is 99% completed, I still have to darken a few of the marks and touch up some things, but other then that I belive the camo is done in that particular section.

This is the web pic that the winter camo is based off of............so do you think my camo is a success so far or does it need to be re-worked? Any and all comments, questions, and suggestions appreciated.

"A good plan executed now is better than a perfect plan next week." - George S. Patton

  Photobucket 

  • Member since
    February 2004
  • From: Second City
Posted by arki30 on Sunday, January 3, 2010 8:46 AM

I think as a base layer it works fine.  However, to pull off the final look of the last picture you'll have to shoot a thin white layer to tie it all together.  That may be your plan anyway.

Keep plugging away.

Building Now:

1/48 Academy Bf-109G6 - 100%

1/48 Tamiya F4U-1A - 5%

Upcoming:

1/48 Revell F-14D

  • Member since
    January 2008
  • From: Hickory, NC
Posted by Bushi on Sunday, January 3, 2010 9:02 AM

Mikael it looks fantastic. Keep up the good work. lookinf forward to seeing it finished.

Oh I have figured out the back deck issue. I should have the finished pics up later today.

Bushi

  • Member since
    December 2007
  • From: Bridgeview, Illinois
Posted by mg.mikael on Sunday, January 3, 2010 9:55 AM

arki30- Hmmm....white layer. I think I'll try to pull something like that off in the weathering stage (I have a wash that might work perfectly.)

bushi- Glad my camo is lookin' good so far. (Can't wait to see your King Tiger all finished up.)

"A good plan executed now is better than a perfect plan next week." - George S. Patton

  Photobucket 

  • Member since
    January 2008
  • From: Hickory, NC
Posted by Bushi on Sunday, January 3, 2010 5:40 PM

Well here is my final on the 1/72 KingTiger. I was a very fun build.

Thanks Dupes for another fun GB

Bushi

PS: Can you believe 3 build done in 11 days. I don't think I will try this again. Big Smile


  • Member since
    January 2003
  • From: Hancock, Me USA
Posted by p38jl on Sunday, January 3, 2010 8:20 PM

Hey Marc, I think I'll get in on this one to..

I gota find a referance, but put me down for an M-10Smile


Chris

[Photobucket]

  • Member since
    December 2007
  • From: Bridgeview, Illinois
Posted by mg.mikael on Sunday, January 3, 2010 10:31 PM

bushi- Nice King tiger, I especially love the fact you left the engine panel off, really adds to the detail.Yes My only complaint is some of your pics are fuzzy and out of focus. Did you zoom in from far away(in other words a few feet), do you have the macro fuction on? 

"A good plan executed now is better than a perfect plan next week." - George S. Patton

  Photobucket 

  • Member since
    November 2006
  • From: Coastal Maine
Posted by dupes on Monday, January 4, 2010 8:36 AM

dioramator
Dupes – started anything yet? (other that the badges) Huh?

As a matter of fact, I couldn't work on the last bits of painting on my Pz.IV last night while watching the Jets pound on Cincinnatti, so I hauled out the Type 90 to give her the pre-build inspection. I am getting VERY excited about this build - between the quality of the kit, the cool add-ons I've got for it, and the crazy paint scheme, it's going to be a ton of fun! Hope to start it later this week. Btw, your Kettenkrad is looking super! Can you talk to me about what gouache is, and how it works?

Mg.Mikael - I think you nailed the look in that photo! Arki is right, you will need a thin white overspray, but the "squiggles" are spot on! I would try going super thin (like 10/90% paint to thinner) and build it up slowly. Yes Fortunately the forecasted "two feet" ended up only being 19 inches or so...still enough to keep me outside plowing and shoveling most of the weekend. Super Angry So, my IV isn't done yet (see above), and neither are the badges (coffee shop closed). It looks like I need to get those done stat, due to the fact that...

...Bushi has finished another build already! Yikes! I second the request for some more in-focus pics, but from what I can see it came out very well.

Tons of great work guys, keep it up! Off to do inventory in the fridge, hope to get back on later today.

  • Member since
    November 2006
  • From: Coastal Maine
Posted by dupes on Monday, January 4, 2010 8:48 AM

Chris - I'll add you to the front page!

Pretty sure you won't have any problems finding pics of an M-10 in whitewash...if the internets fail you, I've got some books you can take a look at. Yes

  • Member since
    November 2006
  • From: Coastal Maine
Posted by dupes on Monday, January 4, 2010 8:51 AM

Shoot, forgot to ask...is that the Academy or AFV Club M-10? (assuming 1/35 scale)

  • Member since
    January 2008
  • From: Hickory, NC
Posted by Bushi on Monday, January 4, 2010 8:22 PM

Ok here are hopefully some better pics. Sorry do not have a macro setting.

Bushi


  • Member since
    December 2007
  • From: Bridgeview, Illinois
Posted by mg.mikael on Monday, January 4, 2010 8:56 PM

bushi- Ahhh, much better pics. Now I can really see your engine deck.....very nice.Yes

---------------------

As for myself the camo is coming along......made a few mistakes(they weren't really mistakes, but I was unhappy with how some areas looked) so I touched them up. Other then that the camo is moving along and I should have the camo done tommorrow. (hull is nearly finished, just have to do the turret.) So that said I'll try to get some pics up tommorrow.......it's looking pretty wicked!Stick out tongue

"A good plan executed now is better than a perfect plan next week." - George S. Patton

  Photobucket 

  • Member since
    January 2008
  • From: Hickory, NC
Posted by Bushi on Monday, January 4, 2010 9:22 PM

Hey mikael Thanks  abunch glad you liked the pics. I can't wait to see you camo'd up.

Bushi

  • Member since
    November 2012
Posted by dioramator on Tuesday, January 5, 2010 7:28 AM


Dupes - Here is a littl bit about gouache

Gouache is a type of paint consisting of pigment suspended in water. It differs from watercolour in that the particles are larger, the ratio of pigment to water is much higher and it is heavier and more opaque, with greater reflective qualities. It will only adhere to a matt surface.

It is diluted with water and remains water soluble even after drying. I keep a range of colours mixed in bottle caps, and just add water when I need to use them, they stay wet on the brush for a long time, and I use them for hand-painting chips and scratches. I also use if for chipping with Scotchbrite®, the beauty of this compared to the masking fluid technique is that I can see the results immediately, and if the chipping is overdone, it is easily removed with a damp Q-tip.

Gum Arabic is used as the binding agent, which can cause problems if it is not sealed, as this medium will absorb moisture from the atmosphere, expanding and contracting, which will eventually strip the underlying paint back to the plastic… which I found out on my Leopold rail gun… but that’s another story.

For white wash, I decided to use Gouache rather than chalk/ water mixture, because it does not leave a residue when removed, that you tend to get with (pastel) chalk.

I'm just about to the stage of applying the white wash, and with luck being on my side, I will post another progress report within a couple of days

Brett


  • Member since
    January 2003
  • From: Hancock, Me USA
Posted by p38jl on Tuesday, January 5, 2010 9:29 PM

Hi Marc, my M-10 is an AFV Club kit,, 1/35 scale..

[Photobucket]

  • Member since
    November 2007
  • From: Toronto Ontario
Posted by Hellcat man on Tuesday, January 5, 2010 9:43 PM

I've painted the interior and am begining to place things, I also ordered my first set of friul tracks and was wondering i anyone had any pointers on using them.

 ALEX ZELYK

  • Member since
    December 2007
  • From: Bridgeview, Illinois
Posted by mg.mikael on Tuesday, January 5, 2010 9:47 PM

Yipee! The camo is finally finished, it took me three days but it's done! Now it's onto the final stretch....weathering. This is also where I may have a trick up my sleeve for giving the build a subtle, overall white appearance that ties in everything. Hope to get started on the first wash tommorrow. But enough of me talking, here's the pics.Big Smile     

PS: I now it's sorta strange to be asking this so late into the build. Nevertheless does anyone have any specifics about what unit carried this camo or where it saw service. Yes, I tried my sources, but to no success. If you have any info, it would be greatly appreciated.

"A good plan executed now is better than a perfect plan next week." - George S. Patton

  Photobucket 

  • Member since
    February 2004
  • From: Second City
Posted by arki30 on Tuesday, January 5, 2010 10:30 PM

That's just cool!  Mg, sweet camo work, although if I squint just right it appears the tank is infested with maggots.  Big SmileWhistling  Eagerly awaiting the final effect.

Speaking of infested, this thread has too much armor in progress!  I need to help bring balance back with some progress pics of my own. 

With the holidays past and a GB finished, I can focus on the 190.  When I left off, there were gnarly gaps at the wing joints due to a warped fuselage.

Some styrene strips cut and inserted into the gaps, and voila.  Filled!  Mostly.  Whistling  A bit more sanding and then some putty to fill the remainder and smooth it all out.

Engine is also painted.  Not much detail, but this is all about OOB.  Besides, with the tight cowl of the 190, you can't see much of it anyway.

Cheers!

Building Now:

1/48 Academy Bf-109G6 - 100%

1/48 Tamiya F4U-1A - 5%

Upcoming:

1/48 Revell F-14D

JOIN OUR COMMUNITY!

Our community is FREE to join. To participate you must either login or register for an account.

SEARCH FORUMS
FREE NEWSLETTER
By signing up you may also receive reader surveys and occasional special offers. We do not sell, rent or trade our email lists. View our Privacy Policy.