SEARCH FINESCALE.COM

Enter keywords or a search phrase below:

FW-190 Reich Defender III 5/10-2/11

437378 views
1810 replies
1 rating 2 rating 3 rating 4 rating 5 rating
  • Member since
    April 2005
Posted by Thunderbolt379 on Friday, September 24, 2010 1:09 AM

Stik -- good work! What kit is that, and what scale? 1:48 by the looks of things...

More progress today, I masked the RLM 04 and shot the 76. It's hard to see the Tamiya tape against the yellow:


With the rudder, fuselage band and cowl band masked, I turned to mixing the 76 according to the ratio suggested by Tamiya in the kit plans. XF-2 White plus XF-23 Light Blue (more a grey) plus XF-66 Light Grey, on a ratio of 7:1:2. To this I added 25% X-22 Clear Gloss for lustre and thinned the whole lot 50%. I was pretty impressed with just how closely the mix was a match for MM enamel '76:


The paint covered the yellow and grey areas with two or three coats, and to my eye certainly looks like RLM 76. I have only one issue and that's with a slightly pebbly finish, despite having given the airbrush a proper service/cleaning beforehand. Maybe the gloss needed to be mixed in more thoroughly, maybe it needed to be thinned more to find its level, I'm not sure. It could be a characteristic of the paints in general, as I've experiences some grain in the past. certainly acrylics do not produce the velvet smoothness enamels are capable of. I may wet sand with 2000-grit paper to level out the surface, but if I go through the paint I'll be spraying again. You can see the roughness in this closeup:


Given that the photo appears about three times bigger on screen than the model actually is, the problem is in fact not a large one!

I've been considering using stencils for the crosses, given that they are all plain, open, single-colour types. Does anyone remember the firm that makes them? The name began with an M, I believe. Also, does anyone know an online supplier who stocks them? I did a search a few months back but could find nothing at my favourite outlets.

Hopefully I'll be masking for the topside shades tomorrow.

Cheers, Mike

http://worldinminiature.blogspot.com/

  • Member since
    July 2004
  • From: Sonora Desert
Posted by stikpusher on Friday, September 24, 2010 1:55 AM

Thanks Mike... my base kit is th old Otaki/Arii kit in 1/48, but I am also dressingit up with "extra" parts from Eduard and Tamiya fW-190s in my stash. Plus a little screatch built modes of my own and a seat from True Details. It will certainly be a Heinz 57 kit with a little of this and a bit of that when I am all done...Propeller

Your Wurger is coming long quite nicely there as well! Hopefully I will be at that point by next month...Whistling


F is for FIRE, That burns down the whole town!

U is for URANIUM... BOMBS!

N is for NO SURVIVORS...

       - Plankton

LSM


  • Member since
    March 2009
  • From: Wirral. UK
Posted by Spike190 on Friday, September 24, 2010 2:07 AM

Nice to see some paint going on Stikpusher,

Mike your paint looks just fine from where I'm sitting, nice job Yes. Are you looking for "Montex" masks? I know you can get them in the UK from A2Zee models. I think I've read something about "miracle masks" but I've never followed up on that one.

Hope thats of some use,

Cheers...

Mike  Toast


  • Member since
    April 2005
Posted by Thunderbolt379 on Friday, September 24, 2010 2:29 AM

Stik -- ah, the Otaki! I have a couple of those on my shelves, so I'll be most interested to see what sort of job you can make of this one. If adding a few extras from TD or Quickboost and swapping out a few parts for Tamegawa unusued bits draws it up to speed, there are some sweet 190s waiting to be built.

Spike -- Montex -- that's the name I was trying to think of! A2Zee -- I'll check 'em out! And thanks for the kind words on the paint!

Cheers, Mike/TB379

PS: I'll have to mix some more 76, I forgot to paint the gear bay doors or the droptank! If I mask up the Academy bird I can get some underside colour on that one too... And the Airfix bird is a 76 underside as well.

http://worldinminiature.blogspot.com/

  • Member since
    March 2006
Posted by simpilot34 on Friday, September 24, 2010 5:43 AM

Mike, Stik, very nice work fellas!!! Mike, pebbly finish? Can't see it from my house!!!Wink Your mixing looks spot on to me mate!!Toast

Cheers, Lt. Cmdr. Richie "To be prepared for war, is one of the most effectual means of preserving the peace."-George Washington
  • Member since
    September 2008
  • From: Ancaster, Ontario
Posted by maxfax on Friday, September 24, 2010 6:23 AM

Hello everyone,

Here is an update- got the plane painted. Will put on the landing gear over the week-end and start to add some details. As usual, I broke off the pitot tube and the tail wheel- so I'll have to frig around with those parts too!

Rob

On the bench:  Revell 1/72 HCMS Snowberry


  • Member since
    March 2010
  • From: Brisbane
Posted by Julez72 on Friday, September 24, 2010 6:25 AM

DittoSim, Nice work guys...Very well doneYes


  • Member since
    March 2006
Posted by simpilot34 on Friday, September 24, 2010 6:33 AM

Wow really looking good Max!!!Toast Almost ready for the stickers!!!

Cheers, Lt. Cmdr. Richie "To be prepared for war, is one of the most effectual means of preserving the peace."-George Washington
  • Member since
    September 2003
  • From: South Central Wisconsin
Posted by Daywalker on Friday, September 24, 2010 7:33 AM

Mike- Awesome work, and a great tip on the X-22 to add the shine.  How much does that stuff impact the overall drying time of the paints?  I think you're right about the recommended Tamiya paint mix, looks just like RLM76 from here.

About those Montex masks... Mike (luftwaffle) used them on his build here, and said they were a little tricky to position, but otherwise performed well.  Funny this came up today, I just ordered a couple of sets of Montex masks last night from A2Z for some 109's.  I have ordered from them before, great people and superb service.

Rob- Sorry to hear about the pitot and tail gear, but your build is looking very good!  Just about time for the stickers! Propeller

Frank 


  • Member since
    April 2005
Posted by Thunderbolt379 on Friday, September 24, 2010 7:56 AM

Hi Frank, Glad you like the progress! As far as I can tell, the addition of the clear has no impact on drying time at all, it simply becomes part of the mix. The only drawback I can see is that there seem to be bright flecks in the finish, a scatter of fine spots that are glossier than elsewhere, as if some of the clear had not completely dissolved into the pigmented part of the mix. I'll try thinning the clear alone first, then adding the pigmented components and more thinner to finish with, maybe that'll even it out.

Yes, the shade looks pretty darn accurate -- it has the characteristic of 76 in that it looks blue in some lights and grey in others. If the other shades mix as accurately, it'll be a great way to spray Luftwaffe subjects when the weather is dead against enamels (and healthier too!).

I'll check out A2Zee and see what they have, those masks sure sound like a great way to avoid decal silvering. I might not have them in time for this build, but future builds will benefit, I'm sure.

Cheers, Mike

http://worldinminiature.blogspot.com/

  • Member since
    March 2006
Posted by simpilot34 on Friday, September 24, 2010 8:20 AM

Note to self, must get some montex masks.....

Cheers, Lt. Cmdr. Richie "To be prepared for war, is one of the most effectual means of preserving the peace."-George Washington
  • Member since
    March 2010
  • From: Brisbane
Posted by Julez72 on Friday, September 24, 2010 9:44 PM

Rob, looking really nice buddy, excellent job on the mottleYes

Had a break in the rain for a couple of hours last night so i took a chance a laid down the preshade...

pics look weird...oneday i'll learn to take decent ones...


  • Member since
    April 2005
Posted by Thunderbolt379 on Friday, September 24, 2010 9:54 PM

looking good, Julez! One of these days I must gird my loins and give preshading a go! I think I'll try it out on the big 32 and if I like what I see I'll go tighter on the smaller scales...

That pebbly effect in my acrylics yielded to a feather-light pass with 2000-grit wet-or-dry, and masking for the topside colours is now underway on my Tamiya F-8, hope to have a pic of the first camo shade later today.

Cheers, M/TB379

http://worldinminiature.blogspot.com/

  • Member since
    April 2005
Posted by Thunderbolt379 on Saturday, September 25, 2010 2:24 AM

Hi all, more work in progress on the Taniya F-8:

Today I got the RLM 76 masked, a long job. I re-used some tape from my last project, which is handy as the glue has already been reduced. I established hard edges for the leading edge and wingroot, protected the fuselage sides and cut soft masks from card for the fuselage demarkation. I checked photos and found a wavy line in every one, so cut a wavy edge, rather than the straight edge on the kit plans (which I think might have been simply a convenience for the artist...)

Here's the plane masked up and the soft masks fitted out with blutack:

As soon as the wings and stabilators were sprayed, I removed the extra masking up the fiuselage sides and pressed the soft masks into place, then resumed spraying:


She came out reasonably well, I think, here's another shot:


Once again the paint has something of a faintly pebbly texture, and bright spots of gloss among the rest, so it'll get the feather-sanding touch tomorrow. Speaking of paint, as accurate as Tamiya's mixing ratio for 76 was, their ratio for 75 was off by a mile. Firstly, the shade has no green component so why khaki would be involved mystifies me. I custom mixed it, eyeballing the comparison to MM 75. I mixed XF-24 Dark Grey with XF-2 Flat White at 2:1, added 30% X-22 Clear Gloss and thinned 50% for spraying. I upped the proportion of gloss because I pulled out the Bf 109 K-4 I did for RD I and the enamels are frankly brighter than this. The acrylics will have to go some to match them... At this point it's an interesting experiment but I'm not sure they'll replace enamels permanently in my arsenal. Dang, that K-4 looks good!

I should have the soft masks for the camo done and applied tomorrow, and the RLM 74 mixed and sprayed, then the process of unmasking and touching up can commense, probably including more feather-sanding.

Cheers, Mike/TB379

http://worldinminiature.blogspot.com/

  • Member since
    September 2004
  • From: Vernon, BC, Canada
Posted by razordws on Saturday, September 25, 2010 11:23 AM

Wow!  Looks like we've got another great batch of builds coming off the assembly lines. Keep the pictures coming guys.  Propeller

Dave

  • Member since
    September 2008
  • From: Ancaster, Ontario
Posted by maxfax on Saturday, September 25, 2010 4:32 PM

Thanks Julez!

Yours is coming along great! When did you start it? Did'nt you just finish a stunning P-51 for the NMF II group? Man, you work fast! I spend too much time on error correction!

Rob

On the bench:  Revell 1/72 HCMS Snowberry


  • Member since
    September 2008
  • From: Ancaster, Ontario
Posted by maxfax on Saturday, September 25, 2010 4:44 PM

Thunderbolt: That looks great! I like your masking technique to obtain the soft edge. I'm glad to see that the colour mixing worked out- the few times that I have tried it didn't look as good as the MM RLM colours.

Rob

On the bench:  Revell 1/72 HCMS Snowberry


  • Member since
    March 2006
Posted by simpilot34 on Saturday, September 25, 2010 9:34 PM

Mikey she's looking good mate!!!!!!Toast Looking forward to seeing more color!!!! Have never tried soft masking. Just not sure I would like doing it. Can't wait to see your results.

Cheers, Lt. Cmdr. Richie "To be prepared for war, is one of the most effectual means of preserving the peace."-George Washington
  • Member since
    April 2005
Posted by Thunderbolt379 on Saturday, September 25, 2010 9:46 PM

Richie -- thanks, mate! I'm applying the last round of card masks right now. It's fiddly but it seems this time it's going easier than before, on that K-4 last year. It's all procedure, I guess, priority of tasks. The result is good enough that I'm thinking of applying it to a 1;48th scale Phantom for SEA camo.

I sanded out the bright spots among the finish without going through the colour, thankfully, and as soon as I have these bits of card in place I'll figure out the mix for the RLM 74 -- I'm sure the suggested mix will be nothing like it!

Cheers, WIP pics tonight, M/TB379

http://worldinminiature.blogspot.com/

  • Member since
    April 2005
Posted by Thunderbolt379 on Saturday, September 25, 2010 11:55 PM

Okay, the RLM 74 is on, and softmasking away. Mixing the shade was a bit of an adventure, details later. For the moment, the fuselage soft mask didn't work quite as well as it might have and I've ended up with a scruffy edge, so I need to prepare a negative mask and retouch the 76 on the flanks, using the same mixing as needed for the droptank, gear bay doors and underside antennae.

Getting there, a bit at a time...

M/TB379

http://worldinminiature.blogspot.com/

  • Member since
    March 2010
  • From: Brisbane
Posted by Julez72 on Sunday, September 26, 2010 1:38 AM

Rob, I've been working on it for a couple of weeks now, i always seem to have 2 on the go and with the Mustang done i can concentrate on the 190...

Mike, this one certainly seems to have you busy, should be looker when it's doneYes

WIP pic...

Painted on the RLM 76 useing Mr Hobby acrylic followed by a coat of future...


  • Member since
    April 2005
Posted by Thunderbolt379 on Sunday, September 26, 2010 2:06 AM

Julez -- love the way the preshade shows through! Is this a technique that is best suited to acrylics, or does it work just as well with enamels??? The NMF panels look great!

I've just finished remasking mine to retouch the 76, and there'll be four other parts put into colour in the same round. I'm gradually whittling the job back. Then spome satin black on the contreline rack, olive green on the bombs, change down to the fine tip and needs and do the few mottles this subject seemed to have, and I think the spraywork will be finished. Oh, plus mask and spray the burnt metal panel behind the exhausts, which means research exactly where the top edge of the discoloured metal should be...

Pics later, cheers, M/TB379

http://worldinminiature.blogspot.com/

  • Member since
    April 2005
Posted by Thunderbolt379 on Sunday, September 26, 2010 4:31 AM

Today's progress, as promised:

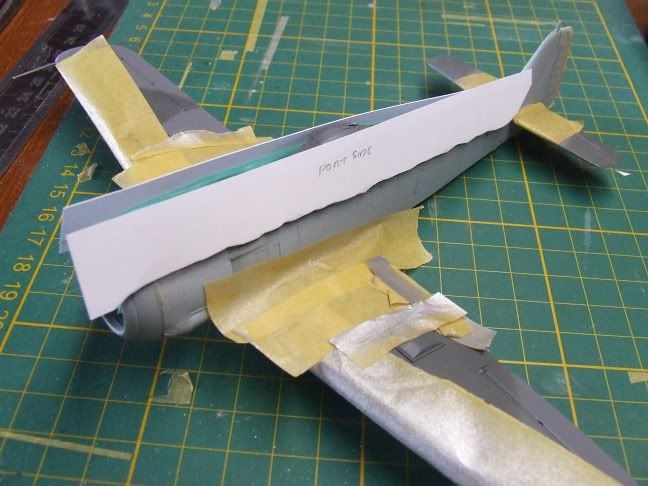
The Tamyiya F-8 was inspected, and the RLM 75 given a feather-light sanding with 2000-grit paper, wet, to even out any pebbliness and bright spots where the gloss had not fully integrated with the paint. Then the plane was fully softmasked for the RLM 74:


Tamiya suggest mixing XF-24 Dark Grey at 3:2 with XF-27 Schwartzgrun, but this mix seemed way too green. Graugrun has a very subtle green component which is really not visible at all in the MM enamel, and the mix was too dark anyway. I experimented, reduced the ratio to 3:1, then added 2 parts white, and finally settled on 3:1:1 as the least-green and dark enough for their to be clear separation of the hues between 74 and 75. Compared to the MM enamels, the gloss component seemed like it needed to be increased (from 25% to 30%) but this was probably a mistake, as the darker shades will reflect more as a natural course.

I laid on the 74 and unmasked the camo, but the soft masks on the fuselage sides had produced a "scruffy" edge due to overspray, so I cut negative masks and mixed some more 76. Here she is remasked for touchup spraying:


I laid on the 76 in a decent couple of coats, plus sprayed the droptank, moraine and loop antennae, and the outer faces of the gear bay doors. The masks must have been held a bit closer this time as the edge is tighter perhaps than it should be, but the effect is clean and neat and looks like the product of a factory sprayshop:


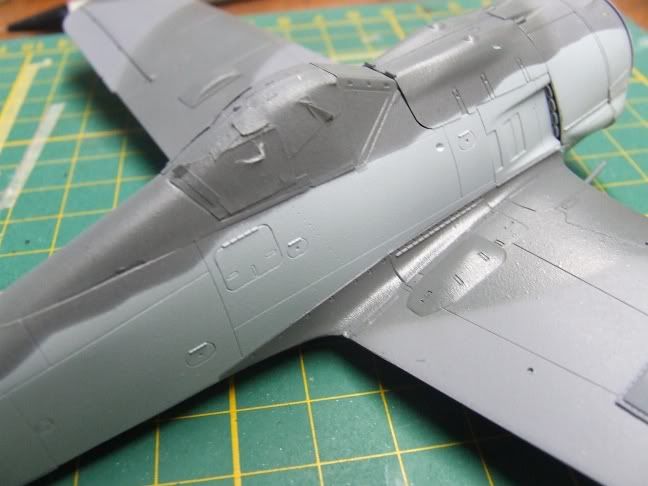
I think this last shot shows it best:


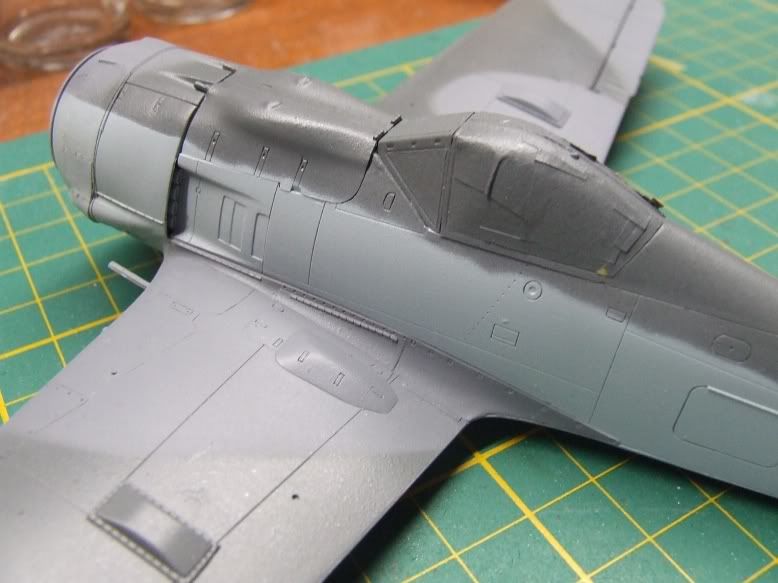
Unfortunately it also shows up the pebbly texture of the 74 and the brighter lustre. The 74 doesn't like to be sanded, either, it may smooth down but it no longer looks like a sprayed finish, so I don't think I can smooth out the darkest shade.

Spraying tomorrow: the RLM 75 mottles on the tail and fuselage, also flushing the top fuselage camo at tail and nose in a couple of places where hard edges came out where they shouldn't have. Then some black on the centreline rack, and we'll take it from there. Hopefully I'll be unmasking the yellow tomorrow.

Weathering is not far away. The Daimler-Benz engines were notorious oil-leakers, but what about the BMW 801? Should a 190 be covered in streaks?

Looking forward to having this animal done,

Cheers, Mike/TB379

http://worldinminiature.blogspot.com/

  • Member since
    March 2010
  • From: Brisbane
Posted by Julez72 on Sunday, September 26, 2010 5:07 AM

Mike, your F is looking really nice and your making great progress on her, well done indeed, the paint looks greatYes

I've always found that preshading works just as well with enamels or acrylics, i personally prefer painting with MM enamels but the only RLM 76 i had on hand was an acrylic, i just thin the paint a little more and gradually build up the colour until i get it where i want...


  • Member since
    September 2003
  • From: South Central Wisconsin
Posted by Daywalker on Sunday, September 26, 2010 8:46 AM

Julez- Excellent stuff there!  Your Future coat looks very even, may I ask what your secret is?  Air pressure, thinning, etc?  It is very well done.

Mike- Your bird is really coming along now!  I can see what you mean about the pebbly texture in the first photo shown without the masking.  Bummer!  Still, it is coming along nicely.  IIRC, when I mixed the RLM 74 on mine, I used Tamiya XF-24 with a drop or two of XF-51 to impart a very slight greenish hue.  It looked OK to me, but yours looks very good too in the photos.  As for the oil leakage, I have not seen any photos I remember showing the oil leakage like the 109's.  I'll do a little digging to see what I can come up with.

Can you guys believe we only have five weeks left?  Wow, the time has really flown by.

Frank 


  • Member since
    March 2010
  • From: Brisbane
Posted by Julez72 on Sunday, September 26, 2010 7:56 PM

Frank, thanks buddy i'm glad you like it...The future i just thin about 15% with Tamiya X20A, seems to flow better through the airbrush, pressure is about 20psi and i hold it about 6 inches from the model with the double action opened up half way for quick passes until it builds upToast

Yes this Gb has flown by hasn't it.....The best thing is that the builds have been constant from the start and are still going strong now....


  • Member since
    July 2008
  • From: USA California
Posted by vetteman42 on Monday, September 27, 2010 1:17 AM

Daywalker I finally have my head above water with GB's, just finished my air racer and have my MiG-3 ready for paint so I will be able to start my FW190 F8 in the morning Big Smile Looks like I will be finishing close to the end this time too

There sure are a bunch of beautiful builds going on here Toast

Randy So many to build.......So little time

  • Member since
    April 2005
Posted by Thunderbolt379 on Monday, September 27, 2010 4:04 AM

Frank -- thanks for the kind words! No, I've not come upon any streaky cowls in pics either -- if the 801 leaked oil it certainly didn't make the kind of patterns you find on a 109!

Latest: today I mixed some 75 (which seems to be a reliable ratio, it laid down invisibly on the previous paint) and corrected some bits on cowl and tail where the masks were off a touch. Against my better judgement I ended up trying a bit of subtle mottle and was pleased with the degree of control from the #3 tip. The art on the side of the box showed a tiny bit of grey mottle, but the plans and the two build-ups of the subject I've seen didn't feature this... Maybe I got carried away. And I'm not sure about that heavy spot that came out below the cockpit...It might get blatted with 76 tomorrow.

May unmask the yellow tonight... Starting to think about decals, possibly beginning with those on the landing gear and droptank.

Cheers, Mike/TB379

http://worldinminiature.blogspot.com/

  • Member since
    March 2006
Posted by simpilot34 on Monday, September 27, 2010 4:45 AM

Julez, Mike excellent work fellas!!!! Lovin' the paintwork on both!!!Toast

Cheers, Lt. Cmdr. Richie "To be prepared for war, is one of the most effectual means of preserving the peace."-George Washington
  • Member since
    March 2009
  • From: Wirral. UK
Posted by Spike190 on Monday, September 27, 2010 5:34 AM

Rob great work on the paint job, you must have the stickers on by now? Bad news breaking those little bits but hey I bust the tail wheel off mine last night so your not alone!

Julez nice progress, I like the effect of the pre-shade technique.

Mike your paint looks great, very clean and tidy and I may nick those card masks for doing mine , it's worked really well.

I've a few WIP pictures for you.

As I said I broke the tail wheel but I'll worry about that another time. I'm pretty much finished with the seams etc and I reached for good old Mr surfacer for the wing roots, cowling and gun bays. Had a complete 'git' of a time getting the engine/cowl fixed in position but it's now sorted, I need to mask the wheel wells and I've used the closed hood as a mask.

Bit more cleaning up and then break out the primer.

Cheers...

Mike  Toast


JOIN OUR COMMUNITY!

Our community is FREE to join. To participate you must either login or register for an account.

SEARCH FORUMS
FREE NEWSLETTER
By signing up you may also receive reader surveys and occasional special offers. We do not sell, rent or trade our email lists. View our Privacy Policy.