SEARCH FINESCALE.COM

Enter keywords or a search phrase below:

FW-190 Reich Defender III 5/10-2/11

437378 views
1810 replies
1 rating 2 rating 3 rating 4 rating 5 rating
  • Member since
    March 2006
Posted by simpilot34 on Monday, September 27, 2010 6:18 AM

Spike she's looking real smooth!!!!! Very nice mate!!!!Toast

Cheers, Lt. Cmdr. Richie "To be prepared for war, is one of the most effectual means of preserving the peace."-George Washington
  • Member since
    March 2009
  • From: Wirral. UK
Posted by Spike190 on Monday, September 27, 2010 10:13 AM

Cheers Richie Toast, I've just put some primer on so maybe some pre-shading tonight Big Smile

Cheers...

Mike  Toast


  • Member since
    September 2008
  • From: Ancaster, Ontario
Posted by maxfax on Monday, September 27, 2010 1:52 PM

Spike: That looks great. Doesn't look like you had any issues. Bugger about the small parts popping off.

Julez: Can't keep away from the NMF?! Looks superb!

Thunderbolt: Nice paint job! Can't wait to see it with the completed mottling.

For me, decals are going on tonight. Covered it with Future last night, but I can never get it smooth. I should try just brushing it on.

Rob

On the bench:  Revell 1/72 HCMS Snowberry


  • Member since
    April 2005
Posted by Thunderbolt379 on Tuesday, September 28, 2010 2:41 AM

Hi guys,

Today's work sees what should be all spraying completed. I touched up the 76 where I slightly iverstated that mottle, sprayed the bombs, resprayed the landing gear struts and bay doors to lighten and brighten the 02, resprayed the 75 on the right stabilator as overspray managed to make an already daggy-looking panel even worse. I sprayed satin black on the tank rack, then remasked and sprayed the burnt metal panels. The latter were a 1:1:1 mix of XF-11 Chrome Silver, X-10 Gunmetal and XF-64 Rotbraun, the effect being intended to be a cross between dark steel and corrosion.

I unmasked the yellow and got good, clean edges. Only a few minor touchups are required on the 04 and 76. Here she is at this point:


Detail painting, decals and weathering coming next. I'm hoping she'll be done in a few days.

Cheers, Mike/TB379

http://worldinminiature.blogspot.com/

  • Member since
    September 2003
  • From: South Central Wisconsin
Posted by Daywalker on Tuesday, September 28, 2010 5:46 AM

You are really zipping along now Mike!  Looking very good in the photos. 

I have still been looking for photos of oil-drenched 190's, but am coming up empty.

Frank 


  • Member since
    April 2005
Posted by Thunderbolt379 on Tuesday, September 28, 2010 8:32 AM

I'm really keen to finish this beast! I've begun decaling tonight -- they're a bit glossy but seem to be going down okay. It also looks like the acrylics will take the Promodeller weathering wash well.

Cheers, M/TB379

http://worldinminiature.blogspot.com/

  • Member since
    March 2010
  • From: Brisbane
Posted by Julez72 on Tuesday, September 28, 2010 10:43 AM

Mike, your on a roll buddy, making great progress and looking very well doneYes


  • Member since
    March 2009
  • From: Wirral. UK
Posted by Spike190 on Tuesday, September 28, 2010 1:02 PM

Cheers Rob

It sure looks the part Mike, nice now you've got the yellow bits unmasked Yes

Cheers...

Mike  Toast


  • Member since
    September 2008
  • From: Ancaster, Ontario
Posted by maxfax on Tuesday, September 28, 2010 1:34 PM

Man- I started putting on the decals last night and I was surprised as to how thick they were. It took several applications of Solvaset to get the decals to seat over details. This is an Accurate Miniatures rebox of an Eduard kit, so I don't know if the same decals are used for the Eduard kit. The large black fuselage decals behind the engine looked to be so thick that I didn't use them- I was concerned of little detail of the air vents etc would not show through considering the problems I was having with the crosses. So I guess I am going to have to paint them on- but with a thin red trim, so for me, it should be a challenge.

Has anyone had any issues with the large fuselage decals?

Rob

On the bench:  Revell 1/72 HCMS Snowberry


  • Member since
    January 2009
  • From: Springfield, MA
Posted by sk3tch on Tuesday, September 28, 2010 6:11 PM

Spike190


Hey Spike...Just wondering, did you have any issues with the cooling fan sticking out of the cowl just a bit  with that kit?

  • Member since
    March 2009
  • From: Wirral. UK
Posted by Spike190 on Wednesday, September 29, 2010 2:43 AM

Hi Sk3tch, I did struggle with the engine and cowl so in the end I glued the engine into the cowl and lined up the exhaust stacks at the cowls back edge whilst trying to keep the prop hub 'square' at the front end, I think it worked and the fan sits just about where it should now.

Cheers...

Mike  Toast


  • Member since
    March 2006
Posted by simpilot34 on Wednesday, September 29, 2010 4:25 AM

Mike she's looking good mate!!!Toast

Cheers, Lt. Cmdr. Richie "To be prepared for war, is one of the most effectual means of preserving the peace."-George Washington
  • Member since
    January 2009
  • From: Tempe, AZ
Posted by eptingmike on Wednesday, September 29, 2010 11:09 PM

Hello all,

I managed to get in a little work over the weekend and tonight.  For starters I primed....and nearly cried!  I got the dreaded fuzzies all over the darn thing!  I am sure that it was just too hot and I wasn't cautious enough, but I would rather blame the cheap-o primer instead as it makes me feel better.  The kit immediately went into the 'bath' meaning a tub of Castrol Super Clean.  Managed to get the bulk of the primer off but it remained in patches, and as the CSC was getting into the cockpit, I called it good enough and did a nice and thorough rinse in some soapy water.  Grabbed a new can of primer which went on nice enough.  I am glad that I find trouble shooting and damage control part of the enjoyable side of model making experience or I would have just thrown the &%^#!! thing against a wall and just called it a day.Stick out tongue

Next up I did a bit of pre-shading, using my favorite color for this:  Delta Ceramcoat Charcoal.  It is such a nice gray and generally sprays pretty well.  Next up was the yellow for the....yellow bits! Tomorrow I am hoping to get the RLM 2 into the wheel wells and on the landing gear.  With a bit of luck I may even start getting into the bulk of the painting.  I am planning on doing a 190 from the In Defense of the Reich Part 1 decal set.

I am doing the third one down.

Here are a few more WIP pics:

Hope you enjoy the pics!

Mike

Horten_IX_Go-229

  • Member since
    March 2006
Posted by simpilot34 on Thursday, September 30, 2010 12:45 AM

Mike, looks like you have made a nice recovery!!!! She's looking good!!!Toast

Cheers, Lt. Cmdr. Richie "To be prepared for war, is one of the most effectual means of preserving the peace."-George Washington
  • Member since
    March 2007
  • From: Carmel, CA
Posted by bondoman on Thursday, September 30, 2010 1:01 AM

Ritchie, might wanna rethink the whole pot of coffee thing...

  • Member since
    April 2005
Posted by Thunderbolt379 on Thursday, September 30, 2010 3:51 AM

Hi all,

Decals are nearly done and I'm pretty disgusted with the stencil data. This is an earlier Tamiya release and they didn't have Cartograf do them at this stage... It was presented on a separate small sheet from the big stuff and was very glossy, so I coated it with Micro Flat to cut the shine, but their carrier film and glue are not up to speed. I'm seriously thinking of replacing them with Aeromaster 190 stencil data, which I was sure I had in stock but can't find, so will have to order in. I can probably source stencils from an Aeromaster sheet and replace them on future subjects from the special data sheet.

Right now I have only the main wing crosses to apply, plus the wing stencils, then I can get on with the panel wash. Oh, and the spinner spiral too! Fortunately that's on the larger sheet whiich might behave better...

Pic later on, possibly with the crosses on.

Cheers, Mike/TB379

http://worldinminiature.blogspot.com/

  • Member since
    September 2007
  • From: Truro Nova Scotia, Canada
Posted by SuppressionFire on Thursday, September 30, 2010 5:27 AM

Daywalker,

I see the deadline quickly approaching and must admit my F-8 is still in the box. My modeling ambitions for the summer / fall 2010 were a tad high as a new job, side jobs and less time at the hobby bench have me behind schedule.

That being said unless there is a carry over or time extension to the GB I will have to back out. Indifferent

To add insult to injury Edward has just released their weekend edition of the F-8! Just what I originally needed for my 'Canadianized' version. 

Interestingly enough I see past GB's still popping up on the main page, when I get the F-8 out of the cardboard hangar & on the bench I will post the WIP's here.

Yet knowing the extra ordinance has gone to a good home and possibly on another award winning model is all good!Toast

Thanks for understanding & hosting the excellent GB!

Jason

http://i6.photobucket.com/albums/y211/razordws/GB%20Badges/WMIIIGBsmall.jpg


  • Member since
    March 2010
  • From: Brisbane
Posted by Julez72 on Friday, October 1, 2010 2:04 AM

bondoman

Ritchie, might wanna rethink the whole pot of coffee thing...

LMAOBig Smile


  • Member since
    March 2010
  • From: Brisbane
Posted by Julez72 on Friday, October 1, 2010 2:10 AM

maxfax

Julez: Can't keep away from the NMF?! Looks superb!

Rob

I know, it's terrible isn't itEmbarrassed

I started on the uppersurface camo, there are 5 RLM colours on the uppersurface of this one but i should have the paintwork done in a week or soYes


  • Member since
    March 2006
Posted by simpilot34 on Friday, October 1, 2010 8:47 AM

Julez72

 bondoman:

Ritchie, might wanna rethink the whole pot of coffee thing...


LMAOBig Smile

Big Smile oopsies LMAO

Cheers, Lt. Cmdr. Richie "To be prepared for war, is one of the most effectual means of preserving the peace."-George Washington
  • Member since
    April 2005
Posted by Thunderbolt379 on Friday, October 1, 2010 8:47 AM

Hi all,

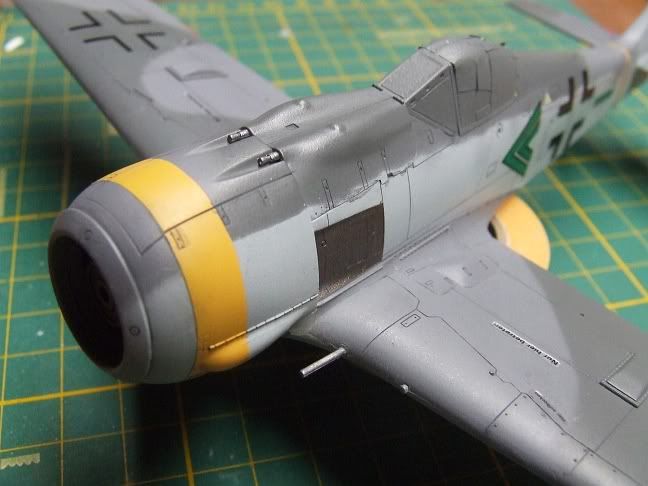
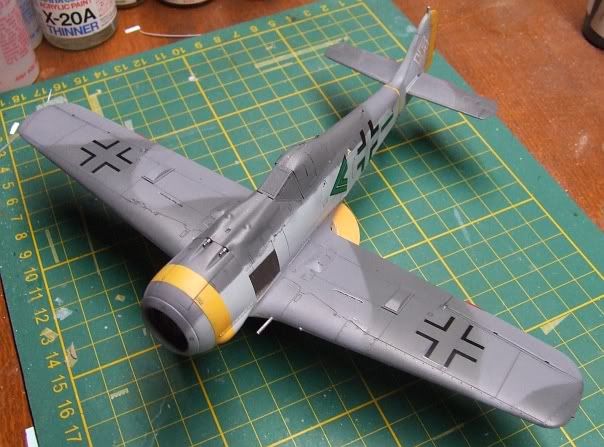
Progress pics, as promised. Today I finished applying the decals (big wing crosses), got around the detail painting (running lights, trim tabs, guns) and applied the panel wash. Together these jobs took quite a while, with the wash needing two or three applications in difficult spots. Here and there are tiny bits that still need cleanup, such as the lower edge of the gun cover. Here she is at this stage:


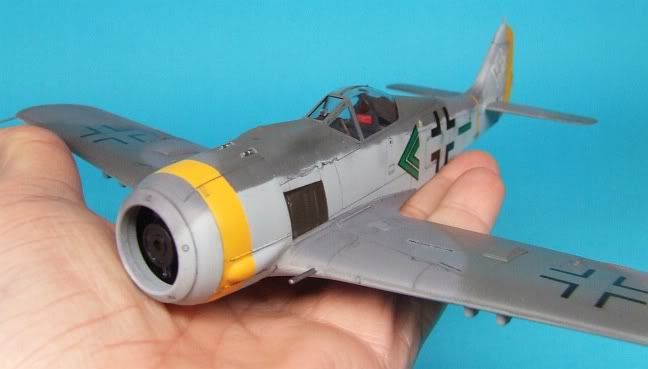
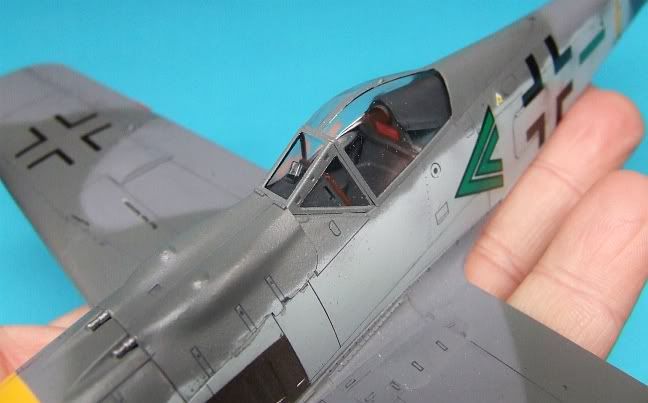
And with the canopy finally unmasked:


I'll probably be dabbing and wiping at the finish until she goes in the display case, that's the nature of the beast. There's always a job left over when the model is ostensibly finished and this one is going to be stencil data. The kit-supplied stencil data was on a second, small decal sheet along with the green SG2 markings, and they were not up to the standard of the main sheet, which was in turn not up to the standard of commercial decals. One of the big double chevrons needed multiple applications of both Set and Sol as it developed some rather strange wrinkles that took a lot of coaxing to lie down. One of the wing crosses developed a similar effect -- maybe the two chemistries are coming into contact? Fortunately they both lay down satisfactorily in the end.

The stencils have tended to be very visible, with carrier film that was too shiny and was coated with Micro Flat to combat this, but which subsequently don't stick very well, curl up at the edges and go brittle. I did not bother with the wing walkways, they would be a disaster, and will probably remove a bunch of items and replace them with an Aeromaster set (148010) -- if I can find them. I thought I had no more to do than go to Squadron and drop them in the cart, but they're not in stock, nor can I find them in stock anywhere else. Why take a product like that out of production? There is never enough stencil data on a main sheet to cater to all subjects, so the mini-sheets of stencils are a necessity.

My next fiddly job is the last main decal, the spiralschnauze. I've been looking at spirals and the way they're meant to be applied, and on all the Aeromaster sheets it appears the spiral's base lies flush with the juncture between the spinner cone and the backing plate. Many spirals are made with a tapered base edge to lie flat against that juncture but the one in the kit is square-ended. Dose this mean it buts up against a prop blade apperture? I'll do a bit more research before I dip that decal, and any tips would be most appreciated.

The landing gear can be assembled, just the hydrualics to paint chrome silver, and I can begin the weathering process. I'm planning some fuel streaks on the droptank, dust on the landing gear, gun carbon and exhaust stains, plus metal chips where appropriate.

I'm hoping to have her finished this weekend, so look for gallery shots in a couple of days (famous last words...!).

Cheers, Mike/TB379

http://worldinminiature.blogspot.com/

  • Member since
    March 2006
Posted by simpilot34 on Friday, October 1, 2010 8:54 AM

Julez she taking on her own personality, really looking good mate!!!!Toast

Cheers, Lt. Cmdr. Richie "To be prepared for war, is one of the most effectual means of preserving the peace."-George Washington
  • Member since
    March 2007
  • From: Carmel, CA
Posted by bondoman on Friday, October 1, 2010 10:43 AM

I wish I could mask that well. Julzy, great looking. I say if the decal gods aren't on your side for a particular model, leave em off.

  • Member since
    September 2003
  • From: South Central Wisconsin
Posted by Daywalker on Friday, October 1, 2010 10:45 AM

Mike-

Bummer about those stencils mate!  I usually tend to not apply most of them on my builds, as most photos I see of late war Luftwaffe birds seem to have so much field-applied paint that they almost appear devoid of most stencils.  Perhaps the ground crews felt they didn't need them all anymore?  Just a thought...

On the spiral decal, I remember a while back seeing one where the spinner backplate was from a different aircraft, and the spiral on the forward portion was broken by the prop blade recess, and the backplate did not have the spiral added.  Therefore, it looked as though the spiral ended at the prop blade recess.  I have looked through my photos, but didn't find it.  I shall keep looking!

In the meantime, looking at photos of the F-8 at the NASM here in the US, and the D-13, both appear to have the same style of spiral as you mention.  Not 100% on their accuracy, but from what I have read, they have both been restored as close to original as possible.  Have a look!

Frank 


  • Member since
    December 2004
  • From: Yokosuka, Japan
Posted by luftwaffle on Friday, October 1, 2010 3:15 PM

Hey guys have been out of the loop for about a month and just got caught up on all the great work, really great stuff!  Makes me wish I had time to do another.

aka Mike, The Mikester My Website

"He has all the virtues I dislike and none of the vices I admire."   -Winston Churchill

  • Member since
    April 2005
Posted by Thunderbolt379 on Friday, October 1, 2010 6:55 PM

Hi Frank,

Many thanks for the research pics, that's exactly what I was thinking of! It looks like that's how this decal is meant to go on, as indeed the spinner on the 109 K-4 i did for RD 1 was meant to go, or certainly looked that way. I'll secure the spinner down on tape because it'll take both hands on the job to apply a fiddly decal to a small part.

it's interesting that the bombs on the restored F-8 are what looks like chromate yellow. I've seen paint callouts for German bombs anywhere from gloss yellow to dark green... Maybe they varied as supplies were available and orders changed. I've gone with dark green, it just seemed the most 'natural' for bombs! And of course, you can't trust museum restorations 100%, they are only as good as the interpretation of the research data, just like anyone else's recommendations... It's also interesting to see from this pic that Tamiya got a much too pronounced step between the cowl and the armored ring.

Ingteresting observation re the stencils -- it may indeed be just as accurate to leave them off by this point, this particular aircraft was in action in March '45, who knows, it may have survived the war, so it was at the extreme end of the supply difficulties and extreme demands on service. With that in mind maybe I should make her a bit dirtier than I normally do!

Glad everyone's enjoying this build! Cheers, hope to get to the spinner, paint chips and carbon staining today, maybe even get her legs under her

Mike/TB379

http://worldinminiature.blogspot.com/

  • Member since
    March 2010
  • From: Brisbane
Posted by Julez72 on Friday, October 1, 2010 8:54 PM

Mike, looking good mate your build is really coming together nicely...I was hopeing to keep up with you but i keep rotating between other builds, at this point i'm thinking next weekend for my finish timeYes


  • Member since
    April 2013
Posted by nomad68 on Saturday, October 2, 2010 12:09 AM

Hey Guys!  I have been away for a while just wanted to say Great Job on some good looking planes. Check out the front page love all those 190s Big Smile

Damon

JOIN OUR COMMUNITY!

Our community is FREE to join. To participate you must either login or register for an account.

SEARCH FORUMS
FREE NEWSLETTER
By signing up you may also receive reader surveys and occasional special offers. We do not sell, rent or trade our email lists. View our Privacy Policy.