SEARCH FINESCALE.COM

Enter keywords or a search phrase below:

Made In USSR GB

61747 views
430 replies
1 rating 2 rating 3 rating 4 rating 5 rating
  • Member since
    October 2008
  • From: italy
Posted by bsyamato on Monday, June 27, 2011 4:05 AM

this kit seems have better fits Yes

need more strange kits from amodel


  • Member since
    July 2008
  • From: Vancouver, the "wet coast"
Posted by castelnuovo on Monday, June 27, 2011 10:41 PM

OK, here is a bit more of a progress. Some paint touch-ups are needed. Funny how it is, some paint incorrectnesses show up when I use the flash on the camera...Confused

Cheers...


  • Member since
    May 2011
Posted by Jeff_G on Tuesday, June 28, 2011 12:02 AM

Progress at last!  It took a while to get started, but things are rolling along now with the ICM I-5 (early) that I'm building.

I got the fuselage populated and ready to go:

The seat was a bit strange and fiddly (for me at least).  It started out as a mostly flat piece of styrene and the instructions had me "fold" it along two seams and glue it in the center to make the final part.  It went easier after I applied a bit of solvent to the creases to soften them up.  Anyone know what that black piece is at the bottom/front?  Bomb sight maybe?

Anyway, here it is all buttoned up:

Next was the engine cowling and nose:
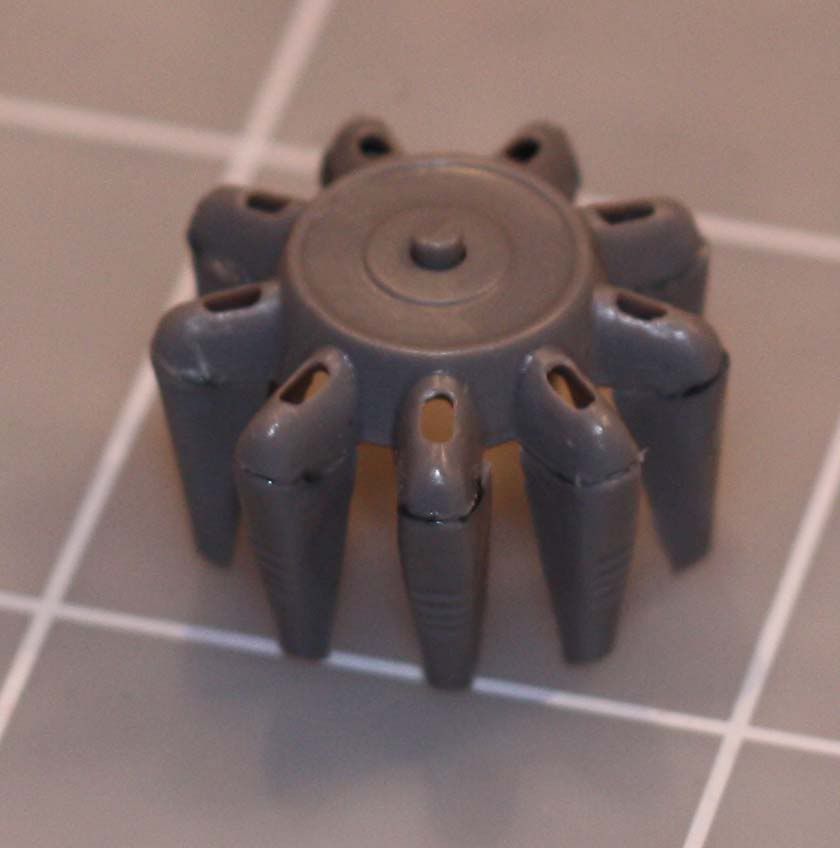
This piece was very challenging for me.  It consisted of the nose part where the spinner goes, then I had to glue on the aft sections of each cowling.  One of these cowlings is different from the others, but has the same part # and the difference is not called out in the instructions (it's the one on top).  As you can see, this arrangement leaves some fun seams to clean up.  Those grid lines are 1" square, so that gives you an idea of how tiny the parts are!  My cheaters got a workout on this one.

I would have preferred that they made each cowling ONE part that was then glued onto the nose.  Seems to me it would have been easier to manufacture and easier to build.  Hi ho...

And here's the cowling installed on the fuselage along with the tail section and top machine guns.

See that little gap just behind the top cowling?  The part that goes there was a bit short.  I have to build that up and fill it before I get too much further.  Lots of cleanup to do as well.

This kit includes two rudders, but I'm not sure what they are for since the instructions don't give any clues and my research was fruitless.  I used the one that matches the box art.  The other one is more pointy at the top of the rudder.

That's as far as I got this weekend.  Next I'll glue up the lower wings and start the paint.  During dry fitting, these parts didn't go together too well.  There were big gaps and steps all over the place.  

But hey, what fun would it be if everything just glued up perfect the first time.  Not much I say!  Geeked

--Jeff

  • Member since
    October 2008
  • From: italy
Posted by bsyamato on Tuesday, June 28, 2011 12:07 PM

this link can be usefull

http://www.airwar.ru/other/draw/i5.html

and here

http://www.airwar.ru/enc/fww1/i5.html

some detail of cockpit and paint scheme too

another pretty subject on the gb! Yes

  • Member since
    May 2011
Posted by Jeff_G on Tuesday, June 28, 2011 1:09 PM

Excellent links bsyamato, that's just what I need!  These will be helpful when it comes time to do the rigging as well.  Yes

  • Member since
    October 2008
  • From: italy
Posted by bsyamato on Wednesday, June 29, 2011 5:31 AM

nice to see the links was usefull. The site is in russian and have a huge quantity of references but not so simple to find.

I'm on painting red on the kamov. Some mistake occurred... stupid beginer mistake Bang Head on painting the lower light gray i not covered the whole helo, so the upper red show some differences between the area covered in gray and the not covered area.. Also completed the rudders area with decals and one of id numbers was destroyed Crying

ASAP i'll post pictures.

  • Member since
    October 2008
  • From: italy
Posted by bsyamato on Wednesday, June 29, 2011 6:10 PM

ka18 updates

a new red layer (used 220 ferrari red humbrol Whistling ) almost resolved the "begginer" mistake

i not lost  time to mask the fuselage, the line between the two colors will be covered (if all goes good) by the decorative decals.

the tail rudders almost finished (right now completed with the white the gap between the decals)

that's all for now

  • Member since
    October 2009
  • From: Oklahoma USA
Posted by Khalee2 on Wednesday, June 29, 2011 9:48 PM

Well here it is done not a bad kit decals did a little better than the 302.


  • Member since
    July 2008
  • From: Vancouver, the "wet coast"
Posted by castelnuovo on Saturday, July 2, 2011 2:10 AM

Well, lets call this one done. Not my most glorious model but there we go...

The Katyusha and three NKVD dudes...


  • Member since
    July 2003
  • From: Bicester, England
Posted by KJ200 on Saturday, July 2, 2011 8:11 AM

Castenuovo, nice job on the Katyusha! Yes

Khalee, the little Sukhoi looks great.

Bsyamato, apologies for spelling your name wrong again.Embarrassed

The helo is looking stunning. Sure looks tiny.

Made some progress on the Mig this week, spending most of my evenings tinkering with the NMF to get something interesting.

The Mig 15s were painted with a clear varnish, so that the variations in the metal were still visible. I've noticed this in a lot of pictures of Korean war Migs. Even the camo'd machines appear to have been varnished as they exhibit a high sheen.

I

I started off with a base coat of Tamiya Chrome Silver, which was left to dry for an hour before being buffed with a cotton wool pad. This helps remove the slightly rough finish you sometimes get with Tamiya acrylics, before applying a coat of Future.

I then masked off various access panels, as well as the flight surfaces and sprayed Tamiya Metallic Grey, by way of some variation.

The red intake is just tacked in place, but adds a welcome splash of colour.

Next stop decals.

Karl


Currently on the bench: AZ Models 1/72 Mig 17PF

  • Member since
    May 2005
  • From: Dublin Rep Of Ireland
Posted by terry35 on Saturday, July 2, 2011 6:32 PM

Hey Guys great work going on, bsyamato, Sir yess I will be washing out theh wood but stay tuned it may take a while, Castlenuavo great Katyusha.

I really like what I'm seeing in this GB, I obviously had tunnel vision when I joined in. I had not taken into account all the wonderful stuff turned out by the former soviet union.

Well heres my update.

Well its been a week of working on the Gun. I have the Tractor complete and ready for paint, The tractor is really a shake and bake kit, falls together.

The gun is really a beautiful kit but between bad fitting parts and flash it is slower going. I got the guntube done and was surprised that it took two evenings to get the barrel right, lots of Humbrol filler thinned with humbrol cement.

Well on with the pic's.

The carriage so far, this is a bit fiddly to get straightened, thet locating tabs are very loose so getting everything lined up is touch and go, the easy way out was to assemble the front axle which is in the final stages of constructtion and use it to secure the front of the carriage ensuring proper alignment.  This assembly beside placed behind the tractor gives you a 16 inch model, so it will be bigger with the barrel.

The spade in travel mode.

The bottom of the spade required a lot of filling.

The limber assembly.

Some of the detail on the carriage, there is no shortage of detail so weathering will be a pleasure, even drybrushed lightly to bring up some rivets.

The detail on the ammunition winch, its a beauty.

Thanks to every body who replied and I hope to update ASAP.

Terry.


  • Member since
    October 2008
  • From: italy
Posted by bsyamato on Sunday, July 3, 2011 5:25 AM

lots of updates here!

Khalee2 nice finished sukhoi, some more paint detail should easy improve the finish

castelnuovo the Katyusha looks good

KJ200 the fagot come great

terry35 the artillery piece have a terrific level of details Indifferent

no update pictures for me, just second corrective layer of light gray and two clear gloss layers for decals.

Waiting to complete doors to finish fuselage


  • Member since
    February 2010
Posted by ozzman on Tuesday, July 5, 2011 9:47 AM

Great work everybody!

  • Member since
    July 2010
  • From: Tornado Alley
Posted by Echo139er on Wednesday, July 6, 2011 8:49 PM

So it begins! I finally got some bench time and was able to start on the SU-85.

This is my first armor kit ever.  It has been a little difficult mainly because I do not know what some of these parts are for (in real tanks) nor what they are supposed to look like. Never the less so far its been great. I cannot wait for the next armor kit to hit my bench.

A few more hours on the bench and it will be ready for the paint booth.  Hopefully this weekend.

The plan is to give it a winter paint scheme. Start with flat black shading. Then Russian tank green, straight from the factory look.  Finish it with white for winter  (i have no idea how to do this buts that's the plan).

Similar to this: SU-85 Winter

  • Member since
    February 2011
  • From: Bent River, IA
Posted by Reasoned on Wednesday, July 6, 2011 10:42 PM

Wow! I've got to finish these other GB kits I'm working on so to start to catch up, you guys are kicking rump! A bunch of great builds on just one page.

In honor of your efforts.....


Hey, I'm a beer kind of guy............ what'd you expect?

Science is the pursiut of knowledge, faith is the pursuit of wisdom.  Peace be with you.

On the Tarmac: 1/48 Revell P-38

In the Hanger: A bunch of kits

  • Member since
    June 2010
  • From: Austin, TX
Posted by DoogsATX on Wednesday, July 6, 2011 11:05 PM

joeviz

The plan is to give it a winter paint scheme. Start with flat black shading. Then Russian tank green, straight from the factory look.  Finish it with white for winter  (i have no idea how to do this buts that's the plan).

Similar to this: SU-85 Winter

That's a pretty fresh-looking white. Having just done my first whitewashed armor, I'd recommend:

1 - adding a teeny touch of gray or tan to the whitewash. Not much, just enough to make it offwhite (or use offwhite to begin with!)

2 - Lightly drybrush the base color along edges, with a bit more pressure in areas of wear, etc. I don't think something that fresh calls for the hairspray method, and I found drybrushing worked quite well...

On the Bench: 1/32 Trumpeter P-47 | 1/32 Hasegawa Bf 109G | 1/144 Eduard MiG-21MF x2

On Deck:  1/350 HMS Dreadnought

Blog/Completed Builds: doogsmodels.com


  • Member since
    July 2010
  • From: Tornado Alley
Posted by Echo139er on Thursday, July 7, 2011 7:28 AM

DoogsATX
1 - adding a teeny touch of gray or tan to the whitewash. Not much, just enough to make it offwhite (or use offwhite to begin with!)

2 - Lightly drybrush the base color along edges, with a bit more pressure in areas of wear, etc. I don't think something that fresh calls for the hairspray method, and I found drybrushing worked quite well...

Nice... Thank you for the tips; they will be put to use.

I love the way your tank turned out.  Its amazing what you guys can do with plastic.Bow Down

Dre
  • Member since
    June 2007
  • From: here, not over there
Posted by Dre on Friday, July 8, 2011 12:12 PM

You guys have been up to some good work while I was off on vacation, so I needed to update my own efforts...

All of the decals are on both models- I used an Archer dry transfer for the MiG's motivational slogan after my plan to use the big red arrows on the cowling fell through due to a massive error on my part.   Still wish I could have used them though...  the T-34 is painted with Tamiya Nato Black and Dark Green for the shadows and MM British Khaki basecoat for highlights with Medium Green for fill-in coloring to give the final paint job a different look.  In person, the contrast between the warm-toned British Khaki and the cool-toned Medium Green is quite striking and once I have all of the weathering done it should look good.

I spent a couple of hours last night doing some preliminary dry brushing on the tank, but there's a lot more to do on both kits.

  • Member since
    June 2010
  • From: Austin, TX
Posted by DoogsATX on Friday, July 8, 2011 12:18 PM

Dre - I'm shocked at how small that MIG is, even in 1/32! I mean, I knew they were small, but it doesn't look any bigger than maybe a 1/48 P-47. Then again, I'm always shocked how small Soviet aircraft were next to the rest of the allied arsenal.

On the Bench: 1/32 Trumpeter P-47 | 1/32 Hasegawa Bf 109G | 1/144 Eduard MiG-21MF x2

On Deck:  1/350 HMS Dreadnought

Blog/Completed Builds: doogsmodels.com


Dre
  • Member since
    June 2007
  • From: here, not over there
Posted by Dre on Friday, July 8, 2011 12:34 PM

Doogs, it's roughly the same dimensions as a Bf 109 and somewhat smaller than a FW 190.

  • Member since
    June 2010
  • From: Austin, TX
Posted by DoogsATX on Friday, July 8, 2011 12:47 PM

Huh, so it's somewhat bigger than the Yak-3 then? From what I can tell, the La-5 is a pretty close equivalent to the 109. 

I may need to pick this kit up so I can keep playing in 1/32 but build things that'll actually fit in my display cabinet!

On the Bench: 1/32 Trumpeter P-47 | 1/32 Hasegawa Bf 109G | 1/144 Eduard MiG-21MF x2

On Deck:  1/350 HMS Dreadnought

Blog/Completed Builds: doogsmodels.com


Dre
  • Member since
    June 2007
  • From: here, not over there
Posted by Dre on Friday, July 8, 2011 1:17 PM

I dunno about a Yak-3's size, just that it is roughly the same footprint as a 109.

I hang them nose-down on the walls, so there's that.

  • Member since
    October 2008
  • From: italy
Posted by bsyamato on Saturday, July 9, 2011 8:42 AM

Dre

You guys have been up to some good work while I was off on vacation, so I needed to update my own efforts...

http://i257.photobucket.com/albums/hh215/DrePanzerVI/sofar-1.jpg

All of the decals are on both models- I used an Archer dry transfer for the MiG's motivational slogan after my plan to use the big red arrows on the cowling fell through due to a massive error on my part.   Still wish I could have used them though...  the T-34 is painted with Tamiya Nato Black and Dark Green for the shadows and MM British Khaki basecoat for highlights with Medium Green for fill-in coloring to give the final paint job a different look.  In person, the contrast between the warm-toned British Khaki and the cool-toned Medium Green is quite striking and once I have all of the weathering done it should look good.

I spent a couple of hours last night doing some preliminary dry brushing on the tank, but there's a lot more. to do on both kits.

the green i like!

nice progress on both models Dre

I used dry transfer on a sci-fi subjects , they work in reverse mode respect decals: decals need glossy base and dry transfers work perfect on matt base.

Joeviz good start on the su-85, i'm curious about your approach on a new model category Yes

wodka cans?

no vacancy till now but lately weeks i moved my work office with my asociate to another location.

Hope will back soon with some news on all three models


  • Member since
    July 2003
  • From: Bicester, England
Posted by KJ200 on Sunday, July 10, 2011 9:23 AM

Dre, nice work on the Mig and the T34.Yes

I really like the earlier 1940 & 41 model T34s.

Got the decals on my Mig 15.

I was nervous about using the Airfix decals, as previous experience has not been good, however these went on beautifully with Mr Mark Softener & Setter snuggling them down nicely.

I've since applied the was and am sorting out the little additions.

Almost finished.

Karl

Currently on the bench: AZ Models 1/72 Mig 17PF

  • Member since
    October 2007
  • From: Scotland
Posted by Milairjunkie on Sunday, July 10, 2011 9:26 AM

You guys are getting some pretty good work out pretty quick here...........

I've been keeping an eye on what's going on, but I've been away from the "bench" until a few days ago, so my progress is slow to say the leastSad

Tags: Tu-160
Dre
  • Member since
    June 2007
  • From: here, not over there
Posted by Dre on Sunday, July 10, 2011 2:17 PM

KJ200, your MiG is looking fantastic!  I love that NMF (and am completely scared of doing one myself).  Could you post some larger pics so we can see it better?  

I actually like the T34-85 line more myself as they finally got the turret to look right, but for this GB the -76 was the less intensive build.  I still can't believe that a DML kit could be built so quickly or easily after all of the panzers of theirs that I've sweated over.


Milairjunkie- no excuses!Smile


I still need to learn how to weather aircraft, as my ham-fisted techniques used for weathering armor just don't look good on planes... 

  • Member since
    July 2003
  • From: Bicester, England
Posted by KJ200 on Monday, July 11, 2011 3:29 PM

Dre, thanks for the kind words.

Well I'm calling this one done.

The obligatory underside view.

Not built for this GB, but seeing as I had the camera out, here are a few more Migs...

Has' venerable Mig27.

...and the even more venerable Mig 25.

Karl

Currently on the bench: AZ Models 1/72 Mig 17PF

Dre
  • Member since
    June 2007
  • From: here, not over there
Posted by Dre on Monday, July 11, 2011 3:56 PM

KJ- sweeeet collection of MiGs.   I don't know which one I like the most...  can I take them all home?

  • Member since
    July 2003
  • From: Bicester, England
Posted by KJ200 on Monday, July 11, 2011 3:59 PM

Dre, thanks mate.

The Mig 25 is missing a pitot and the yaw vane on the front.

I keep knocking them off as this thing is big even in 1/72.

But I couldn't part with any of them.

Karl

Currently on the bench: AZ Models 1/72 Mig 17PF

  • Member since
    October 2007
  • From: Scotland
Posted by Milairjunkie on Monday, July 11, 2011 4:18 PM

KJ200 - I'll second what Dre says regarding the Mig collection - all bleeding lovely, especially the 27!

I'm starting to get quite taken by much of the Russian Cold War stuff, bigger things in particular. If I can finish my current build before I collect my free bus pass, I think I'll be looking at the Tu-22M3 or Tu-95 next.

Tags: Tu-160
JOIN OUR COMMUNITY!

Our community is FREE to join. To participate you must either login or register for an account.

SEARCH FORUMS
FREE NEWSLETTER
By signing up you may also receive reader surveys and occasional special offers. We do not sell, rent or trade our email lists. View our Privacy Policy.