SEARCH FINESCALE.COM

Enter keywords or a search phrase below:

First Annual Berny Memorial Group Build

225113 views
3649 replies
1 rating 2 rating 3 rating 4 rating 5 rating
  • Member since
    February 2010
  • From: Ontario, Canada
Posted by Bockscar on Tuesday, October 23, 2012 6:58 PM

Rich:

Aires:

Link was:

http://www.aires.cz/exhaust-nozzle/fg-1-british-phantom-exhaust-nozzles/

SHHIIISSHHHH sorry that's 1/72...lol....

Here is the 1/48:

Dom

  • Member since
    February 2010
  • From: Ontario, Canada
Posted by Bockscar on Tuesday, October 23, 2012 6:56 PM

Ken:

very cool, beats scratching those details....

  • Member since
    November 2010
  • From: Lafayette, Indiana
Posted by Son Of Medicine Man on Tuesday, October 23, 2012 6:52 PM

Okay, I am pissed again.  For what ever reason, my last post lost half of the pictures and edits.

  • Member since
    November 2010
  • From: Lafayette, Indiana
Posted by Son Of Medicine Man on Tuesday, October 23, 2012 6:49 PM

Hi Everyone,

Well here is tonight's project.  The Aires Auxiliary Air Intakes:

 You will notice in the instructions shown in the next picture that they show cutting off the original doors molded into the wings and mounting the interior behind the wing.  What they don't show is that the fuselage is behind the wing, which needs to also be cut to mount the interior "box":

  • Member since
    February 2010
  • From: Ontario, Canada
Posted by Bockscar on Tuesday, October 23, 2012 6:24 PM

Striker8241

Bockscar

Russ:

What did you use to saw that flap out?...and what did you fill it with? -Thanks

Dom

 
Hi, Dom,
 
I assume you mean the aileron since I didn't do any cutting on the flaps. I used a sharp #11 blade and a flexible straight edge and just kept cutting until I was through. Check the alignment of the edges of the aileron top and bottom with the flap openings - mine was off a bit on the bottom of the left wing and I had to cut at a slight angle. The pieces are so thick that I didn't need to use any fill.
 
Russ
 

Thanks Russ:

After what you mentioned about flap assemblies not being very accurately detailed, I wasn't sure what I was looking at there, I haven't been around enough BUFFS to know. That sounds like a good cutting strategy, I'm guessing it kept the cut gap to a minimum tolerance.

Err, I do know what those spoilers look like though....that one would be hard for Monogram to mess up....Tx again

Flaps down, yeh, pretty close to the ground:

So Russ, is that gap in the flaps for the engine blast, is that where the aileron you've cut is positioned?

Dom

  • Member since
    November 2010
  • From: Lafayette, Indiana
Posted by Son Of Medicine Man on Tuesday, October 23, 2012 6:09 PM

Bockscar

Russ:

What did you use to saw that flap out?...and what did you fill it with? -Thanks

Mike:

Strange how life works, sounds like a great space.  Now maybe a space-heater, pardon the pun,

Or a spray booth and duct outside from your office?

Cliff:

Hey, in another six months maybe I'll go back and look again...lol

Rich:

Yeah, I think I saw the same set. Must be pushing over $40 for those if you can find them.

Ken:

I was searching through a half-dozen half-started kits and found the discs you burned in Dayton.

I'll be downloading that in a day or two.....YAY! I still don't know how it ended up in a vintage Aurora B-58 kit. It's a beauty, it was partially started so I got it fairly inexpensively, and I decided to lengthen the

back of the cabin to more realistic proportions and give it a Lindberg pod. Looks a lot better than the

watermelon supplied in the kit. I'm going to use Rich's technique to make the glass portals. It should be finished sometime in 2017Whistling

If I have the guts I might cut those duct floors on Saturday. It would be nice to get that fuselage assembly completed. It should be finished sometime in 2019Whistling

Dom

Hi Dom,

I vaguely remember you mentioning that Aurora B-58 kit some time ago.  Good thing you happened to be going through your kits like that!  Who knows how long it would have been before you found it if you hadn't!  (2019?)  Smile 

Ken

  • Member since
    April 2012
  • From: USA
Posted by Striker8241 on Tuesday, October 23, 2012 6:08 PM

Thanks, Ken! I appreciate the good words. Smile

Russ


  • Member since
    November 2010
  • From: Lafayette, Indiana
Posted by Son Of Medicine Man on Tuesday, October 23, 2012 6:03 PM

Striker8241

Hey All,

For a change of pace, I've started on the main wings. The trailing edges of the real wings on the B-52 are very thin compared to the overall wing dimensions and the kit's edges are pretty thick, so it requires a lot of sanding to get them even close. One note: if you've ever been around a buff with the flaps fully extended, the corners of the flaps are about at eye level and very sharp and pointed. Definitely a safety hazard but oddly enough, I never saw any safety cushions for them. You just had to be careful walking around them.

Since I plan to have bomb loading in progress, the flaps have to be in full up position for ground clearance. That requires a lot of work to get the trailing edges of the flaps to match up with the wings - the kit flaps were obviously not intended to be fully retracted in the model. Sadly, the model's flap assemblies don't look anything like the real flaps. I had to fill notches in the back edges that do not exist on the real flaps.

Also, I wanted to show the ailerons cocked as they often were. To do that, I had to cut them out - a very frustrating task since the top edges don't exactly match up with the bottom edges. The picture below shows progress on the left wing.

Cheers,

Russ


Hi Russ,

Once again you have done an outstanding job!  That looks real nice!  Yes  Yes 

Ken

  • Member since
    April 2012
  • From: USA
Posted by Striker8241 on Tuesday, October 23, 2012 5:51 PM

Bockscar

Russ:

What did you use to saw that flap out?...and what did you fill it with? -Thanks

Dom

 
Hi, Dom,
 
I assume you mean the aileron since I didn't do any cutting on the flaps. I used a sharp #11 blade and a flexible straight edge and just kept cutting until I was through. Check the alignment of the edges of the aileron top and bottom with the flap openings - mine was off a bit on the bottom of the left wing and I had to cut at a slight angle. The pieces are so thick that I didn't need to use any fill.
 
Russ


  • Member since
    February 2010
  • From: Ontario, Canada
Posted by Bockscar on Tuesday, October 23, 2012 4:54 PM

Russ:

What did you use to saw that flap out?...and what did you fill it with? -Thanks

Mike:

Strange how life works, sounds like a great space.  Now maybe a space-heater, pardon the pun,

Or a spray booth and duct outside from your office?

Cliff:

Hey, in another six months maybe I'll go back and look again...lol

Rich:

Yeah, I think I saw the same set. Must be pushing over $40 for those if you can find them.

Ken:

I was searching through a half-dozen half-started kits and found the discs you burned in Dayton.

I'll be downloading that in a day or two.....YAY! I still don't know how it ended up in a vintage Aurora B-58 kit. It's a beauty, it was partially started so I got it fairly inexpensively, and I decided to lengthen the

back of the cabin to more realistic proportions and give it a Lindberg pod. Looks a lot better than the

watermelon supplied in the kit. I'm going to use Rich's technique to make the glass portals. It should be finished sometime in 2017Whistling

If I have the guts I might cut those duct floors on Saturday. It would be nice to get that fuselage assembly completed. It should be finished sometime in 2019Whistling

Dom

  • Member since
    August 2009
  • From: Toledo Area OH
Posted by Sparrowhyperion on Tuesday, October 23, 2012 10:35 AM

I usually leave the exhaust off until after I spray the fuselage.  Same for missile pylons, probes pitot tubes etc.  I just use a dab or two of Ambroid liquid mask to keep paint off where I don't want it.

In the Hangar: 1/48 Hobby Boss F/A-18D RAAF Hornet,

On the Tarmac:  F4U-1D RNZAF Corsair 1/48 Scale.

  • Member since
    August 2009
  • From: Toledo Area OH
Posted by Sparrowhyperion on Tuesday, October 23, 2012 10:32 AM

Yeh Ken.  Those exhaust cans are great.  I used a set of them on Berny's Tow-Sick-Oh bird.  I just wish I could find a good set of cans for my FGR.2 since it uses the Spey engines which are kind of plain looking OOB.  I saw one kit once, but it was more than the kit. lol

In the Hangar: 1/48 Hobby Boss F/A-18D RAAF Hornet,

On the Tarmac:  F4U-1D RNZAF Corsair 1/48 Scale.

  • Member since
    November 2009
  • From: SW Virginia
Posted by Gamera on Tuesday, October 23, 2012 9:44 AM

Wow Dom I've never gotten customer service or should I say disservice like that. Last problem I had was Squadron leaving out a sheet of decals from an order. One email they and sent me the sheet paying s&h and everything.

"I dream in fire but work in clay." -Arthur Machen


  • Member since
    April 2012
  • From: USA
Posted by Striker8241 on Tuesday, October 23, 2012 8:57 AM

Hey All,

For a change of pace, I've started on the main wings. The trailing edges of the real wings on the B-52 are very thin compared to the overall wing dimensions and the kit's edges are pretty thick, so it requires a lot of sanding to get them even close. One note: if you've ever been around a buff with the flaps fully extended, the corners of the flaps are about at eye level and very sharp and pointed. Definitely a safety hazard but oddly enough, I never saw any safety cushions for them. You just had to be careful walking around them.

Since I plan to have bomb loading in progress, the flaps have to be in full up position for ground equipment clearance. That requires a lot of work to get the trailing edges of the flaps to match up with the wings - the kit flaps were obviously not intended to be fully retracted in the model. Sadly, the model's flap assemblies don't look anything like the real flaps. I had to fill notches in the back edges that do not exist on the real flaps.

Also, I wanted to show the ailerons cocked as they often were. To do that, I had to cut them out - a very frustrating task since the top edges don't exactly match up with the bottom edges. The picture below shows progress on the left wing.

Cheers,

Russ


Tags: B-52D , ailerons


  • Member since
    November 2010
  • From: Lafayette, Indiana
Posted by Son Of Medicine Man on Tuesday, October 23, 2012 5:43 AM

Scorpiomikey

Just went through the new place to sus everything out. Managed to pick up 3 packs of those clip together fake floor boards for $20 so those will be going down in the office with some plastic sheeting underneath so if i spill anything its ok. Looked at the layout and i can get a fair bit of benching and 2 computers in there as well as my modelling gear. A bookcase for my stash. Way more room, so i wont be so cluttered anymore. So stoked.

Hi Mike,

Sounds like you have a nice place for your workbench!  Having more space is great, it will be that much more enjoyable.  That is a bummer about having to spray in the garage, is it heated?

Ken

  • Member since
    March 2010
  • From: New Zealand
Posted by Scorpiomikey on Tuesday, October 23, 2012 12:06 AM

And ive just realized ive got nowhere to spray. Ill have to set up a table in the garage.

"I am a leaf on the wind, watch how i soar"

Recite the litanies, fire up the Gellar field, a poo storm is coming Hmm 

My signature

Check out my blog here.

  • Member since
    March 2010
  • From: New Zealand
Posted by Scorpiomikey on Monday, October 22, 2012 11:56 PM

Just went through the new place to sus everything out. Managed to pick up 3 packs of those clip together fake floor boards for $20 so those will be going down in the office with some plastic sheeting underneath so if i spill anything its ok. Looked at the layout and i can get a fair bit of benching and 2 computers in there as well as my modelling gear. A bookcase for my stash. Way more room, so i wont be so cluttered anymore. So stoked.

"I am a leaf on the wind, watch how i soar"

Recite the litanies, fire up the Gellar field, a poo storm is coming Hmm 

My signature

Check out my blog here.

  • Member since
    February 2010
  • From: Ontario, Canada
Posted by Bockscar on Monday, October 22, 2012 10:42 PM

Great progress Ken,

I hope this weekend to get those floor sections of the intake ducts finished.

Then I'll have a 'kit.'

I'll still have to resculpt the shrunken bottom forward fuselage.

Yeah, I figured what happened is the order-picker just pulled the part out of the bin

beside the one I wanted, the part numbers so close.

I should have tried something else, but then I realized I could use the F-8 engine for the Trumpi in my stash, so i threw it in with that and went shopping.

Thanks for the kind words Ken,

Dom

  • Member since
    November 2010
  • From: Lafayette, Indiana
Posted by Son Of Medicine Man on Monday, October 22, 2012 10:26 PM

You should have insisted on talking with the owner.  They were the ones that screwed up.

Ken

  • Member since
    November 2010
  • From: Lafayette, Indiana
Posted by Son Of Medicine Man on Monday, October 22, 2012 10:24 PM

Hi Everyone,

Tonight I was only able to spend a few minutes at the workbench.  I test fitted the Aires exhaust and it appears that it is going to fit without any need to modify anything.  So if I don't have any interruptions tomorrow the next thing will be to start cutting to fit the Resin Auxiliary Air Intakes.

Ken

  • Member since
    February 2010
  • From: Ontario, Canada
Posted by Bockscar on Monday, October 22, 2012 10:21 PM

Yeah Ken;

Everyone has had overall good experiences with them.....

I was all set to buy one of those big B-17's....

Now I can live without it.

I know they must  be a good outfit but....

i don't know why she eats thorns, not good for business.....

The least she could have offered was to refund the difference, but heck,

I didn't have the time to pursue it, the postage return was aabout $8, so about 16 buck$ out-of-pocket on

a what, $35 buck or so part? And pay for postage back to  me?

I just went elsewhere. I get downright phobic about dealing with people like that.

I also got some great intakes elsewhere, the loss is hers, not mine.

Sorry my typing is so bad lately...

Dom

  • Member since
    November 2010
  • From: Lafayette, Indiana
Posted by Son Of Medicine Man on Monday, October 22, 2012 9:20 PM

Bockscar

Son Of Medicine Man

Hi Everyone,

Now that I have the fuselage cut and ready to mount the intakes, it is time to start on the exhaust:
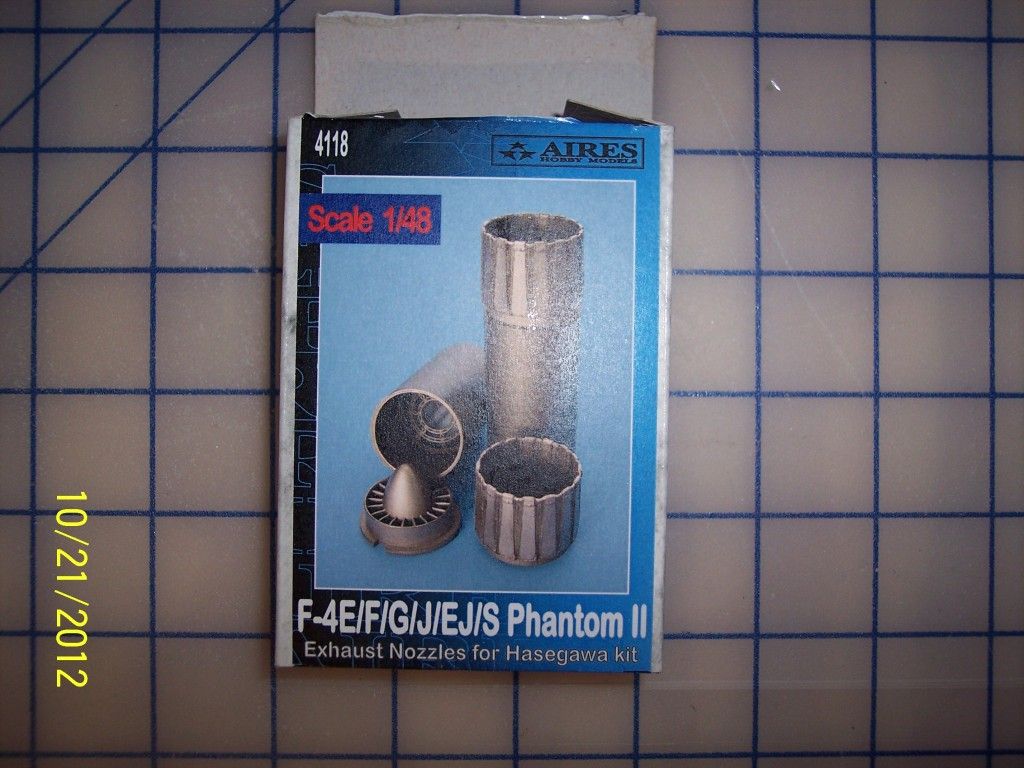
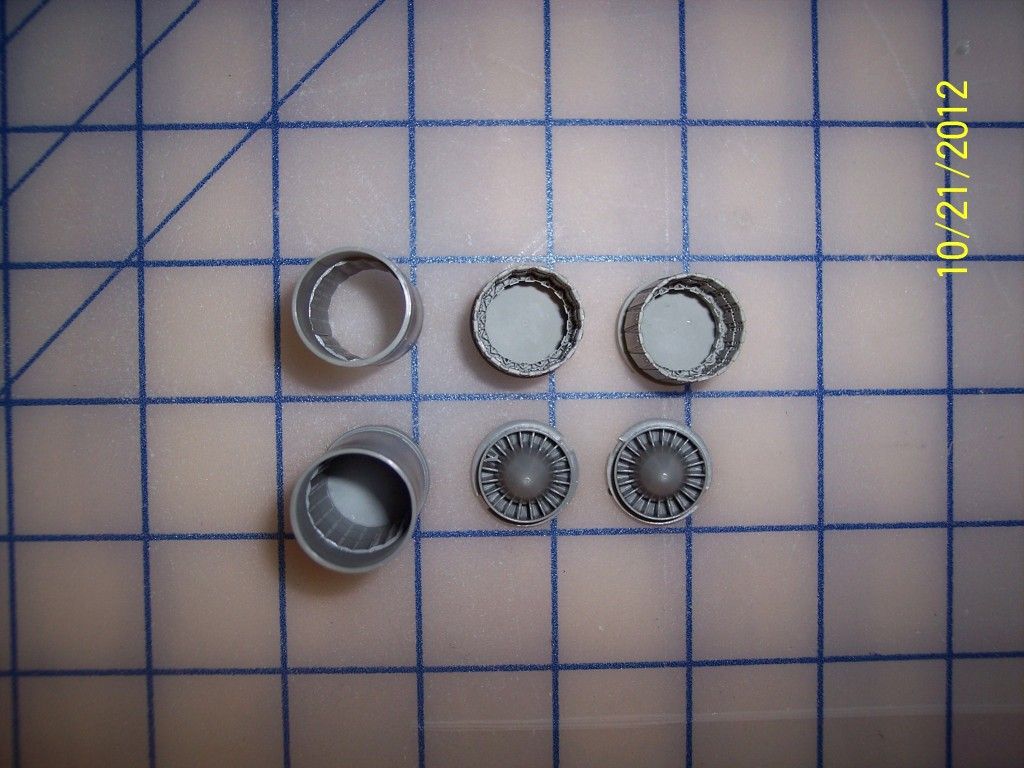
 

I washed the parts in the vinegar water solution to remove the mold release agents and began cutting off the resin mold stubs.  That is as far as I got for tonight.

Ken 

Nice kit Ken:

That ought alook real good in the F-4.

I got off to a rough start with Sprue Bros.

About a year and a half ago I ordered an Aires kit like that in 1/32 to act a s a guide for my scratch engine

project. When the order arived, it was an engine for an F-8 Crusader, turns out at the time they were one digit or so apart.

So i send off an email, and ask them to correct it, and they refused. They lady who emailed me back

obviously eats thorns for breakfast, lunch, and dinner.

She more or less told me i could send it back but as it was my fault, I had to pay return postage.

I pointed out to here that the dinged my credit card for the F-4 unit which cost more at the time, and she

didn't even blink, no, I could return the F-8 part and order a new one, I sent another email pointing out that they owed me mney and she ignored me.Angry

So, I will contiune to buy elsewhere for a few years....lolGeeked

Dom

I remember that Dom.  I don't understand why you had that trouble.  I have had them send me the wrong part before and they don't even bother with wanting me to send it back.  They just tell me to keep it and they send the correct one.  I wish you had pursued it.  I think you must have dealt with an odd person.  I have even had a defective part before and they made good on that too.  And please don't get the wrong impression that they make a lot of mistakes.  It is that I order a LOT of stuff from them.

Ken

  • Member since
    February 2010
  • From: Ontario, Canada
Posted by Bockscar on Monday, October 22, 2012 8:03 PM

Son Of Medicine Man

Hi Everyone,

Now that I have the fuselage cut and ready to mount the intakes, it is time to start on the exhaust:
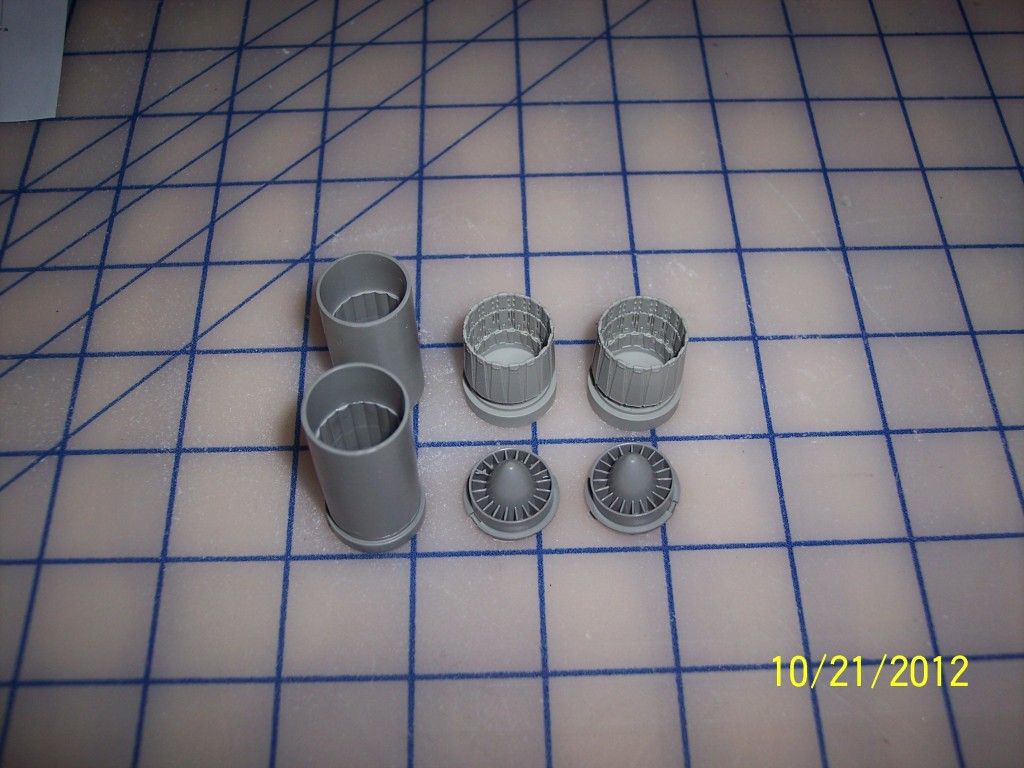
 

I washed the parts in the vinegar water solution to remove the mold release agents and began cutting off the resin mold stubs.  That is as far as I got for tonight.

Ken 

Nice kit Ken:

That ought alook real good in the F-4.

I got off to a rough start with Sprue Bros.

About a year and a half ago I ordered an Aires kit like that in 1/32 to act a s a guide for my scratch engine

project. When the order arived, it was an engine for an F-8 Crusader, turns out at the time they were one digit or so apart.

So i send off an email, and ask them to correct it, and they refused. They lady who emailed me back

obviously eats thorns for breakfast, lunch, and dinner.

She more or less told me i could send it back but as it was my fault, I had to pay return postage.

I pointed out to here that the dinged my credit card for the F-4 unit which cost more at the time, and she

didn't even blink, no, I could return the F-8 part and order a new one, I sent another email pointing out that they owed me mney and she ignored me.Angry

So, I will contiune to buy elsewhere for a few years....lolGeeked

Dom

  • Member since
    April 2012
  • From: USA
Posted by Striker8241 on Sunday, October 21, 2012 9:26 PM

Cool!  Thanks, bud!

Russ


  • Member since
    November 2010
  • From: Lafayette, Indiana
Posted by Son Of Medicine Man on Sunday, October 21, 2012 9:21 PM

Striker8241

Son Of Medicine Man

Hi Everyone,

Now that I have the fuselage cut and ready to mount the intakes, it is time to start on the exhaust:

 I washed the parts in the vinegar water solution to remove the mold release agents and began cutting off the resin mold stubs.  That is as far as I got for tonight.

Ken 

 
Really looking nice, Ken!  BTW, are there kits like these for the 1/72 version?
 
Keep up the good work! Yes Yes
 
Russ

Hi Russ,

Thanks for the compliment!

Yes, Aires does make exhausts for your 1/72 Hasegawa F-4E kit.  Here is a link:

http://store.spruebrothers.com/product_p/ars7128.htm

Ken

  • Member since
    November 2010
  • From: Lafayette, Indiana
Posted by Son Of Medicine Man on Sunday, October 21, 2012 9:00 PM

Gamera

DOM: LOL

Ken: wow those are some sharp afterburner cans.

Hi Cliff,

Thanks, it is amazing how Aires can get this kind of detail.  Their cockpits are the same way.

Ken

  • Member since
    April 2012
  • From: USA
Posted by Striker8241 on Sunday, October 21, 2012 9:00 PM

Son Of Medicine Man

Hi Everyone,

Now that I have the fuselage cut and ready to mount the intakes, it is time to start on the exhaust:

 I washed the parts in the vinegar water solution to remove the mold release agents and began cutting off the resin mold stubs.  That is as far as I got for tonight.

Ken 

 
Really looking nice, Ken!  BTW, are there kits like these for the 1/72 version?
 
Keep up the good work! Yes Yes
 
Russ


  • Member since
    November 2009
  • From: SW Virginia
Posted by Gamera on Sunday, October 21, 2012 8:41 PM

DOM: LOL

Ken: wow those are some sharp afterburner cans.

"I dream in fire but work in clay." -Arthur Machen


  • Member since
    November 2010
  • From: Lafayette, Indiana
Posted by Son Of Medicine Man on Sunday, October 21, 2012 8:33 PM

Hi Everyone,

Now that I have the fuselage cut and ready to mount the intakes, it is time to start on the exhaust:


I washed the parts in the vinegar water solution to remove the mold release agents and began cutting off the resin mold stubs.  That is as far as I got for tonight.

Ken 

  • Member since
    November 2010
  • From: Lafayette, Indiana
Posted by Son Of Medicine Man on Sunday, October 21, 2012 6:44 PM

Big Smile  Big Smile  Big Smile  You guys crack me up!!

Ken

JOIN OUR COMMUNITY!

Our community is FREE to join. To participate you must either login or register for an account.

SEARCH FORUMS
FREE NEWSLETTER
By signing up you may also receive reader surveys and occasional special offers. We do not sell, rent or trade our email lists. View our Privacy Policy.