SEARCH FINESCALE.COM

Enter keywords or a search phrase below:

Fw 190 Butcher Bird 2013 (extended to June 2014) Group Build

564940 views
5865 replies
1 rating 2 rating 3 rating 4 rating 5 rating
  • Member since
    May 2013
  • From: Indiana, USA
Posted by Greg on Friday, August 16, 2013 8:35 PM

Thanks for the Mr Surfacer tips, Joe! I look forward to trying it, but hopefully not to repair a fouled paint job!!! :)

  • Member since
    August 2009
  • From: MOAB, UTAH
Posted by JOE RIX on Friday, August 16, 2013 8:05 PM

Greg
Joe (Rix), excellent recovery job! Now you've gone and done it. I've heard folks discuss Mr Surfacer but these are the first pics I've seen of it in action. My Avenger paint peel recovery pales in comparison to your job (couldn't get rid of the stepped edge by sanding, as somebody warned me might happen). So I've added Mr Surfacer to my next online order list. Toast And thank you for your encouraging comm

Greg - I'm so glad I could push you over the edge. I can say with complete conviction that Mr. Surfacer is an absolute essential on my bench. I figured I'd toss you a couple of tidbits on Mr. Surfacer if you are unfamiliar with it. As you may be aware it comes in three different "grits", 500, 1000 & 1200. 1200 being more of a primer than actual filler. It should be noted that Mr. Surfacer is not for filling large gaps and steps. But works wonders on small gaps and scratches. Also, Mr. Surfacer shrinks when it dries so be prepared to apply extra coats to fill the desired area. There is also another product they make, Mr. Dissolved Putty, that is bit thicker and has more filling capacity. that product can be a challenge to find. Mr. Surfacer is wonderful in that it dries fast and sands beautifully. You couple this stuff with Silly Putty and your modeling will become shear JOY!!

"Not only do I not know what's going on, I wouldn't know what to do about it if I did". George Carlin

  • Member since
    September 2011
  • From: Milaca, Minnesota
Posted by falconmod on Friday, August 16, 2013 8:54 AM

Darren,

 Welcome to the Fw190 crazy house of fun.   I built the A-3 Tamiya 190 and loved it.  And I'm eyeing the same one you are building as well as a Tamiya He162.   Can't wait to see what the parts look like and how they fit.

That kit gives you more than one paint/decal option doesn't it?

John

On the Bench: 1/72 Ki-67, 1/48 T-38

1/144 AC-130, 1/72 AV-8A Harrier

  • Member since
    March 2012
  • From: Corpus Christi, Tx
Posted by mustang1989 on Friday, August 16, 2013 8:37 AM

darson

Thanks Joe, I can't wait to peel the shrink wrap of the box and get that "fresh" styrene smell as I unbag those sprues.

Ha Ha Ha!!!!! Only us fellow modelers can identify with that!! What a laugh! I do exactly the same thing!!


 Forum | Modelers Social Club Forum (proboards.com) 

  • Member since
    March 2010
  • From: MN
Posted by Nathan T on Friday, August 16, 2013 8:34 AM

Welcome aboard Darren!


  • Member since
    April 2013
Posted by SchattenSpartan on Friday, August 16, 2013 8:01 AM

Welcome, Darren!

You are going to love that kit!

I'd be interested in the provided canopy options as well.

  • Member since
    August 2009
  • From: MOAB, UTAH
Posted by JOE RIX on Friday, August 16, 2013 5:29 AM

Hey Darren, Can you answer a question I have about that kit? Does it come with both the flat and blown canopy options? Thank you, Joe

"Not only do I not know what's going on, I wouldn't know what to do about it if I did". George Carlin

  • Member since
    February 2003
  • From: Melbourne, Australia
Posted by darson on Friday, August 16, 2013 1:19 AM

Thanks Joe, I can't wait to peel the shrink wrap of the box and get that "fresh" styrene smell as I unbag those sprues.

  • Member since
    March 2012
  • From: Corpus Christi, Tx
Posted by mustang1989 on Thursday, August 15, 2013 9:46 PM

darson:Got you entered in on the intro posting pal!


 Forum | Modelers Social Club Forum (proboards.com) 

  • Member since
    March 2012
  • From: Corpus Christi, Tx
Posted by mustang1989 on Thursday, August 15, 2013 9:43 PM

A hearty welcome to the group build Darren! I'll get you jotted down on the intro post! Can't wait to see this one being built, Joe


 Forum | Modelers Social Club Forum (proboards.com) 

  • Member since
    October 2008
  • From: Georgia
Posted by Rigidrider on Thursday, August 15, 2013 9:02 PM

Welcome Darren! I think your going to like this bunch! Looking forward to seeing your build...

Doug

When Life Hands You A Bucket Of Lemons...

Make Lemonade!

Then Sell It Back At $2 Bucks A Glass...

  • Member since
    August 2009
  • From: MOAB, UTAH
Posted by JOE RIX on Thursday, August 15, 2013 8:42 PM

Welcome Darren! It's awesome to have you join us. I've got to say I am really looking forward to you building the Tamiya F-8. I have been eyeing that kit strongly here lately and considering getting it as a second build for this GB. I've enjoyed building my 1/72 F-8 so much that l figured a 1/48 one would be great. And you have got to love the Ultracast wheels and seats. I order their sets whenever possible.

 Joe

"Not only do I not know what's going on, I wouldn't know what to do about it if I did". George Carlin

  • Member since
    December 2006
  • From: N. Georgia
Posted by Jester75 on Thursday, August 15, 2013 8:25 PM

Woot, and yet another!! Welcome Darren! I am sure Joe will be along shortly to officially welcome you and get you on the list! Cant wait to see your Tamiya 190!!

Eric


  • Member since
    February 2003
  • From: Melbourne, Australia
Posted by darson on Thursday, August 15, 2013 8:06 PM

Hi all, I would like to throw my hat into the ring for this build please.

The kit that I have in the stash that I'll be doing is the 1/48 Tamiya Fw190 F8/9 and I plan on building it pretty much straight OOB.  The only planned additions I am going to use are a set of Ultracast Late style smooth tires and an Fw190 seat with harness.  The resin bits are currently jetting their way to me from sunny Canada but I’ll be making a start on the rest of the kit on the weekend.

  • Member since
    April 2013
Posted by SchattenSpartan on Thursday, August 15, 2013 6:53 PM

Doug, your reply made my day! (actually night, but whatever...)

I'll post the pics as soon as the dropbox upload is complete.

  • Member since
    October 2008
  • From: Georgia
Posted by Rigidrider on Thursday, August 15, 2013 6:40 PM

Clemens... Hey buddy! We were worried about you! I kinda figured the glue fumes got to you and maybe put you in a hibernation mode, you know 3 or 4 hard marathon weeks of building, then hibernate for a few days then back at it again... Its a never ending cycle!  Just kidding bud, glad your back!

Doug

When Life Hands You A Bucket Of Lemons...

Make Lemonade!

Then Sell It Back At $2 Bucks A Glass...

  • Member since
    April 2013
Posted by SchattenSpartan on Thursday, August 15, 2013 4:03 PM

It's going to take a while to get all those pics named and sort out the really blurry ones, but I'll do my best to get them up ASAP. I have to complete that AB tutorial for you first though...

Please keep in mind that the pics of the aviation museum are kinda sparse compared to those tank pics, because I had 3 days to take pics in Munster, but only 30 minutes in Hanover (i just ran in the museum, took a few pics of the really important stuff and rushed out again to catch my flight...)

  • Member since
    March 2012
  • From: Corpus Christi, Tx
Posted by mustang1989 on Thursday, August 15, 2013 3:52 PM

Glad your back Clemens! Lookin forward to seein those builds!!!


 Forum | Modelers Social Club Forum (proboards.com) 

  • Member since
    May 2013
  • From: Indiana, USA
Posted by Greg on Thursday, August 15, 2013 3:31 PM

Doug, absolutely! And absolutely having fun along the curve!

Clemens, well look who's back! MIssed ya, buddy. Thanks for your nice comments, I was kinda thinking I like the decals too, was difficult to sand off the raised detail after my failed (oil) drybrushing attempts, though.

Please, yes, show us some pics. For sure of the 190, anything else welcome too.

  • Member since
    April 2013
Posted by SchattenSpartan on Thursday, August 15, 2013 1:51 PM

Wow. I missed a lot of stuff here. I was in Munster (Germany) for the last 4 days and visited a great tank museum there. I also went to a small aviation museum in Hanover (on the way back) and took a few pics of an F-190A-8, a BMW radial and an 190D and Bf-109 engine (I don't remember their exact numbers). I'll post those pics next week, if anyone is interested...

Doug: Excellent work! I just love everything about your build!

Greg: Your cockpit looks excellent! Very sharp detail work! It looks better than the printed Eduard PE in my opinion!

Joe: Very nice fix, Buddy!

I hope I can get back to my models soon, but I have a lot of pics to upload Big Smile

  • Member since
    October 2008
  • From: Georgia
Posted by Rigidrider on Thursday, August 15, 2013 12:09 PM

Greg my friend,

I knew we'd get ya in the end! LOL. Seriously, thats what were here for, to practice our hobby, perfect our skills, learn new ones, and to just have fun! And cant leave out meeting new people. I doubt there is anyone here that can honestly say they haven't learned something.

Doug

When Life Hands You A Bucket Of Lemons...

Make Lemonade!

Then Sell It Back At $2 Bucks A Glass...

  • Member since
    May 2013
  • From: Indiana, USA
Posted by Greg on Thursday, August 15, 2013 10:26 AM

Joe (Rix), excellent recovery job! Now you've gone and done it. I've heard folks discuss Mr Surfacer but these are the first pics I've seen of it in action. My Avenger paint peel recovery pales in comparison to your job (couldn't get rid of the stepped edge by sanding, as somebody warned me might happen). So I've added Mr Surfacer to my next online order list. Toast And thank you for your encouraging comments on my cockpit.

(Mustang) Joe, John, Doug, Eric, you gents are too kind. Thank you very much for your supportive comments.

Doug, very cool idea re putting a PE panel (that matches) over the top of instrument panel decals. I'd never considered that. Thank you!

Everyone, I feel compelled to point out that when I stopped lurking and joined here some months ago, I'd read about washing, drybrushing, and other techniques to break the monotony of a single paint job, but it was the gentle prodding I received here to stop discussing it and start messing with it that has me started along the learning curve now. A heartfelt thank you, my friends.

  • Member since
    March 2012
  • From: Corpus Christi, Tx
Posted by mustang1989 on Thursday, August 15, 2013 9:27 AM

Greg:That cockpit looks awesome! Great job and good attention to detail! Keep the pics coming!

Joe Rix:What a recovery!!! Looks like you are pulling it off so far there lil buddy!

Rigidrider:That engine looks beautiful! I'm really looking forward to sinking my hooks into this Tamiya D-9 kit!!

Everybody:Well this morning I finished up the canopy by installing the pull handle. I also installed the 30mm cannon barrels. So far so good. A little touch up on the canopy paint wise and then its off to installing the aerial and the engine cowling stop cables and we're calling this puppy done.  I'm currently working on a photo booth to take finished pics in and then post em in the coming days!!


 Forum | Modelers Social Club Forum (proboards.com) 

  • Member since
    December 2006
  • From: N. Georgia
Posted by Jester75 on Thursday, August 15, 2013 7:32 AM

Greg, are you kidding?? That pit looks awesome! All the detail is nice and crisp, well done!!

Joe, excellent recovery on the paint lift!!

Eric


  • Member since
    October 2008
  • From: Georgia
Posted by Rigidrider on Thursday, August 15, 2013 6:25 AM

Joe... came out great brother! Excellent repair job, when decals and final finish applied, only you will know!(lol) Looks good my friend...

Doug

When Life Hands You A Bucket Of Lemons...

Make Lemonade!

Then Sell It Back At $2 Bucks A Glass...

  • Member since
    August 2009
  • From: MOAB, UTAH
Posted by JOE RIX on Thursday, August 15, 2013 5:32 AM

Alright, Photobucket is functioning this morning so I can post my pic of the finished surface with some paint on it.

 I am very pleased with how it came out. Just need to clean up panel lines and repaint the rest of the camo and I'm back in the decaling business.

"Not only do I not know what's going on, I wouldn't know what to do about it if I did". George Carlin

  • Member since
    October 2008
  • From: Georgia
Posted by Rigidrider on Thursday, August 15, 2013 4:48 AM

Greg,,, Take a bow! Your pit looks great, I personally like the decaled gauges but for a little added detail I try to find PE with holes where the gauges go (like face plates) to help dress them up, But like Joe R said, well done!

When Life Hands You A Bucket Of Lemons...

Make Lemonade!

Then Sell It Back At $2 Bucks A Glass...

  • Member since
    October 2006
  • From: Tucson, AZ
Posted by Archangel Shooter on Thursday, August 15, 2013 12:43 AM

NeedBeer

Airfix newsletter today announcing  re release of FW 190A  kit #A16001A 1/24 scale with new decal schemes!

Has anyone built this kit before?

I'm working on a 1/24 Hurricane, it's old mould/technology but nice detail & good fit - have heard some of the large Airfix kits are a challenge

interested to hear your views?

Hi, I'm working on the old AirFix FW-190 #16001 kit and it can be challenging. If you follow the engine assembly instructions you will find that the fwd fan assembly will extend out about 5mm beyond the cowling so that needs to be fixed. I just found out that the tail gear of the Scale Air Conversion set will not work at all and I have to use the kit tail gear which sits too high into the tail wheel well but that was an easy fix. I'm hoping the SAC MLG pieces will work when I get to that stage. Looking like I will have fit issues when enclosing the engine/cockpit assembly. The engine and cockpit begs added detailing which is what is slowing me down on the build. But hey it's an Airfix kit so I expected this. I had built the 1.24th Stuka decades ago and that went together without any issues.

Scott

 Your image is loading...

 On the bench: So many hanger queens.


  • Member since
    August 2009
  • From: MOAB, UTAH
Posted by JOE RIX on Wednesday, August 14, 2013 11:19 PM

I am making slow but, steady and effective progress on getting the chipped paint area restored. I regret the quality of my photos but, my little Kodak Easy Share can be rather finicky.

After sanding and I applied Mr. Surfacer 1000 along the edges of the effected area:

I then sanded this smooth and reapplied more surfacer as needed:

And then the new paint of Gunze Duck Egg Green (RLM 84) went on. I will post that photo tomorrow as Photobucket just dumped on me. 

"Not only do I not know what's going on, I wouldn't know what to do about it if I did". George Carlin

  • Member since
    September 2011
  • From: Milaca, Minnesota
Posted by falconmod on Wednesday, August 14, 2013 10:43 PM

Greg

In between bothering you guys with dumb airbrush questions, been working on the cockpit.
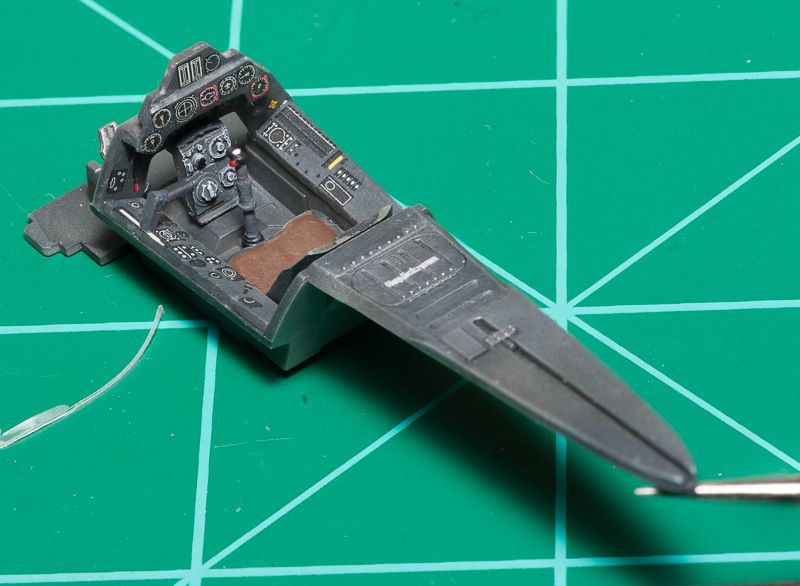
Couple comments:

Not the prettiest cockpit on the block, but it's my cockpit. :)

I was in PE withdrawal, but the decal cockpit ended up better looking than I had expected.

After reading a few comments here about drybrushing with acrylics, I tried it on the resin (or whatever it is, it's a separate part) center column, worked pretty good for this drybrush rookie.

Having fun with this Hasegawa kit. Thanks to all who nudged me towards Hasegawa for my second build here.

Greg,

   Well that does it! I give up.  that cockpit looks great!  I think I'll take my ball and go home.  There are those days you can run with the big dogs and days the big dogs run over me!  today is that day I think.

Wonderful work Greg.

John

On the Bench: 1/72 Ki-67, 1/48 T-38

1/144 AC-130, 1/72 AV-8A Harrier

JOIN OUR COMMUNITY!

Our community is FREE to join. To participate you must either login or register for an account.

SEARCH FORUMS
FREE NEWSLETTER
By signing up you may also receive reader surveys and occasional special offers. We do not sell, rent or trade our email lists. View our Privacy Policy.